
Quick Guide
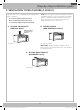
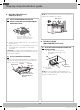
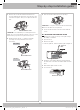
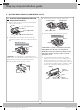
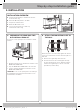
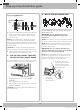

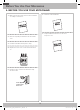
Table Of Contents
- Important safety instructions
- Electrical requirements
- Hood exhaust
- Damage - Shipment/Installation
- Parts included
- Tools you will need
- Mounting space
- 1. Placement of the mounting plate
- 2. Ventilation types (choose a, b or c)
- 3. Installation
- 4. Before you use your microwave

17
Step-by-step installation guide
3. Insert a self-aligning screw through the top center
cabinet hole. Temporarily secure the oven by turning
the screw at least two full turns after the threads
have engaged. (It will be completely tightened later.)
Be sure to keep the power cord tight. Be careful
not to pinch the cord, especially when mounting
flush to the bottom of the cabinet.
Cabinet Front
Filler Block
Microwave Oven Top
Self-Aligning Screw
Equivalent to
Depth of
Cabinet Recess
Cabinet Bottom Shelf
Equivalent to
Depth of Cabinet
Recess
Cabinet Bottom Shelf
Microwave Oven Top
Cabinet Front
Filler Block
Self-Aligning Screw
4. Attach the microwave oven to the top cabinet.
5. Insert the 2 self-aligning screws through the cabinet
bottom and, if used, through the filler blocks into
the outer top of the unit. (See the illustration above).
Continue to support the unit until both screws are
inserted and engaged at least two full turns, then fully
tighten both screws until the unit is secure.
6. Install the grease filters. See the Owner’s Manual
packed with the microwave for instructions.
NOTE: For models with installed grease filters, you do
not need to install a filter.
E. CONNECT THE DUCTWORK FOR
OUTSIDE TOP EXHAUST
House Duct
House Duct
1. Extend the house duct down to connect to the
exhaust adaptor.
2. Seal the exhaust duct joints using duct tape.
ME21R7051SS_SG_AA_DE68-04577A-01_EN.indd 17ME21R7051SS_SG_AA_DE68-04577A-01_EN.indd 17 2021-03-25 오전 11:32:312021-03-25 오전 11:32:31