SAMSUNG Video Wall Kit Installation Guide
Contents English 1.Product Overview 2. Installation 1 2 3 4 4 6 6 10 Product Feature Package Contents Part Names Installation Instructions Adjusting the Level Arranging the Stand Assembling the Monitor Connecting and Arranging the Cables 3. Fixing 11 Fixing the monitor to the wall 4. Various Installation Methods 12 12 12 12 13 Basic (3x3) Stair Pyramid Circular Rectangle 5. Product Specifications (Drawing) i Matrix_ID-Eng.
SAMSUNG Video Wall Kit Setup Guide 1. Product Overview 1.Product Overview Product Feature ● Samsung ID 1 (MID40, MID46) : compatible with 400UX(n), 460UX(n) series ● Samsung ID 2 (MID462) : compatible with 460UT(n) series ● Interlocking Display Solution ● Multi LCD Display Solution ● Free Standing Solution ● Easy Content Management ● 4-Layer stackable 1 Matrix_ID-Eng.
SAMSUNG Video Wall Kit Setup Guide 1. Product Overview Package Contents SAMSUNG Video Wall Kit Main Body Front View / Back View BRACKET-BALLAST Quantity: 5EA BRKT-LINK MIDDLE Quantity: 8EA BRACKET-LINK TOP Quantity: 2EA Screws (M5 x L12) Quantity: 40EA Screws (M6 x L15) Quantity: 5EA Screws (M4 x L10) Quantity: 50EA HOLDER WIER Quantity: 10EA Spanner Hinge L-Shape Wrench (4mm) Quantity: 1EA BRKT-COVER Quantity: 8EA 2 Matrix_ID-Eng.
SAMSUNG Video Wall Kit Setup Guide 1. Product Overview Part Names Link hole Link hole Vents Level Adjuster Level Adjuster Level Adjuster Level Adjuster Fixing Screw Hole Cable Exit Link Fixing Screw Hole Link Fixing Screw Hole Back Cover/ Vents Cable Entrance Level Adjuster Level Adjuster Fixing Screw Hole 3 Matrix_ID-Eng.
SAMSUNG Video Wall Kit Setup Guide 2. Installation 2. Installation Installation Instructions ● Install the product maintaining a distance of at least 50 cm from the wall. ● Make sure to fix the product to the floor with screws. 1 3 ➣ ➣ 2 4 When the assembly is complete, arrange the cables on the back of the stand, close the rear cover and fasten the screws(M6 X L15). Assemble the cover rear with the brkt-cover using the screw(M4 X L10), Each brkt-cover needs 3 screws. 4 Matrix_ID-Eng.
SAMSUNG Video Wall Kit Setup Guide 2. Installation Adjusting the Level 1. Place the product on a flat surface (floor). 2. Level the product using the 4 Level Adjusters at the front and back of the product using the L-shape wrench. 3. Level the product by turning the 2 Level Adjusters on both sides of the product. 4. You must the level the product using the level gauge spirit level so that the angles of the sides and the top are within a range of 89.8~90.2 degrees.
SAMSUNG Video Wall Kit Setup Guide 2. Installation Arranging the Stand ● Arrange the stand in the installation shape. (Level each of the stands referring to the descriptions in the “Adjusting Level” section.) ➣ If you want the monitor inclined towards you, tilt it as far as you need it to go and fix it on the floor. Assemble it follwing the same steps described previously.
SAMSUNG Video Wall Kit Setup Guide 2. Installation 3. Assemble the monitors. 4. After assembling the monitors, assemble the Middle Bracket-Links and Ballast-Brackets. 5. After assembling the Middle Bracket-Links and the Ballast-Brackets, assemble the monitors. 7 Matrix_ID-Eng.
SAMSUNG Video Wall Kit Setup Guide 2. Installation 6. Assemble all the monitors (up to 4 monitors in a column) according to the same procedures, install the Top Bracket-Link, and then fasten all the screws of the connecting parts. 7. When the arrangement is complete, fix it to the floor with the screws. N The parts used for the product assembly are as follows. ex) When monitors are constructed in a 2x3 stack. 8 Matrix_ID-Eng.
9 Matrix_ID-Eng.
SAMSUNG Video Wall Kit Setup Guide 2. Installation Connecting and Arranging the Cables 1. Remove the 6 screws from the back of the product and separate the back cover. 2. Arrange the cables and hubs in the arrangement space and close the cover. 3. Connect the cables with the relevant devices. 4. Tie the cables firmly using the arrangement hook at the back of each monitor. 5. If the number of stacked monitors in a column is equal to or greater than 3, the power cable may be too short.
SAMSUNG Video Wall Kit Setup Guide 3. Fixing 3. Fixing Fixing the monitor to the wall If the monitor is not fixed to the wall, movement of up to ±1degrees at the front and back may occur. Therefore, make sure to fix the monitor to the wall using the Top-Bracket. N Create a fixing pipe referring to the specifications of the Top-Bracket on the “Product Specifications” page. [Required Parts] ● A Wall-Fixing Pipe with a 30mm size (to be created separately.) ● Fixing Screws 1.
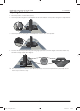
SAMSUNG Video Wall Kit Setup Guide 4. Various Installation Methods 4. Various Installation Methods Basic (3x3) Stair Pyramid Circular Back of the Folding Front of the Folding 12 Matrix_ID-Eng.
SAMSUNG Video Wall Kit Setup Guide 4. Various Installation Methods Rectangle Note: If monitors are assembled in the shape of a rectangle, maintain a space of at least 30cm from the ceiling as air may become trapped inside and result in overheating. 13 Matrix_ID-Eng.
SAMSUNG Video Wall Kit Setup Guide 5. Product Specifications 5. Product Specifications (Drawing) For 40 Inch Monitors Samsung ID 1 1. Weight - Net : 29.0kg - Gross : 45.0kg 2. Size Width[mm] Depth[mm] Height[mm] Set 913.7 600 468 Packing Dimension 1030 696 361 14 Matrix_ID-Eng.
SAMSUNG Video Wall Kit Setup Guide 5. Product Specifications For 46 Inch Monitors Samsung ID 1 1. Weight - Net : 33.0kg - Gross : 51.0kg 2. Size Width[mm] Depth[mm] Height[mm] Set 1049.4 600 468 Packing Dimension 1166 696 361 1009.4 651.7 160.0 100.0 160.0 468.0 269.5 101.5 600.0 229.0 1049.4 571.7 100.0 43.0 120.0 130.0 120.0 134.0 80.0 416.0 13.0 55.5 98.5 600.0 15 Matrix_ID-Eng.
SAMSUNG Video Wall Kit Setup Guide 5. Product Specifications For 46 Inch Monitors Samsung ID 2 1. Weight - Net : 40.0Kg - Gross : 52.0Kg 2. Size Width[mm] Depth[mm] Height[mm] Set 1025.5 600 467 Packing Dimension 1121 696 361 1009.4 651.7 160.0 100.0 160.0 468.0 269.5 101.5 600.0 229.0 1049.4 571.7 120.0 130.0 416.0 80.0 120.0 134.0 467.8 100.0 43.0 13.0 55.5 1023.7 (43.5) 98.5 600.0 40.0° 9.0° 70 (760.3) (643.3) (643.3) .0° (2058.4) (1988.
SAMSUNG Video Wall Kit Setup Guide 5. Product Specifications BRACKET-LINK MIDDLE 79.8 79.8 34.8 34.8 23.5 23.5 23.5 34.0 C/L 40.0 85.0 85.0 BRACKET-TOP 30 7. 21.5 1.5 2 32.4 75 45 6 35 41 127.5 155.5 17 Matrix_ID-Eng.
SAMSUNG Video Wall Kit Setup Guide 5. Product Specifications BRACKET-LINK 4. 10.5 70 23.5 14.5 34 5 14.5 39.2 45 6. 5 W2-M5 TAP, THRU(C1) 10.4 23.5 84.5 BRACKET-BALLAST 34.2 ° 130.1 45.6 15 10 3.9 20 ° 48.8 ° 80 .3 ° 23 BRKT-COVER (MID 40) 500.8 150.0 150.0 4-R3.0 4-R6.2 34.0 38.0 3- 4.2 4-R7.0 59.8 45.0 18 Matrix_ID-Eng.
SAMSUNG Video Wall Kit Setup Guide 5. Product Specifications BRKT-COVER (MID 46) 576.6 59.8 45.0 150.0 59.8 45.0 150.0 3- 4.2 4-R7.0 34.0 38.0 4-R3.0 4-R6.2 BRKT-COVER (MID 462) 540.0 170.0 R6.0 4.2 85.2 40.2 6.0 R6.0 40.0 38.0 170.0 38.0 85.2 40.2 4.2 19 Matrix_ID-Eng.
Contact SAMSUNG WORLDWIDE If you have any questions or comments relating to Samsung products, please contact the SAMSUNG customer care centre. 20 Matrix_ID-Eng.