MICRO COMPONENT SYSTEM CD-R/RW PLAYBACK MM-B3/B4 Instruction Manual
Safety Warnings Thank you for buying this SAMSUNG micro-component system. Contents Please take time to read these instructions. They will allow you to operate your system with ease and take full advantage of its features. B CLASS 1 LASER PRODUCT This Compact Disc player is classified as a CLASS 1 LASER product.
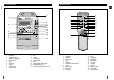
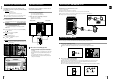
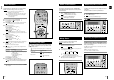
Front Panel View Remote Control B GB On/Standby 7 Push Open EQ Preset 2 EQ TUNER CD TAPE AUX Band Power Sound Down Tuning Mode Up REC/Pause CD Sync. Counter Reset Repeat A B 3 4 9 10 11 12 13 Sleep Power Sound Program /Set CD Repeat Mono/ST. AUX 11 11 12 TUNER 13 13 Band 14 14 15 16 16 TAPE 6 7 CD 17 18 18 VOL. 14 15 5 6 4 Mute 22 3 44 55 8 S.Bass Timer/ Clock 9 10 1 Volume Timer On/Off 1 CD 8 Push Eject Tuning Mode 19 19 CD VOL. 20 20 16 1.
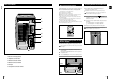
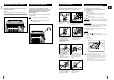
Where to Install Your Micro-Component System Rear Panel View Inserting Remote Control Batteries GB B To take full advantage of your new micro-component system, follow these installation instructions before connecting the unit. 1 2 Install the system on a flat, stable surface. Never place this unit on carpeting. Never place this unit in an outdoor area. Maintain an open space of approximately 6 inches (15 cm) on the sides and rear of the system, for ventilation purposes.
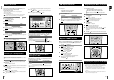
Connecting to an External Source Speaker Connection Connecting the AM (MW)/LW Aerial B GB The auxiliary input can be used to take advantage of the sound quality of your micro-component system when listening to other sources. Examples: A television A video disc player A Hi-Fi stereo video cassette recorder To connect the external source, the source must have an audio output. In addition, you need an RCA connection cable.
CD Repeat Function Setting the Clock Programming the Order of Playback B GB Your system is equipped with a clock which allows you to turn your system on and off automatically. You should set the clock: When you first purchase the micro-component system After a power failure After unplugging the unit 7 If it is desired to pause while the playback is processing, press the CD( ) button.
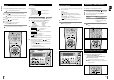
Searching for and Storing the Radio Stations Checking and Changing Programmed Tracks Searching for and Storing the Radio Stations(continued) Selecting a Stored Station B GB You can check and change your selection of tracks at any time. You must have selected at least one track. 1 2 Press Stop ( ) once if you have started listening to the selection. Press Program/Set.
Selecting the Cassette Playback Mode (OPTION) Listening to a Cassette Recording a Compact Disc Recording a Radio Program B GB 1 2 3 Switch the system on by pressing On/Standby ( Your micro-component system has three cassette playback modes which enable you to listen to both sides of a cassette automatically. Press REV.Mode until the appropriate symbol is displayed. ). Select the TAPE function by pressing TAPE on the front panel.
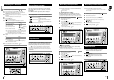
Timer Function S.Bass (Super Bass) Function Power sound function B GB This machine is equipped with the function of POWER SOUND, which amplifies bass treble output to twice as much for powerful real surround-sound. The timer enables you to switch the system on or off at specific times. Example: You wish to wake up to music every morning. If you no longer want the system to be switched on or off automatically, you must cancel the timer.
Microphone Function (option) Connecting Headphones Cleaning Your Micro-Component System Safety Precautions B GB The microphone enables the user to mix in his or her vocals to sing-along with the music. Preparation Plug the microphone with a 3.5mm mic jack into microphone terminal. You can connect a set of headphones to your micro component system so that you can listen to music or radio programs without disturbing other people in the room. The headphones must have a 3.
Precautions When Using Compact Discs Before Contacting the After-Sales Service Technical Specifications B GB Handle your compact discs with care. Always hold them by the edges to avoid leaving fingerprints on the shiny surface. When you have finished playing a compact disc, always put it back in its case. Do not fix paper or adhesive tape to the discs and do not write on the label. Clean them with a special-purpose cloth.
THIS APPLIANCE IS MANUFACTURED BY: ELECTRONICS AH68-01205B