©2003 Nokia Mobile Phones. All rights reserved. Nokia, the Model 3586i and the Original Enhancements logo are either trademarks or registered trademarks of Nokia Corporation and/or its affiliates. Nokia reserves the right to make changes to products or specifications without prior notice. Some features are network dependent. Learn more about Nokia at www.nokia.ca. Nokia is listed on the NYSE (NOK).
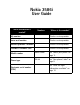
Nokia 3586i User Guide What information is needed? Numbers Where is the number? My number Wireless service provider Voice mail number Wireless service provider Wireless provider’s number Wireless service provider Provider’s customer care Wireless service provider Model number Phone type Electronic serial number (ESN) Nokia 3586i See “About your phone” on page 11. RH-44 See “Your phone’s label” on page 9. See “Have the right information available” on page 10.
The wireless phone described in this guide is approved for use in CDMA networks. LEGAL INFORMATION Part No. 9356778, Issue No. 1 Copyright ©2003 Nokia. All rights reserved. Nokia, Nokia Connecting People, Nokia 3586i, the Nokia Original Enhancements logos, and Racket are trademarks or registered trademarks of Nokia Corporation. All other product and company names mentioned herein may be trademarks or tradenames of their respective owners.
Contents 1 For your safety . . . . . . . . . . . . . . . . . . . . . . . . . . 1 Quick guide . . . . . . . . . . . . . . . . . . . . . . . . . . . . . . . . . . . . . . 3 Menu shortcuts . . . . . . . . . . . . . . . . . . . . . . . . . . . . . . . . . . . 4 2 Welcome . . . . . . . . . . . . . . . . . . . . . . . . . . . . . . . 5 Get the most out of this guide. . . . . . . . . . . . . . . . . . . . . . . 5 Understand wireless network services. . . . . . . . . . . . . . . . .
4 Phone setup . . . . . . . . . . . . . . . . . . . . . . . . . . . 34 Learn about your headset . . . . . . . . . . . . . . . . . . . . . . . . . 34 5 Text entry . . . . . . . . . . . . . . . . . . . . . . . . . . . . 36 Enter letters and numbers . . . . . . . . . . . . . . . . . . . . . . . . . 36 Write using ABC and 123 modes. . . . . . . . . . . . . . . . . . . . . . . . . . . . . . . . . . . . . . 37 Write with predictive text . . . . . . . . . . . . . . . . . . . . . . . . .
8 Voice mailbox . . . . . . . . . . . . . . . . . . . . . . . . . . 56 Store your voice mailbox number . . . . . . . . . . . . . . . . . . . 56 Set greetings . . . . . . . . . . . . . . . . . . . . . . . . . . . . . . . . . . . . 56 Listen to your voice messages . . . . . . . . . . . . . . . . . . . . . . 57 9 Text messages . . . . . . . . . . . . . . . . . . . . . . . . . . 58 Write a text message . . . . . . . . . . . . . . . . . . . . . . . . . . . . . 58 Use message templates . . . . . . . . . . . . .
11 Advanced features . . . . . . . . . . . . . . . . . . . . . . 82 View in-call options . . . . . . . . . . . . . . . . . . . . . . . . . . . . . . 82 Use call forwarding. . . . . . . . . . . . . . . . . . . . . . . . . . . . . . . 83 Use call waiting . . . . . . . . . . . . . . . . . . . . . . . . . . . . . . . . . 85 Make a conference call . . . . . . . . . . . . . . . . . . . . . . . . . . . 85 Send own caller ID when calling . . . . . . . . . . . . . . . . . . . . 86 Use automatic redial . . . . . . .
15 Your phone and other devices . . . . . . . . . . . . . 115 PC Connectivity . . . . . . . . . . . . . . . . . . . . . . . . . . . . . . . . . 115 16 Minibrowser . . . . . . . . . . . . . . . . . . . . . . . . . . 117 Understand browsing sessions and indicators . . . . . . . . 117 Launching the minibrowser . . . . . . . . . . . . . . . . . . . . . . . 118 Minibrowser menu . . . . . . . . . . . . . . . . . . . . . . . . . . . . . . 118 Navigate in the minibrowser . . . . . . . . . . . . . . . . . . . . . .
NOTES [ viii ]
For your safety 1 For your safety The use of mobile phones and their enhancements may be prohibited or restricted in certain areas. Obey applicable law regarding mobile phone usage. Read these simple guidelines. Breaking the rules may be dangerous or illegal. Further detailed information is given in this manual. SWITCH OFF WHERE PROHIBITED Do not switch on the phone when wireless phone use is prohibited or when it may cause interference or danger.
USE SENSIBLY Use only in the normal position. Don't touch the antenna unnecessarily. QUALIFIED SERVICE Only qualified personnel may install or repair phone equipment. ENHANCEMENTS AND BATTERIES Use only approved enhancements and batteries. Do not connect incompatible products. WATER-RESISTANCE Your wireless phone is not water-resistant. Keep it dry. BACKUP COPIES Remember to make backup copies of all important data.
For your safety • QUICK GUIDE Make a call Fully extend whip antenna.
• MENU SHORTCUTS 1 MESSAGES Enhancement settings . . . . Security settings . . . . . . . . . Network services . . . . . . . . . Restore factory settings . . . Text messages . . . . . . . . . . . 01-1 Create message . . . . . . 01-1-1 Inbox . . . . . . . . . . . . . . 01-1-2 Outbox . . . . . . . . . . . . . 01-1-3 Archive . . . . . . . . . . . . . 01-1-4 Templates. . . . . . . . . . . 01-1-5 My folders . . . . . . . . . . 01-1-6 Delete messages . . . . . 01-1-7 Message settings. . . . .
Welcome 2 Welcome Congratulations on the purchase of your Nokia mobile phone - a new tool for the mobile information society. Nokia recommends that you read this chapter before you use your new phone. You will find useful information about: • How to use this guide • How to understand network services • How to contact Nokia • GET THE MOST OUT OF THIS GUIDE The tips that follow can help you use this guide efficiently as you learn to use your phone.
Observe text conventions This user guide provides text clues to help make instructions clear and easy to follow. These clues are called conventions. Convention What it means bold Indicates one of the following items: • The word or phrase appears on the phone’s screen. • Special text such as Notes and Warnings. italic Italics indicate emphasis. Pay close attention to any information in italics. Follow graphic clues This guide uses certain icons (graphic clues) to alert you to important information.
Welcome • UNDERSTAND WIRELESS NETWORK SERVICES Your service provider’s wireless network may be equipped to provide special features or functions for use with your Nokia phone.
• Audiocassette • E-text (electronic documents on a 3.5-inch disk, in Microsoft Word or WordPerfect format). To request any of the above formats, please contact Nokia Customer Care. Please see “Contact Nokia” on page 9 for more information.
Welcome Note: The LPS-4 is sold separately as an enhancement. Once you connect the LPS-4 to your phone, use the phone’s menu (Menu > Settings > Enhancement settings > Loopset) to enable loopset mode. For more information, see “Learn about your headset” on page 34. • CONTACT NOKIA When you need help, the Nokia Care Center can provide information about Nokia products. Please refer to the table on the following page for more information on how to contact Nokia. Customer Care, Canada Nokia Products Ltd.
Have the right information available We recommend that you have the following information available before you contact the Nokia Customer Service department: • the phone’s model number • electronic serial number (ESN) • your postal code Have the phone or enhancement available Whether you are calling about your phone or an enhancement, have the equipment available when you call.
About your phone 3 About your phone This section gives you a brief introduction to your phone and provides you with quick steps for making, answering, and managing your calls. The rest of this guide user provides complete details on phone use. Power key 2.
• ABOUT THE ANTENNAS Your phone is equipped with three antennas. The internal antenna is always active. The whip antenna is activated when the whip antenna is fully extended. The GPS antenna is also internal and is activated when placing emergency calls or when the Location info sharing feature is activated. For more information on Location info sharing, see “GPS (Location info sharing)” on page 105.
About your phone If your dealer has already installed the battery, please see “Charge the battery” on page 13. 1 Remove the back cover of the phone by pressing and holding the release button while sliding the cover upward toward the top of the phone. Set the back cover aside. 2 Place the battery in the compartment with the label side facing up and the metal contacts aligned with the contact prongs. Snap the battery into place.
2 With your phone on or off, connect the lead from the charger to the charging port located on the bottom of the phone. The battery indicator bar appears on the screen and starts to scroll up and down after a few seconds. With the phone off, only the battery indicator bar will appear. 3 Disconnect the charger from the phone and AC outlet when the battery is fully charged.
About your phone RUIM card slot Your phone has an RUIM card slot built into its mechanics. However, the RUIM card slot is not functional in this phone model. Please avoid placing anything in this slot. Important battery information • Recharge your battery only with a charger approved by Nokia. • You can switch the phone on and use it for calls while the battery is charging. • If the battery is totally empty, it may take a few minutes for the battery indicator to appear on the screen.
• CHECK THE START SCREEN The start screen refers to the phone’s display when no calls are in progress, and there are currently no menu or phone book entries displayed. You can easily return to the start screen from any location (other than an active call) simply by pressing the End key. However, keep in mind that any text or numbers that you were entering at the time will be lost, and your work will not be saved.
About your phone Note: The icons you see may differ depending on your service provider. The service provider’s network determines which icons actually appear on the screen. • USE THE SELECTION KEYS Note the two selection keys beneath the screen. The function of these keys is determined by the word shown above them on the screen. Selection keys For example, pressing the left selection key when the word Menu appears above it shows the first of many menus.
• LEARN ABOUT THE KEYS The table on the following page contains a summary of how the various keys on your phone work. Key Description Power: Press and hold to switch the phone on or off. Pressing this key momentarily displays a list of profiles that can be selected. Power key also displays menu while using Minibrowser. Send key Talk: Press the Send key to make a call to the name or number shown on the screen or to answer a call.
About your phone Use the following table as a quick reference for making and answering calls: Task Instructions Make a call 1 Enter the number using the keypad (include area code as needed). 2 Press the Send key. 3 Hold the phone as you would any other telephone, with the ear piece over your ear and the microphone near your mouth. Answer a call When your phone rings, press the Send key. End a call Press the End key to terminate the active call.
Symbol Description Keyguard is active. You have one or more voice messages waiting. You have one or more unread text messages waiting. Digital service is available. Letters you enter appear as uppercase (ALL CAPS). Letters you enter appear in lowercase. Letters you enter appear in sentence case (first word in sentence capitalized) or title case (in phone book). Characters you enter appear as numbers. Predictive text mode is active. Predictive text feature available for Calendar and for text messages.
About your phone Symbol Description Indicates that a headset is connected (either via the 2.5mm jack or to the enhancement connector located at the bottom of phone). Indicates phone is in handsfree car kit. Indicates a connection to data network. Indicates you have a minibrowser message. Indicates TTY/TDD mode is active. Indicates that Emergency is selected and the phone’s location information is shared only during an emergency call to the official emergency number programmed into your phone.
• USE THE SELECTION KEYS Note the two selection keys beneath the screen. The function of these keys is determined by the word shown above them on the screen. Left selection key Right selection key For example, pressing the left selection key when the word Menu appears above it shows the first of many menus. You scroll through the menus by scrolling up and down with the scroll key. Likewise, pressing the right selection key when Contacts appears above it displays the phone book menu.
About your phone • BROWSE PHONE MENUS Your phone’s menu system displays choices you can make to change settings on your phone or gives you access to various phone features. Your phone has 10 menus, plus the phone book menu (Contacts). Each menu can contain several levels of submenus. Menu items You can use menus and submenus two ways: by scrolling or by using a shortcut.
SCROLLING TIPS • You can scroll up as well as down to find some of the most frequently used submenu options. • You can return to the previous menu level by pressing Back. • To exit a menu and return to the start screen, press the End key. If you leave a menu by pressing the End key, you cancel any changes you made. • Some menus may not appear. Ask your service provider for details. • Your phone has 4-way scrolling ability.
About your phone • MENU AND MENU SHORTCUTS MESSAGES . . . . . . . . . . . . . . . . . . . . . . . . . . . . . . . . . . . . . . . . . . . . 1 Text messages . . . . . . . . . . . . . . . . . . . . . . . . . . . . . . . . . . . . . . . . . . . . 01-1 Create message (Text/Numeric Page) . . . . . . . . . . . . . . . . . . . . 01-1-1 Add number . . . . . . . . . . . . . . . . . . . . . . . . . . . . . . . . . . . 01-1-1-1 Add e-mail . . . . . . . . . . . . . . . . . . . . . . . . . . . . . . . . . . . .
Voice messages1 . . . . . . . . . . . . . . . . . . . . . . . . . . . . . . . . . . . . . . . . . 01-2 Listen to voice messages. . . . . . . . . . . . . . . . . . . . . . . . . . . . . . 01-2-1 View details of last voice mail . . . . . . . . . . . . . . . . . . . . . . . . . 01-2-2 Voice mailbox number. . . . . . . . . . . . . . . . . . . . . . . . . . . . . . . . 01-2-3 Clear voice mail icon . . . . . . . . . . . . . . . . . . . . . . . . . . . . . . . . . 01-2-4 Minibrowser messages . . . . . . . . . . .
About your phone Data/fax calls . . . . . . . . . . . . . . . . . . . . . . . . . . . . . . . . . . . . . . . . . . . . . 2-6 Last sent data/fax . . . . . . . . . . . . . . . . . . . . . . . . . . . . . . . . . . . . 2-6-1 Last received data/fax . . . . . . . . . . . . . . . . . . . . . . . . . . . . . . . . 2-6-2 All sent data/fax . . . . . . . . . . . . . . . . . . . . . . . . . . . . . . . . . . . . . 2-6-3 All received data/fax. . . . . . . . . . . . . . . . . . . . . . . . . . . . . . . . . .
SETTINGS . . . . . . . . . . . . . . . . . . . . . . . . . . . . . . . . . . . . . . . . . . . . . 4 Call settings . . . . . . . . . . . . . . . . . . . . . . . . . . . . . . . . . . . . . . . . . . . . . . 4-1 Location info sharing . . . . . . . . . . . . . . . . . . . . . . . . . . . . . . . . . 4-1-1 Anykey answer . . . . . . . . . . . . . . . . . . . . . . . . . . . . . . . . . . . . . . . 4-1-2 Automatic redial . . . . . . . . . . . . . . . . . . . . . . . . . . . . . . . . . . . . .
About your phone Date . . . . . . . . . . . . . . . . . . . . . . . . . . . . . . . . . . . . . . . . . . . . . . . 4-3-2 Show (Hide) date . . . . . . . . . . . . . . . . . . . . . . . . . . . . . . . . 4-3-2-1 Set the date . . . . . . . . . . . . . . . . . . . . . . . . . . . . . . . . . . . . 4-3-2-2 Date format . . . . . . . . . . . . . . . . . . . . . . . . . . . . . . . . . . . . 4-3-2-3 Date separator . . . . . . . . . . . . . . . . . . . . . . . . . . . . . . . . . .
Network services1 . . . . . . . . . . . . . . . . . . . . . . . . . . . . . . . . . . . . . . . . . 4-7 Voice privacy . . . . . . . . . . . . . . . . . . . . . . . . . . . . . . . . . . . . . . . . 4-7-1 Call forwarding . . . . . . . . . . . . . . . . . . . . . . . . . . . . . . . . . . . . . . 4-7-2 Forward all calls . . . . . . . . . . . . . . . . . . . . . . . . . . . . . . . . . 4-7-2-1 Activate. . . . . . . . . . . . . . . . . . . . . . . . . . . . . . . . . . . . . 4-7-2-1-1 Cancel . . . . . . . . . .
About your phone VOICE . . . . . . . . . . . . . . . . . . . . . . . . . . . . . . . . . . . . . . . . . . . . . . . . 9 Voice tags . . . . . . . . . . . . . . . . . . . . . . . . . . . . . . . . . . . . . . . . . . . . . . . . 9-1 Add voice tag1 . . . . . . . . . . . . . . . . . . . . . . . . . . . . . . . . . . . . . . . 9-1-1 Playback . . . . . . . . . . . . . . . . . . . . . . . . . . . . . . . . . . . . . . . 9-1-1-1 Change . . . . . . . . . . . . . . . . . . . . . . . . . . . . . . . . . . . . . . . .
Make a note . . . . . . . . . . . . . . . . . . . . . . . . . . . . . . . . . . . . . . . . . 11-2-2 Meeting. . . . . . . . . . . . . . . . . . . . . . . . . . . . . . . . . . . . . . . . 11-2-2-1 Memo . . . . . . . . . . . . . . . . . . . . . . . . . . . . . . . . . . . . . . . . . 11-2-2-2 Call . . . . . . . . . . . . . . . . . . . . . . . . . . . . . . . . . . . . . . . . . . . 11-2-2-3 Birthday . . . . . . . . . . . . . . . . . . . . . . . . . . . . . . . . . . . . . . . 11-2-2-4 Reminder. . . . . . . .
About your phone • PHONE BOOK MENU From the start screen, press Contacts. The following phone book options are available: Menu Menu (cont’d.) Own number Caller groups Familya Rename group Group ringing tone Group logo Group members Remove contact Add contact VIP Friends Business Other Search Add new Edit name Delete One by one Delete all Add number Settings Scrolling view Name list Name+number Memory status 1-touch dialing View number Change Delete Voice tags Playback Change Delete a.
4 Phone setup Now that you have had a chance to learn about some of the basic functions and features of your phone, you may want to explore a few options to improve the way you use your phone. • LEARN ABOUT YOUR HEADSET Using the HDB-4 headset (available for purchase) offers you convenient handsfree communications with your phone. Connect the headset Before using the headset: 1 Plug the headset jack into the side of your phone. 2 Wrap the device around ear.
Phone setup Adjust screen brightness You can change the brightness on your phone’s screen, making the screen brighter or darker. 1 Press Menu 4-4-4 (Settings > Display settings > Display brightness). Your phone displays the current setting. 2 Press the scroll key to the left or right to increase or decrease brightness. 3 Press OK to confirm your changes.
5 Text entry Warning: Do not switch on the phone when wireless phone use is prohibited or when it may cause interference or danger. You can enter letters, numbers, and special characters via the phone’s keypad when working with the phone book, calendar, text messaging, or while browsing the Internet. This section provides detailed instructions for the two text entry methods: traditional text entry, and predictive text input.
Text entry • WRITE USING ABC AND 123 MODES A status indicator in the upper left corner of your screen indicates what mode you are in whenever you are entering information into your phone (phone book, calendar, or text messaging). Enter letters The following table contains a list of the characters displayed when entering text and numbers from your keypad: Key Characters Key Characters 1 .
For example: to enter the name “Albert”: Press 2 A Press 5-5-5 l Press 2-2 b Press 3-3 e Press 7-7-7 r Press 8 t where first letter Note: Default mode is sentence case of a name or sentence is automatically capitalized. Phone book default mode is title case - each word is capitalized. OTHER OPTIONS • Delete mistakes - If you make a mistake, press Clear to delete one character to the left. Press and hold the left selection key to speed up the erasing process.
Text entry Enter punctuation/other characters You can enter punctuation, specials characters, and symbols while writing text messages, entering notes in the Organizer, creating phone book entries, or browsing the Internet. The illustration to the right shows a sample of the available characters.
p This character creates a pause that occurs when the phone dials a number. Numbers entered to the right of this special character are automatically sent as touch tones after a 2.5-second pause. w This character causes the phone to wait for you to press Send. • WRITE WITH PREDICTIVE TEXT Your phone offers predictive text input. Predictive text uses a highly compressed database (or "dictionary") of common words and tries to anticipate the word you are entering.
Text entry KEYS AND TOOLS FOR PREDICTIVE TEXT Key Description 2-9 Use for text entry. Press each key only once per letter. Press and hold the key to enter the number. */+ If the underlined word is not the word you intended, press this key repeatedly until the word you want appears. Press and hold this key to display a list of punctuation and special characters. Spell If the word entered is not recognized, Spell appears above the left selection key.
Turn on predictive text input You can turn on predictive text input from the Options menu while writing a text message. Once enabled, predictive text is available to all features that support it. in the screen’s upper left corner indicates predictive text is active. ENABLE PREDICTIVE TEXT (QUICK METHOD) While creating a new text message or calendar note, press and hold the Options key for two seconds.
Text entry If the displayed word is not correct: • Press */+ repeatedly until the word you want appears, then press 0 to confirm your choice and continue. -OR- • Press Options, scroll to Matches, then press Select. Scroll to the correct word and press Use. Press 0 to confirm the word and enter a space. Tip: When you enter punctuation at the end of a sentence, the phone switches to sentence case. The first letter of the next word automatically appears in uppercase.
6 Contacts (Phone book) Warning: Do not switch on the phone when wireless phone use is prohibited or when it may cause interference or danger. You can save up to 500 entries (contacts and associated numbers) in your phone book. The phone’s memory is capable of storing multiple numbers for each name (home, business, mobile, etc.), as well as text information (postal address, e-mail address, or note). Note: The amount of detail stored for each entry may affect the total number of entries available.
Contacts (Phone book) • RECALL CONTACTS AND NUMBERS There are several ways to recall phone book entries. Once you locate the desired name and number from the phone book, you can perform any of the following tasks: call the number, edit or add information to the selected phone book entry, or delete the entry. From the start screen, recall a phone book entry as follows: • Scroll up or down to display the list of phone book entries. Press repeatedly to scroll through the list of contacts.
Option Description of function 1-touch dialing Allows you to assign phone book entries to any of the 8 speed dialing locations Voice tags Allows you to create and manage voice tags for voice dialing Own number Displays your phone number(s) Caller groups Allows you to organize phone book entries into groups and categories and assign special ringing tones and graphics to the group Displaying the phone book Your phone book’s information can be displayed in two different ways: • Name list - Entries d
Contacts (Phone book) • ADD A NUMBER TO A PHONE BOOK ENTRY There are several ways to add additional numbers to an existing phone book entry. Your phone’s memory book can store up to five numbers per entry. Once you choose to add a number, you can assign one of the following number types for the additional numbers: General, Mobile, Home, Work, or Fax. From the phone book 1 Press Contacts, scroll to Add number, then press Select. 2 Scroll to the entry you wish to modify, then press Add no.
1 Recall the name from the phone book. 2 Press Details, then scroll to highlight the number you want to modify. 3 Press Options, scroll to Change type, then press Select. 4 Scroll to the number type you would like, then press Select. Important: If you plan on using Nokia PC Suite to synchronize your phone book and your PC’s PIM (Personal Information Manager) application, make sure all phone numbers are assigned the correct number type.
Contacts (Phone book) DELETE ENTIRE PHONE BOOK ENTRY 1 Highlight the phone book entry you want to delete, then press Details. 2 Press Options. Scroll to Delete, then press Select. 3 Press OK to delete the phone book entry (including all details). DELETE THE ENTIRE PHONE BOOK 1 Press Contacts, scroll to Delete, then press Select. 2 Scroll to Delete all and press Select. 3 When you see the message Are you sure?, press OK. 4 Enter your security code, then press OK.
Assign phone number to a caller group 1 2 3 4 Recall the desired phone book entry, then press Details. Scroll to the desired phone number, then press Options. Scroll to Caller groups, then press Select. Scroll to the desired caller group (for example Family), then press Select. Edit caller group options You can edit various aspects of a caller group. SETTING A RINGING TONE AND GRAPHIC FOR A CALLER GROUP 1 Press Contacts. 2 Scroll to Caller groups and press Select.
Call log 7 Call log Warning: Do not switch on the phone when wireless phone use is prohibited or when it may cause interference or danger. Your phone keeps a log (record) of call-related information including phone numbers and call times.
2 Scroll up or down to view the list of missed, received, or dialed calls. Scroll to the desired call log entry, then press Options. Note: If the phone number recorded by the call log matches a number stored in your phone book, the name of the phone book entry is displayed. View call log options The table below contains a list of options available for all call log entries.
Call log DIALED NUMBERS You can view the list of dialed calls without having to access the Call log menu. From the start screen: 1 Press the Send key. The most recently dialed call is displayed. 2 Scroll up or down to view the other call log entries. 3 Press the Send key again to redial the number displayed, or press Options to work with the selected call log entry. Tip: To redial the last number, press the Send key twice.
ACCESS THE VARIOUS CALL TIMERS: 1 Press Menu 2-5 (Call log > Call timers).
Call log • CLEAR CALL TIMERS 1 2 Press Menu 2-5-6 (Call log > Call timers > Clear timers). The Security code field appears. 3 Enter your security code and press OK. Caution: This action cannot be undone. Tip: If using call timers to log the amount of time spent on calls, you may want to record the information from the call timers before you clear them.
8 Voice mailbox Warning: Do not switch on the phone when wireless phone use is prohibited or when it may cause interference or danger. Voice mail is a feature that enables those who call you to leave a voice message, in the event you are unable to answer your phone. Using your phone in conjunction with your service provider’s voice mail system, you can retrieve your messages at any time. Note: Voicemail is a network dependent feature.
Voice mailbox • LISTEN TO YOUR VOICE MESSAGES Note: The way you retrieve your voice messages varies, depending on your service provider. Call your service provider if you have any questions. LISTEN TO MESSAGES WHEN NOTIFIED If your phone plays an alert tone and New voice message is displayed, press Listen and follow the prompts. If you would rather listen to your messages later, press Exit. LISTEN TO MESSAGES LATER • From the start screen, press and hold 1 for two seconds.
9 Text messages Warning: Do not switch on the phone when wireless phone use is prohibited or when it may cause interference or danger. You can use the Messages menu (Menu 1) and Short Message Service (SMS) to read, write and send text messages to another phone in your network. You may also be able to use the Minibrowser’s e-mail feature to send text messages to phones in other networks. Important: When sending SMS messages, your phone may display the words Message Sent (where service is available).
Text messages 1 From the start screen, press Menu, then press Select. 2 Select Text messages, then select Create message. 3 Select either Text (up to 160 characters) or Numeric page (message consists of phone number only). Note: The ability to send a numerical page may be dependent on your wireless network. Please contact your service provider for more information on text messaging in your area. 4 5 Scroll to Add number, then press Select. Enter the phone number of the recipient, then press Select.
Option Description List recipients Allows to you add or remove recipients to the message Settings Allows you to mark a message as urgent, to request a delivery receipt or to specify a callback number Save message Saves the current message to the desired folder Clear screen Clears the screen of all text and characters Exit editor Used to return to the Messages menu Insert contact Used to insert a phone book entry into the text message Insert number Used to insert a phone book number into the t
Text messages 3 Scroll to one of the available templates: “Please call” “I am late. I will be there at” “I’m at home. Please call” “See you in” “I’m at work. Please call” “See you at” “I’m in a meeting, call me later at” “Sorry, I can’t help you on this.” “Meeting is canceled.” “I will be arriving at” 4 Press Select to enter the text into your new message. 5 Complete the process described earlier to send your message. You can also create a new message while browsing the Templates folder.
Messages to phones in other networks Most service providers now have the ability to route e-mail messages to your phone (appearing as text messages). The following are just a few examples of how your phone’s e-mail address may appear: 2135551234@myserviceprovider.com username@serviceprovider.com 2135551234@mobile.myserviceprovider.com It can be difficult to send messages to phones outside your service provider’s network using traditional text messaging.
Text messages icon in front of the message header indicates the Note: The message has not been read. in front of the message header indicates you have already viewed the message. • RESPOND TO A TEXT MESSAGE You have several options when reading a text message.
• REPLY TO A MESSAGE You can reply to a text message either by a traditional text message or by an e-mail message. The origin of the message or the sender’s wireless network affects how you reply to the incoming message. Replying via SMS 1 While viewing a message, press Options. 2 Scroll to Reply and press Select.
Text messages • DELETE MESSAGES You have several options for erasing individual messages or erasing the contents of an entire folder. You may need to delete older or unwanted messages in order to free up your phone’s memory for new messages. Learn about delete options The Messages menu has an option that allows you to delete the entire contents of your folders as described below.
1 While viewing a message, press Options. 2 Scroll to Forward and press Select. 3 Select Add e-mail or Add number, then address the message. For multiple recipients, press Options again, then add additional e-mail addresses or phone numbers. 4 Press Options, scroll to Send, then press OK. If you want to edit the forwarded message, select Edit text from the options menu prior to sending the message.
Text messages A blinking icon indicates the text message memory is full. Before you can receive, save, or send any new messages, you must delete older messages from your Inbox, Outbox, or the Archive folder. • MESSAGE SETTINGS Specify several settings that affect the overall way your phone handles text messaging. Use (Menu 01-1-8) to configure the following: • Sending options - used to specify normal or urgent priority, request delivery note, or specify that a callback number be sent automatically.
10 Personalization Warning: Do not switch on the phone when wireless phone use is prohibited or when it may cause interference or danger. • LEARN ABOUT PROFILES A profile refers to a group of settings you can use to customize the way your phone works. You can use the existing profiles or you can customize a profile to suit your own preferences.
Personalization • CUSTOMIZE A PROFILE 1 Press Menu 3 (Profiles). 2 Scroll to the profile you want to customize, then press Select. 3 Scroll to Customize, then press Select. The following sections describe each of the options you can customize. Set ringing options You can choose the way your phone rings to notify you of incoming calls. This setting does not affect text message alert tones. 1 From a profile’s Customize menu, scroll to Ringing options, then press Select.
1 From a profile’s Customize menu, scroll to Ringing tone and press Select. 2 Scroll through the options and listen. When you hear the ringing tone you want to use, press Select. About polyphonic sound (MIDI) Your phone is equipped with a polyphonic tone generator capable of playing up to four different voices simultaneously. The generator can reproduce over 40 different instrument tones, including drums, guitar, saxophone, flute, etc.
Personalization 1 2 From the selected profile’s Customize menu, scroll to Message alert tone and press Select. Scroll through the options and listen. When you hear the message alert tone you want to use, press Select. Set keypad tones Use the Keypad tones option to set the volume of the tones heard when pressing your phone’s keys. 1 2 From the selected profile’s Customize menu, scroll to Keypad tones and press Select. Scroll to one of the levels and press Select.
2 Select Change image from the list of options to activate wallpaper. 3 Use the scroll keys to browse the image gallery. When you arrive at the image of your choice, press Options, scroll to Set as wallpaper, and press Select. 4 If Replace current wallpaper? appears in the display, press OK. A message appears in the display confirming your selection. ACTIVATE/DEACTIVATE WALLPAPER 1 Press Menu 4-4 (Settings > Display settings) and select Wallpaper.
Personalization ADJUST TIMEOUT SETTINGS The Timeout setting allows you to determine how long the phone must be in idle mode before the screen saver is activated. The default timeout setting for screen saver is 2 minutes. To adjust this setting: 1 Press Menu 4 (Settings). 2 Scroll to Display settings and press Select. 3 Scroll to Screen saver timeout and press Select. 4 Select 2 minutes, 5 minutes or Other. The minimum value for Other is 5 seconds and the maximum value is 60 minutes.
View folders 1 At the start screen, press Menu 5-1 (Gallery > View folders), and then press Select. A list of folders appears in the display. 2 Scroll to a folder, such as Graphics or Tones and press Open. 3 Scroll through the list of graphics or tones, and press Options. Press Select to activate the option or to enter its submenu.
Personalization Select and customize an enhancement profile Note: You must have an enhancement (such as a loopset) attached to your phone prior to selecting the Enhancement settings menu. To select and customize profiles for use with the headset, handsfree device (car kit), loopset, and TTY/TDD: 1 Press Menu 4-5 (Settings > Enhancement settings). 2 Scroll to one of the following Enhancement profiles and press Select.
IF YOU SELECTED TTY/TDD The following option is available. Press Select to enter the option’s submenu and modify its settings. • Use TTY - Enable the use of a TTY/TDD device. Scroll to Yes or No and press Select. Note: If the loopset is enabled, you will be asked to disable the loopset before enabling TTY/TDD. Press Yes to disable the loopset (thus enabling TTY/TDD). Press No to leave the loopset enabled.
Personalization Use PC Composer You can use Nokia PC Suite’s PC Composer to create new ringing tones and send them to your phone via the DKU-5 cable (available as an enhancement). For more information, please refer to the Nokia PC Suite User Guide and PC/ PDA Connectivity Guide in the Download Software section of www.nokia.ca. Note: Check with your service provider for availability of services.
By default, the clock gets its information from the wireless network. If you wish to override the network clock, do the following: Manually setting the clock 1 Press Menu 4-3-1 (Settings > Time settings > Clock). 2 Scroll to Set the time, then press Select. 3 Enter the current time, then press OK. For example, to enter 7:30, enter 0730. 4 Scroll to am or pm, then press Select. Selecting time format 1 Press Menu 4-3-1 (Settings > Time settings > Clock). 2 Scroll to Time format, then press Select.
Personalization Displaying or hiding the clock 1 Press Menu 4-3-1 (Settings > Time settings > Clock). 2 Depending on the current settings, either Hide clock or Show clock is highlighted. 3 Press Select. • CUSTOMIZE THE WELCOME SCREEN You can set your phone to display a brief message each time you switch on your phone. The message can include your name or a reminder and can be up to 44 characters long. Create a startup message 1 Press Menu 4-2-3 (Settings > Phone settings > Welcome note).
Option Description Recorder Used to start recording a memo Call log Used to access the Call log menu Create a voice tag for a menu option Important: Please see “Important notes about voice tags” on page 90 for more information on creating voice tags. 1 Press Menu 8-2 (Voice > Voice commands). 2 Scroll to the menu option you wish to tag, then press Select. 3 Press Options, then select Add command. 4 Press Start. After the tone sounds, speak the voice tag clearly into the microphone.
Personalization Work with voice tags You can listen to an existing voice tag (in case you forgot what you recorded), re-record a voice tag, or delete an existing tag. 1 Press Menu 8-2 (Voice > Voice commands). 2 Scroll to the menu option you wish to tag, then press Select. 3 Press Options, scroll to either Playback, Change, or Delete, and press Select. Note: If you chose Change, press Start to record again. The new tag that is recorded replaces the old information.
11 Advanced features Warning: Do not switch on the phone when wireless phone use is prohibited or when it may cause interference or danger. Note: Some in-call options are network services features. Please contact your service provider for information and availability. This chapter describes advanced calling features such as conference calling, call waiting, and the use of calling cards for calls. Not all the features described here are available in all wireless network systems.
Advanced features Option Description Contacts Used to view phone book. Press Back to close phone book and return to call. Menu Used to display main menu. • USE CALL FORWARDING When you use call forwarding, your network redirects incoming calls to another phone number. Using this feature helps to prevent missing important phone calls. Important: Call forwarding is a network-dependent feature and may not work the same in all networks.
Feature code type Description Forward if out of reach Forwards incoming calls to another number when you are out of the network or when the phone is switched off Forward all data calls Forwards all incoming data calls to the number you specify Cancel all call forwarding Cancels any and all call forwarding options you may have set Store a feature code 1 Press Menu 4-7-5 (Settings > Network services > Network feature setting). The Feature code field appears after a few seconds.
Advanced features 2 Scroll to the desired call forwarding option, then press Select. 3 Highlight Activate and press Select. 4 Enter the number to which you want your calls forwarded (or press Search to recall a number from the phone book), and press OK. 5 Your phone calls the network to activate (or cancel) the feature you have requested. The network sends a confirmation note when the feature has been activated (or cancelled) successfully.
1 2 Note: Check with your service provider to make sure this service is available in your network. Make a call to the first participant as usual. When you are ready to place a call to the next party: Press Options, then press New call. 3 Enter the number and press the Send key (or press Search to recall the number from the phone book). 4 5 Press the Send key again to connect both parties. To end the call, press the End key. This action disconnects both parties.
Advanced features Store the feature codes Before you can use the Send own caller ID when calling feature, you must store the feature codes for activating this feature. Once the code is stored in your phone, it is sent automatically to the network when you select this option from your phone’s menu. 1 Press Menu 4-7-5 (Settings > Network services > Network feature setting). The Feature code field appears after a few seconds.
If the system is busy, your phone makes three additional call attempts. If you want to stop the automatic redial process before the last attempt, press the End key. Important: This feature does not automatically retry a number when the number you are calling is busy. • CALLING CARD If you wish to use a calling card for long distance calls, you must first save your calling card information into your phone. Your phone is equipped to handle up to four calling cards.
Advanced features 6 Enter the required information (access number or prefix and card number). Press OK to confirm your entries. 7 Press OK to save your changes. 8 Scroll to Card name, then press Select. Enter the card name, then press OK. Note: This procedure might not work with all calling cards. Please look at the back of your calling card or contact your long distance company for more information.
• Voice tags are sensitive to background noise. Record them and make calls in a quiet environment. • When recording a voice tag or making a call by saying a voice tag, hold the phone in the normal position near to your ear. • Very short contacts are not accepted. Use long contacts and avoid similar contacts for different numbers. Important: You must say the name exactly as you said it when you recorded it.
Advanced features • Unique tags are recognized more accurately. Consider using first and last name or first name, last name, and number type (for example, mobile, home, work, etc.) when tagging a number. For example, "John Smith, work." • Avoid pauses or silence as you record the voice tag. • If the voice tag memory is full, the phone displays Delete an existing voice tag? Press OK, scroll to locate a tag to delete, then press Delete. • Deleting a phone number deletes any associated voice tags.
Work with voice tags You can listen to an existing voice tag (in case you forgot what you recorded), rerecord a voice tag, or delete an existing tag. 1 At the start screen, press Contacts. Scroll to Voice tags, then press Select. Note: This option displays a list of only those contacts/numbers that have been assigned a voice tag. 2 Scroll to the phone number whose voice tag you want to edit, then press Options. 3 Scroll to either Playback, Change, or Delete, and press Select.
Advanced features 4 Enter the phone number manually, or press Search to locate a phone book entry. 5 Select the desired name or entry from the phone book. If more than one number is stored for that entry, scroll to the desired number and press Select. 1-touch dialing options You can change or delete (clear) numbers assigned to 1-touch dialing or view the number assigned to a key from the 1-touch dialing menu. 1 Press Contacts. 2 Scroll to 1-touch dialing and press Select.
SELECT A RINGING TONE AND GRAPHIC FOR A CALLER GROUP 1 Press Contacts. 2 Scroll to Caller groups and press Select. 3 Scroll to one of the caller groups and press Options. 4 Scroll to one of the following options and press Select: Option Description Rename group Used to rename the selected caller group Group ringing tone Used to select a ringing tone for this group.
Advanced features SET TOUCH TONE TYPE 1 Press Menu 4-2-2-1 (Settings > Phone settings > Touch tones > Manual touch tones). 2 Select one of the following options, then press Select: Option Description Continuous Tone sounds for as long as you press and hold a key. Fixed Used to send tones of the duration you specify in the Touch tone length option. Off Used to turn off tones. No tones are sent when you press a key.
RECALL TOUCH TONE STRING FROM THE PHONE BOOK 1 During a call to the automated service, press Options, scroll to Touch tones and press Select. 2 Press Search, scroll to the touch tone string entry in your phone book, then press OK. 3 Press Tones to send the touch tones. Store touch tone string with phone number You can store touch tone strings (for example: voice mailbox number and PIN code) as a part of a phone book entry.
Advanced features USE LINKING OPTIONS 1 Store the touch tone string into your phone book. 2 Assign the phone book entry with the touch tones to a 1-touch dialing location (example: location 3). For more information on 1-touch dialing, see “1-touch dialing” on page 92. 3 Edit the automated service’s phone number by adding +n to the end of the phone number (where n is the 1-touch dialing location). Press */+ twice to enter the + symbol. Example: 214-555-1234+3 4 Press OK to save your changes.
NOTES • Pressing Back instead of entering a subject discards the memo without saving. • Pressing OK without entering a subject assigns the default name (Recording) to the memo. Work with recorded memos To view a list of recorded memos: 1 Press Menu 8-3-2 (Voice > Voice recorder > Recordings list). 2 Scroll through the list of memos, then press Options. The following options are available: Option Description Playback Plays back the selected message through the earpiece (phone or headset).
Security and System settings 12 Security and System settings Warning: Do not switch on the phone when wireless phone use is prohibited or when it may cause interference or danger. Your phone has a variety of security features that help prevent some of the following: • Placing accidental or unintentional calls. • Unauthorized use of your phone. • Placing and accepting calls from certain phone numbers. • Accidental erasing of information or restoring factory settings.
• SECURITY CODE Your phone prompts you for a five-digit security code for certain features and commands. Access is granted only after the correct security code has been entered successfully. Your phone’s default security code is 12345. It is recommended that you change this code at once, write it down, and store it in a safe place away from your phone. Important: When entering your security code, ***** is displayed on the screen to keep others from viewing your code.
Security and System settings • PHONE LOCK This feature protects your phone from unauthorized outgoing calls or unauthorized access to information stored in the phone. When phone lock is activated, Phone locked is displayed each time you turn your phone on or off. After pressing either Contacts or Menu, you must enter your lock code. Once your lock code has been accepted, your phone will function normally. Important: Call not allowed is displayed if you attempt to place a call while phone is locked.
Activating and deactivating phone lock 1 Press Menu 4-6-2-1 (Settings > Security settings > Access codes > Phone lock). 2 Enter the lock code, then press OK. 3 Scroll to On or Off, then press Select. 4 Turn your phone off and back on to complete the phone lock activation (or deactivation). Answer a call with phone lock on Press the Send key or Answer.
Security and System settings • CALL RESTRICTIONS This feature allows you to restrict incoming and outgoing calls. You can restrict all calls or create a custom list of numbers to restrict. Learn about restriction options When you select either Restrict outgoing calls or Restrict incoming calls from the Security settings options, your options are: • Select - Used to display a list of all available restricted numbers. Select those numbers you want to restrict from this screen.
6 Enter a name to identify this restriction, or just press OK. Note: When creating a new restriction, that restriction is automatically selected (enabled) at the time it is saved. Select call restrictions 1 Press Menu 4-6-1 (Settings > Security settings > Call restrictions). 2 Enter your security code and press OK. 3 Scroll to Restrict outgoing calls or Restrict incoming calls and press Select. Then, scroll to Select and press Select.
Security and System settings 3 Scroll to Restrict outgoing calls or Restrict incoming calls and press Select. 4 Scroll to Delete and press Select. 5 Scroll to the restriction you wish to delete, then press OK. 6 Press OK again to delete restriction. • GPS (LOCATION INFO SHARING) The GPS feature allows the phone to share position information over the network. For calls to emergency numbers, this position information may be used by the emergency operator to determine the position of the phone.
Note: Location information will always be shared with the network during emergency calls to the official emergency number programmed into the phone, regardless of which setting is selected. After placing an emergency call the phone remains in emergency mode for five minutes. During this time, the phone’s location information will be shared with the network. For more information on emergency calls, see “Emergency calls” on page 128.
Organizer 13 Organizer Your phone has a calendar, alarm clock, stopwatch, and contact database— everything you need in an organizer or personal digital assistant. • USE THE ALARM CLOCK Your phone’s alarm clock can be set to sound an alarm at a time you specify. The alarm clock uses the clock’s time format (12-hour or 24-hour format). The icon, displayed on the start screen, indicates that an alarm is set. The alarm clock will work, regardless if the phone is on or off.
Alarm when phone power is off If the alarm time is reached while the phone is switched off, the phone switches itself on and starts sounding the alarm tone. If you press Stop, the phone asks whether you want to activate the phone for calls. Press No to switch off the phone or Yes to make and receive calls. Warning: Do not press Yes when wireless phone use is prohibited or when it may cause interference or danger.
Organizer Learn about Calendar views WEEK LIST From the Organizer menu, scroll to Calendar, and press Select. Use the week list to view your calendar four weeks at a glance. When you view the calendar, notice that today’s date is highlighted. Use the fourway scroll keys to move to a different date. Tip: Your phone supports four-way scrolling in the calendar week list. Use the scroll key to move up, down, left or right. Day view From the week list, scroll to the desired day.
The Options list for note view include: • Delete, Edit, Move, or Repeat the current note (every day, every week, biweekly or every year). • Make a note - used to create a new note for the selected day. • Go to date is used to jump to a specific date. • Copy - allows you to copy the note to another day. • Send note - provides various options for sending the current note (via SMS, or as an SMS text message. Please check for availability in your network).
Organizer 4 Scroll to the desired alarm option, then press Select. The presence of an alarm is indicated by when you view the notes. WHEN THE ALARM SOUNDS FOR A NOTE The phone flashes its lights, beeps, and displays the note. When a Call note is displayed, you can call the number by pressing the Send key. To stop the alarm, press Exit or the End key. • CALCULATOR You can use your phone’s calculator to add, subtract, multiply or divide numbers and convert currencies.
• STOPWATCH You can use your phone’s Stopwatch feature to time an event in hours, minutes and seconds. The event’s time can be saved, viewed, or deleted. Warning: Your phone must be switched on to use this function. Do not switch the phone on when wireless phone use is prohibited or when it may cause interference or danger. Important: Using the stopwatch consumes the battery and the phone's operating time will be reduced.
Organizer • • Reset - clears the current timing data and resets the timer. Start - restarts the split timer from the point the timer was stopped. Time an event using lap timing The lap time function allows you to measure the amount of time it takes to complete a cycle or lap. To measure lap time: 1 From the Organizer menu, scroll to Stopwatch and press Select. 2 Scroll to Lap timing, then press Select. 3 Press Start. The running time appears on the display.
14 Games Warning: Your phone must be switched on to use this function. Do not switch the phone on when wireless phone use is prohibited or when it may cause interference or danger. You can use your phone not only for communication but also for some serious fun. Your phone offers games which you can play. Game control You phone supports four-way scrolling. While playing the games, use the scroll key to move up, down, left or right.
Your phone and other devices 15 Your phone and other devices Your phone is capable if interacting with, or connecting to a computer using the DKU-5 USB cable. Your phone can exchange information with other desktop and laptop PCs. Your phone can also function as a wireless modem when connected to PCs. Warning: Your phone must be switched on to use this function. Do not switch the phone on when wireless phone use is prohibited or when it may cause interference or danger.
Please refer to the document Nokia PC Suite User Guide and PC/PDA Connectivity Guide for installation and setup instructions available in the Download Software section of www.nokia.ca. Modem setup You can use your Nokia phone as a modem with your laptop computer or handheld device, giving you access to the Internet (for e-mail and Web browsing) or corporate networks wherever you are.
Minibrowser 16 Minibrowser Warning: Your phone must be switched on to use this function. Do not switch the phone on when wireless phone use is prohibited or when it may cause interference or danger. Important: This feature is available only if your service provider’s network supports mobile internet access. Your service provider may also require that you subscribe to this additional service. For more information, contact your service provider.
• LAUNCHING THE MINIBROWSER Note: You must be in digital coverage to use the minibrowser. If you are in analog coverage you will get the error message “Network not responding”. The first time you launch the minibrowser, you go through a security setup process that takes three to five minutes (follow the on-screen prompts). 1 Press Menu, scroll to Minibrowser, then press Connect. A message appears, reminding you that you may be billed for the connection time. (You can disable this message.
Minibrowser Option Description Version Displays information about the minibrowser’s software version and developers. Advanced Displays a several advanced browser options. Downloads Used to view or access downloaded ringing tones Exit browser Exits the minibrowser and ends your browsing session. Switch off! Turns the phone off. ABOUT WEB PAGE CONTENT The following items may appear on web pages: • Menu choices (may appear as a numbered list). • Hyperlinks (appear as underlined text).
GO TO THE HOME PAGE • Press the End key repeatedly to move back through previously viewed pages until the Home Page appears. OR, • Press to display the minibrowser menu, scroll to Home, then press OK. SELECT OR OPEN AN ITEM (FOR EXAMPLE, A LINK) • Press the appropriate number key on your phone’s keypad (if the item on the page is numbered), OR • Scroll to the item, then press the appropriate selection key (for example, to select or open a link).
Minibrowser • BOOKMARKS You can create a bookmark for a page so that you can quickly return to that page later. (You may also be able to create bookmarks via your personal account at your service provider’s web site.) BOOKMARK A PAGE 1 Go to the page for which you want to set a bookmark. 2 Press the 3 Scroll to Bookmark page, then press Select. (A message may appear asking you to confirm this action.) key to access the minibrowser menu.
You can use the Minibrowser messages menu (Menu 01 - 3) to read your messages at a later time. Web links in minibrowser messages You can receive minibrowser messages containing Web links. If you receive a message containing a link, select Use Web link from the message’s Options menu to open the link and go to the Web site. You can also receive Web links in standard SMS messages. Selecting Use Web link from the message’s Options menu launches the minibrowser and takes you to the link’s Web site.
Minibrowser Tip: To prevent unintentional exiting of the minibrowser session, select either the Both or On exit options. This ensures that a confirmation message appears before exiting. Note: If you press and hold the End key, the minibrowser session ends without confirmation (regardless of the minibrowser confirmation setting).
17 Reference information • USE ENHANCEMENTS SAFELY This section provides information about the phone’s batteries, enhancements, and chargers. Be aware that the information in this section is subject to change as the batteries, chargers, and enhancements change. This phone is intended for use when supplied with power from an ACP-7U, ACP-12U, or LCH-12 charger. Other usage could invalidate any approval given to this apparatus and may be dangerous.
Reference information Leaving the battery in hot or cold places, such as in a closed car in summer or winter conditions, will reduce the capacity and lifetime of the battery. Always try to keep the battery between 15°C and 25°C (59°F and 77°F). A phone with a hot or cold battery may temporarily not work, even when the battery is fully charged. Battery performance is particularly limited in temperatures below freezing. Do not dispose of batteries in a fire! Warning: Use only your hands to remove the battery.
PACEMAKERS Pacemaker manufacturers recommend that a minimum separation of at least 6 inches (approximately 15 cm) be maintained between a handheld wireless phone and a pacemaker to avoid potential interference with the pacemaker. These recommendations are consistent with the independent research by and recommendations of Wireless Technology Research.
Reference information POSTED FACILITIES Switch your phone off in any facility where posted notices so require. Potentially explosive atmospheres Switch off your phone when in any area with a potentially explosive atmosphere and obey all signs and instructions. Sparks in such areas could cause an explosion or fire resulting in property and/or bodily injury or even death. Users are advised to switch off the phone when at a refuelling point (service station).
Aircraft Switch off your phone before boarding an aircraft. The use of wireless telephones in an aircraft may be dangerous to the operation of the aircraft, disrupt the wireless telephone network, and may be illegal. Failure to observe these instructions may lead to suspension or denial of telephone services to the offender, legal action or both. Emergency calls Important: This phone, like any wireless phone, operates using radio signals, wireless, and landline networks as well as userprogrammed functions.
Reference information • CERTIFICATION INFORMATION (SAR) THIS MODEL PHONE MEETS GOVERNMENT REQUIREMENTS FOR EXPOSURE TO RADIO WAVES Your mobile phone is a radio transmitter and receiver. It is designed and manufactured not to exceed the limits for exposure to radio frequency (RF) energy set by Industry Canada. These limits are part of comprehensive guidelines and establish permitted levels of RF energy for the general population.
• CARE AND MAINTENANCE Your phone is a product of superior design and craftsmanship and should be treated with care. The suggestions below will help you to fulfill any warranty obligations and to enjoy this product for many years: • Keep the phone and all its parts and enhancements out of the reach of small children. • Keep the phone dry. Precipitation, humidity and all types of liquids or moisture can contain minerals that will corrode electronic circuits.
Reference information • ENHANCEMENTS If you want to enhance your phone’s functionality, a range of enhancements is available for you. You can select any of these items to help accommodate your specific communication needs. For availability of these and other enhancements, contact your service provider. A FEW PRACTICAL RULES FOR ENHANCEMENT OPERATION • Keep all enhancements out of the reach of small children. • When you disconnect the power cord of any enhancement, grasp and pull the plug, not the cord.
Charging Times Charging times for the BLC-2 Li-Ion Battery (1000 mAh) are approximate: Battery option: ACP-7U BLC-2 Li-Ion 3 hrs 50 min Standby and Talk Times Mode Talk time Standby time Digital Up to 2.
Reference information • CHARGERS AND OTHER ENHANCEMENTS Check the model number of any charger before use with this device. This device is intended for use when supplied with power from the devices listed on the following pages. Warning: Use only batteries, chargers, and enhancements approved by Nokia for use with this particular phone model. The use of any other types may invalidate any approval or warranty applying to the phone and may be dangerous.
Travel charger (ACP-12U) This is a lightweight and durable AC charger. To use the Standard travel charger, plug it into a standard 120 V AC wall outlet and connect the lead from the charger to the base of your phone. Rapid mobile charger (LCH-12) You can charge your phone’s battery from your vehicle battery by using the Rapid mobile charger. Calls are possible during charging. A green light indicates that the charger is ready for charging (when not charging).
Reference information Data cable (DKU-5) Easy and convenient connection to your PC or laptop computer for wireless modem functionality. DKU-5 is a USB cable that can be used with Nokia PC Suite and the DCV-15 Desktop charger with PC Sync. Connectivity stand (DCV-15) Used together with the Standard travel charger or the Rapid travel charger, the DCV-15 Connectivity stand allows you to charge your phone in an upright position, so that you have a clear view of the phone’s screen.
Car kit (CARK-142) Phone sold separately The Car kit (CARK-142) offers a convenient handsfree option, automatic charging facility, and transmission capacity with external antenna connection. Professional installation of this product is recommended. Basic car kit (BHF-1) The BHF-1 Basic car kit offers a headrest handsfree option with an ergonomic design and easy installation. • NOKIA XPRESS-ON™ COLOUR COVERS Your phone’s Xpress-on cover is available in several fashion colours.
Reference information 1 Push the release button on the back cover. 2 Slide the cover downward and lift off. REMOVE THE FRONT COVER 1 With the phone face down or up, grab the top of the phone’s front cover. 2 Gently pry the front cover away from the phone and lift the cover off the phone. Warning: When the front cover is off the phone, be careful not to damage the phone’s screen face or the rubber gasket around it. REMOVE AND REPLACE THE KEYPAD 1 Lift the keypad from the inside of the front cover.
REPLACE THE FRONT COVER 1 Align the keypad with the proper openings in the front cover. 2 Gently push the front cover into the phone until it clicks into place. REPLACE THE BACK COVER 1 Insert the two catches of the back cover in the corresponding slots in the phone. 2 Slide the cover towards the bottom of the phone until it locks into place.
Reference information • FREQUENTLY ASKED QUESTIONS (FAQ) This section lists and answers the questions that you most frequently ask. Where necessary, the answers refer you to the appropriate text within this guide. Note: Some of the answers tell you to use menu shortcuts. For a complete listing of these shortcuts, refer to. Q. How do I lock my phone? A. Press Menu 4-6-2-1, then press Select. Enter your lock code, scroll to On, and press OK. Refer to see “Phone lock” on page 101 for more information. Q.
Q. How do I change the ringing tone? A. Press Menu 3 and scroll through the list of profiles until you find the one for which you want to change the ringing tone, then press Select. Highlight Customize and press Select. Scroll to Ringing tone, then press Select. Scroll through the options. After you hear the tone you want to use, press Select. Q. How do I store my voice mailbox number? A. Press Menu 01-2-3, enter your voice mailbox phone number, and press OK. The screen tells you that the number is saved.
Reference information Q. How do I assign a key to 1-touch dialing? A. Press Contacts and scroll to 1-touch dialing. Press Select. Scroll to the first number that includes the message (empty) and press Assign. Scroll to the name/number to which you want to assign to this key and press Select. Repeat these steps as many times as necessary. Refer to see “1-touch dialing” on page 92, for more information. Q. How do I find out how many memory locations the phone has? A. Press Contacts and scroll to Settings.
• GLOSSARY Term: Definition: analog network A network where the signal is conveyed by varying the frequency, amplitude or phase of the transmission. antenna The portion of your phone designed to transmit and receive the wireless signal. battery The source of power for your mobile phone when the phone is not connected to a charger. bookmark A way to save a web site address (or URL) to your phone’s memory.
Reference information Term: Definition: e-mail Electronic Mail. A written form of communication in which text (and other types of information) is transmitted between recipients electronically via special electronic mail systems managed by corporations and/or Internet service providers. END key Used to terminate an active call or reject an incoming call. Also used to return to the start screen from the phone book or from within the phone’s menu. Functions as “back” key while using the Minibrowser.
Term: Definition: message alert tone The sounds that are heard upon receipt of a text or system message (e.g. call waiting notification) by your phone. microphone The electronic element in the base of your phone that picks up your voice and other sounds. navigate A term that refers to the act of moving from one Internet site or page to another, or to the act of moving from one area of your phone’s memory or menu to another.
Reference information Term: Definition: profile Refers to the various settings relating to your phone’s audible, visible and vibrating alerts, and the ability to have multiple configurations to match your location or environment. ringing tone The tone or melody that is heard when you have an incoming call. ringing volume Refers to the volume of your phone’s ringing tone. roaming The state of your phone when you are no longer in your home system. Additional charges may result.
Term: Definition: voice dialing The ability to dial numbers in your phone using the phone’s voice recognition feature. (see voice tags) voice mail A system maintained by your service provider, used to record voice messages when you are unable to answer a call. voice mailbox The location on your service provider’s network used to store voice mail messages. voice tag A recording of a user’s voice that is assigned to a phone book entry.
Reference information • TECHNICAL INFORMATION Wireless system Dual-band CDMA 800 MHz, 1900 MHz plus 800 AMPS Weight 116.6 grams / 4.1 oz Dimensions Length: 117.6 mm/4.63 in Width: 49.5 mm/1.95 in Thickness: 23.9 mm/0.94 in Frequency range Highband: 1850.04 - 1909.92 MHz (TX) 1930.08 - 1989.96 MHz (RX) Lowband: 824.04 - 848.97 MHz (TX) 869.04 - 893.97 MHz (RX) GPS: 1575.42 MHz Battery voltage 3.6v nominal Charging current 900mA max with ACP-7U, LCH-12 and DCV-15 Operating temp.
• TROUBLESHOOTING Problem My phone is not charging. Possible cause Possible solution Charger and phone are Check connection between not properly charger and phone/ connected. charger stand and phone. Charger is not properly Make sure charger is plugged in. properly plugged into wall outlet. Battery is not charged. Charge the battery. My phone is not making/answering Poor signal strength. Extend whip antenna. calls. Outside of service area. I cannot listen to my voice messages.
Reference information Problem Possible cause Possible solution My SMS messages You do not have SMS service. are not being delivered. Call your wireless service provider. Excessive background noise during the recording process. Find a quiet location and try again. Voice tag memory is full. Follow screen prompt to delete an existing tag, making room for new voice tag. I cannot successfully tag a phone book entry or menu command.
Nokia One-Year Limited Warranty Nokia warrants that the Nokia wireless phone and enhancements are free from defects in material and workmanship. The warranty period for the Phone (Radio) units and all enhancements (excluding carry cases) is twelve (12) months from the date of purchase OR fourteen (14) months from date of wholesale shipment from Nokia, OR fifteen (15) months from the date of manufacture by Nokia.
Reference information 4 This warranty does not cover defects or damages caused by a product which is not approved by Nokia to be connected to its wireless phone; 5 This warranty does not cover defects or damages caused by improper or defective function of the carrier system or by inadequate signal reception by the antenna; 6 Removal and reinstallation costs are not covered by this warranty; 7 This warranty is applicable only to products bought through Nokia Products Ltd.
Besides this 90-day service warranty, the warranty repairs or replacements do not affect the original warranty conditions, which are determined by the date of purchase. THE FOREGOING WARRANTY IS THE PURCHASER’S SOLE AND EXCLUSIVE REMEDY AND IS IN LIEU OF ALL OTHER WARRANTIES, EXPRESSED OR IMPLIED, INCLUDING BUT NOT LIMITED TO ANY IMPLIED WARRANTY OR MERCHANTABILITY OR FITNESS FOR A PARTICULAR PURPOSE OR USE.
Index Numerics 1-touch dialing 92 setup 92 3-way conference calls 85 A ABC and 123 modes 37 access codes lock code 101 security code 100 accessibility alternate formats 7 features 8 mobile inductive loopset 8 solutions 7 TTY contact 8 website 7 accessories battery 132 complete car kit 136 data cable 135 loopset lps-4 135 spare battery charger 135 accessory cigarette lighter charger 134 headset kit 134 standard travel charger 133 activate automatic redial 87 call forwarding 83, 84 loopset 75 TTY/TDD 75 adju
call forwarding 83, 84 activate 84 cancel 84 feature codes 84 call lists, clearing 53 call restrictions 103 adding 103 editing 104 erasing 104 selecting 104 call timers clearing 55 turning on 54 call waiting 85 answer a new call 85 switch between calls 85 caller groups 49 assign a number 50 edit options 50 phone book menu 46 calls 1-touch dialing 92 3-way calls 85 answer a call 19 call waiting 85 end a call 19 ignoring 3 make a call 19 phone lock 102 redial last 3 reject a call 19 car kit 136 change letter
erase mistakes 38 erase mistakes 38 erase names or numbers 46 ESN number 10 F FAQ 139 fax call timers 55 G games 114 starting 114 glossary of terms 142 GPS (Location sharing) 105 H headset connect 34 setup 34 use 34 headset kit 134 hearing impaired solutions 8 help 22 I icons 6 in-call options 82 K keyguard 99 keypad about 18 lock 99 keypad tones, setting 71 keys, selection 17, 22 L label 9 language setting 77 letters, entering 37 lock code 101 changing 101 lock keypad 99 loopset 8 description 135 M
network services 7 subscribing 7 Nokia PC Suite 115 number type, changing 47 number types 47 numbers, add to message 43 numbers, entering 38 O one-touch dialing 92 options in-call menu 82 P PC Composer (PC Suite) 115 PC Connectivity 115 PC Suite Content Copier 115 instructions 116 PC Composer 115 PC Sync 115 PC Suite (application) 115 PC Sync (PC Suite) 115 phone book add entries 44 add number to entry 47 add other info 49 caller groups 49 change number type 47 change views 46 edit entry 46 erase names 48
ring volume, setting 70 ringing tone, setting 69 ringing tones, download 76 ringing tons polyphonic sound 70 rings and tones 68 S save e-mail address 49 phone book entry 44 street address 49 scroll keys 23 scroll through menus 23 security 99 lock keypad 99 phone lock 101 security code 100 security code changing 100 security settings call restrictions 103 phone lock 101 selecting call restrictions 104 selection keys 17, 22 serial number 10 service provider differences 7 signing up 7 service provider, contac
U underlined words 42 understanding wireless network services 7 unlock keypad 99 updates to this guide 6 use the headset 34 V vibrating alert, setting 70 view calendar note 109 dialed calls 51 missed calls 51 new text messages 62 received calls 51 voice command shortcut 4 voice commands 79 voice commands create a voice tag 80 using 80 voice dialing 89 dialing a number 91 important notes 90 voice tags 90 working with tags 81, 92 voice mail greetings 56 voice mail, setting up 56 voice messages, listening to
NOTES [ 159 ]
NOTES [ 160 ] 08/03