
User Manual


3. Check your adjustments
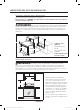
Use a spirit level to check your adjustments. Place the level diagonally on the oven rack or surface
cooktop, and check each direction for level.
1. Check direction 1.
2. Check direction 2.
If the spirit level doesn’t show level on the oven
rack or surface cooktop, adjust the leveling legs
with a wrench.
CAUTION
CAUTION For your safety, do not
attempt to modify or straighten front legs. Front
leveling legs on the range are designed to be
slanted to prevent accidental tipping.
Ground
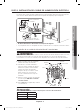
FINALIZING THE INSTALLATION
• Move range close enough to the opening to plug into the receptacle.
• Slide range into position insuring that the rear left(or rear right) leg slides under the Anti-Tip bracket.
The range will sit 0" away from the back wall when properly installed.
• Carefully tip the range forward to insure that the Anti-Tip bracket engages the back brace and
prevents tip-over.
• Turn on the electrical power. Check the range for proper operation as described in the user manual.
Anti-Tip bracket
Leveling leg
DG68-00108G-09
English - 12
Install_30_Electric_Range_USA_DG68-00108G-09_EN+MES.indb 12 2018-07-31 3:48:06