
Installation Guide


1 - English
Preparing to install the range
Prepare tools & Parts
The tools you will need
Drill Adjustable
Wrench
Pliers 1⁄4" Nut Driver Phillips
Screwdriver
Flat
Screwdriver
Pencil Level
What’s included with your range Additional materials you may need
Anti-tip Bracket
Template
Anti-Tip Bracket Screws
(short:2 ea,
long:2 ea)
Filler Kit 4-Wire Cord or 3-Wire Cord
(UL Approved 40 or 50 AMP)
Strain Relief
(For Conduit Installation Only)
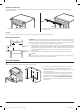
Checking the installation site
Clearances and dimensions
To install the range, refer to the following gure.
CAUTION
This range has been designed to comply with the maximum allowable wood cabinet temperatures of 194 °F. Make sure the wall covering,
countertops, and cabinets around the range can withstand the heat (up to 194 °F) generated by the range. If not, discoloration, delamination, or
melting may occur.
36 in
(914.4 mm) Min.
36
3
/4 in
(933.45 mm) Max.
29
15
/16 in
(761.0 mm)
26
7
/
16
in
(671.7 mm)
28
11
/
16
in
(728.6 mm)
With handle
49
1
/
4
in (1250.3 mm)
Door fully open
A
B
36"-36
3
⁄4"
29
15
⁄16"
29
3
⁄4"
28
11
⁄16"
26
7
⁄16"
49
1
⁄4"
25"
24"
6"
35
7
⁄8"
24"
3"
3"
A. Cabinet opening min 30" (76.2 cm)
B. Acceptable electrical outlet area
IMPORTANT: If your cabinets are over 36
3
⁄4" high, you must install this
range on a hard, heat resistant support that raises the surface of the
range so that it is about even with the countertop.
CAUTION
You must use the rear ller kit to install the range in a freestanding
cutout cabinet. For more information, see “Optional rear ller kit” as
shown below.
NOTE
If you install the product in a kitchen island, you must maintain
minimum 2
1
/2" from cutout to back edge of the countertop and
minimum 3" from cutout to side edges of the countertop.
Install_NE63T8911_AA_DG68-01302A-01_EN+MES.indb 1Install_NE63T8911_AA_DG68-01302A-01_EN+MES.indb 1 2021-01-29 6:21:192021-01-29 6:21:19