
Use and Care Manual


8 English
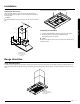
Connecting Vent System
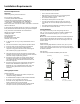
1. Install the transition on the top of the hood (if removed for shipping)
with 2 - 3.5 x 9.5 mm sheet metal screws.
A
B
A. Vent transition
B. 3.5 x 9.5 mm screw
For vented installations only:
2. Fit the vent system over the exhaust outlet.
3. Measure from the bottom of the air deector to the bottom of the
hood outlet. Cut the ductwork at the measured lenght.
Dimension
to measure
Roof
outlet
Wall
outlet
4. Seal the connection with clamps.
5. Check that the back draft dampers work properly.
Electrical Connection
WARNING
Electrical Shock Hazard
Disconnect power before servicing.
Replace all parts and panels before operating.
Failure to do so can result in death or electrical shock.
1. Disconnect power.
2. Remove the terminal box cover.
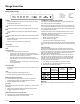
3. Remove the knockout in the terminal box cover and install
a UL listed or CSA approved
1
⁄2” strain relief.
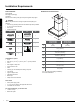
A
C
B
A. Terminal box
B. Knockout
C. Terminal box cover
4. Run the home power supply cable through strain relief, into
terminal box.
A
B
C
D
E
F
A. Home power supply cable
B. UL listed or CSA approved
strain relief
C. Black wires
D. UL listed wire connectors
E. White wires
F. Green (or bare) and
yellow-green ground wires
5. Use UL listed wire connectors and connect the black wires
(C) together.
6. Use UL listed wire connectors and connect the white wires (E)
together.
WARNING
Electrical Shock Hazard
Electrically ground blower.
Connect the ground wire to the green and yellow ground wire in the
terminal box. Failure to do so can result in death or electrical shock.
7. Connect the green (or bare) ground wire from the home power
supply to the yellow-green ground wire (F) in terminal box using
UL listed wire connectors.
8. Tighten the strain relief screw.
9. Install the terminal box cover.
10. Reconnect power.
Installation
Installation