SAMSUNG P528/R528/R578/R728/R778 User Guide
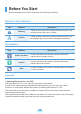
Contents Chapter 1. Getting Started Cautions Regarding OS Support 6 Before You Start 7 Safety Precautions 9 Chapter 3. Settings and Upgrade 24 Replacement Parts and Accessories 26 Regulatory Compliance Statements 28 WEEE SYMBOL INFORMATION 42 Basic Items 43 Overview 44 Front View Status Indicators Right View Left View Back View Bottom View Turn on the computer Attaching the Battery Connect the AC adapter Turn on the computer Using Sleep Mode Chapter 2.
Chapter 1.
Cautions Regarding OS Support z Windows is neither installed nor supplied with this computer. x Therefore, customers should purchase a Windows XP or Windows 7/Vista software license and install the software. Do not install an illegal copy or a copy that has already been installed on another PC. c For the installation procedures and any issues with the operating systems or applications not supplied by Samsung Computer, contact the corresponding software company.
Before You Start Before reading the User Guide, first check the following information. Safety Precaution Notations Icon Notation Description Warning Failing to follow instructions marked with this symbol, may cause personal injury and or fatality. Caution Failing to follow instructions marked with this symbol, may cause slight injury to yourself or damage your property.
About the Product Capacity Representation Standard About HDD Capacity Representation The capacity of the storage device (HDD, SSD) of the manufacturer is calculated assuming that 1KB=1,000 Bytes. However, the operating system (Windows) calculates the storage device capacity assuming that 1KB=1,024 Bytes, and therefore the capacity representation of the HDD in Windows is smaller than the actual capacity due to the difference in capacity calculation. (E.g.
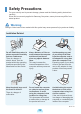
Safety Precautions For your security and to prevent damage, please read the following safety instructions carefully. Since this is commonly applied to Samsung Computers, some pictures may differ from actual product. Warning Failing to follow instructions marked with this symbol may cause personal injury and even fatality. Installation Related Do not install the product in places exposed to humidity such as a bathrooms. There is a danger of electric shock.
Warning Failing to follow instructions marked with this symbol may cause personal injury and even fatality. Power Related The power plug and wall outlet figures may differ depending on the country specifications and the product model. Do not touch the main plug or power cord with wet hands. There is a danger of electric shock. Do not exceed the standard capacity (voltage/current) of a multiplug or power outlet extension when using it for the product. There is a danger of electric shock or fire hazard.
Warning Failing to follow instructions marked with this symbol may cause personal injury and even fatality. Power Related Do not bend the power cord excessively or do not place a heavy object over the power cord. It is especially important to keep the power cord out of reach of infants and pets. If water or another substance enters the power input jack, AC adapter or the computer, disconnect the power cord and contact the service center. If the cord is damaged, it may cause electric shock or fire.
Warning Failing to follow instructions marked with this symbol may cause personal injury and even fatality. AC Adapter Usage Precautions Connect the power cord to the AC adapter firmly. Otherwise, there is a danger of fire due to an incomplete contact. Use only the AC adapter supplied with the product. Do not place heavy objects or step onto the power cord or AC adapter to avoid damaging the power cord or AC adapter. If the cord is damaged, there is a danger of electric shock or fire.
Warning Failing to follow instructions marked with this symbol may cause personal injury and even fatality. Battery Usage Related Keep the battery out of the reach of infants and pets, as they could put the battery into their mouths. There is a danger of electric shock or choking. Authorized Parts Use an authorized battery and AC adapter only. Please use an authorized battery and adapter approved by Samsung Electronics.
Warning Failing to follow instructions marked with this symbol may cause personal injury and even fatality. Usage Related Never heat the battery or put the battery into a fire. Do not put or use the battery in a hot location such as a sauna, inside a vehicle exposed to the heat, and so on. There is a danger of an explosion or fire. Take care not to allow metal objects such as a key or clip to touch the battery terminal (metal parts).
Warning Failing to follow instructions marked with this symbol may cause personal injury and even fatality. Upgrade Related Do not place any container filled with water or chemicals over or near the computer. Avoid direct sunlight when the computer is in an air-tight location such as inside a vehicle. If water or chemicals enter the computer, this may cause fire or electric shock. There is a danger of a fire hazard. The computer may overheat and also present opportunity to thieves.
Warning Failing to follow instructions marked with this symbol may cause personal injury and even fatality. Custody and Movement Related Use only authorized parts (multiplug, battery and memory) and never disassemble parts. There is a danger of damaging the product, electric shock or fire hazard. Shut down the computer and disconnect all cables before disassembling the computer. If there is a modem, disconnect the phone line. If you are disassembling a notebook computer, make sure to remove the battery.
Caution Failing to follow instructions marked with this symbol may cause slight injury or damage to the product. Installation Related Battery Usage Related Do not block the ports (holes), vents, etc. of the product and do not insert objects. Dispose of worn-out batteries properly. Damage to a component within the computer may cause electric shock or fire. The battery disposal method may differ depending on your country and region. Dispose of the used battery in an appropriate way.
Caution Failing to follow instructions marked with this symbol may cause slight injury or damage to the product. Usage Related Do not place a candle, light cigar, etc. over or on the product. Do not use your computer and AC Adapter on your lap or soft surfaces. Do not touch the antenna with electricity facility such as the power outlet. There is a danger of fire. If the computer temperature increases, there is a danger of burning yourself. There is a danger of electric shock.
Caution Failing to follow instructions marked with this symbol may cause slight injury or damage to the product. Upgrade Related Use recommended computer cleansing solution when cleaning the product and only use the computer when it is completely dried. Take care when touching the product or parts. Failing to do so may cause electric shock or fire. Take care not to throw or drop a computer part or device. Emergency disk eject method using paperclip should not be used while the disk is in motion.
Caution Failing to follow instructions marked with this symbol may cause slight injury or damage to the product. Custody and Movement Related Cautions on Preventing Data Loss (Hard Disk Management) When moving the product, turn the power off and separate all connected cables first. Take care not to damage the data on a hard disk drive. The product might be damaged or users may trip over the cables.
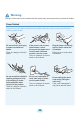
Proper Posture During Computer Use Maintaining a proper posture during computer use is very important to prevent physical harm. The following instructions are about maintaining a proper posture during computer use developed through human engineering. Please read and follow them carefully when using the computer. Otherwise, the probability of (RSI: Repetitive Strain Injury) from repeated operations may increase and serious physical harm may be caused.
Eye Position Hand Position Keep the monitor or LCD away from your eyes by at least 50cm. Keep your arm at a right angle as shown by the figure. m 50c Keep the line from your elbow to your hand straight. Adjust the height of the monitor and the LCD screen so that its top height is equal to or lower than your eyes. Do not place your palm over the keyboard while typing. Avoid setting the monitor and LCD excessively bright. Keep the monitor and LCD screen clean.
Volume Control (Headphones and Speakers) Use Time (Break Time) Take a break for 10 minutes or more after a 50-minute period when working for more than one hour. Check your volume first to listen to music. Illumination Do not use the computer in dark locations. The illumination level for computer use must be as bright so for reading a book. Check your volume!! Indirect illumination is recommended. Use a curtain to prevent reflection on the LCD screen.
Important Safety Information Safety Instructions Openings in the computer case are provided for ventilation. Do not block or cover these openings. Make sure you provide adequate space, at least 6 inches (15 cm), around the system for ventilation when you set up your work area. Never insert objects of any kind into the computer ventilation openings. Your system is designed and tested to meet the latest standards for safety of information technology equipment.
Care During Use The Instruction On Safety Operation of NotePC Do not walk on the power cord or allow anything to rest on it. z When installing and operating devices Do not spill anything on the system. The best way to avoid spills is to not eat or drink near your system. please refer to safety requirements in the user guide. x Devices can be used only with the Some products have a replaceable CMOS battery on the system board.
Replacement Parts and Accessories Use only replacement parts and accessories recommended by manufacturer. To reduce the risk of fire, use only No. 26 AWG or larger telecommunications line cord. Do not use this product in areas classified as hazardous. Such areas include patient care areas of medical and dental facilities, oxygen rich environments, or industrial areas.
Connect and Disconnect the AC adapter Power Cord Requirements The power cord set (wall plug, cable and AC adapter plug) you received with your computer meets the requirements for use in the country where you purchased your equipment. The socket-outlet shall be installed near the equipment and shall be easily accessible. Do not unplug the power cord out by pulling the cable only. Power cord sets for use in other countries must meet the requirements of the country where you use the computer.
Regulatory Compliance Statements Wireless Guidance (If fitted with 2.4G band or 5G band) Low power, Radio LAN type devices (radio frequency (RF) wireless communication devices), operating in the 2.4GHz/ 5GHz Band, may be present (embedded) in your notebook system. The following section is a general overview of considerations while operating a wireless device. Additional limitations, cautions, and concerns for specific countries are listed in the specific country sections (or country group sections).
Radio frequency wireless communication can interfere with equipment on commercial aircraft. Current aviation regulations require wireless devices to be turned off while traveling in an airplane. 802.11ABGN (also known as wireless Ethernet or Wi-Fi) and Bluetooth communication devices are examples of devices that provide wireless communication.
United States of America USA and Canada Safety Requirements and Notices Use On Aircraft Caution Regulations of the FCC and FAA prohibit airborne operation of radio-frequency wireless devices because their signals could interfere with critical aircraft instruments. Do not touch or move antenna while the unit is transmitting or receiving.
Unintentional Emitter per FCC Part 15 If necessary, the user should consult the dealer or an experienced radio/television technician for additional suggestions. The user may find the following booklet helpful: “ Something About Interference.” (If fitted with 2.4G band or 5G band) This device complies with Part 15 of the FCC Rules.
Intentional emitter per FCC Part 15 Wireless devices are not user serviceable. Do not modify them in any way. Low power, Radio LAN type devices (radio frequency (RF) wireless communication devices), operating in the 2.4GHz/5GHz Band, may be present (embedded) in your notebook system. This section is only applicable if these devices are present. Refer to the system label to verify the presence of wireless devices. Modification to a wireless device will void the authorization to use it.
FCC Part 68 (If fitted with a modem device.) The telephone company may make changes in its facilities, equipment, operations, or procedures that could affect the operation of the equipment. If this happens, the telephone company will provide advanced notice in order for you to make necessary modifications to maintain uninterrupted service. This equipment compiles with part of the FCC rules.
Canada Unintentional Emitter per ICES-003 The maximum allowed antenna gain for use with this device is 6dBi in order to comply with the E.I.R.P limit for the 5.25- to 5.35 and 5.725 to 5.85 GHz frequency range in pointto-point operation. This digital apparatus does not exceed the Class B limits for radio noise emissions from digital apparatus as set out in the radio interference regulations of Industry Canada.
Telecommunications per DOC notice (for products fitted with an ICcompliant modem) To avoid electrical shock or equipment malfunction do not attempt to make electrical ground connections by yourself. Contact the appropriate inspection authority or an electrician, as appropriate. The Industry Canada label identifies certified equipment. This certification means that the equipment meets certain telecommunications network protective, operation, and safety requirements.
European Union European Union CE Marking and Compliance Notices European Directives This Information Technology Equipment has been tested and found to comply with the following European directives: Products intended for sale within the European Union are marked with the Conformité Européene (CE) Marking, which indicates compliance with the applicable Directives and European standards and amendments identified below. This equipment also carries the Class 2 identifier.
European Radio Approval Information (for products fitted with EU-approved radio devices) This Product is a Notebook computer; low power, Radio LAN type devices (radio frequency (RF) wireless communication devices), operating in the 2.4GHz/5GHz band, may be present (embedded) in your notebook system which is intended for home or office use. This section is only applicable if these devices are present. Refer to the system label to verify the presence of wireless devices.
EU R&TTE Compliance Statements Česky [Czech] Samsung tímto prohlašuje, že tento Notebook PC je ve shodě se základními požadavky a dalšími příslušnými ustanoveními směrnice 1999/5/ES. Dansk [Danish] Undertegnede Samsung erklærer herved, at følgende udstyr Notebook PC overholder de væsentlige krav og øvrige relevante krav i direktiv 1999/5/ EF.
Malti [Maltese] Hawnhekk, Samsung, jiddikjara li dan Notebook PC jikkonforma malħtiāijiet essenzjali u ma provvedimenti oħrajn relevanti li hemm fidDirrettiva 1999/5/EC. Magyar [Hungarian] Alulírott, Samsung nyilatkozom, hogy a Notebook PC megfelel a vonatkozó alapvetõ követelményeknek és az 1999/5/EC irányelv egyéb elõírásainak. Polski [Polish] Niniejszym Samsung oświadcza, Ŝe Notebook PC jest zgodny z zasadniczymi wymogami oraz pozostałymi stosownymi postanowieniami Dyrektywy 1999/5/EC.
European Economic Area Restrictions General European standards dictate maximum radiated transmit power of 100 mW effective isotropic radiated power (EIRP) and the frequency range 2400 – 2483.5 MHz. The low band 5.15 - 5.35 GHz is for indoor use only. Local Restriction of 802.11b/802.11g Radio Usage [Note to integrator: The following statements on local restrictions must be published in all end-user documentation provided with the system or product incorporating the wireless product.
European Telecommunication Information (for products fitted with EU-approved modems) This equipment has been approved to Council Decision 98/482/EEC - “CTR 21” for PanEuropean single terminal connection to the Public Switched Telephone Network (PSTN). Marking by the symbol indicates compliance of this equipment to the Radio and Telecom Terminal Equipment Directive 1999/5/EC.
WEEE SYMBOL INFORMATION Correct disposal of this product (Waste Electrical & Electronic Equipment) (Applicable in the European Union and other European countries with separate collection systems.) This marking on the product, accessories or literature indicates that the product and its electronic accessories (e.g. charger, headset, USB cable) should not be disposed of with other household waste at the end of their working life.
Basic Items The items included in the package may vary depending on your selection of the optional items. Some items may be replaced with similar products and the color of some items may differ from that in this document. Computer Power Cable Standard Battery User Guide Charge the battery fully when using the computer for the first time.
Overview Before You Start! Optional items may be changed or may not be provided depending on the computer model. The actual color and appearance of the computer may differ from the pictures used in this guide. Front View 1 9 2 3 4 8 5 6 7 1 Camera Lens (Optional) Using this lens, you can take still pictures and record video. 2 Speaker A device used to generate sound. 3 Power Button Turns the computer on and off. 4 Keyboard A device to enter data by pressing the keys.
Status Indicators 1 2 3 4 5 1 Caps Lock This turns on when the Caps Lock key is pressed allowing capital letters to be typed without holding the Shift button down. 2 HDD/ODD This turns on when the hard disk is or ODD being accessed. 3 Wireless LAN This turns on when the wireless LAN is operating. 4 Charge Status This shows the power source and the battery charge status. Green: When the battery is fully charged or the battery is not installed. Red: When the battery is being charged.
Right View 1 1 CD Drive(ODD) (Optional) 2 USB Port 2 Plays CD or DVD titles. Since an ODD(Optical Disk Drive) is optional, the installed drive depends on the computer model. You can connect USB devices to the USB port such as a keyboard/mouse, digital camera, etc.
Left View Either type A or B is provided depending on the model. ► Type A Model 1 2 3 4 5 6 7 8 1 Security Lock Port You can connect a Kensington lock to the Security Lock Port to prevent the computer from being stolen. 2 DC Jack A jack to connect the AC adapter that supplies power to the computer. 3 Monitor Port A port used to connect a monitor, TV or projector supporting a 15pin D-SUB interface. 4 Wired LAN Port Connect the Ethernet cable to this port.
Left View ► Type B Model 1 2 3 4 5 6 7 8 9 10 1 Security Lock Port You can connect a Kensington lock to the Security Lock Port to prevent the computer from being stolen. 2 DC Jack A jack to connect the AC adapter that supplies power to the computer. 3 Monitor Port A port used to connect a monitor, TV or projector supporting a 15pin D-SUB interface. 4 Wired LAN Port Connect the Ethernet cable to this port.
Back View 1 1 Battery 2 This is a Lithium-Ion rechargeable battery that supplies power to the computer. The internal heat of the computer is emitted through these holes. 2 Fan Vents If the vents are blocked the computer may overheat. Avoid blocking the vents as this may be dangerous. Bottom View 1 2 3 1 Battery Latches The latch used to remove or install the battery. 2 Memory Compartment Cover The main memory is installed inside the cover.
Turn on the computer Attaching the Battery 1 Battery preparation. 2 Attaching the Battery. Connect the AC adapter 1 Connect the AC adapter. 2 Connect the power cable. z x Power Cable DC-in Jack AC Adapter Charge the battery fully when using the computer for the first time. When using the power cable, insert the power cable completely into the AC adapter. Some items may be replaced with similar products and the color of some items may differ from that in this document.
Turn on the computer Charge the battery fully when using the computer for the first time. 1 Lift up the LCD panel. 2 Press the Power button to turn the computer on. Power button LED is lit while the computer is turned on. Press the Fn+ ( ) key to increase the LCD brightness. You can only use this function after installing Windows XP or Windows 7/Vista and installing the Easy Display Manager program with the system software media disk.
Chapter 2.
Keyboard Shortcut key functions and procedures are discussed in the following sections. The keyboard image may differ from the actual keyboard. You can only use the hot keys and the pre-determined shortcut keys (Windows key, application key, volume key, etc.) after installing Windows XP or Windows 7/Vista. Some model is not supplied System Software Media depending on your computer model. Either type A or B is provided depending on the model.
Fn+ Name Function Mute You can turn the sound on or off after installing Windows XP or Windows 7/Vista. Samsung Support Center System diagnosis, recovery and Internet consultation program, Samsung Support Center, will be launched. (Optional) You can only use this function after installing Windows XP or Windows 7/Vista and installing the Samsung Support Center program with the system software media disk.
Screen Brightness Control To adjust the LCD brightness press the Fn + ( combination. ) key combination or the Fn + ( ) key The changed screen brightness is displayed at the center of the screen for a moment. You can use the screen brightness control keys after installing Windows and Easy Display Manager. Volume Control To control the volume, press the Fn + ( combination. ) key combination or the Fn + ( You can mute the sound or cancel the mute function by clicking the Fn + ( combination.
Touchpad The touchpad provides the same function as a mouse and the left and right buttons of the touchpad plays the role of the left and right buttons of a mouse. Before You Start! Use the Touchpad with your fingers. Using a sharp object may damage the Touchpad. If you touch the Touchpad or press the Touchpad buttons while booting up, the Windows boot time may be extended. Either type A or B is provided depending on the model.
CD Drive (ODD, Optional) An optical disk drive is optional and may differ depending on your computer model. For detailed specifications, refer to the catalogue. Do not insert a cracked or scratched CD. Otherwise, the CD may break and damage the optical disk drive when the CD rotates at a high speed. When you clean a CD or DVD title, wipe with a soft cloth from inside to outside. Do not eject a CD when the CD operating LED is on. The figures used for the description are of a representative model.
Multi Card Slot (Optional) Using the multi card slot, you can read and write data to a SDHC, MMC and SD card. You can use a card as a removable disk and conveniently exchange data with digital devices such as a digital camera, digital camcorder, MP3, etc. You can only use it after installing Windows XP or Windows 7/Vista. Before You Start! You have to additionally purchase a multi card with the necessary capacity depending on your requirements.
ExpressCard Slot (Optional) You can use Express cards using this slot. The ExpressCard slot can be regarded as the next generation PCMCIA card specification and supports LAN, TV Tuner and Sound cards. This computer’s slot supports the Express Card/34 specification. You can only use it after installing Windows XP or Windows 7/Vista. Before You Start! Remove the dummy card installed to protect the slot first. Lightly push the dummy card of the slot. The dummy card pops up. Eject the dummy card.
Chapter 3.
LCD Brightness Control You can adjust the LCD brightness in 8 levels. Before You Start! The LCD brightness is the brightest (Level 8) when the computer is running on AC power, and it becomes dimmer when running on battery power. Controlling the Brightness Using the Keyboard You can use the screen brightness control keys after installing Windows and Easy Display Manager. Adjust the LCD brightness by pressing the Fn +( ) key or the Fn +( ) key.
BIOS Setup The BIOS Setup enables you to configure your computer hardware according to your needs. Before You Start! Use the BIOS setup to define a boot password, change the booting priority, or add a new device. Since incorrect settings may cause your system to malfunction or crash, take care when configuring the BIOS. The functions of the BIOS setup are subject to change for product function enhancement purposes. The BIOS Setup menus and items may differ depending on your computer model.
Setting a Boot Password When setting a password, you have to enter a password to use the computer or enter the BIOS Setup. By configuring a password, you can restrict system access to authorized users only and protect data and files saved on the computer. Before You Start! Do not lose or forget your password. If you have forgotten your password, contact a Samsung service center. In this case, a service fee will be charged.
Before configuring a user password, a supervisor password must have been configured. Deactivating the supervisor password also deactivates the user password. Changing the hard disk drive password For security purposes, you can only change a hard disk drive password after restarting the computer by pressing the computer Power button. In the Set User Password item, press and complete the procedures from Step 3 of Setting a Supervisor Password.
Upgrading Memory One or more memory modules are installed on the computer. There are 2 memory slots and users can replace the installed memory or add new memory. Before You Start! Replace new memory only after shutting the computer down completely. Do not replace memory when the computer is in Sleep mode. Disconnect main power plug and remove the battery before continuing.
3 4 Push the memory module down so that it is completely fixed. If the memory does not fit easily, push the memory module down while pulling the memory module latches outward. Close the memory compartment cover and fasten the screw. Removing a memory module Pull the memory module latches outward. The memory module will pop up. Remove the memory module out at an angle of 30 degrees.
Battery Please refer to the following instructions when running the computer on battery power without connecting the AC power. A Lithium-Ion smart battery is supplied with this computer. Before You Start! Carefully read and follow the precautions printed on the battery before using the battery. Precautions Use only chargers specified in the User Manual. Never heat the battery pack, put it near or in a fire or use at a temperature higher than 60°C, as this may cause fire.
Charging the Battery 3 To install the battery again, slide the battery into the system. The battery latches move inwards and fix the battery automatically. Check if the battery latch has been moved inwards. 69 1 Attach the battery and connect the AC adapter to the DC-in jack of the computer. The battery will then start charging. 2 When charging is complete, the Charge LED turns red.
Chapter 4.
Product Specifications The system specifications may differ depending on the derived models. For detailed system specifications, refer to the product catalogue. NP-P528/R528/R578/R728/R778 CPU (Optional) Intel Celeron/Pentium / Core2 Duo/Core2 Quad Processor Main Memory (Optional) Memory type: DDR2 SODIMM DDR3 SODIMM Main Chipset (Optional) Intel GL40/GM45/PM45/PM55/HM55 Hard Disk Drive (Optional) 9.
Registered Trademarks Samsung is a registered trademark of Samsung Co., Ltd. Intel, Pentium/Celeron are registered trademarks of the Intel Corporation. Microsoft, MS-DOS, and Windows are registered trademarks of the Microsoft Corporation. All other product or company names mentioned herein are registered trademarks of their respective companies. ENERGY STAR® Partner s an ENERGY STAR® Partner, SAMSUNG has determined that this product A meets the ENERGY STAR® guidelines for energy efficiency.
BA81-08958A13 BA81- 08958A13 100715