
User Manual


46
/ 78
!
WARNING
To avoid risk of electrical shock that can cause death or severe personal injury,
disconnect unit from power before servicing unless tests require power.
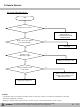
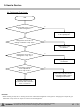
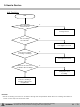
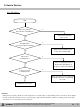
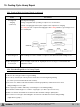
10. Cooling Cycle Heavy Repair
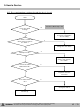
10-1. Summary of Heavy Repair
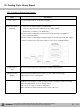
Process Contents Tools
Step Valve Position 1. Place Step Valve into full open position
- WATER FILTER + ICE MAKER+DOOR ALARM 5times
2. Turn off refrigerator after 10 minutes to open Step valve
Remove refrigerant
residuals
Cut charging pipe ends(compressor & dryer) and
discharge refrigerant from dryer and compressor.
Nipper, side cutters
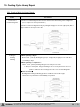
Parts replacement
and welding
Confirm refrigerant (R134a or R600a) and oil for
compressor and dryer.
Confirm N2 sealing and packing conditions before use.
Use good one for welding and assembly.
Weld under nitrogen gas atmosphere.
Repair in a clean and dry place.
Pipe, gas welder, N2 gas
Vacuum Evacuate for more than forty minutes after connecting
manifold gauge hose and vacuum pump to high (dryer)
and low (compressor) pressure sides.
Vacuum pump, manifold gauge
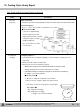
Refrigerant
charging and
charging inlet
welding
Weigh and control the charge in a vacuum conditions
with electronic scales and charge through compressor
inlet (process tube).
Charge while refrigerator operates.
Weld carefully after inlet pinching.
Can of refrigerant,
refrigerant manifold gauge,
electronic scales, punching off
flier, gas welding machine
Check
refrigerant leak
and cooling
capacity
Check leak at weld joints.
※ Note :Do not use soapy water for check.
Check cooling capacity
→ Check condenser manually to see if warm.
→ Check hot pipe manually to see if warm.
→ Check frost formation on the whole surface of the
evaporator.
Electronic leak detector, driver.
Compressor
compartment and
tools arrangement
Remove flux from the silver weld joints with soft
brush wet rag. (flux may be the cause of corrosion and
leaks.)
Clean tools and store them in a clean tool box or in their
place.
Copper brush, rag, tool box
Transportation and
installation
Installation should be conducted in accordance with the
standard installation procedure. (Leave space of more
than 5 cm from the wall for compressor compartment
cooling fan mounted model.)