Owner’s Instructions PL42P3S IMPORTER Samsung Electronics Mexico S.A. de C.V. Saturno No. 44, Col Nueva Industrial Vallejo Gustavo A. Madero C.P. 07700, Mexico TEL) 52-5-747-5100 EXPORTER Samsung Electronics co., Ltd.
Warning! Important Safety Instructions Thank You for Choosing Samsung Thank you for choosing Samsung! Your new Samsung product represents the latest in television technology. We designed it with easy-to-use on-screen menus and closed captioning capabilities, making it one of the best products in its class. We are proud to offer you a product that will provide convenient, dependable service and enjoyment for years to come. CAUTION: TO REDUCE THE RISK OF ELECTRIC SHOCK, DO NOT REMOVE COVER (OR BACK).
FCC Information • Protect the power cord. Power supply cords should be routed so that they won’t be walked on or pinched by objects placed on or against them. Pay particular attention to cords at plugs, convenience receptacles, and the point where they exit from the unit. • Unplug the PDP from the wall outlet and disconnect the antenna or cable system during a lightning storm or when left unattended and unused for long periods of time.
Important Warranty Information Regarding Television Format Viewing Table of Contents Wide screen format PDP Displays (16:9,the aspect ratio of the screen width to height) are primarily designed to view wide screen format full-motion video.The images displayed on them should primarily be in the wide screen 16:9 ratio format,or expanded to fill the screen if your model offers this feature and constantly moving.
P L A S M A D I S P L A Y P A N E L General Information Your New Plasma Display Panel ....................................................10 Remote Control Buttons ................................................................12 Wall Installation Instructions ..........................................................
Your New Plasma Display Panel Front Panel Rear Panel Speakers (optional) Remote Control Signal Receiver Aim the remote control towards this spot on the PDP. SOURCE button Press to display all of the available video sources (ie., Video, S-Video, Component1, Component2, PC ). MENU button Displays the main on-screen menu. VOL(+,-) button Press to increase or decrease the volume. Also used to select or adjust items on the on-screen menu.
Remote Control Buttons ¸ SURROUND button Press the hear the Dolby surround effect. Remote Control Œ POWER button Turns the PDP on and off. ˛ MTS button Press to choose stereo, mono or Separate Audio Program (SAP broadcast). ◊ AUTO PROG. button The TV automatically cycles through all of the available channels and stores them in memory. ´ ASPECT button ± ADD/DEL button ˇ Number buttons ¨ +100 button ≠ DNIe button ˆ MUTE button — SET button Press to change the screen size.
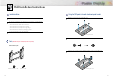
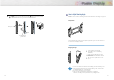
Wall Installation Instructions Installation Notes 1 2 Do not install the PDP in any location other than a vertical wall. 1 Remove the screws on the rear of the PDP panel. To protect the performance of the PDP and prevent problems, avoid the following places. • • • • 3 Fixing the PDP panel to the wall attachment panel bracket Do Do Do Do not not not not install install install install next to smoke and fire detectors. in an area subjected to vibration. in an area subjected to high voltage.
4 Put the 4 pegs on the PDP in the grooves of the wall mount bracket and pull down on the PDP (Œ) to secure it to the wall mount bracket. (´) Tighten the screws as shown (ˇ) so that the PDP cannot be separated from wall mount bracket. How to Adjust Mounting Angle Notice : Please secure the mounting bracket on the wall surface after setting its angle at 0° Factory default PDP panel Wall Wall attachment panel bracket The wall mount bracket is delivered separately.
P L A S M A D I S P L A Y P A N E L Connections Connecting Connecting Connecting Connecting Connecting Connecting Connecting VHF and UHF Antennas ..............................................20 Cable TV....................................................................21 Speakers.................................................................. ..23 a VCR........................................................................24 a Camcorder ...............................................
Connecting VHF and UHF Antennas Connecting Cable TV You can connect different cable systems to your PDP, including cable without a cable box, and cable with a cable box that descrambles some or all channels. Antennas with 75-ohm Round Leads If your antenna looks like this: 1 Cable without a Cable Box it has 75-ohm round leads. 1 Plug the antenna lead into the VHF/UHF terminal on the PDP. Use the Antenna Cable, an accessory included in the product package.
Connecting Speakers External speakers are sold seperately. Check with your dealer. Cable with a Cable Box that Descrambles Some (But Not All) Channels To complete this connection you will need a two-way splitter, an RF (A/B) switch, and four coaxial cables (which you can buy from your Samsung dealer or any electronics store). 1 Find and disconnect the cable that is connected to the ANTENNA IN terminal of your cable box. This terminal might be labeled "ANT IN", "VHF IN", or simply, "IN".
Connecting a VCR Connecting a Camcorder Connecting a VCR to the Video or S-Video/Audio jack PDP Viewing camcorder tapes VCR Camcorder PDP Power Plug Ferrite Cores Audio Cable Power Plug S-Video Cable Video Cable Video Cable Ferrite Cores Audio Cable How to Connect Connect the Video/Audio cables between the AUDIO(L/R)/VIDEO jacks on the PDP and AUDIO/VIDEO OUT jacks on the VCR. (Note: For better video, you can use an S-Video cable.) Videotape Playback: 1.
Connecting a DVD Player (480i, 480p) Connecting a DTV Receiver This PDP displays the optimum picture in 720p mode. (480p, 720p, 1080i) This PDP displays the optimum picture in 720p mode. Playing DVD Watching DTV PDP DVD Player PDP DTV Receiver Power Plug Power Plug Video Cable or Video Cable Audio Cable Audio Cable Ferrite Cores DVI Cable Use the DVI-D connection cable.
P L A S M A D I S P L A Y P A N E L Operation Turning the PDP On and Off ..........................................................30 Memorizing the Channels..............................................................32 Setting Up Your Remote Control ....................................................
Turning the PDP On and Off Turning the PDP On and Off Displaying Status Information Press the INFO button on the remote control. The PDP will display the Picture mode, Sound mode, MTS, Signal and Caption. Press the INFO button on the remote control again. The PDP will display the Clock. Press the Power button on the remote control. The PDP will be turned on and you will be ready to use it’s features. You can also use the POWER( ) button on the front of the PDP.
Memorizing the Channels Your PDP can memorize and store all of the available channels for both “off-air” (antenna) and cable channels. After the available channels are memorized, use the CH and CH buttons to scan through the channels. This eliminates the need to change channels by entering the channel digits. There are three steps for memorizing channels: selecting a broadcast source, memorizing the channels (automatic) and adding and deleting channels (manual).
Adding and Erasing Channels (Manual Method) 1 Use the number buttons to directly select the channel that will be added or erased. To View Memorized Channel (PIP Mode) Ant 4 1 Press the MENU button. Press the UP or DOWN button to select “Channel”, then press the ENTER button. Channel Ant/ CATV Auto Program Fine Tune LNA Ch. Scan Ex) Channel “4” Move 2 Press the ADD/DEL button: Repeatedly pressing this button will alternate between “Added” and “Erased.
Setting Up Your Remote Control This PDP's remote control can operate almost any VCR, cable box or DVD. After it has been set up properly, your remote control can operate in four different modes :TV, VCR, Cable or DVD. Pressing the corresponding button on the remote control allows you to switch between these modes, and control whichever piece of equipment you choose. Changing Channels Using the Channel Buttons Press the CH or CH Note : buttons to change channels.
Remote Control Codes VCR Codes P Cable Box Codes L A S M A D I S P L A Y P A N E L Picture Control Customizing the Picture ................................................................40 Using Automatic Picture Settings ....................................................41 Selecting the Color Tone................................................................42 DNIe (Digital Natural Image engine) ............................................43 Viewing the Picture-in-Picture..........
1 Customizing the Picture Using Automatic Picture Settings You can use the on-screen menus to change the Contrast, Brightness, Sharpness, Color, and Tint settings of your PDP. Your PDP has automatic picture settings that allow you to adjust the video display easily. Press the MENU button, then press the ENTER button. 1 Picture Mode Adjust Color Tone DNIe Custom Custom On Press the MENU button, then press the ENTER button. ➤ Quick way to access the picture setting: Just press the “P.
Selecting the Color Tone DNIe (Digital Natural Image engine) Samsung’ s New Technology brings you more detailed images with contrast and white enhancement and 3D noise reduction. 1 Press the MENU button, then press the ENTER button. Picture Mode Adjust Color Tone DNIe Move 2 3 Press the UP or DOWN button to select “Color Tone”, then press the LEFT or RIGHT button to select “Normal”, “Warm1”, “Warm2”, “Cool2” or “Cool1”. • You can select “Custom”, “Color1”, “Color2” or “Color3” in PC mode.
Viewing the Picture-in-Picture Selecting the PIP Screen 1 Selecting an External Signal You can use PIP to view a signal from an external source, such as a VCR. Press the MENU button. Press the UP or DOWN button to select “PIP”, then press the ENTER button. PIP Select Off 1 ➤ Quick way to access the PIP mode: Just press the “PIP” button on Press the MENU button. Press the UP or DOWN button to select “PIP”, then press the ENTER button. the remote control.
Swapping the Contents of the PIP Image and Main Image 1 Press the MENU button. Press the UP or DOWN button to select “PIP”, then press the ENTER button. ➤ Quick way to access swapping: Just press the “SWAP” button under the cover of the remote control. Press the UP or DOWN button to select “Swap”, then press the ENTER button. • The image in the PIP window will appear on the main screen, and vice versa. Press the MENU button to exit. On TV Press the MENU button.
Changing the Location of the PIP Image 1 Press the MENU button. Press the UP or DOWN button to select “PIP”, then press the ENTER button. Changing the PIP Channel Move 2 Press the LEFT or RIGHT button to move the PIP screen where you want. 48 Press the MENU button to exit. “CH▼” button under the cover of the remote control. Ant Ant 5 Select Press the MENU button. Press the UP or DOWN button to select “PIP”, then press the ENTER button.
Changing the Screen Size When you press the ASPECT button on the remote control, the PDP’s screen mode should appear in sequence. The screen displays in this order: Wide, Panorama, Zoom1, Zoom2, Normal. Note Changing the Screen Size Still Press the Still button on the remote control to freeze a moving picture. Press again to cancel. • If you watch a still image or the Normal (4:3) mode for a long time (over 2 hours), an image may be burned onto the screen.
P L A S M A D I S P L A Y P A N E L Sound Control Customizing the Sound ................................................................54 Using Automatic Sound Settings ....................................................55 Choosing a Multi-Channel Sound (MTS)Soundtrack ..........................56 Using the Auto Volume ..................................................................57 Using Dolby Virtual ......................................................................
Customizing the Sound 1 Press the MENU button. Press the UP or DOWN button to select “Sound”, then press the ENTER button. Press the UP or DOWN button to select “Adjust”, then press the ENTER button. You will also see the items “Bass”, “Treble” and “Balance”. Press the UP or DOWN button to select the item you wish to change. 54 Select Menu Move 2 Custom Press the LEFT or RIGHT button to select “Adjust”, “Standard”, “Music”, “Movie” or “Speech” sound setting.
Choosing a Multi-Channel Sound (MTS) Soundtrack Using the Auto Volume Each broadcasting station has its own signal conditions, which can make it necessary to adjust the volume every time the channel is changed. “Auto volume” lets you automatically adjust the volume of the desired channel by lowering the sound output when the modulation signal is high or by raising the sound output when the modulation signal is low.
Using Dolby Virtual Using a Subwoofer This feature allows the PDP’s optional L/R speakers to provide a Home Theater-like Dolby effect. The center and surround sounds are mixed into the L/R speakers. 1 Press the MENU button. Press the UP or DOWN button to select “Sound”, then press the ENTER button. ➤ Quick way to access the Surround: Just press the “SURROUND” button on the remote control.
P L A S M A D I S P L A Y P A N E L Channel Control Fine Tuning Channels....................................................................62 LNA (Low Noise Amplifier) ............................................................
1 Fine Tuning Channels LNA (Low Noise Amplifier) Use fine tuning to manually adjust a particular channel for optimal reception. If the TV is operating in a weak-signal area, sometimes the LNA function can improve the reception (a low-noise preamplifier boosts the incoming signal). Press the MENU button. Press the UP or DOWN button to select “Channel”, then press the ENTER button. Channel Ant/ CATV Auto Program Fine Tune LNA Ch. Scan Move 2 Press the UP or DOWN button to select “Fine Tune”.
P L A S M A D I S P L A Y P A N E L Connecting a PC and Operation Connecting to a PC ......................................................................66 Adjusting the PC Screen................................................................70 Changing the Position of the Image................................................71 Changing the Size of the Image ....................................................72 Information ...............................................................
Connecting to a PC Connection to a Macintosh computer may require in adapter. PDP Pin Configuration D-Sub Cable DVI-D Cable (Digital-Only Connector) • 15Pin Signal Cable (based on protruded pin) Power Plug Use the DVI-D connection cable. (sold separately) DVI Cable Ferrite Cores or PC Cable Audio Cable PC DVI jack (The actual configuration on your PC may be different, depending on the model.
How to Set up Your PC Software (Windows only) The Windows display-settings for a typical computer are shown below. However, the actual screens on your PC will probably be different, depending upon your particular version of Windows and your particular video card. But even if your actual screens look different, the same, basic set-up information will apply in almost all cases. (If not, contact your computer manufacturer or Samsung Dealer.
Adjusting the PC Screen Changing the Position of the Image Adjusting the R.G.B After connecting the PDP to your PC, adjust the position of the screen if it is not well-aligned. Preset: • Press the TV/VIDEO button, then press the UP or DOWN button to select PC. Press the ENTER button to select PC mode. Preset: • Press the TV/VIDEO button, then press the UP or DOWN button to select PC. Press the ENTER button to select PC mode. 1 Press the MENU button, then press the ENTER button.
Changing the Size of the Image Information Preset: Preset: • Press the TV/VIDEO button, then press the UP or DOWN button to select PC. Press the ENTER button to select PC mode. • Press the TV/VIDEO button, then press the UP or DOWN button to select PC. Press the ENTER button to select PC mode. 1 Press the MENU button. Press the UP or DOWN button to select “PC”, then press the ENTER button.
Picture Quality Adjustment Picture Automatic Adjustment Coarse Adjustment Preset: Preset: • Press the TV/VIDEO button, then press the UP or DOWN button to select PC. Press the ENTER button to select PC mode. • Press the TV/VIDEO button, then press the UP or DOWN button to select PC. Press the ENTER button to select PC mode. 1 Press the MENU button. Press the UP or DOWN button to select “PC”, then press the ENTER button.
Fine Tuning (Fine) Preset: • Press the TV/VIDEO button, then press the UP or DOWN button to select PC. Press the ENTER button to select PC mode. 1 Press the MENU button. Press the UP or DOWN button to select “PC”, then press the ENTER button. PC Position Adjust Scaling Information Auto Adjust Move 2 Press the UP or DOWN button to select “Adjust”, then press the ENTER button.
Setting the Clock Setting the Sleep Timer You can set your PDP to automatically turn off after a preset interval. 1 Press the MENU button. Press the UP or DOWN button to select “Function”, then press the ENTER button. Move 2 Press the UP or DOWN button to select “Time”, then press the ENTER button. Press the LEFT or RIGHT button to select hour, then press the UP or DOWN button to select the correct hour.
Setting the Timers This PDP can be set to turn on or off automatically at specific times that you choose. Before using the timers, you must set the PDP’s clock, as described previously. Setting the On/Off Timer 1 Press the MENU button. Press the UP or DOWN button to select “Function”, then press the ENTER button. Language Time Caption NR Auto Power Off V-Chip Film Mode Move 2 Press the UP or DOWN button to select “Time”, then press the ENTER button.
Setting the Preferred Channel and Volume Level The preferred channel and volume can be set for when the timer automatically turns on the TV. 1 Press the MENU button. Press the UP or DOWN button to select “Function”, then press the ENTER button. Function Language Time Caption NR Auto Power Off V-Chip Film Mode Move 2 Press the UP or DOWN button to select “Time”, then press the ENTER button. Off Select Press the UP or DOWN button to select “On Time Volume”.
Selecting a Menu Language 1 Press the MENU button. Press the UP or DOWN button to select “Function”, then press the ENTER button. Your TV decodes and displays the closed captions that are broadcast with certain TV shows. These captions are usually subtitles for the hearing impaired or foreignlanguage translations. All VCRs record the closed caption signal from television programs, so home-recorded video tapes also provide closed captions.
1 Digital Noise Reduction Setting Auto Power Off If the broadcast signal received by your TV is weak, you can activate the Digital Noise Reduction feature to help reduce any static and ghosting that may appear on the screen. The PDP can be set to turn off automatically if no buttons are pressed for 3 hours after the PDP turns on via the On timer. Press the MENU button. Press the UP or DOWN button to select “Function”, then press the ENTER button.
Using the V-Chip The V-Chip feature automatically locks out programs that are deemed inappropriate for children. The user must enter a PIN (personal ID number) before any of the V-Chip restrictions are set up or changed. Note : When the V-chip feature is activated, the PIP and auto channel program features do not function. Setting Up Your Personal ID Number (PIN) 1 Press the MENU button. Press the UP or DOWN button to select “Function”, then press the ENTER button.
How to Set up Restrictions Using the “TV guidelines” First, set up a personal identification number (PIN), and enable the V-Chip. (See previous section.) Parental restrictions can be set up using either of two methods: The TV guidelines or the MPAA rating. 1 Press the MENU button. Press the UP or DOWN button to select “Function”, then press the ENTER button. Press the UP or DOWN button to select “V-Chip”, then press the ENTER button. The message "Enter Pin" will appear. Enter your 4-digit PIN number.
How to Set up Restrictions using the MPAA Ratings: G, PG, PG-13, R, NC-17, X How to Reset the TV after the V-Chip Blocks a Channel (“Emergency Escape”) The MPAA rating system uses the Motion Picture Association of America (MPAA) system, and its main application is for movies. When the V-Chip lock is on, the TV will automatically block any programs that are coded with objectionable ratings (either MPAA or TV-Ratings). If the TV is tuned to a restricted channel, the V-Chip will block it.
Selecting the Film Mode 1 Press the MENU button. Press the UP or DOWN button to select “Function”, then press the ENTER button. Function Language Time Caption NR Auto Power Off V-Chip Film Mode Move 2 Press the DOWN button to select Film Mode, then press the RIGHT or LEFT button to select “On” or “Off”. •On: Automatically senses and processes film signals from all sources and adjusts the picture for optimum quality. •Off: Switches off the Film mode.
Care and Maintenance Troubleshooting Before you call a service technician, please scan this list of problems and possible solutions. It may save you time and money. With proper care, your PDP will give you many years of service. Please follow these guidelines to get the maximum performance from your PDP. Identifying Problems Problem Possible Solution Poor picture. Check all wire connections. Your Remote control does not operate the PDP.
Specifications Memo Exterior design and product specifications are subject to change without prior notice to improve the performance of this product. This PDP applies to Class B digital device. (Note: Class B system is for home use.) This PDP has been registered for residential use in terms of EMI. So it can be used in all areas as well as residential areas.