Contact SAMSUNG WORLD-WIDE If you have any questions or comments relating to Samsung products, please contact the SAMSUNG customer care center. Contacte con SAMSUNG WORLD WIDE Si tiene alguna pregunta o comentario referente a nuestros productos, por favor contacte con nuestro Servicio de Atención al Cliente Country Web Site Customer Care Center ARGENTINE 0800-333-3733 www.samsung.com/ar BRAZIL 0800-124-421 4004-0000 www.samsung.com CHILE 800-SAMSUNG(726-7864) www.samsung.
Important Warranty Information Regarding Television Format Viewing Wide screen format PDP Displays (16:9, the aspect ratio of the screen width to height) are primarily designed to view wide screen format full-motion video. The images displayed on them should primarily be in the wide screen 16:9 ratio format, or expanded to fill the screen if your model offers this feature and the images are constantly moving.
User Instructions Screen Image retention Do not display a still image (such as on a video game) on the plasma display panel for more than several minutes as it can cause screen image retention. This image retention is also known as “screen burn”. To avoid such image retention, refer to page 23 of this manual to reduce the degree of brightness and contrast of the screen when displaying a still image. Altitude The PDP can only operate normally at heights under 6500ft.
English Contents General Information Channel Control ■ ■ ■ ■ ■ ■ ■ ■ ■ ■ List of Features..............................................................5 Accessories....................................................................5 Viewing the Control Panel..............................................6 Viewing the Connection Panel....................................... 7 Remote Control..............................................................8 Installing Batteries in the Remote Control..........
General Information List of Features • • • • Adjustable picture settings that can be stored in the TV’s memory. Automatic timer to turn the TV on and off. A special sleep timer. Excellent Picture Quality - DNIe technology provides life-like clear images. • SRS TruSurround XT - SRS TruSurround XT provides a virtual Dolby surround system. • HDMI/DVI connection of your PC to this TV. Accessories Please make sure the following items are included with your TV. If any items are missing, contact your dealer.
Viewing the Control Panel Buttons on the Lower-Right Part of the Panel The buttons on the lower-right panel control your TV’s basic features, including the on-screen menu. To use the more advanced features, you must use the remote control. POWER ➢ The product color and shape may vary depending on the model. 1 SOURCE Toggles between all the available input sources (TV, AV1, AV2, S-Video, Component1, Component2, PC, HDMI1, HDMI2, HDMI3, HDMI4).
Viewing the Connection Panel Rear Panel Jacks Use the rear panel jacks to connect A/V components that will be connected continuously, such as VCR or DVD players. For more information on connecting equipment, see pages 9-14. The product color and shape may vary depending on the model. 1 POWER IN Connect the supplied power cord. 2 AV IN 1(VIDEO)/(AUDIO-R/L) Video input for external devices, such as a camcorder or VCR. Audio inputs for external devices, such as a camcorder or VCR.
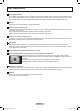
Remote Control You can use the remote control up to a distance of about 23 feet from the TV. 1 POWER Turns the TV on and off. 2 TV Selects the TV mode directly. 3 NUMERIC BUTTONS Press to directly select a channel. 4 – Use to select a channel over 100. For example, for channel 122, press “-”, then “2”, then “2”. 5 MUTE Press to temporarily cut off the sound. 6 VOL Press to increase or decrease the volume. 7 CH LIST Used to display Channel Lists on the screen.
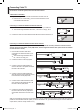
Installing Batteries in the Remote Control 1 Lift the cover at the back of the remote control upward as shown in the figure. 2 Install two AAA size batteries. ➢ Make sure to match the “+” and “–” ends of the batteries with the diagram inside the compartment. ➢ Do not mix battery types, i.e. alkaline and manganese. 3 Close the cover as shown in the figure. ➢ Remove the batteries and store them in a cool, dry place if you won’t be using the remote control for a long time.
Connecting Cable TV To connect to a cable TV system, follow the instructions below. Cable without a Cable Box 1 Plug the incoming cable into the ANT IN terminal on the back of the TV. ➢ Because this TV is cable-ready, you do not need a cable box to view unscrambled cable channels. ANT IN Connecting to a Cable Box that Descrambles All Channels 1 Find the cable that is connected to the ANT OUT terminal on your cable box. ➢ This terminal might be labeled “ANT OUT”, “VHF OUT” or simply, “OUT”.
Connecting a DVD Player or Cable Box / Satellite receiver (Set-Top Box) via HDMI This connection can only be made if there is an HDMI Output jack on the external device. This connection will provide the highest quality picture. 1 Connect an HDMI Cable between the HDMI IN(1, 2 , 3 or 4) jack on the TV and the HDMI jack on the DVD Player or Cable Box / Satellite receiver (Set-Top Box).
Connecting a DVD Player or Cable Box / Satellite receiver (Set-Top Box) via Component cables The rear panel jacks on your TV make it easy to connect a DVD Player or Cable Box / Satellite receiver (Set-Top Box) to your TV. 1 Connect Component Cables between the COMPONENT IN (1 or 2) [Y, PB, PR] jacks on the TV and the COMPONENT [Y, PB, PR] jacks on the DVD Player or Cable Box / Satellite receiver (Set-Top Box).
Connecting a VCR Video Connection These instructions assume that you have already connected your TV to an antenna or a cable TV system (according to the instructions on pages ~10). Skip step 1 if you have not yet connected to an antenna or a cable system. 1 Unplug the cable or antenna from the back of the TV. Connect the cable or antenna to the ANT IN terminal on the back of the VCR. Connect an Antenna Cable between the ANT OUT terminal on the VCR and the ANT IN terminal on the TV.
Connecting an Amplifier / DVD Home Theater 1 Connect Audio Cables between the AUDIO OUT [R-AUDIO-L] on the TV and AUDIO IN [L-AUDIO-R] on the Amplifier / DVD Home Theater. TV Rear Panel Amplifier / DVD Home Theater When an audio amplifier is connected to the AUDIO OUT [R-AUDIO-L] jacks terminals: Decrease the volume of the TV, and adjust the volume level with the Amplifier’s volume control. Audio Cable (Not supplied) ➢ ➢ Each Amplifier / DVD Home Theater has a different back panel configuration.
Operation Turning the TV On and Off Press the POWER button on the remote control. You can also use the POWER button on the TV. ➢ It may take a while before you see a full picture. Plug & Play Feature When the TV is initially powered On, basic settings proceed automatically and subsequently: The Screen Saver is activated if there is no operating signal for longer than 15 minutes. 1 Press the POWER button on the remote control. The message Start Plug & Play. is displayed. Plug & Play Start Plug & Play.
5 Select the correct signal source among Air, STD, HRC, and IRC by pressing the ▲ or ▼ button, then press the ENTER button. Plug & Play Air / Cable Air : STD HRC IRC Move 6 Press the ENTER button to start search the channels. The channel search will start and end automatically. After all the available channels are stored, Clock Set menu is automatically displayed. Press the ENTER button. ➢ To stop the search before it has finished, press the ENTER button with Stop selected.
If you want to reset this feature... 1 Press the MENU button to display the menu. Press the ▲ or ▼ button to select Setup, then press the ENTER button. Setup TV Plug & Play Language : English Time Caption External Settings Entertainment : Off Energy Saving : Off AV Color System : Auto PIP 2 Press the ENTER button to select Plug & Play. For further details on setting up options, refer to the pages 15~16. ➢ The Plug & Play feature is only available in the TV.
Adjusting the Volume Using the Volume Buttons 1 Press the VOL or VOL button to increase or decrease the volume. Using the Mute Button At any time, you can cut off the sound using the MUTE button. 1 Press MUTE and the sound cuts off. Mute will displayed on the screen. 2 To turn mute off, press the MUTE button again, or simply press the VOL VOL button. or Using the TOOLS Button You can use the TOOLS button to select your frequently used functions quickly and easily.
Viewing the Menus 1 With the power on, press the MENU button. The main menu appears on the screen. Its left side has five icons: Picture, Sound, Channel, Setup, Input. TV Picture Mode : Standard Cell Light Contrast Brightness Sharpness Color Tint G 50 Detailed Settings ▼ More 2 Press the ▲ or ▼ button to select one of the icons. Then press the ENTER button to access the icon’s sub-menu. Move ► 7 95 45 20 50 R 50 ► Enter Exit 3 Press the EXIT button to exit.
Storing Channels in Memory (Automatic Method) 1 Press the MENU button to display the menu. Press the ▲ or ▼ button to select Channel, then press the ENTER button. TV Channel Antenna : Air Auto Program Channel Manager Fine Tune Color System : Auto 2 Press the ▲ or ▼ button to select Auto Program, then press the ENTER button. Move 3 Press the ENTER button. The TV will begin memorizing all of the available channels. After all the available channels are stored, the Auto program menu reappears.
To Select the Source Use to select TV or other external input sources such as DVD players or Set-top/Cable boxes connected to the TV. Use to select the input source of your choice. 1 Press the MENU button to display the menu. Press the ▲ or ▼ button to select Input, then press the ENTER button. TV Input Source List : TV Edit Name Anynet+(HDMI-CEC) WISELINK Move 2 Press the ENTER button to select Source List. Press the ▲ or ▼ button to select signal source, then press the ENTER button.
Picture Control Changing the Picture Standard You can select the type of picture which best corresponds to your viewing requirements. 1 Press the MENU button to display the menu. Press the ENTER button to select Picture. TV 2 Press the ENTER button to select Mode. Press the ▲ or ▼ button to select Dynamic, Standard, or Movie. Press the ENTER button. • Dynamic : Select the picture for high-definition in a bright room. • Standard : Select the picture for the optimum display in a normal environment.
Adjusting the Detailed Settings Samsung’s new TVs allow you to make even more precise picture settings than previous models. See below to adjust detailed picture settings. Activating Detailed Settings 1 Press the MENU button to display the menu. Press the ENTER button to select Picture. TV 2 Press the ENTER button to select Mode. Press the ▲ or ▼ button to select Standard or Movie, then press the ENTER button. ➢ Detailed Settings is available in Standard or Movie mode.
Changing the Color Space Color space is a color matrix composed of red, green and blue colors. Select your favorite color space to experience the most natural color. TV Detailed Settings Black Adjust : Off Dynamic Contrast : Medium Gamma :0 Color Space : Native White Balance Flesh Tone :0 Edge Enhancement : On xvYCC : Off 10 Press the ▲ or ▼ button to select Color Space, then press the ENTER button. 11 Press the ENTER button again to select Color Space.
Flesh Tone You can emphasize the pink flesh tone in the picture. TV Detailed Settings Black Adjust : Off Dynamic Contrast : High Gamma :0 Color Space : Custom White Balance Flesh Tone :0 Edge Enhancement : Off xvYCC : Off 20 Press the ▲ or ▼ button to select Flesh Tone, then press the ENTER button. 21 Press the ◄ or ► button to decrease or increase the value. Press the ENTER button. ➢ Changing the adjustment value will refresh the adjusted screen.
Changing the Screen Size Occasionally, you may want to change the size of the image on your screen. Your TV comes with screen size options, each designed to work best with specific types of video input. Your cable box or satellite receiver may have its own set of screen sizes as well. In general, though, you should view the TV in 16:9 mode as much as possible. 1 Follow the Activating Picture Options instructions numbers 1 and 2. 2 Press the ▲ or ▼ button to select Size, then press the ENTER button.
16:9 Sets the picture to 16:9 wide mode. 4:3 Sets the picture to 4:3 normal mode. Wide Zoom Magnify the size of the picture more than 4:3. Zoom The screen size when Wide screen is vertically enlarged. Just Scan Use the function to see the full image without any cutoff when HDMI (720p/1080i/1080p), Component (1080i/1080p) signals are input.
DNIe (Digital Natural Image engine) This TV includes the DNIe function to provide high visual quality. If you set DNIe to on, you can view the screen with the DNIe feature activated. 1 Follow the Activating Picture Options instructions numbers 1 and 2. (Refer to page 25) 2 Press the ▲ or ▼ button to select DNIe, then press the ENTER button. 3 Press the ▲ or ▼ button to select Off, Demo or On then press the ENTER button. • Off : Switches off the DNIe mode.
Setting the Blue Only Mode This function is for AV device measurement experts. This function displays the blue signal only by removing the red and green signals from the video signal so as to provide a Blue Filter effect that is used to adjust the Color and Tint of video equipment such as DVD players, Home Theaters, etc.
Preventing Screen Burn-in To reduce the possibility of screen burn, this unit is equipped with screen burn prevention technology. This technology enables you to set picture movement up/down (Vertical Line) and side to side (Horizontal Dot). The Time setting allows you to program the time between movement of the picture in minutes. 1 Follow the Activating Picture Options instructions numbers 1 and 2.
Resetting the Picture Settings to the Factory Defaults 1 2 To select the desired picture mode, follow the Activating Picture Options instructions numbers 1. (see page 25) TV Picture More Picture Options Reset ▲ Press the ▲ or ▼ button to select Reset, then press the ENTER button. Press the ◄ or ► button to select OK or Cancel then press the ENTER button. Press the EXIT button to exit. ➢ Each mode can be reset.
Customizing the Sound The sound settings can be adjusted to suit your personal preference. 1 Press the MENU button to display the menu. Press the ▲ or ▼ button to select Sound, then press the ENTER button. TV Sound Mode : Custom Equalizer SRS TS XT : Off MTS : Stereo Auto Volume : Off TV Speaker : On Sound Select : Main 2 Press the ▲ or ▼ button to select Equalizer, then press the ENTER button. Move 3 Press the ◄ or ► button to select a particular frequency to adjust.
Choosing a Multi-Channel Sound (MTS) Track - Analog Depending on the particular program being broadcast, you can listen to Mono, Stereo or SAP. Multi-Track Sound 1 Press the MENU button to display the menu. Press the ▲ or ▼ button to select Sound, then press the ENTER button. TV 2 Press the ▲ or ▼ button to select MTS, then press the ENTER button. Press the ▲ or ▼ button to select a setting you want, then press the ENTER button. Press the EXIT button to exit. Move MTS is available only in TV mode.
Setting the TV Speakers On/Off Sound output from the TV speakers is muted. TV Press the MENU button to display the menu. Press the ▲ or ▼ button to select Sound, then press the ENTER button. 1 Sound Mode : Custom Equalizer SRS TS XT : Off MTS : Stereo Auto Volume : Off TV Speaker : On Sound Select : Main 2 Press the ▲ or ▼ button to select TV Speaker, then press the ENTER button. Move TV 3 Press the ▲ or ▼ button to select Off or On, then press the ENTER button. Press the EXIT button to exit.
Channel Control Adding and Erasing Channels Using the Channel Manager, you can conveniently lock or add channels. 1 Press the MENU button to display the menu. Press the ▲ or ▼ button to select Channel, then press the ENTER button. TV Channel Air/Cable : Air Auto Program Channel Manager Fine Tune Color System : Auto 2 Press the ▲ or ▼ button to select Channel Manager, then press the ENTER button. Move 3 Press the ENTER button to select Channel List.
Activating the Child Lock This feature allows you to prevent unauthorized users, such as children, from watching unsuitable programmes by muting out video and audio. Child Lock cannot be released using the buttons on the side. Only the remote control can release the Child Lock setting, so keep the remote control away from children. 1 Press the MENU button to display the menu. Press the ▲ or ▼ button to select Channel, then press the ENTER button.
Fine Tuning Analog Channels Use fine tuning to manually adjust a particular channel for optimal reception. 1 Press the MENU button to display the menu. Press the ▲ or ▼ button to select Channel, then press the ENTER button. TV Channel Air/Cable : Air Auto Program Channel Manager Fine Tune Color System : Auto 2 Press the ▲ or ▼ button to select Fine Tune, then press the ENTER button. Move 3 Press the ◄ or ► button to adjust the fine tuning.
PC Display Using Your TV as a Computer (PC) Display Setting Up Your PC Software (Based on Windows XP) The Windows display-settings for a typical computer are shown below. The actual screens on your PC will probably be different, depending upon your particular version of Windows and your particular video card. However, even if your actual screens look different, the same basic set-up information will apply in almost all cases. (If not, contact your computer or Video Card manufacturer.
Setting up the TV with your PC Use the Auto Adjust function to have the TV set automatically adjust the video signals it receives from the PC. The function also automatically fine-tunes the settings and adjusts the frequency values and positions. How to Auto Adjust ➢ Preset : Press the SOURCE button to select PC mode. 1 Press the MENU button to display the menu. Press the ▲ or ▼ button to select Picture, then press the ENTER button.
Changing the Screen Position Adjust the PC’s screen positioning if it does not fit the TV Screen. ➢ Preset: Press the SOURCE button to select PC mode. 1 Press the MENU button to display the menu. Press the ▲ or ▼ button to select Picture, then press the ENTER button. Press the ▲ or ▼ button to select Screen, then press the ENTER button. TV Screen Coarse Fine Position Image Reset Move 2 Press the ▲ or ▼ button to select Position, then press the ENTER button.
Time Setting Setting the Clock Setting the clock is necessary in order to use the various timer features of the TV. Also, you can check the time while watching the TV. (Just press the INFO button.) Option 1: Setting the Clock Manually 1 Press the MENU button to display the menu. Press the ▲ or ▼ button to select Setup, then press the ENTER button. Press the ▲ or ▼ button to select Time, then press the ENTER button.
Setting the Sleep Timer The sleep timer automatically shuts off the TV after a preset time (from 30 to 180 minutes). 1 Press the MENU button to display the menu. Press the ▲ or ▼ button to select Setup, then press the ENTER button. Press the ▲ or ▼ button to select Time, then press the ENTER button.
Setting the On/Off Timer 1 Press the MENU button to display the menu. Press the ▲ or ▼ button to select Setup, then press the ENTER button. Press the ▲ or ▼ button to select Time, then press the ENTER button. TV 2 Press the ▲ or ▼ button to select Timer 1, Timer 2, or Timer3, then press the ENTER button. The timer menu is displayed. Press the ▲ or ▼ button to adjust hour, then press the ► button to move to the next step. Set other items using the same method as above.
Function Description Selecting a Menu Language 1 Press the MENU button to display the menu. Press the ▲ or ▼ button to select Setup, then press the ENTER button. Press the ▲ or ▼ button to select Language, then press the ENTER button.
4 Depending on the particular broadcast, it might be necessary to make changes to Channel and Field: Press the ▲ or ▼ button to make the changes. (Follow the same procedure as in steps 3 above.) Press the EXIT button to exit. ➢ The Caption feature doesn’t work in Component, PC, HDMI modes. ➢ Different channels and fields display different information: Field 2 carries additional information that supplements the information in Field 1.
Adjusting the TV On/Off Melody Sound The TV power on/off melody sound volume can be adjusted. 1 Press the MENU button to display the menu. Press the ▲ or ▼ button to select Setup, then press the ENTER button. TV 2 Press the ▲ or ▼ button to select External Settings, then press the ENTER button. 3 Press the ENTER button to select Melody. Press the ▲ or ▼ button to select Off, Low, Medium, or High, then press the ENTER button.
Using the Energy Saving Feature This feature adjusts the power consumption of the unit in order to save energy. 1 Press the MENU button to display the menu. Press the ▲ or ▼ button to select Setup, then press the ENTER button. TV Setup Plug & Play Language : English Time Caption External Settings Entertainment : Off Energy Saving : Off AV Color System : Auto PIP Move 2 Press the ▲ or ▼ button to select Energy Saving, then press the ENTER button.
Viewing Picture-in-Picture You can use the PIP feature to simultaneously watch two video sources. (See page 34 to select the PIP picture sound.) This product has one built-in tuner, which does not allow PIP to function in the same mode. Please see ‘PIP Settings’ below for details. TV Activating Picture-in-Picture 1 Press the MENU button to display the menu. Press the ▲ or ▼ button to select Setup, then press the ENTER button. Press the ▲ or ▼ button to select PIP, then press the ENTER button.
Changing the Position of the PIP Window 5 Press the ▲ or ▼ button to select Position, then press the ENTER button. Press the ▲ or ▼ button to select the required option, then press the ENTER button. ➢ In Double Window ( ) and Double Wide ( ) modes, Position cannot be selected. TV Setup : On : TV : : : Air 4 PIP Source Size Position Channel Move Return Enter Changing the PIP Channel 6 Press the ▲ or ▼ button to select Channel, then press the ENTER button.
WISELINK Using the WISELINK Function This function enables you to view and listen to photo (JPEG) and audio files (MP3) saved on a USB Mass Storage Class (MSC) device. Press the POWER button on the remote control or front panel. Connect a USB device containing JPEG and/or MP3 files to the WISELINK jack (USB jack) on the side of the TV. If you enter the WISELINK mode with no USB device connected the message There is no device connected will appear.
Using the WISELINK Menu 1 2 Press the MENU button. Press the ▲ or ▼ button to select Input, then press the ENTER button. Press the ▲ or ▼ button to select WISELINK, then press the ENTER button. TV Input Source List : TV Edit Name Anynet+ (HDMI-CEC) WISELINK Move 3 Enter Return Press the ▲ or ▼ button to select the corresponding USB Memory Device, then press the ENTER button. ➢ The WISELINK menu differs depending on the USB Memory Device connected to TV.
Using the Movie List This menu shows Movies files and folders saved on an USB memory device. Movie 1 Complete Steps 1 to 3 of “Using the WISELINK Menu”. (Refer to page 51) 2 Press the ◄ or ► button to move to Movie, then press the ENTER button. The saved file information is displayed as a folder or file. 3 P ress the ▲ or ▼ button to move to an icon, then press the ENTER button. • Press the / ENTER button over a movie icon to play the movie.
Using the PHOTO (JPEG) List This menu shows JPEG files and folders saved on an USB memory device. 1 Complete Steps 1 to 3 of Using the WISELINK Menu. (Refer to page 51) 2 Press the ◄ or ► button to move to Photo, then press the ENTER button. The saved file information is displayed as a folder or file. Photo SUM 861MB/994MBFree Movie Photo 3 Press the ▲, ▼, ◄ and ► buttons to select a file. • Pressing the ENTER button over a photo icon shows the currently selected photo in full screen.
Using the Menu during a Slide Show Slide Show Speed: Select to control the slide show speed. Press the ▲ or ▼ button to select the required option(Fast, Normal, Slow), then press the ENTER button. Slide Show Speed : Normal Fast Background Music : On Normal Background Music Setting Slow List Exit Background Music: Select to choose whether you want to play an MP3 file during a slide show. Press the ▲ or ▼ button to select the required option(On, Off), then press the ENTER button.
Using the Option Menu 1 2 3 4 Complete Steps 1 to 3 of Using the WISELINK Menu. (Refer to page 51) Press the ◄ or ► button to move to Photo, then press the ENTER button. The saved file information is displayed as a folder or file. Press the ▲, ▼, ◄ and ► button to select a file, then press the ENTER button. Pressing the button over a photo thumbnail displays the photo in full screen.
Using the MP3 List This menu shows MP3 files from among the files saved on a USB memory device. 1 2 3 4 Complete Steps 1 to 3 of Using the WISELINK Menu. (Refer to page 51) Press the ◄ or ► button to move to Music, then press the ENTER button. The saved file information is displayed as a folder or file. Press the ▲ or ▼ button to move to an icon, then press the ENTER button. ➢ Pressing the ENTER button over a musical note icon immediately plays the music file.
Using the Setup Menu Setup displays the user settings of the WISELINK menu. 1 2 3 4 Complete Steps 1 to 3 of Using the WISELINK Menu. (Refer to page 51) Press the ◄ or ► button to move to Setup, then press the ENTER button. Press the ▲ or ▼ button to select an item you want, then press the ENTER button. (Slide Show Speed, Background Music, Background Music Setting, Repeat Music, Screen Saver) Press the ▲ or ▼ button to select the option, then press the ENTER button. To exit WISELINK mode, press the W.
Repeat Music: Select to determine whether to repeat playing the music when all MP3 files in the current folder have been played. Slide Show Speed : Fast Background Music : On Background Music Setting Off Repeat Music : On Repeat Movie On : Off Screen Saver : 5 min Move Enter Return Repeat Movie: Select to determine whether to repeat playing the movie when all Movie files in the current folder have been played.
About Anynet+ What is Anynet+? Anynet+ is an AV network system that enables you to control all connected Samsung AV devices with your Samsung TV’s remote. Connecting Anynet+ Devices The Anynet+ system can be used only with Samsung AV devices that have the Anynet+ feature. To be sure your Samsung AV device has this feature, check if there is an Anynet+ mark on it.
Setting Up Anynet+ The following settings are to use Anynet+ functions. To use the Anynet+ Function, Anynet+ (HDMI-CEC) must be set to On 1 2 Press the MENU button to display the menu. Press the ▲ or ▼ button to select Input, then press the ENTER button. TV P1 View TV Press the ▲ or ▼ button to select Anynet+ (HDMI-CEC), then press the ENTER button. Select Device Record Menu on Device 3 Press the ▲ or ▼ button to select Setup, then press the ENTER button.
Anynet+ Menu The Anynet+ menu changes depending on the type and status of the Anynet+ devices connected to the TV. Anynet+ Menu Description View TV Switches from Anynet+ to TV broadcast mode. Record Starts a recording. (This menu works only for a device supporting recording.) (Device_Name) Menu Shows the menu of the connected device. Example: When a DVD Recorder is connected, the DVD Recorder’s title menu appears. (Device_Name) Operation Shows the play control menu of the connected device.
Listening through a Receiver (Home theater) You can listen to sound through a receiver instead of the TV speaker. 1 2 Press the MENU button to display the menu. Press the ▲ or ▼ button to select Input, then press the ENTER button. Press the ▲ or ▼ button to select Anynet+ (HDMI-CEC), then press the ENTER button. 3 Press the ▲ or ▼ button to select Receiver, then press the ENTER button. 4 5 Press the ◄ or ► button to select to On, then press the ENTER button.
Appendix Troubleshooting If the TV seems to have a problem, first try this list of possible problems and solutions. If none of these troubleshooting tips apply, call your nearest Samsung service center. Problem Poor picture quality. Poor sound quality. No picture or sound. No sound or sound is too low at maximum volume. Picture rolls vertically. The TV operates erratically. The TV won’t turn on. Remote control malfunctions Possible Solution Try another channel. Adjust the antenna.
Auto Wall-Mount (Sold separately) Once the wall mount is installed, the position of your TV can be easily adjusted. Auto Wall-Mount TV Rear Panel EX-LINK Cable (Not supplied) Entering the menu 1 Press the ▲, ▼, ◄ or ► button on your remote control. The Wall Mount Adjustment screen is displayed. If the Wall Mount Adjustment screen is not displayed when clicking on a direction button while watching your TV, use the menu to display that screen. •P ress the MENU button to display the menu.
Moving to the remembered position ► Auto Wall-Mount Position 1 ► ► ► 1 Complete Step 1 of Entering the menu. 2 Pressing a Color (Red, Green, Yellow) button moves the auto wall mount to the saved position. ➢ You can move the wall mount to one of the 3 pre-set positions by pressing the Red (Position 1), Green (Position 2) or Yellow (Position 3) buttons. ➢ If you adjust the positon after moving to a pre-set position, the position display will disappear.
Wall Mount Kit Specifications (VESA) Install your wall mount on a solid wall perpendicular to the floor. When attaching to other building materials, please contact your nearest dealer. If installed on a ceiling or slanted wall, it may fall and result in severe personal injury. Product Family inch VESA Spec.
How to assemble the Stand-Base Using the 6 screws for securing the stand base and the monitor, firmly attach the monitor to the stand base. (The exterior of the set may be different than the picture.) When mounting your TV on a wall, install the cover (1) on the stand-base using two screws. Warning Firmly secure the stand to the TV before moving it, as the stand may fall and could cause serious injury. ➢ Two or more people should carry the TV.
This page is intentionally left blank. BN68-01613-00-Eng.
Informações importantes sobre a garantia com relação à visualização no formato da TV Os monitores PDP formato wide screen (16:9, relação de largura x altura da tela) são projetados essencialmente para visualizar vídeo full motion (de movimento total) no formato wide screen. As imagens exibidas na tela devem estar no formato wide screen 16:9, ou no formato expandido para preencher a tela, se o modelo oferecer esse recurso, e as imagens estiverem em movimento constante.
Instruções ao usuário Retenção da imagem na tela Não exiba uma imagem estática (como em um video game) no painel do monitor de plasma por mais de alguns minutos, uma vez que pode causar retenção da imagem na tela. Essa retenção de imagem também é conhecida como “queima da tela”. Para evitar esse tipo de retenção da imagem, consulte a página 25 deste manual para reduzir o grau de brilho e contraste da tela ao exibir uma imagem estática.
Português ÍNDICE Informações gerais CONTROLE DE CANAL ■ ■ ■ ■ ■ ■ ■ ■ ■ ■ Lista de funções.............................................................5 Acessórios.....................................................................5 Visualizando o Painel de Controle................................. 6 Visualizando o Painel de Conexão................................ 7 Controle remoto.............................................................8 Colocando pilhas no controle remoto........................
Informações gerais Lista de funções • • • • Imagem ajustável e definições de som que podem ser armazenadas na memória da TV. Temporizador automático para ligar e desligar a TV. Sleep Timer especial. Execelente qualidade de imagem Imagens nítidas e reais são proporcionadas pela tecnologia DNIe • SRS TruSurround XT A tecnologia SRS TruSurround XT oferece um sistema virtual Dolby surround. • Conexão HDMI/DVI do seu PC para esta TV. Acessórios Verifique se os itens a seguir foram incluídos com a TV.
Visualizando o Painel de Controle Botões da parte inferior à direita do painel Os botões da parte inferior à direita do painel controlam as características básicas da TV, inclusive o menu digital na tela. Para utilizar as funções mais avançadas é preciso usar o controle remoto. ➢ A cor e o formato do produto podem variar, dependendo do modelo. Botões do painel frontal Toque em cada botão para operar.
Visualizando o Painel de Conexão Tomadas do painel traseiro Utilize as tomadas do painel traseiro para ligar permanentemente um componente A/V, como VCR ou DVD players. Para mais informações sobre a ligação de equipamentos, consulte as páginas 9-15. 1 ENTRADA DE ENERGIA Conecte o cabo de força fornecido. 2 AV IN 1(VIDEO / AUDIO-R/L) Entrada de vídeo para dispositivos externos, como uma camcorder ou um VCR. Entradas de áudio para dispositivos externos, como uma camcorder ou um VCR.
Controle remoto Use o controle remoto até uma distancia de aproximadamente 7 metros da TV. 1 POWER Liga/desliga o televisor. % SOURCE Pressione para exibir e selecionar todas as fontes de vídeo disponíveis. 2 TV Seleciona o modo TV diretamente. 3 BOTÕES NUMÉRICOS Pressione mudar o canal. 4 – Pressione para selecionar um canal acima de 100. Por exemplo, para o canal 122, pressione “-”, seguido de “2” e “2”. 5 MUTE Pressione este botão para cortar temporariamente o som.
Colocando pilhas no controle remoto 1 Levante a tampa localizada na parte traseira do controle remoto, conforme mostrado na figura. 2 Coloque duas pilhas de tamanho AAA. ➢ Certifique-se de combinar os pólos “+” e “–” das pilhas com o diagrama no interior do compartimento. ➢ Não misture os tipos de pilhas, ou seja, alcalinas e de manganês. 3 Feche a tampa conforme mostrado na figura. ➢ Remova as pilhas e guarde-as em um local fresco e seco, se não for utilizar o controle remoto por um longo período.
Conectando uma TV a cabo Para fazer a ligação de um sistema de televisão a cabo, seguir as instruções abaixo. Ligação a cabo sem utilizar um decodificador 1 Ligar o cabo ao terminal ANT IN na parte traseira do televisor. ➢ Como este televisor já está pronta pra uma ligação a cabo, não é necessário um decodificador para visualizar os canais da televisão a cabo decodificados. ANT IN Fazer a ligação a um decodificador para todos os canais 1 Localizar o cabo ligado ao terminal ANT OUT no decodificador.
Conectando o DVD Player ou receptor/decodificador de satélite (set-Top) via hDmI Essa conexão pode ser efetuada apenas se houver uma saída hDmI no dispositivo externo. 1 Conecte um cabo HDMI entre entre a tomada HDMI IN (1,2,3 ou 4) na TV e a tomada HDMI no DVD player/ Decodificador de TV a cabo/ receptor de Satélite (Set-Up Box).
Conectando o DVD Player ou receptor/decodificador de satélite (set-Top) via cabos Component As entradas do painel traseiro na TV facilitam a conexão do DVD Player ou receptor/decodificador de satélite (set-Top) com a sua TV. 1 Conecte cabos componentes entre as tomadas COMPONENT IN (1 ou 2) [Y, PB, PR] na TV e as tomadas COMPONENT [Y, PB, PR] no DVD Player ou decodificador de TV a cabo/receptor de Satélite (Set-Top Box).
ligar um vídeo cassete Conexão de vídeo Nestas instruções, parte-se do princípio que o televisor já esta ligado a uma antena ou sistema de televisão a cabo. (conforme instruções nas páginas -10). Ignore a etapa 1 se você ainda não tiver feito a conexão à antena ou ao sistema a cabo. 1 Desligar o cabo ou a antena da parte traseira da TV. Ligar o cabo ou a antena ao terminal ANT IN na parte traseira do VCR. Conecte um cabo de antena entre o conector ANT OUT no VCR e o conector ANT IN na TV.
Conectando um amplificador/DVD home Theater 1 Conecte os cabos de áudio entre os conectores AUDIO OUT [R-AUDIO-L] na TV e os conectores AUDIO IN [LAUDIO-R] no Amplificador/ DVD Home Theater. Painel traseiro da TV Amplificador/DVD home Theater Quando um amplificador de áudio estiver conectado aos terminais das tomadaAUDIO OUT [R-AUDIO-L]: Diminua o volume da TV e ajuste o nível do volume com o controle de volume do amplificador.
OPERAÇÃO Ligar/Desligar o televisor Pressione o botão POWER no controle remoto. Você também pode usar o botão POWER No painel frontal. ➢ A imagem completa pode demorar um pouco para aparecer. Recurso Plug & Play Quando a TV é ligada inicialmente, diversos ajustes básicos são automaticamente relaizados em sequencia para o cliente: O protetor de tela é ativado se nenhum botão for pressionado dentro de 15 Plug & Play minutos. 1 Iniciar Plug & Play Pressione o botão POWER no controle remoto.
5 Pressione o botão▲ ou ▼ para selecionar Ar, STD, HRC ou IRC, depois pressione o botão ENTER. Plug & Play Ar/Cabo 6 Pressione o botão ENTER para iniciar a pesquisa de canais. A pesquisa de canais começará e terminará automaticamente. Após a memorização dos canais disponíveis, o menu Clock Set (Definição do relógio) é exibido. Pressione o botão ENTER. ➢ Para interromper a busca antes de terminar, pressione o botão ENTER com Parar selecionado.
Se você quiser reinicializar esse recurso... Configuração TV Plug & Play Idioma : Português Hora Closed Caption Configurações Externas Entretenimento : Desligado Economia energia : Desligado Sistema de cor AV : Auto PIP 1 Pressione o botão MENU para exibir o menu. 2 Pressione o botão ▲ ou ▼ para selecionar Configuração, depois pressione o botão ENTER. 3 Pressione o botão ENTER novamente para selecionar Plug & Play.
Ajustando o volume Utilizando os botões de Volume 1 Pressione o botão VOL ou VOL para aumentar ou diminuir o volume. Utilizando o botão Mute A qualquer momento som pode ser bloqueado temporariamente pressionando o botão MUTE. 1 Pressione MUTE para que o som desapareça. A palavra “mudo” será exibido na tela. 2 Para desativar o silencioso, pressione novamente o botão MUTE ou simplesmente pressione o botão VOL ou VOL .
Ver os menus 1 Com o televisor ligado, pressione o botão MENU. O menu principal aparecerá na tela. O lado esquerdo tem cinco ícones: Imagem, Som, Canal, Configuração, Entrada. TV 2 Utilizar os botões ▲ ou ▼ para selecionar um dos ícones. Em seguida, pressione o botãoENTER para acessar o submenu do ícone. Mover 3 Pressione o botão EXIT para sair.
Gravar canais na memória (método automático) 1 Primeiro, selecionar a fonte de sinal correta (Air, STD, HRC ou IRC). 2 Pressione o botão ▲ ou ▼ para selecionar Prog. Auto. Pressione o botão ENTER. 3 Pressione o botão ENTER selecionar Iniciar O televisor começa a memorizar todos os canais disponíveis. Após os canais disponíveis estarem armazenados, o menu Auto Program aparecerá novamente. Pressione o botão ENTER para sair.
Para selecionar a fonte Use para selecionar a TV ou outras fontes de entrada externa como DVD players ou cabo/receptor de satélite conectadas à TV. Use para selecionar a fonte de entrada escolhida. 1 Pressione o botão MENU para exibir o menu. Pressione o botão ▲ ou o ▼ para selecionar Entrada, depois pressione o botão ENTER. TV Entrada Lista de Entradas : TV Editar Nome Anynet+(HDMI-CEC) WISELINK Mover 2 Pressione o botão ENTER para selecionar Lista de Entradas.
Controle da imagem Alterando o padrão da imagem Você pode ativar os modos Dinâmico, Padrão ou FIlme selecionado a partir do menu. 1 Pressione o botão MENU para exibir o menu. Pressione o botão ENTER para selecionar Imagem. TV Imagem 2 Pressione o botão ENTER para selecionar Modo. Pressione o botão ▲ ou ▼ para selecionar Dinâmico, Padrão ou Filme. Pressione o botão ENTER. • Dinâmico : Seleciona a imagem para alta definição em uma sala clara.
Como ajustar as configurações detalhadas A nova TV Samsung permite que você crie definições de imagem muito mais precisas do que os modelos anteriores. Para ajustar as definições de imagem detalhadas, veja abaixo. Ativação das configurações detalhadas 1 Pressione o botão MENU para exibir o menu. Pressione o botão ENTER para selecionar Imagem. TV Imagem Modo : Padrão Luz da Célula Contraste Brilho Nitidez Cor Matiz Vd50 Configurações detalhadas ▼ Mais 2 Pressione o botão ENTER para selecionar Modo.
Alterando o espaço de cores O espaço de cores é uma matriz de cores composta pelas cores vermelho, verde e azul. Selecione o espaço de cores de sua preferência e experimente as cores mais naturais. TV Configurações detalhadas Ajuste de preto : Desligado Contraste Dinâmico : Alto Gamma : 0 Espaço de cores : Nativo Estabilidade de branco Tom Flesh :0 Aprim. Margem : Ligado xvYCC : Desligado 10 P ressione o botão ▲ ou ▼ para selecionar Espaço de cores, depois pressione ENTER.
Tom de Pele Você pode realçar a tonalidade de pele na imagem. 20 P ressione o botão ▲ ou ▼ para selecionar Tom Flesh e, em seguida, o botão ENTER. TV 21 Pressione o botão ◄ ou ► para reduzir ou aumentar o valor de um item específico. Pressione o botão ENTER. ➢ A alteração do valor do ajuste atualizará a tela ajustada. Ativação do aprimoramento da margem Você pode destacar as margens de um objeto da imagem. 22 Pressione o botão ▲ ou ▼ para selecionar Aprim. Margem e, em seguida, pressione o botão ENTER.
Alterando o tamanho da tela É possível que você queira alterar o tamanho da imagem na tela. A sua TV vem com seis opções de tamanho de tela, projetadas para o melhor desempenho com tipos específicos de entrada de vídeo. O cabo ou receptor de satélite também pode ter a própria configuração de tamanhos de tela. Geralmente, você deve visualizar a TV no modo 16:9 sempre que possível. 1 Siga as instruções 1 e 2 de “Ativando as opções de imagem“.
16:9 Ajusta a imagem para o modo amplo 16:9. 4:3 Ajusta a imagem no modo normal 4:3. Zoom Amplo Amplia o tamanho da imagem acima de 4:3. Zoom O tamanho da tela quando a wide screen está verticalmente ampliada. Apenas varrer Use esta função para ver a imagem inteira sem cortes, quando houver a entrada dos sinais HDMI (720p/1080i/1080p) e Componente (1080i/ 1080p).
DNIe (Digital Natural Image engine) Esta TV inclui a função DNIe para fornecer alta qualidade visual. Se o DNIe estiver ligado, poderá visualizar a tela com o recurso DNIe ativado. Se o DNIe estiver Demo, poderá visualizar o DNIe aplicado e as imagens normais na tela para fins de demosntração. Ao utilizar estao função, você poderá ver a direrença na qualidade visual. 1 Siga as instruções “Ativando as opções de imagem” números 1 e 2.
Definindo o Modo Somente Azul Esta função é para conhecedores de dispositivos de medição de A/V. Esta função exibe somente o sinal azul através da remoção dos sinais vermelho e verde do sinal de vídeo de forma que forneça um efeito de filtro azul utilizado para ajustar a cor e a matiz de equipamentos de vídeo como DVD players, Home Theaters, etc.
Evitando queima de tela Para reduzir a possibilidade de queima de tela, esta unidade é equipada com tecnologia de prevenção contra queima de tela. Essa tecnologia permite ajustar o movimento da imagem para cima/para baixo (Linha vertical) e de um lado a outro (Ponto horizontal). A opção Hora permite programar a hora entre o movimento da imagem em minutos.
Redefinição dos ajustes de imagem para os padrões de fábrica 1 2 Para selecionar o modo de imagem desejado, siga a instrução número 1 de “Ativando as opções de imagem” (consulte a página 25) Imagem TV Mais Opções de Imagem Restaurar Padrões : ▲ Pressione o botão ▲ ou ▼ para selecionar Restaurar Padrões, depois pressione o botão ENTER. Pressione o botão ▲ ou ▼ para selecionar OK ou Cancelar, depois pressione o botão ENTER. Pressione o botão EXIT para sair.
Personalizando o som Você pode ajustar as definições de som de acordo com a sua preferência. 1 Pressione o botão MENU para exibir o menu. Pressione o botão ▲ ou ▼ para selecionar Som, depois pressione o botão ENTER. TV Som Modo : Personalizado Equalizador SRS TS XT : Desligado MTS : Estéreo Volume Automático : Desligado Alto-falante da TV : ligado Seleção do Som : Principal 2 Pressione o botão ▲ ou ▼ para selecionar Equalizador e, em seguida. o botão ENTER.
Selecionando uma trilha de som multicanal (MTS) Dependendo do programa específico transmitido, é possível ouvi-lo em Mono (Mono), Stereo (Estéreo) ou SAP. Som multitrilha 1 Pressione o botão MENU para exibir o menu. Pressione o botão ▲ ou ▼ para selecionar Som, depois pressione o botão ENTER. 2 Pressione o botão ▲ ou ▼ para selecionar MTS, em seguida pressione o botão ENTER. Pressione o botão ▲ ou ▼ para selecionar uma definição desejada, depois pressione o botão ENTER. Pressione o botão EXIT para sair.
Configurando o alto-falante da TV para Ligar/desligar A saída de som dos alto-falantes da TV é desativada. 1 Pressione o botão MENU para exibir o menu. Pressione o botão ▲ ou ▼ para selecionar Som, depois pressione o botão ENTER. Som TV 2 Pressione o botão ▲ ou ▼ para selecionar Alto-falante da TV, em seguida pressione o botão ENTER.
CONTROLE DE CANAL Configurando o Gerenciador de Canais Você pode adicionar ou excluir um canal para exibir somente os canais desejados. 1 Pressione o botão MENU para exibir o menu. Pressione o botão ▲ ou ▼ para selecionar Canal, depois pressione o botão ENTER. TV Canal Ar/Cabo : Ar Prog. Auto Gestor canais Sintonia fina Sistema de cor : Auto 2 Pressione o botão ▲ ou ▼ para selecionar Gestor canais, depois pressione ENTER. Mover 3 Pressione o botão ENTER para selecionar Lista de canais.
Ativando o bloqueio para crianças Este recurso permite que você impeça usuários não autorizados, como crianças, de assistirem a programas inadequados ao ativar o mute do vídeo e do áudio. Não é possível desativar o Bloqueio de Canais usando os botões laterais. Somente o controle remoto pode desativar o ajuste do Bloqueio de Canais, portanto mantenha-o afastado delas. 1 Pressione o botão MENU para exibir o menu. Pressione o botão ▲ ou ▼ para selecionar Canal, depois pressione o botão ENTER.
Sintonização fina dos canais analógicos Use a sintonia fina para obter a melhor recepção de um determinado canal. 1 Pressione o botão MENU para exibir o menu. Pressione o botão ▲ ou o ▼ para selecionar Canal, depois pressione o botão ENTER. TV Canal Ar/Cabo : Ar Prog. Auto Gestor canais Sintonia fina Sistema de cor : Auto 2 Pressione o botão ▲ ou ▼ para selecionar Sintonia Fina, depois pressione o botão ENTER. Mover 3 Pressione o botão ◄ ou ► para ajustar a sintonia fina.
EXIBIÇÃO DO PC Utilizando o televisor como monitor (PC) Como configurar o software do PC (baseado no Windows XP) As programações de visualização do Windows de um computador normal são apresentadas abaixo. No entanto é provável que as telas que aparecem no PC sejam diferentes; Tudo depende da versão do Windows e da placa de vídeo. Mesmo que as telas pareçam diferentes, são aplicadas, na maioria dos casos as mesmas informações de configuração básica.
Configuração da TV com o PC Utilize a função Ajuste Automático para que o televisor ajuste automaticamente os sinais de vídeo que recebe do PC. Essa função também faz a sintonia fina automática das configurações e ajusta as posições e valores de freqüência. Como Fazer o Ajuste Automático ➢ Predefinição: Pressione o botão SOURCE para selecionar o modo PC. 1 Pressione o botão MENU para exibir o menu. Pressione o botão ▲ ou o ▼ para selecionar Imagem, depois pressione o botão ENTER.
Alterar a posição da tela Ajuste o posicionamento de tela do PC se esta não se encaixar na tela da TV. ➢ Predefinição: Pressione o botão SOURCE para selecionar o modo PC. 1 Pressione o botão MENU para exibir o menu. Pressione o botão ▲ ou ▼ para selecionar Imagem, em seguida pressione o botão ENTER. Pressione o botão ▲ ou ▼ para selecionar Tela, em seguida pressione o botão ENTER. 2 Pressione o botão ▲ ou ▼ para selecionar Posição, depois pressione o botão ENTER.
Ajuste de hora Definir o relógio É necessário definir o relógio para poder utilizar as várias funcionalidades do temporizador do aparelho de televisão. Além disso, pode se saber as horas enquanto se assiste a televisão. (Basta pressionar o botão INFO.) 1 Pressione o botão MENU para exibir o menu. Pressione o botão ▲ ou ▼ para selecionar Configuração, depois pressione o botão ENTER. Pressione o botão ▲ ou ▼ para selecionar Hora, depois pressione o botão ENTER.
Definir o temporizador O sleep timer desliga automaticamente a TV depois de um tempo predefinido (de 30, 60, 90, 120, 150 e 180 minutos). 1 Pressione o botão MENU para exibir o menu. Pressione o botão ▲ ou ▼ para selecionar Configuração, depois pressione o botão ENTER. Pressione o botão ▲ ou ▼ para selecionar Hora, depois pressione o botão ENTER. 2 Pressione o botão ▲ ou ▼ para selecionar Sleep Timer e em seguida, o botão ENTER.
Definindo o temporizador como Ligado/Desligado 1 Pressione o botão MENU para exibir o menu. Pressione o botão ▲ ou ▼ para selecionar Configuração, depois pressione o botão ENTER. Pressione o botão ▲ ou ▼ para selecionar Hora, depois pressione o botão ENTER. 2 Pressione o botão ▲ ou ▼ para selecionar Temporizador 1, Temporizador 2 ou Temporizador 3, depois pressione o botão ENTER. O menu do timer é exibido.
DESCRICÃO DAS FUNÇÕES Selecionando um idioma do menu 1 Pressione o botão MENU para exibir o menu. Pressione o botão ▲ ou ▼ para selecionar Configuração, em seguida pressione o botão ENTER. Pressione o botão ▲ ou ▼ para selecionar Idioma, em seguida pressione o botão ENTER.
4 Dependendo da transmissão, pode ser necessário alterar o Canal e o Campo: Pressione o botão ▲ ou ▼ para realizar as alterações. (Siga o mesmo procedimento dos 3 primeiros passos acima.) TV Closed Caption Closed Caption Modo Canal Campo Pressione o botão EXIT para sair. ➢ ➢ ➢ O recurso Caption (Legenda) não funciona nos modos Componente, PC, HDMI. Os diferentes canais e campos exibem informações distintas: O Campo 2 oferece informações que suplementam as do Campo 1.
Ajustando o som da melódico da TV em Ligado/Desligado É possivel fazer com que a melodia seja tocada quando a TV for ligada ou delisgada. 1 Pressione o botão MENU para exibir o menu. Pressione o botão ▲ ou ▼ para selecionar Configuração, depois pressione o botão ENTER.
Usando o recurso Economia energia Este recurso ajusta o brilho da TV, a fim de reduzir o consumo de energia. Ao assistir TV à noite, ajuste a opção do modo Economia energia para Alta para reduzir o cansaço dos olhos e também o consumo de energia. Configuração TV 1 Pressione o botão MENU para exibir o menu. Plug & Play ► Pressione o botão ▲ ou ▼ para selecionar Configuração, depois pressione o Idioma : Português ► Hora ► botão ENTER.
Visualizando Picture in Picture (PIP) É possível utilizar a função PIP para ver simultaneamente duas fontes de vídeo. (Consulte a página 34 para selecionar o som de imagem PIP.) Este produto tem um sintonizador interno que não permite que o PIP funcione no mesmo modo. Consulte “Ajustes PIP” abaixo para obter mais detalhes.
Alterando a posição da janela PIP 5. Pressione o botão ▲ ou ▼ para selecionar Posição, depois pressione o botão ENTER. Pressione o botão ▲ ou ▼ para selecionar a opção desejada, depois pressione o botão ENTER. ➢ Nos modos ( disponível. ) (Janela dupla) e ( PIP TV PIP Origem Tamanho Posição Canal : Ligado : TV : : : Air 43 ) (Largura dupla), Posição não está Mover Entrar Retornar Alterando o canal PIP 6. Pressione o botão ▲ ou ▼ para selecionar Canal, depois pressione o botão ENTER.
WISELINK Utilizando a Função WISELINK Esta função permite exibir e ouvir arquivos de foto (JPEG) e áudio (MP3) salvos em um dispositivo de Classe de armazenamento em massa USB (MSC). Pressione o botão POWER no controle remoto ou no painel frontal. Conecte um dispositivo USB contendo arquivos JPEG e/ou MP3 na tomada WISELINK (tomada USB) na lateral da TV. Se você inserir o modo WISELINK, mas não tiver nenhum dispositivo USB conectado, a mensagem Não há nenhum dispositivo conectado será exibida.
Utilizando o menu WISELINK 1 Pressione o botão MENU. Pressione o botão ▲ ou ▼ para selecionar Input(Entrada), em seguida, pressione o botão ENTER. 2 Pressione o botão ▲ ou ▼ para selecionar WISELINK e, em seguida, o botão ENTER. TV Entrada Lista de Entradas : TV Editar Nome Anynet+ (HDMI-CEC) WISELINK Mover ► ► Entrar Retornar 3 Pressione o botão▲ ou ▼ para selecionar o Dispositivo de memória USB correspondente, em seguida, pressione o botão ENTER.
Utilizando a lista de filmes Este menu apresenta arquivos e pastas de filmes salvos em um dispositivo de memória USB. 1 Etapas completas 1 a 3 em “Utilizando o menu WISELINK”. (Consulte a página 51) 2 Pressione o botão ◄ ou ► para mover para um Filme, em seguida, pressione o botão ENTER. As informações do arquivo salvo são exibidas em uma pasta ou arquivo. 3 Pressione o botão ▲ ou ▼ para mover para um ícone, em seguida, pressione o botão ENTER. / ENTER sobre um ícone de filme para reproduzir o filme.
Utilizando a Lista de fotos (JPEG) Este menu apresenta arquivos e pastas JPEG salvos em um dispositivo de memória USB. 1 Etapas completas 1 a 3 em Utilizando o menu WISELINK. (Consulte a página 51) 2 Pressione o botão ◄ ou ► para mover para Photo, (Foto), e em seguida, pressione o botão ENTER. As informações do arquivo salvo são exibidas em uma pasta ou arquivo. Foto SUM 861MB/994MBFree Filme Foto 3 Pressione os botões ▲, ▼, ◄ e ► para selecionar um arquivo.
Utilizando o menu durante uma apresentação de slides Velocidade da apresentação de slides: Selecione para controlar a velocidade da apresentação de slides. Pressione o botão ▲ ou ▼ para selecionar a opção solicitada(Fast (Rápido), Normal, Slow (Lento)), em seguida, pressione o botão ENTER . Velocidade de Slide Show : Normal Rápido Música de Fundo : Ligado Normal Lento Config.
Utilizando o menu Opções 1 Etapas completas 1 a 3 em Utilizando o menu WISELINK. (Consulte a página 51) 2 Pressione o botão ◄ ou ► para mover para Photo, (Foto), e em seguida, pressione o botão ENTER. As informações do arquivo salvo são exibidas em uma pasta ou arquivo. 3 Pressione o botão ▲, ▼, ◄ e ► para selecionar a opção, em seguida, pressione o botão ENTER. Pressione o botão sobre um ícone de foto para exibir a foto em tela cheia.
Utilizando a lista MP3 Este menu apresenta os arquivos MP3 dentre os arquivos salvos em um dispositivo de memória USB. 1 Etapas completas 1 a 3 emUtilizando o menu WISELINK. (Consulte a página 51) 2 Pressione o botão ◄ ou ► para mover para Musica, em seguida pressione o botão ENTER. As informações do arquivo salvo são exibidas em uma pasta ou arquivo. 3 Pressione o botão ▲ ou ▼ para mover para um ícone, em seguida, pressione o botão ENTER.
Utilizando o menu Configuração Exibe as configurações do usuário no menu WISELINK. 1 Etapas completas 1 a 3 em Utilizando o menu WISELINK. (Consulte a página 51) 2 Pressione o botão ◄ ou ► para mover para Setup, em seguinda pressione o botão ENTER. 3 Pressione o botão ▲ ou ▼ para selecionar o botão desejado, em seguida, pressione o botão ENTER.
Repetir música: Selecione para determinar a repetição da reprodução da música quando todos os arquivos MP3 na pasta atual forem reproduzidos. Configuração Velocidade de Slide Show Música de Fundo : Rápido : Ligado Repetição da música Desligado : Ligado Repetição da Filme Ligado : Desligado Protetor de Tela : 5 min Mover Repetir filme: Selecione para determinar a repetição da reprodução do filme quando todos os arquivos de filme na pasta atual forem reproduzidos.
Sobre o Anynet+ O que é Anynet+? Anynet+ é uma função que permite o controle de todos os dispositivos Samsung conectados que suportam Anynet+ com o controle remoto da TV Samsung. Conexão de dispositivos Anynet+ O sistema Anynet+ pode ser usado apenas com os dispositivos da Samsung com a função Anynet+. Para verificar se o seu dispositivo Samsung possui esse recurso, verifique se existe o logotipo Anynet+ nele.
Configuração do Anynet+ As seguintes configurações usam funções Anynet+. Para usar a função Anynet+, Anynet+ (HDMI-CEC) deve estar Ligado. 1 Pressione o botão MENU para exibir o menu. Pressione o botão ▲ ou ▼ para selecionar Entrada, depois pressione o botão ENTER. Pressione o botão ▲ ou ▼ para selecionar Anynet+ (HDMI-CEC), depois pressione ENTER. Pressione o botão ▲ ou ▼ para selecionar Configuração, depois pressione o botão ENTER.
Menu Anynet+ O menu Anynet+ muda de acordo com o tipo e o estado dos dispositivos Anynet+ conectados à TV. Menu Anynet+ Descrição Ver TV Muda de Anynet+ para modo de transmissão TV. Gravar Inicia uma gravação. (Este menu somente funciona para um dispositivo que realiza gravação.) Menu (Nome_do_dispositivo) Mostra o menu do dispositivo conectado. Exemplo: Se há um gravador de DVD conectado, é exibido o menu com o título do gravador de DVD.
Como ouvir através do receiver (Home theater) É possível ouvir o som através de um receiver em vez dos alto-falantes da TV. 1 2 Pressione o botão MENU para exibir o menu. Pressione o botão ▲ ou ▼ para selecionar entrada, em seguida pressione o botão ENTER. Pressione o botão ▲ ou ▼ para selecionar Anynet+ (HDMI-CEC), depois pressione ENTER. 3 Pressione o botão ▲ ou ▼ para selecionar Receiver, em seguida pressione ENTER. 4 Pressione o botão ▲ ou ▼ para selecionar Ligado, depois pressione ENTER.
APÊNDICE Solução de problemas Se a TV aparenta ter um problema, consultar antes esta lista de possíveis problemas e soluções. Caso nada disto funcione, entre em contato com o centro de atendimento ao cliente da Samsung mais próximo. Problema Má qualidade de imagem Solução possível Tente outro canal. Ajuste a antena. Verifique todas ligações de cabos. Som com qualidade deficiente. Tente outro canal. Ajuste a antena. Sem imagem ou som. Tente outro canal. Pressione o botão SOURCE.
Montagem na parede (vendido separadamente) Depois que o suporte de parede for instalado, a posição da TV pode ser ajustada facilmente. Painel traseiro da TV Suporte automático de parede Cabo EX-LINK (não fornecido) Entrando no menu 1 Pressione o botão ▲, ▼, ◄ ou ► no controle remoto. ➢ A tela de ajuste de suporte de parede é exibida. ➢ Se a tela de ajuste do suporte de parede não for exibida ao clicar em um botão de direção enquanto você assiste TV, use o menu para exibir a tela.
Mudando para a posição relembrada 2 Se você pressionar um botão de cor (Vermelho, Verde, Amarelo), o suporte de parede automático irá para a posição salva. Você pode mover o suporte de parede para uma das 3 pré-posições, pressionando os botões Vermelho (Posição 1), Verde (Posição 2) ou Amarelo (Posição 3). ➢ Se você ajustar a posição após mudar para a posição de pré-ajuste, a exibição da posição desaparecerá. ➢ Para instalação, consulte o Manual de instalação fornecido com o suporte de parede.
Especificações do kit de montagem na parede (VESA) Instale seu suporte de montagem em uma parede sólida e perpendicular ao chão. Ao instalar em outros tipos de materiais ou construção, entre em contato com o respectivo fornecedor mais próximo. Se instalado em um teto ou em uma parede com inclinação, ele poderá cair e ocasionar algum dano pessoal grave. Família de produto polegadas Especif.
Como montar a Base Prenda o monitor firmemente à sua base com os 6 parafusos indicados para essa fixação. (A parte externa do aparelho pode ser diferente do que está na figura.) Ao montar a TV na parede, instale a tampa (1) da base usando dois parafusos. Aviso Prenda o suporte com firmeza à TV antes de movê-la, uma vez que o suporte pode cair e causar ferimentos graves. ➢ Duas ou mais pessoas devem levantar a TV. Nunca deite a TV no chão para evitar danos à tela.
Esta página foi deixada em branco. BN68-01613-00-PRBP.
Esta página foi deixada em branco. BN68-01613-00-PRBP.