MX-FS9000 PREMIUM HI-FI Component System MP3/WMA/CD-DA Playback with CD/USB user's manual Imagine the possibilities Thank you for purchasing this Samsung product. To receive more complete service, please register your product at www.samsung.com/register MX-FS9000-ZA-ENG_130401.
Safety Warnings TO REDUCE THE RISK OF ELECTRIC SHOCK, DO NOT REMOVE THE COVER (OR BACK). NO USER-SERVICEABLE PARTS ARE INSIDE. REFER SERVICING TO QUALIFIED SERVICE PERSONNEL. CAUTION RISK OF ELECTRIC SHOCK DO NOT OPEN This symbol indicates “dangerous voltage” inside CAUTION : TO PREVENT ELECTRIC SHOCK, This symbol indicates important instructions the product that presents a risk of electric shock or MATCH WIDE BLADE OF PLUG TO WIDE SLOT, FULLY accompanying the product. personal injury. INSERT.
Important Information on Use Precautions • Ensure that the AC power supply in your house complies with the identification sticker located on the back of your product. • Install your product horizontally, on a suitable base (furniture), with enough space around it for ventilation (7.5~10cm). • Do not place the product on amplifiers or other equipment which may become hot. Make sure the ventilation slots are not covered. • Do not stack anything on top of the product.
Contents Contents Thank you for buying this SAMSUNG Hi-Fi-Component system. Please take time to read these instructions. They will allow you to operate your system with ease and take full advantage of its features. Move FOLDER....................................... 12 How to safely remove the USB device....... 12 Read Before Using the USB Storage Devices.................................................. 12 Bluetooth...................................................... 12 What is Bluetooth?.................
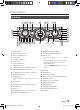
Description Front Panel 1 2 3 4 5 6 7 8 9 10 11 12 13 33 32 14 15 16 31 17 30 29 28 27 26 25 24 23 22 21 20 19 18 1. DELETE button 20. REMOTE CONTROL SENSOR 2. EASY SEARCHING JOG 21. BACKWARD SEARCH/SKIP button 3. DISPLAY/ DEMO button 4. STOP button 5. CD/ Bluetooth button 22. AUX IN 1 jack Connecting an external device such as an MP3 player. 6. Display Panel 7. PLAY/PAUSE button 8. TUNER/AUX button 9.
Description Rear Panel 7 6 1 2 3 4 5 1. FM Antenna Connector Terminal 1. Connect the FM antenna to the FM antenna connector terminal. 2. Slowly move the antenna wire until you find a location where reception is good, then fasten it to a wall or other rigid surface. 3. If reception is poor, you may need to install an outdoor antenna. To do so, connect an outdoor FM antenna to the FM antenna connector terminal of the product using a 75Ω coaxial cable (not supplied). 2.
Description Remote Control 30 1 29 USB 2 3 CD/ 28 4 5 6 27 7 8 9 10 11 12 26 13 21 20 19 14 15 16 17 25 24 23 22 AH59-02553A 1. 2. 3. 4. POWER TUNER/AUX USB Number(0~9) button During playback, press the desired track number. The selected track is played. 17. 18. 19. 20. 21. MY KARAOKE MIC VOLUME -, + USB REC DELETE M ono/Stereo for FM, CD REC SPEED for CD Ripping 5. 6. 7. 8. 9. 10. SKIP (-10, +10) SKIP STOP PLAY REPEAT GIGA 11. 12. 13. 14. 15. 16.
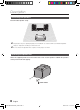
Description Connecting the Speakers Recommended speaker setup. ☛ The product may not operate properly if not installed in accordance with recommended speaker setup, or exposed to shaking or external shocks. ☛ Do not stretch the speaker wires or place a heavy object on them. Attaching the speaker feet Attach the supplied speaker feet to the bottom rear corner of each speaker to stabilize the speakers and to prevent them from slipping. FOOT Rubber 8 English MX-FS9000-ZA-ENG_130401.
Basic Functions The Display function You can view all functions available on the display, adjust the brightness of the display and set the Display/LED either on or off. Each time you press the DISPLAY/DEMO button, the display mode will change as follows: ◆◆ The Dimmer function The Dimmer function is selected and the display darkens. ◆◆ LED OFF The LED is turned off while the dimmer function is working. ◆◆ Clock ON The clock you set is displayed. ◆◆ Display/LED ON All displays and the LED are turned on.
Basic Functions Selecting a Track You can select a desired track while the disc is being played. To play the previous track Press the [ button within 3 seconds after the current track has started playing. Press the [ button twice at least 3 seconds after the current track has started playing. To play the next track Press the ] button. To play the current track from the beginning Press the [ button 3 seconds after the current track track has started playing.
Basic functions 3. Use the [ or ] button to move to a desired track. • Press [ to move to the previous track. • Press ] to move to the next track. ) button to confirm your 4. Press the ENTER ( selection. The selection is stored and is displayed. 2. 3. 4. ➣➣ To remove the USB device If you press the Stop ( @ ) button once again, you can remove the USB device safely. 5. To select another track, follow Steps 3 and 4 above. 6. Press the PLAY (+) button to play the programmed tracks. 7.
Basic Functions 4. Press the ENTER button on the remote control. Bluetooth The selected file will be deleted. ☛☛The NTFS file system is not supported. To Skip Next 10 Files 1. Press the +10 or -10 button while in playback mode. The unit will skip as many as 10 tracks forward or 10 tracks back from the current track. Move FOLDER Press the remote control's TUNING/ALBUM ,, . button to move to the previous/next folder. How to safely remove the USB device 1. 2.
Basic functions • If the Bluetooth device has failed pair with the product, delete the previous “[Samsung] HI-FI XXXXXX” found by the Bluetooth device and have it search for the product again. 5. Play music on the connected device. • You can listen to the music playing on the connected Bluetooth device over the Hi-Fi Component system. • In Bluetooth mode, some model's Play/Repeat/Stop/ Next/Back functions are not available.
Basic Functions `` When My Karaoke is on, EQ and GIGA SOUND do not work. `` When you stop playing the CD or USB, My Karaoke turns off automatically. `` My Karaoke is only available when a microphone is connected to the HI-Fi Component. 10 Skip Function Press the +10 or -10 button while the unit is in playback mode. The unit will skip as many as 10 tracks forward or 10 tracks back from the current track.
Advanced Functions Timer Function 4. Set the timer switch-off time. a P ress the TUNING/ALBUM , or . button to set the hours. ) button. b P ress the ENTER ( Result: The minutes flash. the TUNING/ALBUM , or . button to set c Press the minutes. ) button. d Press the ENTER ( Result: V OLUME XX is displayed, where XX corresponds to the volume already set. 5. ress the TUNING/ALBUM , or . button to adjust the P volume level and press the ENTER ( ) button.
Advanced Functions • The maximum length of time for tuner timer recording is 5 hours. • If the timer switch on and off times are identical, the word ERROR is displayed. • You can use the [, ] buttons on the product instead of the TUNING/ALBUM , or . button to make adjustments in Steps 3 through 8. • If the switch-on or -off time is the same as the timer recording time, only the switch-on or -off time is effective, and the timer recording is not applied.
Advanced functions • The WMA/MP2 file just can be copied not recorded. • Do not disconnect the USB device or the AC Cord during recording. You can cause file damage. • If you disconnected the USB device during recording, the product will turn off and you will not be able to delete the file that has been recorded. If his occurs, connect the USB device to a PC, back up the USB data to the PC, and then reformat the USB device.
Advanced Functions BEAT WAVING Function The Beat Waving function lets you change the Speaker LED display mode. 1. Each time you press the BEAT WAVING button on the product, the Speaker LED display mode changes as follows: PARTY 1 ; PARTY 2 ; FUN 1 ; FUN 2 ; PURE ; FRESH ; LOVE ; JOY ; SUNSET ; SUNRISE ; NATURE 1 ; NATURE 2 ; WAVE 1 ; WAVE 2 ; AURORA ; OFF • If you select BEAT WAVING OFF, all the speaker LED displays are turned off.
Troubleshooting Troubleshooting Refer to the chart below when this product does not function properly. If the problem you are experiencing is not listed below or if the instruction below does not help, turn off the product, disconnect the power cord, and contact the nearest authorized dealer or Samsung Electronics Service Center. Symptom Check/Remedy I cannot eject the disc. • Is the power cord plugged securely into the outlet? • Turn off the power and then turn it back on.
Specifications Specifications General FM Tuner CD Disc Amplifier Power Requirements Main unit Weight Speakers Main unit Dimensions Each Speaker Operating Temperature Range Operating Humidity Range Signal/Noise ratio Usable sensitivity Total harmonic distortion CD : 12 cm (COMPACT DISC) AC110-120V~ 50/60Hz 80W 8 Kg (17.64 pounds) 70 Kg (154.32 pounds) 23.1 in. x 9.4 in. x 15.3 in. (588mm (W) X 238mm (H) X 388mm (D)) 23.1 in. x 34.7 in. x 22.7 in.
Warranty LIMITED WARRANTY TO ORIGINAL PURCHASER This SAMSUNG brand product, as supplied and distributed by Samsung Electronics America, Inc.
QUESTIONS OR COMMENTS? COUNTRY CALL OR VISIT US ONLINE AT WRITE U.S.A 1-800-SAMSUNG (726-7864) www.samsung.com Samsung Electronics America, Inc. 85 Challenger Road Ridgefield Park, NJ 07660 AH68-02612A-00 MX-FS9000-ZA-ENG_130401.