User’s Manual Thank you for buying a Samsung Camera. This manual will guide you through using the camera, including capturing images, downloading images and using the application software. Please read this manual carefully before using your new camera.
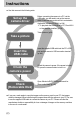
Instructions ƈ Use this camera in the following order Set up the camera driver Before connecting the camera to a PC, via the USB cable, you will need to set up the camera driver. Install the camera driver that is contained in Application software CD-ROM. (p.138) ſ To play back the movie clip on a PC, DirectX 9.0 or later must be installed. (p.138) Take a picture. (p.
Contents READY ƃGetting to know your camera ƃDanger ƃWarning ƃCaution ƃSystem chart ƃIdentification of features ƈFront ƈSide (Left/ Right) ƈTop ƈBack ƈBottom ƈSelf-timer lamp ƈCamera Status Lamp ƈMode icon ƃBefore using the camera ƈConnecting to a Power Source ƈUsing the battery ƈRemoving the battery ƈHow to charge the rechargeable battery ƈAC adapter (SAC-81, DC 8.
Contents ƃSave/ Load a specific camera configuration (MySET) 78 ƃSpot AE point 79 PLAY ƃStarting play mode ƃLCD monitor indicator ƈRear LCD/ Finder LCD ƈTop LCD ƃThumbnail button/ Enlargement button ƃDisplay/ Information button ƃAlbum mode ƃ5-function button ƃRemote control ƃDelete button ƃSetting up the play back function using the LCD monitor ƃStarting the slide show ƃProtecting images ƃDeleting images ƃVoice memo ƃResize ƃRotating an image ƃDPOF ƃDPOF : STANDARD ƃDPOF : INDEX ƃDPOF : PRINT SIZE ƃPictBri
Getting to know your camera Thank you for buying a Samsung Digital Camera. ƃ Prior to using this camera, please read the user manual thoroughly. ƃ When you require After Sales service, please bring the camera and the cause of the camera malfunction (such as battery, Memory card etc.) to the A/S centre. ƃ Please check that the camera is operating properly prior to when you intend to use it (e.g. for a trip or an important event) to avoid disappointment.
Danger ƈ Do not attempt to modify this camera in any way. This may result in fire, injury, electric shock or severe damage to you or your camera. Internal inspection, maintenance and repairs should be carried out by your dealer or Samsung Camera Service centre. ƈ Please do not use this product in close proximity to flammable or explosive gases, as this could increase the risk of explosion. ƈ Should any form of liquid or a foreign object enter the camera, do not use it.
Caution ƈ Leaking, overheating, or burst batteries could result in fire or injury. ҮUse batteries with the correct specification for the camera. ҮDo not short circuit, heat or dispose of battery in fire. ҮDo not insert the batteries with the reverse polarities. ƈ Remove the batteries when not planning to use the camera for a long period of time. Batteries may leak corrosive electrolyte and permanently damage the camera's components. ƈ Do not fire the flash while it is in contact with hands or objects.
System chart Please check that you have the correct contents before using this product. To buy the optional equipment, contact your nearest Samsung dealer or Samsung service centre. < Included items > Camera case DPOF compatible printer (see p.103) Flash plate AC adapter ŝ8Ş Remote control User manual, Warranty card Camera strap Software (p.137) CF (CompactFlash) card (p.
System chart System Requirements Computer (p.144) USB cable PictBridge compatible printer (see p.105) AV cable For Windows ҮPC with processor better than Pentium II 450MHz (Pentium 700MHz or better is recommended) ҮWindows 98/ 98SE/ 2000/ ME/ XP ҮMinimum 64MB RAM (XP : 128MB) Ү200MB of available hard-disk space (Over 1GB is recommended) ҮUSB port ҮCD-ROM drive Ү1024x768 pixels, 16-bit colour display compatible monitor (24-bit colour display recommended) ҮDirectX 9.
Identification of features Front AF passive sensor Self-timer lamp & Auto Focus lamp Shutter button Front Jog dial (JOG 1) Microphone Remote control sensor Lens Microphone Side (Left/ Right) AF lock(AF-L) button Pop-up flash (OPEN) button/ Flash compensation button Remote control sensor Flash High Speed shutter (HS) button Focus area selection (AF-A) button Focus mode selection button Speaker Connector cover Side (Left) ŝ10Ş Memory card slot cover Side (Right)
Identification of features Top Zoom ring Zoom scale indicator Focus ring Flash EVC (Exposure Value Compensation) ring Hot shoe Shutter button Flash status lamp Drive button ISO button Mode dial Metering button Speaker Power button/ Power lamp Top LCD Self-timer button Hot shoe cap ŝ11Ş
Identification of features Back Rear Jog dial (JOG 2) Back LCD Strap eyelet Finder LCD Diopter adjustment ring LCD button ,Q[XTIa 1VNWZUI\QWV J]\\WV Connector cover SCENE/ Delete button Connectors AV port AE Lock (AE-L) button/ Thumbnail button Strap eyelet Card in use lamp Digital zoom/ Enlargement button Memory card slot cover 5-function button Play mode button Memory card slot Memory card slot USB connector port DC-in port ŝ12Ş Memory card eject lever
Identification of features Bottom Battery chamber cover & lock Tripod socket Diopter adjustment ring Battery chamber Battery chamber Battery holder ŝ13Ş
Identification of features ƈ Self-timer lamp Icon Status Description Blinking For 2 seconds, the lamp blinks quickly at 0.25-second intervals. - For the first 7 seconds, the lamp blinks at 1 second intervals. Blinking - For the final 3 seconds, the lamp blinks quickly at 0.25-second intervals. Blinking A picture will be taken after about 10 seconds and 2 seconds later a second picture will be taken.
Before using the camera Connecting to a Power Source ƈ There are two ways in which to provide the camera with power. You can use battery or alternatively, you can use the AC adaptor. ƈ Specification of SLB-1974 rechargeable battery Model SLB-1974 Type Lithium Ion Voltage, Capacity 7.4V, 1900mAh Charging time Approx. 180MIN (Using the SBC-L4) ſ To buy the exclusive AC adapter (SAC-81, DC 8.4V 1.5A), contact your nearest Samsung dealer or Samsung service centre.
Before using the camera Using the battery : If the camera does not turn on after you have inserted battery, please check whether the battery is inserted with the correct polarity (+/-). 1. Turn the battery chamber lock in the direction of the arrow (OPEN) and open the battery chamber cover. 2. Insert the battery taking note of the polarity (+/-). 3. Close the battery chamber cover and turn the battery chamber lock in the direction of the arrow (CLOSE).
Before using the camera Removing the battery 1. Turn off the camera. Turn the battery chamber lock in the direction of the OPEN mark and open the battery chamber cover. 2. Move the battery holder aside and the battery will be released. 3. Take out the battery and close the battery chamber cover. Turn the battery chamber lock in the direction of the CLOSE mark. ƈ There are 4 indicators for battery condition that are displayed on the LCD monitor.
Before using the camera ƈ How to charge the rechargeable battery 1. Plug the AC cord’s power plug into the wall outlet and insert the AC cord into the charger. 2. Place the battery in the charger as shown. ſ If the charging LED doesn’t blink as red or blinks as yellow, please check whether the battery is inserted with the correct polarity (+/-). ſ Check the battery charging status with the Charging LED of the charger.
Before using the camera INFORMATION ƃ The proper operating temperature of the charger is 0°C ~ 40°C. When you charge the battery under/over the proper operating temperature, the charger may not operate (Yellow LED is on). Charging will restart at the operating temperature and this is not camera malfunction. ƃ Samsung warrants the charger for a period of one year and the Lithium Ion battery for a period of six months from the original date of purchase of the product.
Before using the camera Instructions on how to use the memory card ƃ Be sure to format the memory card (see p.116) if you are using a newly purchased memory for the first time, if it contains data that the camera cannot recognise, or if it contains images captured with a different camera. ƃ Turn off the camera power whenever the memory card is being inserted or removed. ƃ Repeated use of the memory card will eventually reduce the memory card's performance.
Before using the camera INFORMATION ƃ When the memory card slot cover opens, the camera can't be turned on by pressing the power button. ƃ Don’t remove the memory card when the Card in use lamp is blinking as this may cause damage to data in the memory card. ƃ If the memory card slot cover is opened while data is being saved, a warning alarm sounds and the camera power is turned off after saving the data. ƈ The camera can use CF (CompactFlash) I and II type card.
Before using the camera Inserting the memory card 1. Ensure the camera is off and pull the memory card slot cover in the direction of the arrow to open. 2. Insert the memory card as shown on the memory slot cover. 3. To close, push the memory card slot cover until you hear a click. If the memory card does not slide in smoothly, do not attempt to insert it by force. Check the direction of insertion, and then insert it correctly. Do not insert the memory card the wrong way round.
Before using the camera Attaching the strap 1. Thread the strap through the strap eyelet on the camera as shown alongside. 2. Thread the strap back through the strap ring as shown alongside. 3. Fasten the strap as shown. 4. Repeat steps 1 ~ 3 to attach the other end of the strap to the other eyelet.
Before using the camera Attaching the lens hood ƈ When you shoot in direct or bright lighting conditions, the image quality may be deteriorated caused by unnecessary light. In this case, use the lens hood. 1. Attach the lens adapter to the camera by turning the lens adapter clockwise as shown alongside. ſ You can use a general purpose filter (Ґ72mm) after attaching the lens adapter. 2. Attach the lens hood by turning it clockwise.
Before using the camera Attaching the lens cap ƈ When you don’t use the camera, attach the lens cap. You can attach the lens cap as show below.
LCD indicator Rear LCD/ Finder LCD ƈ The LCD displays information about the shooting functions and selections. ƈ Refer to page 63 for more information about selecting the LCD. ڹ ں ڻ ڼ ڽ ؓ ؒ ؑ ؐ ؏ ھ ؎ ؍ ڿ ۀ ، ؋ ہ ؊ ؉ ۂ ؈ ؇ ؆ ۃ ۄ ۅ ۆ ۇ [ Image & Full status ] No. Description 1 Drive modes Icons p.36~39 Page 2 Image size p.70 3 Self-timer/ Remote control p.40~41 4 Metering p.43 5 Battery status p.17 6 High speed shutter mode/Camera shake warning p.
LCD indicator 14 Direct MF 15 Focal length/ Digital zoom p.48 16 Exposure compensation p.50 17 Flash power compensation p.58 18 Date imprint p.119 19 Flash p.57~60 20 Macro p.55~56 21 White balance p.53~54 28mmX4.0 p.44~45 22 ISO 23 Aperture value F2.2 p.30~31 p.42 24 Shutter speed 1/1600 p.30~31 25 Colour space p.77 26 Recording mode p.29~33 27 Number of available shots remaining 28 Exposure lock 29 Auto focus frame - 30 Spot zone p.79 25 p.21 p.
LCD indicator Top LCD ڽ ڼ ڻ ںڹ ۇ ۆ ۅ؆ ڿھ ۀ ؇؈ ؉ ۄۃ ۂہ ؊ Icons ؋ ، No. Description 1 Recording mode p.29~33 2 ISO p.42 3 Shutter speed 4 Camera shake warning p.34 5 Exposure lock p.51 6 Aperture value 1/1600 F2.2 Page p.30~31 p.30~31 7 Saturation p.74 8 Sharpness p.75 9 Image size p.70 10 Image quality 11 Number of shots remaining 12 Drive mode p.71 25 p.21 p.36~39 13 Metering p.43 14 Battery status p.17 15 Macro p.
LCD indicator 17 Focus lock/ Focus mode p.47~48 18 Contrast p.73 19 Compensation indicator p.50 20 Flash power compensation p.58 21 Self-timer p.40~41 22 White balance p.53~54 23 Flash p.57~60 Recording mode ƈ How to use the AUTO ( ) mode Please select this mode for quick and easy picture taking with minimal user interaction. 1. Insert the battery and memory card. (p.16, 22) 2. Press the power button to turn on the camera. (Date & Time will display for about 3 Sec. and disappear.) 3.
Recording mode ƈ How to use the PROGRAM mode ( ) Selecting the program mode will configure the camera with optimal settings. You can still manually configure all functions except the aperture value and shutter speed. Step 1~2 are the same as those for AUTO mode. 3. Select the PROGRAM mode by rotating the mode dial. 4. Press the menu button to configure advanced functions (p.67). 5. Point the camera towards the subject and compose the image by using the LCD. 6. Press the shutter button to capture an image.
Recording mode ƈ How to use the SHUTTER PRIORITY mode ( ) This mode will set the shutter speed for automatic exposure depends on the brightness of the object by automatic aperture value setting in the camera. Steps 1~2 are the same as those for AUTO mode. 3. Select the SHUTTER PRIORITY mode by rotating the mode dial. 4. Select the desired shutter speed by rotating the Front jog dial (JOG1). 5. Point the camera towards the subject and compose image by using the LCD. 6.
Recording mode ƈ How to use the MySET mode ( ) This mode allows users to save frequently used shooting settings for later use. Steps 1~2 are the same as those for AUTO mode. 3. Select the MySET mode by rotating the mode dial. 4. Press the menu button and select the [ ] menu tab. 5. Press the Right button and select the [Load Myset] menu by pressing the Up/ Down button. 6. Press the Right button and select a desired MySET number by pressing the Up/ Down button. 7.
Recording mode ƈ How to use the SCENE mode ( ) Use the menu to easily configure optimal settings for a variety of shooting situations. These include NIGHT, PORTRAIT, CHILDREN, LANDSCAPE, CLOSE UP, TEXT, SUNSET, DAWN, BACKLIGHT, FIREWORKS and BEACH & SNOW scenes. Steps 1~2 are the same as those for AUTO mode. 3. Select the SCENE mode by rotating the mode dial. 4. Press the SCENE button and scene menu will display as shown alongside. 5.
Things to Watch Out for When Taking Pictures ƈ Pressing the shutter button down half way. Lightly press the shutter button to confirm focus and flash battery charge (p.14). - When the green auto focus frame lights up, it means the camera is focused on the subject and a beep will sound. - When the flash is charged, the flash status lamp (Red) will illuminate. Press the shutter button all way down to take the picture.
Using the camera buttons to adjust the camera ƈ The RECORDING (AUTO, PROGRAM, APERTURE PRIORITY, SHUTTER PRIORITY, MANUAL, MySET, MOVIE CLIP, SCENE) mode can be set up by using the camera buttons. POWER button ƃ Used for turning the camera’s power on or off. ƃ If there is no operation during the specified time, the camera's power will be turned off automatically to save battery life. Refer to page 113 for more information about the auto power off function.
Drive button ƈ You can select various shooting modes. ƈ Drive mode ƃ Single shooting ( ) : Takes one picture only. ƃ Continuous shooting ( ) : Images will be taken continuously until the shutter button is released. ƃ High speed continuous shooting ( ) : This takes 2.5 shots per second when the shutter is pressed down and held. ƃ Ultra High speed continuous shooting ( ) : This takes 10 shots per second, when the shutter is pressed down and held.
Drive button ƈ How to set the drive mode ƃ Selecting the various modes available 1. Press the Drive button and drive mode icon will display on the LCD. 2. Select a desired drive mode by rotating the Rear jog dial (JOG 2). [ Drive mode menu ] [ Still image mode ] ƃ How to set the AEB 1. Select the AEB icon by rotating the Rear jog dial (JOG2) 2. Select a desired exposure value by rotating the Front jog dial (JOG1). - The pre-view image will display on the Rear LCD as the exposure value is changed.
Drive button 2. Select a desired focus value by rotating the Front jog dial (JOG1). 3. Press the OK or Shutter button to set the focus value. 4. Press the shutter button to capture an image. You can take 3 or 5 shots according to the selected focus value. ſ Number of shots 3 5 *ZI .7+=; ť Selectable focus value ť1, ť2, ť3, ť4, ť5, ť6 ť1&ť2, ť2&ť4, ť3&ť6 ſ You can’t select the AFB icon in the Auto recording mode and movie clip mode. ƃ How to set the WBB 1.
Drive button ƃ How to use the interval shooting 1. Select the Interval shooting icon [ ] by rotating the Rear jog dial (JOG2). 2. Press the shutter button to capture an image. Images are taken at a set interval. - After taking a picture, the camera power is turned off automatically. - After a set time, the camera power is turned on automatically and the second image is taken. - Images are taken up to a set number of shots at fixed intervals. 3.
Self-timer/ Remote button ƈ This function is often used when the photographer would also like to be in the image. ƈ Self-timer/ Remote mode - Off ( ) - 2 Sec. Self-timer ( ) - 10 Sec. Self-timer ( ) - Double Self-timer ( ) - Remote control ( ) - 2 Sec. Remote control ( : Self-timer function is off. : Pressing the shutter button will allow an interval of 2 seconds before the image is taken. : Pressing the shutter button will allow an interval of 10 seconds before the image is taken.
Self-timer/ Remote button INFORMATION ƃ Though you select a remote control icon, you can still take an image by using the shutter button of the camera. ƃ If you select the 2 Sec. remote control icon and press the shutter button of the camera, the image will be taken after 2 seconds. ƃ When you select RAW and TIFF file types, you can’t select the double self-timer.
ISO button ƈ You can select the ISO sensitivity when taking pictures. The speed or specific light-sensitivity of a camera is rated by ISO numbers. ƈ ISO - AUTO ( ): The camera’s sensitivity is automatically changed by variables such as lighting value or subject brightness. - 50, 100, 200, 400 : You can increase the shutter speed while the same amount of light is present, by increasing the ISO sensitivity. However, the image may be saturated in high luminance.
Metering button ƈ If you cannot obtain suitable exposure conditions, you can change the metering method to take better pictures. ƈ Metering methods - Multi metering ( ): Exposure will be calculated based on each parts of the LCD divided into several parts. This is suitable for general use. - CWA (Centre Weighted Average) metering ( ): Exposure will be calculated based on an average of the available light in the image area. However, the calculation will be biased towards the centre of the image area.
Zoom operation ƈ You can change the zoom rate by rotating the Zoom ring. ƃ This camera has a 15X optical zoom and a 2X and 4X digital zoom function. Using both will offer a total zoom ratio of 30X or 60X. ƃ Optical Zoom TELE Rotate the Zoom ring to the right. This will zoom into the subject i.e. the subject will appear nearer. [ Wide ] [ Tele ] ƃ Optical Zoom WIDE Rotate the Zoom ring to left. This will zoom out from the subject i.e. the subject will appear further away.
Zoom operation ƃ Digital zoom Pressing the Digital zoom button for over 1 second will enlarge the subject as shown below. Pressing the Zoom button Pressing the Zoom button x2.0 [ Off ] [ Digital zoom 2X ] x4.0 [ Digital zoom 4X ] Pressing the Zoom button INFORMATION ƃ Images taken using the digital zoom may take a little longer for the camera to process. Allow time for this to take place. ƃ The digital zoom cannot be used in RAW, TIFF and movie clip shots.
Focusing ƈ You can select the proper focus mode by switching the focus switch. ƃ AF-A : Changing the focus frame ( ) You can change the focus frame size and position according to the subject size and position by pressing the AF-A button. This function is available in the AF-S, AF-C mode. - Wide AF : This is useful when taking wide range of frame. - Fixed spot AF : The frame (White) will be fixed at the centre of the LCD. - Modifying the Spot AF position : The frame will be yellowed and blink.
Focusing ƃ AF-L : Focus lock To focus on the subject positioned outside of the centre, use this button. This function is available in the AF-S mode. - How to use the focus lock 1. Ensure the subject is in the centre of the auto focus frame. 2. Press the AF-L button. The frame turns green and Focus lock icon ( ) will display. It means the camera is focused on the subject. 3. Recompose the picture and press the shutter button. After taking an image, the Focus lock function will be cancelled.
Focusing ƃ MF : Manual Focus Where the automatic focusing is not available, for example, in very dark conditions, use the manual focus. Please be careful when using the manual focus as the picture can be blurred easily. ƃ How to set Manual focus in the Program mode You can change the focus even though the camera is focused on a subject by rotating the focus ring. This function is available in the AF-S mode. 1. Press the Menu button and select [P] menu tab. 2.
High speed shutter mode ƈ You can reduce camera shake without using the flash in this mode. ƃ How to set the High speed shutter mode 1. Press the HS (High Speed) button for over 1 second to set the High speed shutter mode. 2. The HS icon will display on the Rear LCD as shown alongside. 3. Press the shutter button to capture an image. INFORMATION ƃ Note that the noise level in the image will increase when you use the high speed shutter as the high speed shutter use higher ISO value.
Exposure control ƈ Exposure compensation This camera automatically adjusts the exposure according to the ambient lighting conditions. You can also select the exposure value by using the EVC (Exposure Value Compensation) ring. This function is available in the PROGRAM, APERTURE PRIORITY, SHUTTER PRIORITY, SCENE, MySET, MOVIE CLIP mode. ƃ How to set the Exposure Value Compensation 1. Press and hold the AE-L button. And then rotate the EVC ring. The Exposure Compensation menu will display.
Exposure control ƈ Exposure lock This camera automatically adjusts the exposure according to the ambient lighting conditions. You can change the exposure value manually by using the AE-L (Auto Exposure Lock) button in a lighting situation where there are exposure differences between a subject and background. ƃ How to set the Exposure Value Compensation 1. Ensure the subject is in the centre of the auto focus frame. 2. Move the focus frame to a subject that has the desired exposure value. 3.
5-function button ƈ The 5 function button activates the following; - Up button : While the menu is showing, press the Up button to move up the cursor up the sub menu. When the menu is not displayed on the LCD monitor, the UP button operates as the white balance button. - Down button : While the menu is showing, press the Down button to move the cursor down the submenu. When the menu is not showing, you can use the Down button to take macro pictures.
White balance ƈ The white balance control allows you to adjust the colours to appear more natural looking. ƃ How to set the white balance 1. Press the WB (Up) button and a white balance icon will display on the LCD monitor. 2. Select a desired white balance by rotating the Rear jog dial (JOG2). [ White balance icons ] AUTO : The camera automatically selects the appropriate white balance settings, depending on the prevailing lighting conditions. DAYLIGHT : For taking images outside.
White balance ƃ How to set the custom white balance White balance settings may vary slightly depending on the shooting environment. You can select the most appropriate white balance setting for a given shooting environment by setting up the custom white balance. 1. Select the CUSTOM ( ) menu of the White Balance. You can select CUSTOM 1 or CUSTOM 2 white balance. 2. Place a sheet of white paper in front of the camera so that the LCD shows only white, and then press the SHUTTER button.
Macro ƈ When the menu is not showing, you can use the MACRO/ DOWN button to take macro pictures. Unit : cm ƈ Types of focus modes and focus ranges Focus type Focus range Macro Auto Wide Tele Wide Tele 50~ū 400~ū 10~70 150~430 Super macro Wide Tele 3~70 (Focus range : 50 ~ 100m) Auto macro Wide Tele 10~ū 150~ū ƃ How to set the macro 1. Press the Macro (Down) button and the macro icon will display on the LCD. 2. Select a desired macro icon by rotating the Rear jog dial (JOG2). 3.
Macro INFORMATION ƃ If you rotate the zoom ring to the zoom mark on the barrel of the lens, macro mode will change to Auto macro (unless it is in S. MACRO mode). ƃ When the macro mode is selected, it is possible that camera shake will occur. If this is the case, use a tripod to eliminate this. ƃ When you take a picture within 10cm (MACRO focus), select the FLASH OFF mode. ƃ When you take a picture within 5cm, the AF may take a time to get exact focus range. ƈ Available focusing method, by recording mode.
Flash ƈ You can select a flash according to the shooting conditions. ƃ How to set the flash mode 1. Press the Flash button (Left) and flash mode icons display on the LCD. 2. Select a desired flash icon by rotating the Rear jog dial (JOG2). 3. Press the Flash button to set the setting. [ Flash mode icons ] ƃ How to set the pop-up flash 1. Press the Menu button and select the [P] menu tab. 2. Press the Right button and select [Pop-up] menu by pressing the Up/ Down button. 3.
Flash ƃ Flash compensation : The intensity of the flash will be controlled, according to the lighting conditions. 1. Press the Pop-up flash button and the flash will pop up. 2. Press the Pop-up flash button again and a gauge will display as shown alongside. -2 FLASH +2 +0.7 FL 3. Rotate the Front jog dial (JOG1) to select a desired intensity of flash. 4. Press the shutter button half way down to set the setting. The intensity of flash will display on the LCD.
Flash (Unit : cm, ISO 100) ƈ Flash range (Internal flash) Camera mode Wide Tele Flash range 7 ~ 600 150 ~ 300 ſ We recommend using the flash off mode in the macro and super macro mode. ƈ Flash mode indicator Icon Flash mode Description If the subject or background is dark, the camera flash will Auto Flash operate automatically. The Fill in flash icon will display in dark condition and the Flash off icon will display in bright condition.
Flash ƈ Available flash mode, by recording mode. The items indicated by settings.
External flash (optional) ƈ You can mount an external flash in accordance with the shooting conditions. ƈ If the external flash is mounted, you can’t use the internal flash. ƈ When the external flash is mounted, it is possible that camera shake will occur. We recommend using a tripod to reduce this. ƈ Refer to the user manual of the external flash (optional) for more information. ƃ How to use the external flash 1. Turn off the flash power and mount it to the hot shoe. 2.
Custom settings ƈ You can save your preferences in the [Custom] menu and load it by pressing the Custom button. ƃ How to set the Custom settings in the Program mode 1. Press the Menu button and select the [P] menu tab. 2. Press the Right button and select the [Custom] menu by pressing the Up/ Down button. 3. Press the Right button and select a desired sub menu by pressing the Up/ Down button.
LCD button ƈ You can change the display of the Rear LCD, Finder LCD and Top LCD. ƈ Refer to page 26 for more information about each LCD. ƃ How to change the display status 25 - Rear LCD is on - Top LCD is on (Icon) - Finder LCD is off 28 Pressing the LCD button Pressing the LCD button - Rear LCD is off - Top LCD is on (Icon) - Finder LCD is on Pressing the LCD button - Rear LCD is off - Top LCD is on (Icon, Pre-view) - Finder LCD is off ſ When using the Rear LCD, set the shutter speed over 1/250.
Display/ Information button ( ) ƈ You can check the recording status in the LCD. Pressing the Display/ Information button will change the display as shown below. ƈ Some information will not display in the AUTO, MOVIE CLIP and SCENE mode. Pressing the ( ) button [ Image only ] Pressing the ( ) button [ Current and last shot comparison ] [ Image & Full information ] Pressing the ( ) button [ Grid mark ] ƈ Histogram shows you the distribution of brightness in recorded images.
SCENE button ƈ Select the [Scene] submenu to automatically configure optimal settings, depending on the selected scene. ƈ If you change the camera mode, Macro (p.56), Flash (p.57), High speed shutter (p.49) and Drive mode settings (p.36) set in the Scene mode are changed to default setting automatically. Sub menu Icon [Night] Description Use this for shooting still images at night or in other dark conditions. [Portrait] To take a picture of a person.
Diopter ƈ You can see the Finder LCD clearly by rotating the diopter. ƈ The range is from -4 to +2 dpt. ƃ Diopter 1. Select the Finder LCD by pressing the LCD button (p.63). 2. While looking though the Finder LCD, rotate the diopter to the left or the right. 3. When you can see the Finder LCD clearly, adjustment is complete.
Using the LCD monitor to adjust the camera settings ƈ You can use the menu on the LCD to set up recording functions. INFORMATION ƃ The menu will not be displayed on the LCD monitor in the following circumstances : - When another button is being operated. - While image data is being processed. (when the Card in use lamp blinks) - When there is no battery capacity. ƈ The following functions are available, depending on the mode you have selected. The items indicated by Main menu are default settings.
Using the LCD monitor to adjust the camera settings Main menu Sub menu Camera working mode Page Normal Effect B&W Sepia p.72 Negative Contrast +2 ~ 0 ~ -2 p.73 Saturation +2 ~ 0 ~ -2 p.74 Soft Sharpness Normal p.75 Vivid Off Voice memo One Pic p.76 All Pics Interval/Time 1 ~ 60 min Interval/Number 2 ~ 99 pics p.39 LCD Brightness, Size, Quality Custom Effect p.62 Sharpness Voice memo Color Space sRGB Adobe RGB p.
Using the LCD monitor to adjust the camera settings Main menu Flash Synchro. Flash Pop-up Direct MF Spot AE Point Sub menu 1st Curtain 2nd Curtain Auto Manual Off On Center Focus Area Camera working mode Page p.58 p.57 p.48 p.79 * Menus are subject to change without prior notice.
Size ƈ You can select the image size appropriate for your application.
Quality ƈ You can select the compression ratio appropriate for your application of the captured images. The higher the compression ratio, the lower the picture quality. Direct MF Spot AE point Size TIFF Super Fine Quality Fine Effect Normal RAW Contrast Saturation [ Program mode ] Still image mode Mode Movie clip mode Icon RAW TIFF Sub menu RAW TIFF S.
Effect ƈ By using the camera’s digital processor, it is possible to add special effects to your images. Spot AE point Size Size Quality Negative Effect Normal Contrast B&W Sepia Saturation Sharpness [ Program mode ] [Normal] [B & W] [Sepia] [Negative] ŝ72Ş Frame Rate Negative Effect Normal Contrast B&W Sepia Saturation Custom [ Movie clip mode ] : No effect is added to the image. : Converts the image to black and white.
Contrast ƈ You can change the distinction between light and dark parts of images. ƈ You can make images with marked differences in light and shadow softer, and those with less differences more vivid. ƃ How to set the contrast in the Program mode 1. Press the Menu button and select the [P] menu tab. Size 2. Press the Right button and select the [Contrast] menu by pressing the Up/ Down button. Quality Effect Contrast 0 Saturation Sharpness Voice Memo 3.
Saturation ƈ You can change the saturation of images. ƃ How to set the saturation in the Program mode 1. Press the Menu button and select the [P] menu tab. 2. Press the Right button and select the [Saturation] menu by pressing the Up/ Down button. Quality Effect Contrast Saturation 0 Sharpness Voice Memo Interval/Time 3. Press the Right button and select a desired menu by pressing the Up/ Down button. - Setting range : +2 ~ 0 ~ -2 4. Press the OK button to set the setting.
Sharpness ƈ You can adjust the sharpness of the picture you want to take. You cannot check the sharpness effect on the LCD before you take a picture, because this function is applied only when the captured image is stored in the memory. Effect Contrast Saturation Soft Sharpness Normal Voice Memo Vivid Interval/Time Interval/Number [ Program mode ] Sub menu Soft Normal Vivid Icon Description The edges of the image are softened. This effect is suitable for editing images on your PC.
Voice memo ƈ You can add your voice-over to a stored image. ƃ Recording a voice memo in the Program mode 1. Press the Menu button and select the [P] menu tab. 2. Press the Right button and select the [Voice Memo] menu by pressing the Up/ Down button. 3. Press the Right button and select a desired menu by pressing the Up/ Down button. - [Off] : cancels the voice memo. - [One Pic] : the voice memo is added to a stored image only. - [All Pics] : the voice memo is added to all stored image. 4.
Colour space ƈ You can select how the colours are reproduced (sRGB, Adobe RGB) on the monitor or printer. ƈ Adobe RGB has more colour spectra than sRGB and it is suitable for printing and computer graphics. ƃ How to set the Colour space in the Program mode 1. Press the Menu button. and select the [P] menu tab. 2. Press the Right button and select the [Color space] menu by pressing the Up/ Down button. Interval/Time Interval/Number Custom Color Space Adobe RGB Save Myset sRGB Flash Synchro.
Save/ Load a specific camera configuration (MySET) ƈ Use the MySET mode to save frequently used camera settings (Save Myset) and use it later (Load Myset). ƃ Saving the camera configuration : Available in the PROGRAM, A, S, M shooting mode and MySET mode. 1. Use the camera buttons and menu to set the desired Interval/Number camera configuration. Custom 2. Press the menu button in any mode except AUTO, MOVIE Color Space Myset 3 CLIP and SCENE mode. Select the [P] menu tab.
Spot AE (Auto Exposure) point ƈ You can select a spot AE point where the brightness is calculated. ƃ How to set the spot AE point in the Program mode 1. Select the spot metering mode (p.43). 2. Press the Menu button and select the [P] menu tab. 3. Press the Right button and select the [Spot AE point] menu by pressing the Up/ Down button. Flash Synchro. Flash Pop-up 4. Press the Right button and select a desired menu Direct MF by pressing the Up/ Down button.
Starting play mode ƈ Turn the camera on and select Play mode by pressing the play mode button ( The camera can now play back the images stored in the memory. ). ƈ If you have turned on the camera by pressing the POWER button, you can press the PLAY MODE button once to switch to Play mode and press it again to switch to Recording mode. ƈ You can turn the power on with the play mode button. The camera is turned on in play mode. Press the play mode button again to switch to Recording mode.
Starting play mode ƈ Playing back a movie clip Steps from 1-2 are the same as those to play back a still image. 3. Select the recorded movie clip that you want to play back by using the Left/ Right button. 4. Press the Play & Pause button ( ) to play back PAUSE? a movie clip file. - To play back or pause a movie clip. Press the Play & Pause button. - To rewind the movie clip while it is playing, press the Left button. To fast forward the movie clip, press the Right button.
LCD monitor indicator Rear LCD/ Finder LCD ƈ The LCD displays shooting information about the displayed image. ƈ Refer to page 63 for more information about selecting an LCD. ں ڻ ڹ ؉ ؈ ڼ ڽ ؇ ؆ ھ ۇ ڿ ۆ ۀ ۅ ۄ ہ ۂ ۃ [ Image & Full information ] No. Description 1 Image size p.70 2 Metering p.43 3 Battery status p.17 4 Date 2005.07.01 p.117 5 Time 13:00 PM p.117 6 Contrast p.73 7 Saturation p.74 8 Quality p.71 9 Sharpness p.
LCD monitor indicator 12 Flash p.57~60 13 Macro p.55~56 14 White balance p.53~54 15 ISO p.42 16 Aperture value F2.2 p.30~31 17 Shutter speed 1/30 p.30~31 18 Colour space p.77 19 Play mode p.80 20 Folder name and Stored image number 100-0009 p.112 Top LCD ڹ ڻ ں No.
Thumbnail button/ Enlargement button ƈ In Play mode, you can use the buttons and the jog dial on the camera to conveniently set up the Play mode functions. ƈ You can view multiple pictures, enlarge a selected picture, and crop and save a selected area of an image. ƃ Thumbnail display 1. While an image is displayed full screen, press the Thumbnail button ( ). 2. The thumbnail display will highlight the image that had been showing at the time the thumbnail mode was selected.
Thumbnail button/ Enlargement button ƃ The maximum enlargement rate in proportion to the image size. Image size Maximum enlargement rate Ŧ10.20 Ŧ10.20 Ŧ10.20 Ŧ6.82 Ŧ4.64 Ŧ4.00 Ŧ3.33 INFORMATION ƃ You can tell whether the image displayed is an enlarged view by checking the image enlargement indicator shown at the bottom left of the LCD. (If the image is not an enlarged view, the indicator will not be displayed.) You can also check the area of enlargement.
Display/ Information button ( ƈ The shooting and playing back information will be displayed on the LCD. The last image stored in the memory is displayed on the LCD by pressing the play mode button. ƈ Pressing the Display/ Information button( ) in the PLAY mode will change the display as shown below. [ Shooting information ] [ Playing back information ] [ Image only ] ƈ Refer to page 82 for more information about the shooting information. ƈ The following is playing back information.
Album mode ƈ You can organise the captured still images into albums. ƈ This camera has 8 albums and each album can take up to 100 images. ƈ The album menu loading time depends on the memory card type. ƈ How to use the album ƃ Selecting the album 1. In the play mode, press the Album (Up) button. 2. Select the [ ] menu by pressing the Up/ Down button and press the Right button. Exit:OK Exit:OK Move: Move: 3. Select a desired album by pressing the Up/ Down/ Left/ Right buttons and press the OK button.
Album mode 3. Select the still images you wish to add by pressing the Up/ Down/ Left/ Right buttons and rotate the Front jog dial (JOG1). V marks are displayed on the selected images. * To cancel the selection, rotate the Front jog dial (JOG1) again. Set:OK Select:JOG1 4. Press the OK button and a confirmation window will display. Select a desired sub menu by pressing the Up/ Down button and press the OK button. [Yes] : Inserts the selected images into the album. [No] : Cancels the insertion of images.
Album mode ƃ Playing back the albums Ƅ Playing back all of the albums 1. Select [ ] menu and press the OK button. All of the albums will be selected. 2. Select the [ ] menu by pressing the Up/ Down button and press the Right button. ſYou can select [Start], [Interval], [Repeat] and [Effect] menus. - [Start] : Start the slide show - [Interval] : Set the slide show play interval - [Repeat] : Choose to repeat the slide show after finishing the first cycle.
5-function button ƈ The 5 function button activates the following. - Up button : While the menu is showing, press the Up button to move the cursor up the menu. When the menu is not displayed on the LCD, the Up button operates as the Album button. - Down button : While the menu is showing, press the Down button to move the cursor down. If a still image with a voice memo or a movie clip is playing, pressing the Down button make the files play back or pause.
Remote control ƈ After connecting the camera with an external monitor, you can see the captured image by using the remote control. ƈ Remote control is optional in some countries. ƈ In play mode, you can use the remote control to set up the play mode functions. Enlargement button Thumbnail button Display/ Information button Up/ Down/ Left/ Right button Play & Pause button ƈ See below for operation of buttons - Enlargement button : In play mode, this button enlarges the selected image.
Remote control - Display/ Information button : In play mode, you can view the information of the selected image by pressing this button. - Up/ Down/ Left/ Right button : In play mode, you can select a still image or movie clip by pressing the Left/ Right button. In play mode, different parts of the enlarged image can be viewed by pressing these buttons. In the thumbnail mode, you can move to a desired image by pressing these buttons.
Setting up the play back function using the LCD monitor ƈ PLAY mode functions can be changed by using the LCD monitor. Press the Menu button and select the [Ȟ] menu tab. The play back menu will display. The menus you can set up in Play mode are as follows. To capture an image after setting up the play menu, press the Play mode button or shutter button.
Setting up the play back function using the LCD monitor ƈ This menu is available while the camera is connected to a PictBridge supporting printer (direct connection to the camera, sold separately) with a USB cable. Menu tab Main menu Sub menu Secondary menu One Pic - All Pics - No - Yes - Images Page p.106 p.107 Auto Set Auto Postcard Card 4X6 Paper Size L 2L Letter A4 A3 Auto Full Custom Set 1 2 Layout 4 8 9 16 Auto Plain Paper Type Photo Fastphoto ŝ94Ş p.
Setting up the play back function using the LCD monitor Menu tab Main menu Sub menu Secondary menu Page Auto Draft Quality Normal Fine Auto Custom Set p.107 Date Print Off On Auto File Name Off On Standard - Index - No - Yes - No - Yes - p.108 Print p.108 DPOF Print Reset p.109 ſ Menus are subject to change without prior notice.
Starting the slide show ƈ Images can be displayed continuously at pre-set intervals. You can view the slide show by connecting the camera to an external monitor. 1. In play mode, press the Menu button and select the [Ȟ] menu tab. 2. Press the Right button and select the [Slide Show] menu by pressing the Up/ Down button. 3. Press the Right button and select a desired sub menu by pressing the Up/ Down button.
Starting the slide show ƃ Configure slide show effects : Unique screen effects can be used for the slide show. 1. Select the [Effect] sub menu by pressing the Up/ Down button and press the Right button. 2. Use the Up/ Down button to select the type of effect. [Off] : Normal display. [Effect 1] : Image moves from the top left. off Repeat [Effect 2] : The image slides diagonally from top left Effect 1 Effect to bottom right.
Protecting images ƈ This is used to protect specific shots from being accidentally erased (Lock). It also unprotects images that have been previously protected (Unlock). ƃ How to protect images 1. In play mode, press the Menu button. 2. Select the [Ȟ] menu tab and press the Right button. 3. Select the [Protect] menu by pressing the Up/ Down button and press the Right button. 4. Select a desired sub menu by pressing the Up/ Down button and press the Right button.
Deleting images ƈ Of all the files stored in the memory card, the unprotected files in the DCIM subfolder will be deleted. Remember that this will permanently delete unprotected images. Important shots should be stored on a computer before deletion takes place. The startup image is stored in the camera’s internal memory (i.e., not on the memory card) and it will not be deleted even if you delete all files on the memory card. ƃ How to delete images 1. In play mode, press the Menu button. 2.
Voice memo ƈ You can add your voice to a stored still image. ƃ How to add a voice to a still image 1. Select an image that you wish to add sound to by pressing the Left/ Right button. 2. Select the [Ȟ] menu by pressing the Menu button and press the Right button. 3. Select the [Voice Memo] menu by pressing the Up/ Down button and press the Right button. 4. Select the [On] menu by pressing the Up/ Down button and press the OK button.
Resize ƈ Change the resolution (size) of pictures taken. Select the [User Image] to save an image to be the start-up image. The resized image will have a new file name. 1. In play mode, press the Menu button and select the [Ȟ] menu tab. 2. Press the Right button and select the [Resize] menu by pressing the Up/ Down button. Protect 3. Press the Right button and select a desired sub menu Delete 640X480 by pressing the Up/ Down button. Voice Memo User Image 4.
Rotating an image ƈ You can rotate the stored images by various degrees. 1. In play mode, press the Menu button and select the [Ȟ] menu. 2. Press the Right button and select the [Rotate] menu by pressing the Up/ Down button. 3. Press the Right button and select a desired sub menu by pressing the Up/ Down button.
DPOF ƈ DPOF(Digital Print Order Format) allows you to embed printing information on your memory card’s MISC folder. Select the pictures to be printed and how many prints to make. ƈ The DPOF indicator will display on the LCD when an image that has DPOF information plays back. Images can then be printed on DPOF printers, or at an increasing number of photo labs. ƈ This function is not available for Movie clips, RAW and TIFF files.
DPOF : INDEX ƈ Images (except for movie clips and voice file) are printed as index type. 1. In play mode, press the Menu button and select the [Ȟ] menu tab. 2. Press the Right button and select the [DPOF/Index] menu by pressing the Up/ Down button. Resize 3. Press the Right button and select a desired sub menu by Rotate DPOF/Standard pressing the Up/Down button. DPOF/Index If [No] is selected : Cancel the index print setting.
PictBridge ƈ You can use the USB cable to connect this camera to a printer that supports PictBridge (sold separately) and print the stored images directly. RAW, TIFF and Movie clip files cannot be printed. You can set up the following settings from the PictBridge menu. Images : Select the pictures to be printed.
PictBridge : Picture Selection ƈ Easy printing When you connect the camera to printer in the Play back mode, you can print a picture easily. - Pressing the shutter button : Currently displayed image will be printed with the printer’s default setting. - Pressing the Left/ Right button: Selects a previous/ next image. Move Pic:Ȝ Ȟ Print:SHUTTER ƈ Select pictures to print 1. Connect the camera to your printer. The USB menu must be set to [Printer] before you connect the camera to the DPOF Print printer.
PictBridge : Print Setting ƈ AUTO SET Connect the camera to your printer. The USB menu must be set to [Printer] before you connect the camera to the Reset printer. (See p.105) Images No Auto Set 1. Select the [Auto Set] menu by pressing the Up/ Down Yes Custom Set button. Print 2. Press the Right button and select a desired sub menu DPOF Print by pressing the Up/ Down button. [No] : [Custom Set] values are kept. [Yes] : Press the OK button and a confirmation window will display.
PictBridge : Printing ƈ Printing Pictures Connect the camera to your printer. The USB menu must be set to [Printer] before you connect the camera to the Auto Set printer. (See p.105) Custom Set Standard Print 1. Select the [Print] menu by pressing the Up/ Down Index DPOF Print button. Reset 2. Press the Right button and select a desired sub menu Images by pressing the Up/ Down button. [Standard] : Print the pictures stored in the memory card in set numbers. One picture is printed on one piece of paper.
PictBridge : RESET ƈ Initialises user-changed configurations. Connect the camera to your printer. The USB menu must be set to [Printer] before you connect the camera to the Print printer. (See p.105) DPOF Print 1. Select the [Reset] menu by pressing the Up/ Down Reset No Yes Images button. Auto Set 2. Press the Right button and select a desired sub menu Custom Set by pressing the Up/ Down button. If [No] is selected : Settings will not be reset.
Setup menu ƈ In this mode, you can set up basic settings. The items indicated by are default settings. Menu tab Main menu Sub menu Secondary menu Series - Reset - Power Off 1, 3, 5 min - p.113 LCD Off Off, 10, 20, 30, 60 sec - p.114 File Page p.112 ENGLISH ጥૹ FRANÇAIS DEUTSCH ESPAÑOL ITALIANO ⁹ᷘ Language P”CCK»… PORTUGUÊS DUTCH DANSK SVENSKA SUOMI p.
Setup menu Menu tab Main menu World Time Sub menu Secondary menu Okhotsk Denver, Phoenix Wellington, Auckland Chicago, Dallas Samoa, Midway New York, Miami Honolulu, Hawaii Caracas, La Paz Alaska Buenos Aires LA, San Francisco Mid-Atlantic Page p.118 Off Imprint Date - p.119 Date & Time Sound Off Low Medium High p.120 Main LCD Brightness EVF Bright, Normal, Dark p.120 - p.121 - p.122 - p.123 - p.124 - p.
File name ƈ This function allows the user to select the file naming format. ƃ How to set the file names 1. Press the Menu button and select the [ ] menu tab. Auto Rotating 2. Press the Right button and select the [File] menu USB Reset All by pressing the Up/ Down button. File Series 3. Press the Right button and select a desired sub menu Reset Power Off by pressing the Up/ Down button.
Auto power off ƈ This function switches the camera off after a set amount of time in order to prevent unnecessary battery drainage. ƃ How to set the Auto power Off 1. Press the Menu button and select the [ ] menu tab. 2. Press the Right button and select the [Power Off] menu by pressing the Up/ Down button. 3. Press the Right button and select a desired sub menu by pressing the Up/ Down button. [1, 3, 5 min] : The power will turn off automatically if not used for the period of time specified. 4.
Auto turning off the LCD ƈ This function switches the LCD off after a set amount of time in order to prevent unnecessary battery drainage. ƃ How to set the auto turn off time 1. Press the Menu button and select the [ ] menu tab. 2. Press the Right button and select the [LCD Off] menu by pressing the Up/ Down button. 3. Press the Right button and select a desired sub menu by pressing the Up/ button. [Off] : The LCD will not turn off.
Language ƈ There is a choice of languages that can be displayed on the LCD. Even if the battery or AC adapter are removed and inserted again, the language setting will be preserved. ƃ How to set the language 1. Press the Menu button and select the [ ] menu tab. File 2. Press the Right button and select the [Language] menu Power Off by pressing the Up/ Down button. LCD Off 3. Press the Right button and select a desired sub menu Language Format by pressing the Up/ Down button.
Formatting a memory card ƈ This is used for formatting the memory card. If you run [Format] on the memory card, all images, including the protected images, will be deleted. Be sure to download important images to your PC before formatting the memory card. ƃ How to format the memory card 1. Press the Menu button and select the [ ] menu tab. Power Off 2. Press the Right button and select the [Format] menu LCD Off by pressing the Up/ Down button. Language 3.
Setting up the Date & Time ƈ You can change the date and time that will be displayed on the captured images. ƃ How to set the Date & Time 1. Press the Menu button and select the [ ] menu tab. 2. Press the Right button and select the [Date & Time] menu by pressing the Up/ Down button. 3. Press the Right button and select a desired sub menu by pressing the Up/ Down button. - Left/ Right button : Selects the year/ month/ day/ hour/ minute item. - Up/ Down button : Changes the setting value 4.
World time ƈ You can check the time of cities of various nations. ƃ How to check the time 1. Press the Menu button and select the [ ] menu tab. 2. Press the Right button and select the [World Time] menu by pressing the Up/ Down button. Format Date & Time Date Type World Time Seoul Imprint Tokyo Sound Brightness 3. Press the Right button and a world map will display as shown alongside. - Left/ Right or Rear jog dial (JOG2) : moves the red line to check the time of various cities. 4.
Imprinting the recording date ƈ There is an option to include Date/Time on still images. ƃ How to imprint the date & time 1. Press the Menu button and select the [ ] menu tab. Date & Time 2. Press the Right button and select the [Imprint] menu Date Type by pressing the Up/ Down button. World Time Imprint 3. Press the Right button and select a desired sub menu. Sound [Off] : The DATE & TIME will not be imprinted Brightness on the image file.
Sound ƈ If you set the operation sound to ON, various sounds will be activated for camera startup, when button are pressed, and if there is a card error, so that you can be aware of the camera operation status. ƃ How to set the sound 1. Press the Menu button and select the [ ] menu tab. 2. Press the Right button and select the [Sound] menu by pressing the Up/ Down button. 3. Press the Right button and select a desired sub menu. [Sound] sub menu : Off/ Low/ Medium/ High 4.
Selecting Video out type ƈ The Movie output signal from the camera can be NTSC or PAL. Your choice of output will be governed by the type of device (monitor or TV, etc.) to which the camera is connected. PAL mode can support only BDGHI. ƃ How to set the video out type 1. Press the Menu button and select the [ ] menu tab. 2. Press the Right button and select the [Video Out] menu by pressing the Up/ Down button. 3. Press the Right button and select a desired LCD by pressing the Up/ Down button.
Quick view ƈ If you enable Quick View before capturing an image, you can view the image you just captured on the LCD for the duration set in the [Quick View] setup. Quick view is possible only with still images. ƃ How to set the quick view 1. Press the Menu button and select the [ ] menu tab. 2. Press the Right button and select the [Quick View] menu by pressing the Up/ Down button. 3. Press the Right button and select a desired sub menu by pressing the Up/ Down button.
Auto rotating sensor ƈ When an image taking vertically plays back, the auto rotating sensor will rotate the image correctly. ƈ You can view the reversed image correctly without rotating the image. ƃ How to set the auto rotating sensor 1. Press the Menu button and select the [ ] menu tab. 2. Press the Right button and select the [Auto Rotating] menu by pressing the Up/ Down button. 3. Press the Right button and select a desired sub menu by pressing the Up/ Down button.
Connecting an External Device (USB) ƈ You can select an external device to which you want to connect the camera using the USB cable. ƃ How to set the external device 1. Press the Menu button and select the [ ] menu tab. Video Out 2. Press the Right button and select the [USB] menu by Quick View pressing the Up/ Down button. Auto Rotating 3. Press the Right button and select a desired sub menu Computer USB by pressing the Up/ Down button.
Setting up the MYCAM menu ƈ You can set up a start up image, start up sound, shutter sound and sound effect. The items indicated by are default settings. Menu tab Main menu Start Image Start Sound Shutter Sound Sound Effect Sub menu Page Off Logo User Image - Off Sound 1 Sound 2 Sound 3 Off Shutter 1 Shutter 2 Shutter 3 Off Effect 1 Effect 2 Effect 3 p.126 p.126 p.127 p.127 * Menus are subject to change without prior notice.
Start up image ƈ You can select the image that is first displayed on the LCD whenever the camera is turned on. ƃ How to set the start up image 1. Press the Menu button and select the [ ] menu tab. 2. Press the Right button and select the [Start Image] menu by pressing the Up/ Down button. 3. Press the Right button and select a desired sub menu by pressing the Up/ Down button. 4. Press the OK button to set the setting.
Shutter sound ƈ You can select the shutter sound. ƃ How to select the shutter sound 1. Press the Menu button and select the [ ] menu tab. 2. Press the Right button and select the [Shutter Sound] menu by pressing the Up/ Down button. 3. Press the Right button and select a desired sub menu by pressing the Up/ Down button. 4. Press the OK button to set the setting.
Important notes Be sure to observe the following precautions! ƈ This unit contains precision electronic components. Do not use or store this unit in the following locations. - Areas exposed to severe changes in temperature and humidity. - Areas exposed to dust and dirt. - Areas exposed to direct sunlight or the inside of a vehicle in hot weather. - Environments where there is high magnetism or excessive vibration. - Areas with high explosives or highly flammable materials.
Important notes ƈ Caution on Using the Lens - If the lens is subjected to direct sunlight, it could result in discoloration and deterioration of the image sensor. - Pay attention not to get fingerprints or foreign substances on the surface of the lens. ƈ If the digital camera is not used for a long period, an electric discharge can occur. It is a good idea to remove the batteries and the memory card if you do not intend using the camera for an extended period of time.
Warning indicator ƈ There are several warnings that may appear on the LCD display. Card Error ! ϛMemory card error ƍ Turn off the camera power and turn it on again ƍ Insert the memory card again ƍ Insert the memory card and format the memory card (p.
Warning indicator Set USB ϛ[USB] sub menu and connected device are not matched. ƍ Reconfigure [USB] in the [Setup] menu. Out Of Number ϛWhen selecting too many printing pages in the PictBridge menu. ƍ Select printing page within the limitation. Before contacting a service centre ƈ Please check the following The camera doesn’t switch on ϛThere is low battery capacity. ƍ Insert charged battery. The camera power ceases while in use. ϛThe battery is exhausted. ƍ Insert charged battery.
Before contacting a service centre Camera does not take images when pressing the Shutter button ϛThere is insufficient memory capacity. ƍ Delete unnecessary image files ϛThe memory card has not been formatted ƍ Format the memory card (p.116) ϛThe memory card is exhausted ƍ Insert a new memory card ϛThe camera’s power is off ƍ Turn the camera power on ϛThe batteries are exhausted ƍ Insert charged battery.
Before contacting a service centre The images don't play back ϛIncorrect file name (Violation of DCF format) ƍ Do not change the image file name Colour of image is different to the original scene ϛWhite balance or effect setting is incorrect ƍ Select appropriate White balance and effect Images are too bright ϛExposure is excessive ƍ Reset exposure compensation No image on external monitor ϛThe external monitor has not been connected properly with the camera ƍ Check the connection cables ϛThere are incorrect
Specifications Image Sensor Lens Type Effective Pixel Total Pixel Focal Length F No. Digital Zoom Electronic Viewfinder Viewfinder LCD Monitor Type Modes Focusing Range Shutter Type Speed Control Exposure Compensation ISO Equivalent High Speed Mode Modes Flash Range Recharging Time External Flash (optional) Sharpness Effect Color Space White Balance Voice Recording Date Imprinting Shooting ŝ134Ş Still Image 2/3" CCD Approx. 8.0 Mega-pixel Approx. 8.3 Mega-pixel Schneider Lens f = 7.2 ~ 108.
Specifications Shooting Movie Clip Media File Format Image Size Storage Capacity (64MB) Image Play Type Editing Interface Power Source Dimensions (WxHxD) Weight Operating Temperature Operating Humidity Camera Driver Software Application Special Features With stereo audio (recording time : memory capacity dependent) (640X480 and 25fps : up to 30 sec.
Software Notes Please ensure that you read the instruction manual carefully before use. ϛThe attached software is a camera driver and image editing software tool for Windows. ϛUnder no circumstances should all or part of either the software or the user manual be reproduced. ϛCopyrights for software are licensed only for use with a camera. ϛIn the unlikely event of a manufacturing fault, we will repair or exchange your camera.
About the software After inserting the software CD provided with this camera into the CD-ROM drive, the following window should automatically run. Before connecting the camera to the PC, you should first install the camera driver. ƈ Camera driver : This enables images to transfer between the camera and PC. This camera uses the USB Storage Driver as the camera driver. You can use the camera as a USB card reader.
Setting up the application software To use this camera with a PC, install the application software first. After this has been done, the stored images in the camera can be moved to the PC and can be edited by an image editing program. INFORMATION ƃ Close other programs before installing the application software. ƃ Before installing the application software, disconnect the USB connection. You can visit the Samsung web-site through the internet. http://www.samsungcamera.com : English http://www.
Setting up the application software 4. A window will open. Click the [Next(N) >] button. [Click !] 5. DirectX Installation is completed. Click the [Finish] button and then the Digimax Master installation will be started. * The system will not reboot even if you click the [Finish] button. * The screen shot of step 5 can can be different from the illustration depending on the system requirements. [Click !] 6. A window where you can choose the program you want to install will appear.
Setting up the application software INFORMATION ƃ If you select [Cancel] at step 7, a window for installing Digimax Reader will be displayed. 8. A window will open. Click the [Next >] button. [Click !] 9. A destination selection window will open. Click [Next >]. To copy the files to another folder, click [Browse..] and choose a folder you want. [Click !] 10. A window will open, asking you to choose a folder to which program icons will be added. Click [Next >] button.
Setting up the application software 12. Digimax Master installation is successfully completed. Click the [Finish] button to install Digimax Reader. * The screen shot of step 12 can be different from the illustration depending on the system requirements. [Click !] 13. A window will be displayed as shown alongside. Click the [INSTALL] button. - If you click the [Manual] button instructions, instructions for using Digimax reader will be displayed.
Setting up the application software 16. A destination selection window will open. Click the [Next >] button. To copy the files to another folder, click [Browse...] and choose a folder you want. [Click !] 17. Digimax Reader Installation is completed. The system will not reboot even if the [Yes, I want to restart the computer now] option is selected. ſ The screen shot of step 17 can be different from the illustration depending on the system requirements. [Click !] 18.
Setting up the application software 21. If you can see [Removable Disk] under [My computer], the camera driver installation was successful. Now you can transfer image files from the camera to PC via the USB cable. INFORMATION ƃ If you have installed the camera driver, The [Found New Hardware Wizard] may not open. ƃ On a Windows 98 or 98 SE system, the Found New Hardware Wizard dialog box opens and a window asking you to select a driver file may appear. In this case, specify "USB Driver" in the CD supplied.
Starting PC mode Ү If you connect the USB cable to a USB port on your PC and then turn on the power, the camera will automatically switch to "computer connection mode". Ү In this mode, you can download stored images to your PC through the USB cable. Ү The LCD monitor is always turned off in PC mode. Ү The Card in use lamp will blink when the files are transferring via the USB connection. ƈ Connecting the camera to a PC 1. Turn the PC power on. 2. Turn the camera power on. 3.
Starting PC mode ƈ Downloading stored images You can download the still images stored on the camera to your PC's hard disk and print them or use a photo editing software to edit them. 1. Connect the camera to your PC with the USB cable. 2. On your computer's desktop display, select [My computer] and double click [Removable Disk ƍ DCIM ƍ 100SSCAM]. The image files will then be displayed. 3. Select an image and press the right mouse button. 4. A pop-up menu will open. Click the [Cut] or [Copy] menu.
Starting PC mode 6. Press the right mouse button and a pop-up menu will open. Click [Paste]. 7. An image file is transferred from the camera to your PC. - By using [Digimax Master], you can see the stored images in the memory directly on the PC monitor and you can copy or move the image files.
Removing the USB Driver for Windows 98SE ƈ To remove the USB driver, refer to the process shown below. 1. Click [Start ƍ Settings] and click [Control Panel]. 2. Double-click [System]. 3. Select [Device manager ƍ Hard Disk Controller ƍ Samsung Digital Camera] and click the [Remove] button. [Click !] 4. Click the [OK] button. The camera is removed from the system.
Removing the USB Driver for Windows 98SE 5. Trace [Start ƍ Settings ƍ Control Panel] and double click [Add/Remove programs]. 6. The [Add/Remove Programs Properties] window will open. Click [Pro 815] and click the [Add/Remove] button. [Click !] 7. Uninstallation is complete. Click the [Finish] button and the window will disappear.
Removable Disk ƈ To use this camera as a Removable Disk, install (p.138) the USB Driver. 1. Before turning the camera power on, connect the camera to the PC with the USB cable. 2. Click [Removable Disk] under [My Computer] or [Windows Explorer]. 3. Image files stored in the Removable Disk (DCIM ƍ 100SSCAM) can be transferred to the PC. INFORMATION Important information whilst using the Removable Disk ƃ The [Removable Disk] indicator will not show when the camera power is off or the USB cable is removed.
Removing the removable disk ƈ Windows 98/98SE 1. Check whether the camera and PC is transferring a file. If the Card in use lamp blinks, you have to wait until the lamp is turned off. 2. Unplug the USB cable. ƈ Windows 2000/ME/XP (The illustrations may be different from the real display in accordance with the Windows O/S.) 1. Check whether the camera and PC is transferring a file. If the Card in use lamp blinks, you have to wait until the lamp is turned off. 2.
Removing the removable disk 6. A [Unplug or Eject Hardware] window will open. Click the [Close] button and the removable disk will be removed safely. 7. Unplug the USB cable. [Click !] Setting up the USB Driver for MAC 1. A USB Driver for MAC is not included with the software CD as MAC OS supports the camera driver. 2. Check the MAC OS. This camera is compatible with MAC OS 10.0 or later. 3. Connect the camera to the Macintosh and turn the camera power on. 4.
Digimax Master ƈ You can download, view, edit and save your digital images and movies with this software. This software is only compatible with Windows except for the Windows 98. ƈ To start the program, click [Start ƍ Programs ƍ Samsung ƍ Digimax Master]. ƃ Downloading images 1. Connect the camera to your PC. 2. A window for downloading images will display after connecting the camera and your PC. - To download the captured images, select the [Select All(A)] button.
Digimax Master 4. Select a destination and make a folder to save downloaded images and folders. - Folders will be made in order of date and images will be downloaded. - Folder names can be made as you want and images will be downloaded. - After selecting a folder that was made before, images will be downloaded. 5. Click [Next(N) >] button. [Click !] 6. A window will open as shown alongside. The destination of the selected folder will be displayed on the upper side of the window.
Digimax Master ƃ Image viewer : You can view the stored images. ڹ ڽ ھ ڿ ں ڻ ڼ - Image viewer functions are listed below. ڹMenu bar : You can select menus. File, Edit, View, Tools, Change functions, Auto download, help, etc. ںImage selection window : You can select the desired images in this window. ڻMedia type selection menu : You can select image viewer, image edit, movie edit functions in this menu.
Digimax Master ƃ Image edit : You can edit the still image. ڹ ڼ ں ڻ - Image edit functions are listed below. ڹEdit menu : You can select the following menus. [Tools] : You can resize or crop the selected image. See the [Help] menu. [Adjust] : You can modify image quality. See the [Help] menu. [Retouch] : You can change image or insert effects on the image. See the [Help] menu. ںDrawing tools : Tools for editing an image. ڻImage display window : a selected image displays in this window.
Digimax Master ƃ DNG converter : You can convert a RAW (*.dng) file into a JPEG or TIFF file format. ڹ ں ڻ - DNG converter functions are listed below. ڹHistogram display : Histogram of displayed image will be displayed. ںTools : You can edit the RAW (*.dng) files as you want [White Balance] : You can edit the colour temperature and saturation of the image. [Exposure] : You can edit the Exposure value, Contrast and gamma value. [Sharpness] : You can edit the Sharpness of the image.
Digimax Master ƃ Movie edit : You can have still images, movies, narration and music all in one movie file. ڹ ں - Movie clip edit functions are listed below. ڹEdit menu : You can select the following menus. [Add Media] : You can add other media elements to a movie. [Edit Clip] : You can change the brightness, contrast, colour and saturation. [Effects] : You can insert an effect. [Set Text] : You can insert texts. [Narrate] : You can insert a narration.
Digimax Reader ƈ Digimax Reader is a Text recognition program. You can save an image file that is captured in the Text mode, as a text file with this program. This software is only compatible with Windows. ƈ To start the program, click [Start ƍ Programs ƍ Digimax Reader]. The following screen will appear. ƈ How to use the Digimax Reader 1. Connect the camera and the PC with a USB cable and download the images that were stored in the camera to the PC.
Digimax Reader 4. Select the image you want to save as a text file. * Only an image that was taken with a SAMSUNG camera can be opened. 5. Click the Area Analysis( ) icon to scan the image. 6. Part of the image you selected will be displayed as shown. 7. Click the Character Recognition( ) icon. The part selected in the previous step will be recognized as text. 8. To save the section as a text, click the Save( ) icon. A window as shown alongside will be displayed.
Digimax Reader 9. Select the file type that you want. Selectable file types : *.TXT, *.HWP, *.DOC, *.RTF INFORMATION ƃ To get an image that can be recognized as a text : - Keep a distance that you can capture the image clearly between the subject and the camera. - The subject need to be centered. - Avoid camera shake to get a good image. ƃ Refer to the [Help] menu in Digimax Reader for further information. FAQ ƈ Please check the following if the USB connection malfunctions.
FAQ [Case 5] There is an unexpected error during file transfer ƍ Turn the camera power off and on again. Transfer the file again. [Case 6] How do I know my computer supports a USB Interface? ƍ Check the USB port in your computer or keyboard. ƍ Check the OS version. A USB Interface is available in Windows 98, 98SE, 2000, ME, XP. ƍ Check [Universal Serial Bus controllers] in Device Manager. Do the following to checks [Universal Serial Bus controllers].
FAQ [Case 9] When I open the Device Manager (by clicking Start ƍ (Settings) ƍ Control Panel ƍ (Performance and Maintenance) ƍ System ƍ (Hardware) ƍ Device Manager), there areèUnknown DeviceséorèOther Deviceséentries with a yellow question mark (?) beside them or devices with an exclamation mark (!) beside them. ƍ Right-click on the entry with the question (?) or exclamation (!) mark and select "Remove". Restart the PC and connect the camera the again.
FAQ ƈ If a PC (Windows 98) stops responding while the camera and PC are connected repeatedly ƍ If a PC (Windows 98) is turned on for a long time and the camera is connected repeatedly the PC may not recognise the camera. In this case, re-start the PC. ƈ If a PC connected with the camera stops responding while Windows is starting. ƍ In this case, disconnect the PC and the camera and Windows will start. If the problem happens continuously, set the Legacy USB Support to disable and re-start the PC.
SAMSUNG TECHWIN CO., LTD. OPTICS & DIGITAL IMAGING DIVISION 145-3, SANGDAEWON 1-DONG, JUNGWONGU, SUNGNAM-CITY, KYUNGKI-DO, KOREA 462-121 TEL : (82) 31-740-8086,8088, 8090, 8092, 8099 FAX : (82) 31-740-8398, 8111 www.samsungcamera.com SAMSUNG OPTO-ELECTRONICS AMERICA, INC. HEADQUARTERS 40 SEAVIEW DRIVE, SECAUCUS, NJ07094, U.S.A. TEL : (1) 201-902-0347 FAX : (1) 201-902-9342 WESTERN REGIONAL OFFICE 18600 BROADWICK ST., RANCHO DOMINGUEZ, CA 90220, U.S.A. TEL : (1) 310-900-5263/5264 FAX : (1) 310-537-1566 www.