Contact SAMSUNG WORLDWIDE If you have any questions or comments relating to Samsung products, please contact the SAMSUNG customer care centre. Country EIRE U.K Customer Care Centre 0818 717100 0330 SAMSUNG (7267864) Web Site www.samsung.com www.samsung.com Plasma TV user manual SUPPORT Thank you for purchasing this Samsung product. To receive more complete service, please register your product at www.samsung.com/register Model _____________ Serial No. _____________ © 2012 Samsung Electronics Co.
A detailed User’s Manual is built into your TV. For more information about how to view this e-Manual see page 33. Figures and illustrations in this User Manual are provided for reference only and may differ from actual product appearance. Product design and specifications may be changed without notice. Digital TV notice 1.
Watching the Plasma TV in 4:3 format for a long period of time may leave traces of borders displayed on the left, right and centre of the screen caused by the difference of light emission on the screen. Playing a DVD or a game console may cause similar effects to the screen. Damages caused by the above effect are not covered by the Warranty. •• After-images on the Screen. Displaying still images from Video games and PC for longer than a certain period of time may produce partial after-images.
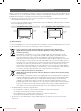
Providing Proper Ventilation for Your TV When you install your TV, maintain a distance of at least 4 inches between the TV and other objects (walls, cabinet sides, etc.) to ensure proper ventilation. Failing to maintain proper ventilation may result in a fire or a problem with the product caused by an increase in its internal temperature. ✎✎ Whether you install your TV using a stand or a wall-mount, we strongly recommend you use parts provided by Samsung Electronics only.
List of Features •• 3D: This exciting new feature enables you to view 3D content. •• SMART HUB: Using Smart Hub, you can stream movies, videos, and music from the Internet, access various for pay or free-of-charge applications and view them on your TV. •• •• •• •• −− Application content includes news, sports, weather forecasts, stock market quotes, maps, photos, and games.
Accessories ✎✎ Please make sure the following items are included with your TV. If any items are missing, contact your dealer. ✎✎ The items’ colours and shapes may vary depending on the models. ✎✎ Cables not included in the package contents can be purchased separately. ✎✎ Check that there is no accessory hidden behind packing materials when you open the box.
Using the TV's Controller (Panel Key) The TV's Controller, a small joy stick like button on the rear right side of the TV, lets you control the TV without the remote control. ✎✎ The product colour and shape may vary depending on the model. Angle adjustment wheel Camera rear Function menu m R P Remote control sensor Up(Rear) Left Right TV Controller Down(Front) ✎✎ Follow these instructions facing the front of your TV.
Standby mode Your TV enters Standby mode when you turn it off and continues to consume a small amount of electric power. To be safe and to decrease power consumption, do not leave your TV in standby mode for long periods of time (when you are away on vacation, for example). It is best to unplug the power cord. Connecting to an Aerial ✎✎ Plug the power cord into a wall outlet only after you have made all other connections.
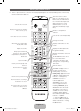
Viewing the Remote Control ✎✎ This is a special remote control for the visually impaired persons and has Braille points on the Power, Channel and Volume buttons. Turns the remote control light on or off. When on, the buttons become illuminated for a moment when pressed. (Using the remote control with this button set to On will reduce the battery usage time.) Turns the TV on and off. Displays and selects the available video sources. (p. 17) Returns to the previous channel. Cuts off the sound temporarily.
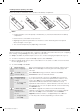
Installing batteries (Battery size: AAA) Match the polarity of the batteries to the symbols in the battery compartment. 1 2 3 ✎✎ NOTE •• Install the batteries so that the polarity of the batteries (+/-) matches the illustration in the battery compartment. •• Use the remote control within 23 feet of the TV. •• Bright light may affect the performance of the remote control. Avoid using when near special fluorescent lights or neon signs. •• The colour and shape may vary depending on the model.
5 Select Country. (Depending on the country) Select the appropriate country. ✎✎ After selecting the country in the Country menu, some models may proceed with an additional option to setup the pin number. 6 Auto Tuning (1): Selecting how you watch your TV Let’s find and store channels on your TV. Do you need to search for channels? •• Yes, I need to.: All the channels available will be found and stored on your TV. •• No, I don’t need to.
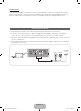
Connecting to AV Devices (Blu-ray Players, DVD Players, etc.) Using an HDMI Cable for an HD connection (up to 1080p, HD digital signals) For the best quality HD picture, we recommend using an HDMI connection. Use with DVD players, Blu-ray players, HD cable boxes, and HD Set-Top-Box satellite receivers.
•• The ARC function allows digital audio to output via the HDMI IN 2 (ARC) port on the TV. It can be enabled only when the TV is connected with an audio receiver that supports the ARC function. •• This product supports the Mobile High-Definition Link (MHL) function via an HDMI-MHL cable. Note that the MHL function is supported by the HDMI IN 3 (MHL) port only. •• The MHL function lets you display a mobile device's screen via the HDMI IN 3 (MHL) port on the TV.
Using a Component (up to 1080p) or an Audio/Video (480i only) and a Scart Cable SERVICE: Connector for service only.
Connecting to a PC Using an HDMI cable or an HDMI to DVI cable ✎✎ Your PC may not support an HDMI connection. ✎✎ Use your PC speakers for audio. PC connection HDMI Cable (Not Supplied) HDMI to DVI Cable (Not Supplied) HDMI OUT DVI OUT AUDIO OUT Audio Cable (Not Supplied) The optimal resolution is 1920 X 1080 @ 60 Hz. See the Display Resolution page for all available resolutions (page 38). ✎✎ NOTE •• For an HDMI to DVI cable connection, you must use the HDMI IN 1 (DVI) jack.
Audio Connections – Using and Optical (Digital) or a Headphone Connection DVD home theatre connection Optical Cable (Not Supplied) OPTICAL ✎✎ DIGITAL AUDIO OUT (OPTICAL) •• When a digital audio system is connected to the DIGITAL AUDIO OUT (OPTICAL) jack, decrease the volume of both the TV and the system. •• 5.1 CH (channel) audio is available when the TV is connected to an external device supporting 5.1 CH.
Changing the Input Source Source ™ → Source When you are watching TV and you want to watch a movie on your DVD player or Blu-ray player or switch to your cable box or STB satellite receiver, you need to change the Source. ■■ TV / Ext. / HDMI1/DVI / HDMI2 / HDMI3 / AV / Component 1. Press the ™ button on your remote. The Smart Hub screen appears. 2. Select Source. The Source screen appears. 3. Select a desired external input source.
SMART Interaction Using this function, you can access and control menu options and functions using speech, gestures or face recognition. INFORMATION BOOKLET DISCLAIMER •• Face Recognition Log-in In order for Face recognition to function, a thumbnail image of your face will be stored in your TV for logging-in purposes. Logging into the Smart Hub using Face recognition may be less secure than using an ID and password.
✎✎ If a menu option or function is not supported by the Voice Control function, we suggest trying the Motion control function. To use the Motion control, raise your hand while opening it toward the screen, hold it for a moment and then wave it 3–4 time to the left and right. Motion control starts. If the Motion control starts, the cursor is displayed at the center of the screen and the Motion guide bar size is at the bottom of the screen. ■■ Voice Control Turns the Voice Control function on or off.
Using the Voice Text Input Mode The Voice Text Input mode is useful especially when you search for a long sentence from sources (e.g. applications, Your Video, AllShare Play). 1. Speak "Search All" while in the Voice Control mode. ✎✎ When you use a QWERTY keypad screen, you can use the Voice Text Input Mode. Speak the Trigger words that you selected using the microphone embedded in the TV or press and hold the VOICE˜ button on your remote. 2. Say the word or phrase you wish to search for. 3.
− Brightness Test: This test checks to see if your room is bright enough for Motion control to work properly. Select Start using your remote. The test will start and should take only a few seconds. − Camera Angle Test: Start Camera Angle Test Select Start using your remote. Please put yourself in the rectangle on the screen by adjusting the camera or moving around. If you are not located in the correct position, the test may not work properly.
Face recognition Once you register your face through the camera installed on the TV, you can use the face recognition function to access the contents provided by Smart Hub that requires your login information. ™ → Tools → Settings → Account Manager → Change account information → Register face Enable or disable the Face recognition function. Lets you register your face in your Samsung account.
Connecting to a COMMON INTERFACE slot (Your TV viewing Card Slot) Attaching the CI Card Adapter Attach the adapter as shown below. To connect the CI CARD Adapter, follow these steps. ✎✎ We recommend attaching the adapter before TV Rear installing the wall mount, or inserting the “CI or CI+ CARD”. ✎✎ To install the CI card adapter, please remove the sticker attached to the TV. 1. Insert the CI CARD Adapter into the two holes on the product 1.
✎✎ NOTE •• You must obtain a “CI or CI+ CARD” from a local cable service provider. •• When removing the “CI or CI+ CARD”, carefully pull it out with your hands since dropping the “CI or CI+ CARD” may cause damage to it. •• Insert the “CI or CI+ CARD” in the direction marked on the card. •• The location of the COMMON INTERFACE slot may be different depending on the model. •• “CI or CI+ CARD” is not supported in some countries and regions; check with your authorized dealer.
Network Connection You can set up your TV so that it can access the SMART TV applications. through your local area network (LAN) using a wired or wireless connection. Network Connection - Wireless You can connect your TV to your LAN through a standard wireless router or modem. The LAN Port on the Wall Wireless IP sharer (Router having DHCP server) TV LAN Cable Samsung’s Wireless LAN adapter supports the IEEE 802.11a/b/g and n communication protocols. Samsung recommends using IEEE 802.11n.
The Smart Touch Control Guide Improved user convenience has been provided so that you can switch the channel and adjust the volume with just your fingertips while focusing on the TV screen. In addition, the built-in Touch Pad removes the need for a mouse when you change the menu settings and search for something on the Internet. ✎✎ For more detailed information about Smart Touch Control, see "Using the Smart Touch Control" in e-Manual. You can use the MIC to give Voice Control commands.
Installing batteries (Battery size : AA) 2 1 1. Press the back of the remote at the very bottom with both thumbs, and then slide the battery cover up in the direction of the arrow. 2. Install two batteries so that the polarity of the batteries (+/-) matches the illustration in the battery compartment. 3. Slide the cover down in the direction of the arrow to close the battery cover.
Using the Touch Pad To display the shortcut functions list on the bottom of the screen, press the ‹ button at the bottom of the Touch Pad. This list include Menu, Source, CH List, 3D and other functions. To display the colour and playing control functions on the top of the screen, press the top of the Touch Pad. RETURN VOICE button on the NUMBER To Move the Highlight: Rest your finger on the Touch Pad, and then slide it from one side to the other, from top to bottom, or bottom to top.
To Enter a channel number through Smart Touch Control 1. While watching a broadcast, press the NUMBERš button on the Smart Touch Control. The TV displays the number button screen. 2. Using the Touch Pad, highlight a number, and then press the Touch Pad. The TV displays a list of channels that start with the number you selected. 3. Using the Touch Pad, highlight the channel in the list you want, and then press the Touch Pad.
The IR Blaster Guide The IR Blaster converts the Smart Touch Control to a universal remote control to operate the devices connected to the TV. When pressing a button or tapping the Touch Pad on the Smart Touch Control, the IR Blaster takes the command from the Smart Touch Control and sends it to the indicated device as infrared signal. Pairing Button OPEN Device Indicator LED IR Blaster shows the pairing state. PAIRING Power Switch ON OFF OPEN Installing batteries (Battery size : AA) 1.
Setting up Smart touch control to use as a Universal Remote Control Lets you control a Set-Top-Box (STB) or a BD player or both connected to the TV using your Smart Touch Control. After you connect the device to the TV, the Smart Touch Control can control the navigation, number, and other keys needed to operate and control the device. ✎✎ The Universal Remote Control can adjust TV's volume, but STB's volume cannot be adjusted. Watch STB after adjusting STB's volume to appropriate level.
6. Select Download, and then press the Touch Pad. Download the configuration data for the IR Blaster in the same way. Setup data for your device will now be downloaded to your Smart Touch Control. Select Download on the TV screen using your Smart Touch Control. 7. When all the settings are complete, select the Complete button and press the Touch Pad. Universal remote setup complete. Congratulations! Your Set-top box-Samsung connected via Component is now ready to use.
How to view the e-Manual You can find instructions for your TV’s features in the e-Manual. To open the e-Manual, press the SUPPORT button on your standard remote or select Support (‹ → Support) using the Smart Touch Control. You can also access it through the menu: Menu → Support → e-Manual When you run the e-Manual after you select menu, the manual for the selected menu opens. Access the e-Manual To use the e-Manual, follow these steps: 1. When you need help, select Support using your remote.
Using the coloured and function buttons with the e-Manual • Scroll bar: Scroll the e-Manual screen up or down. • l / r: Moves to the previous or next chapter. • a Try now: Move the OSD menu that corresponds to the topic. To return to the e-Manual screen, select Support using your remote. • b Home: Moves to the e-Manual home screen. • { Position: Each time you select {, using your remote, you change the position of the e-Manual screen. • } Index: Displays the Index screen.
Installing the Wall Mount Installing the Wall Mount Kit The wall mount kit (sold separately) allows you to mount the TV on the wall. For detailed information on installing the wall mount, see the instructions provided with the wall mount. Contact a technician for assistance when installing the wall mount bracket. We do not advise you to do it yourself. Samsung Electronics is not responsible for any damage to the product or injury to yourself or others if you elect to install the TV on your own.
Storage and Maintenance ✎ If you attached some stickers on the TV screen, some debris may remain after removing the sticker. Please clean it to watch TV. Do not spray water directly onto the product. Any liquid that goes into the product may cause a failure, fire, or electric shock. Clean the product with a soft cloth dampened in a small amount of water. Do not use a flammable liquid (e.g. benzene, thinners) or a cleaning agent.
Troubleshooting If you have any questions about the TV, first refer to this list. If none of these troubleshooting tips apply, please visit “www.samsung.com,” then click on Support, or contact the call centre listed on the back-cover of this manual.a Issues Solutions and Explanations The TV won’t turn on. • Make sure the AC power cord is securely plugged in to the wall outlet and the TV. • Make sure the wall outlet is working.
Display Resolution Mode IBM MAC VESA DMT Resolution Horizontal Frequency (KHz) Vertical Frequency (Hz) Pixel Clock Frequency (MHz) Sync Polarity (H / V) 640 x 350 31.469 70.086 25.175 +/- 720 x 400 640 x 480 31.469 35.000 70.087 66.667 28.322 30.240 -/+ -/- 832 x 624 49.726 74.551 57.284 -/- 1152 x 870 640 x 480 68.681 31.469 75.062 59.940 100.000 25.175 -/-/- 640 x 480 37.861 72.809 31.500 -/- 640 x 480 37.500 75.000 31.500 -/- 800 x 600 37.879 60.317 40.
Specifications Display Resolution Environmental Considerations Operating Temperature Operating Humidity Storage Temperature Storage Humidity TV System Colour/Video System Sound System HDMI IN Stand Swivel (Left / Right) Model Name Screen Size Sound (Output) Dimensions (WxHxD) Body With stand Weight Without Stand With Stand 1920 x 1080 10°C to 40°C (50°F to 104°F) 10% to 80%, non-condensing -20°C to 45°C (-4°F to 113°F) 5% to 95%, non-condensing Analogue: B/G, D/K, L, I (Depending on your country selection
Smart Touch Control Model Name Power Input Output Features MBR Voice Bluetooth Setup Operating Compatibility Dimension Weight RMCTPE1 Source Button Touch Pad Indicator IR Touch Control MBR Voice Bluetooth MBR Database Coverage Supported Device Mode Maximum Working Distance Voice Transfer Supported Audio Data Rate Suggested Sound Level RF Pairing Method Maximum Pairing Distance Maximum Working Distance Pairing with TV Programming MBR Operating Temperature Working Distance Working Hours LED TV PDP TV Set (
IR Blaster Model Name VG-IRB2000 Power Source Input Button Indicator IR MBR Bluetooth MBR Database Coverage Supported Device Mode Maximum Working Distance RF Pairing Method Maximum Pairing Distance Maximum Working Distance Pairing with TV Programming MBR Operating Temperature Working Distance Working Angle Working Hours LED TV PDP TV Set (mm) Package (mm) Set (without Batteries)(g) Set (Including Batteries)(g) Package(g) Output Features MBR Bluetooth Setup Operating Compatibility Dimension (WxDxH) We
Recommendation - EU Only •• Hereby, Samsung Electronics, declares that this LED TV is in compliance with the essential requirements and other relevant provisions of Directive 1999/5/EC. •• The official Declaration of Conformity may be found at http://www.samsung.com, go to Support > Search Product Support and enter the model name. •• This equipment may only be used indoors. •• This equipment may be operated in all EU countries. Licence English - 42 [PE8000-XU]BN68-04062J.
Warning! Important Safety Instructions Please read the appropriate section that corresponds to the marking on your Samsung product before attempting to install the product. CAUTION RISK OF ELECTRIC SHOCK DO NOT OPEN CAUTION: TO REDUCE THE RISK OF ELECTRIC SHOCK, DO NOT REMOVE COVER (OR BACK). THERE ARE NO USER SERVICEABLE PARTS INSIDE. REFER ALL SERVICING TO QUALIFIED PERSONNEL. This symbol indicates that high voltage is present inside.
Warranty Card United Kingdom Republic of Ireland (EIRE) This Samsung product is warranted for a period of twelve (12) months from the original date of purchase, against defective materials and workmanship. In the event that warranty service is required, you should return the product to the retailer from whom it was purchased. However, Samsung Authorised Dealers and Authorised Service Centres in other EC Countries will comply with the warranty on the terms issued to purchasers in the country concerned.
Wiring the Mains Power Supply Plug (UK Only) IMPORTANT NOTICE The mains lead on this equipment is supplied with a moulded plug incorporating a fuse. The value of the fuse is indicated on the pin face of the plug and, if it requires replacing, a fuse approved to BSI1362 of the same rating must be used. Never use the plug with the fuse cover omitted if the cover is detachable. If a replacement fuse cover is required, it must be of the same colour as the pin face of the plug.
This page is intentionally left blank. [PE8000-XU]BN68-04062J.