Plasma TV user manual imagine the possibilities Thank you for purchasing this Samsung product. To receive more complete service, please register your product at www.samsung.com/register Model BN68-02161A_Eng.indb 1 Serial No.
Contact SAMSUNG WORLDWIDE If you have any questions or comments relating to Samsung products, please contact the SAMSUNG customer care centre. Country Customer Care Centre Web Site AUSTRALIA 1300 362 603 www.samsung.com/au CHINA 800-810-5858 400-810-5858 010-6475 1880 www.samsung.com/cn HONG KONG : 3698-4698 www.samsung.com/hk INDIA 3030 8282 1800 110011 1-800-3000-8282 www.samsung.com/in INDONESIA 0800-112-8888 www.samsung.com/id JAPAN 0120-327-527 www.samsung.
User Instructions Screen Image retention Do not display a still image (such as on a video game or when hooking up a PC to this PDP) on the plasma monitor panel for more than 2 hours as it can cause screen image retention. This image retention is also known as “screen burn”. To avoid such image retention, reduce the degree of brightness and contrast of the screen when displaying a still image. Height The PDP can normally operate only under 2000m in height.
Contents Connecting and Preparing Your TV Media Play-DLNA ■■ Checking Parts........................................................................... 4 ■■ Using the Stand-Base................................................................ 4 ■■ Assembling the Cables.............................................................. 4 ■■ Viewing the Control Panel.......................................................... 5 ■■ Viewing the Connection Panel...................................................
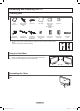
Connecting and Preparing Your TV Checking Parts Owner’s Instructions Remote Control/ AAA Batteries (2ea) Power Cord Cloth-Clean Warranty Card/ Safety Guide Manual (Not available in all locations) Program CD Screw (4ea) PS50B650 only Cover-Bottom PS50B650 only Cover-Bottom / Screws (2ea) PS63B680 only Holder-Ring (4ea) (Refer to page 62) Ferrite Core for Power Cord Ferrite Core for Headphone Holder-Wire Cable NN The ferrite core is used to shield the cable from interference.
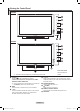
Viewing the Control Panel PS50B650 PS63B680 Front Panel buttons NN The product colour and shape may vary depending on the model. 1 SOURCE Toggles between all the available input sources (TV, AV1, AV2, Component1, Component2, PC, HDMI1, HDMI2/DVI, HDMI3, HDMI4, USB). NN In the on-screen menu, use this button as you would use the ENTERE button on the remote control. 2 MENU Press to see an on-screen menu of your TV’s features. 3 + VOL – Press to increase or decrease the volume.
Viewing the Connection Panel TV Rear Panel 1 or 0 Cable Television Network 2 or 3 4 5 6 7 8 9 ! NN The product colour and shape may vary depending on the model. NN Whenever you connect an audio or video system to your set, ensure that all elements are switched off. NN When connecting an external device, match the colour of the connection terminal to the cable. 1 LAN Connect a LAN cable to this port to connect to the Network 2 POWER IN Connect the supplied power cord.
TV Side Panel 4 1 2 3 NN The product colour and shape may vary depending on the model. 1 USB 1(HDD), USB 2 Connect a USB mass storage device to view photo files (JPEG), play audio files (MP3) and movie files. You can connect to SAMSUNG’s network wirelessly. 2 HDMI IN 4 Connect to the HDMI jack of a device with HDMI output. 3 AV IN 2 Video and audio inputs for external devices, such as a camcorder or VCR. English - 7 BN68-02161A_Eng.
Remote Control You can use the remote control up to a distance of about 23 feet from the TV. NN The performance of the remote control may be affected by bright light. 1 POWER button (turns the TV on and off) 2 Selects the TV mode directly.
Installing Batteries in the Remote Control 1. 2. Lift the cover at the back of the remote control upward as shown in the figure. Install two AAA size batteries. NN Make sure to match the ‘+’ and ‘–’ ends of the batteries with the diagram inside the compartment. 3. Close the cover. NN Remove the batteries and store them in a cool, dry place if you won’t be using the remote control for a long time. NN If the remote control doesn’t work, check the following 1. Is the TV power on? 2.
Viewing the Menus 1. 2. NN The on-screen menus disappear from the screen after about one minute. Picture 3. With the power on, press the MENU button. The main menu appears on the screen. The menu’s left side has icons: Picture, Sound, Channel, Setup, Input, Application, Support. Press the ▲ or ▼ button to select one of the icons. Then press the ENTERE button to access the icon’s sub-menu. Press the EXIT button to exit.
Plug & Play Feature When the TV is initially powered on, basic settings proceed automatically and subsequently. NN The Screen Saver is activated if there is no remote control key input for longer than 1 minute while Plug & Play is running. NN The Screen Saver is activated if there is no operating signal for longer than 15 minutes. 1. Press the POWER button on the remote control. The message Select ‘Home Use’ when installing this TV in your home. is displayed. 2.
Channel Control Storing Channels ❑❑ Country You can change the desired country. ❑❑ Auto Store Channel NN The PIN number input screen appears. Enter your 4 digit PIN number. NN The default PIN number of a new TV set is ‘0-0-0-0’. Country : New Zealand ► Auto Store Manual Store Scans for all channels with active broadcast stations (and availability depends on your Channel List country) and stores them in the TV's memory. Channel Mode : Added Ch. You can memorize the Antenna source.
❑❑ Fine Tune (only analogue channels) If the reception is clear, you do not have to fine tune the channel, as this is done automatically during the search and store operation. If the signal is weak or distorted, you may have to fine tune the channel manually. NN Fine tuned channels that have been saved are marked with an asterisk * on the right-hand side of the channel number in the channel banner. NN If you do not store the fine-tuned channel in memory, adjustments are not saved.
Timer Viewing If you reserve a programme you want to watch, the channel is automatically switched to the reserved channel in the Channel List; even when you are watching another channel. To reserve a programme set the current time first. (See page 25) NN Only memorized channels can be reserved. NN You can set the channel, date, or start time directly by pressing the number buttons on the remote control. NN Reserving a programme will be shown on Programmed menu.
Picture Control Changing the Picture Settings ❑❑ Mode Picture You can select the type of picture which best corresponds to your viewing requirements. •• Dynamic: Selects the picture for high-definition in a bright room. •• Standard: Selects the picture for the optimum display in a normal environment. •• Eco: Selects the picture for optimum and eye-comfortable display. NN When in PC mode, Eco is not available. •• Movie: Selects the picture for viewing movies in a dark room.
White Balance You can adjust the colour temperature for more natural picture colours. •• R-Offset / G-Offset / B-Offset / R-Gain / G-Gain / B-Gain: Changing the adjustment value will refresh the adjusted screen. •• Reset: The previously adjusted white balance will be reset to the factory defaults. Flesh Tone You can adjust the flesh tone to be more or less red. NN Changing the adjustment value will refresh the adjusted screen.
Digital NR → Off / Low / Medium / High / Auto If the broadcast signal received by your TV is weak, you can activate the Digital Noise Reduction feature to help reduce any static and ghosting that may appear on the screen. NN When the signal is weak, select one of the other options until the best picture is displayed. HDMI Black Level → Normal / Low You can directly select the black level on the screen to adjust the screen depth.
Viewing the Picture in Picture (PIP) Setup You can display a sub picture within the main picture of set programme or video input. In this way, you can watch the picture of set programme or video input from any connected equipment while watching the main picture. Melody : Medium Energy Saving : Off PIP ► NN You may notice that the picture in the PIP window becomes slightly unnatural when you use the main screen to view a game or karaoke. TT Press the TOOLS button to display Tools menu.
PC Display ❑❑ Setting Up Your PC Software (Based on Windows XP) 1. 2. 3. 4. The Windows display-settings for a typical computer are shown below. The actual screens on your PC will probably be different, depending upon your particular version of Windows and your particular video card. However, even if your actual screens look different, the same basic set-up information will apply in almost all cases. (If not, contact your computer manufacturer or Samsung Dealer.
Sound Control Changing the Sound Setting ❑❑ Mode TT Press the TOOLS button to display Tools menu. Sound You can select the type of special sound effect to be used when watching a given broadcast. •• Standard: Selects the normal sound mode. •• Music: Emphasizes music over voices. •• Movie: Provides the best sound for movies. •• Clear Voice: Emphasizes voice over other sounds. •• Custom: Recalls your customized sound settings.
❑❑ Auto Volume → Off / On Each broadcasting station has its own signal conditions, and so it is not easy to adjust the volume every time the channel is changed. This feature lets you automatically adjust the volume of the desired channel by lowering the sound output when the modulation signal is high or by raising the sound output when the modulation signal is low. ❑❑ Speaker Select → External Speaker / TV Speaker If you want to hear the sound through separate speakers, cancel the internal amplifier.
Function Description Configuring the Setup Menu ❑❑ Game Mode When connecting to a game console such as PlayStationTM or XboxTM, you can enjoy a more realistic gaming experience by selecting the game menu. Plug & Play Setup When the Game Mode is On Time Game Mode : Off BD Wise : On •• Picture Mode is automatically changed to Standard and users cannot change the Network Type mode. Network Setup •• Sound Mode is automatically changed to Custom and users cannot change the Child Lock mode.
❑❑ Subtitle You can activate and deactivate the subtitles. Use this menu to set the Subtitle Mode. Normal under the menu is the basic subtitle and Hard of hearing is the subtitle for a hearing-impaired person. •• Subtitle → Off / On: Switches subtitles off or on. •• Mode → Normal / Hard of hearing: Sets the subtitle mode. •• Subtitle Language: Set the subtitle language.
❑❑ Melody → Off / Low / Medium / High The TV power on / off melody sound can be adjusted. NN The Melody does not play -- When no sound is output from the TV because the MMUTE button has been pressed. -- When no sound is output from the TV because the – (Volume) button has been pressed. -- When the TV is turned off by Sleep Timer function. ❑❑ Energy Saving This feature adjusts the brightness of the TV in order to reduce power consumption.
❑❑ Timer 1 / Timer 2 / Timer 3 Three different on / off timer settings can be made. •• On Time: Set the hour, minute, and Activate / Inactivate. (To activate timer with the setting you’ve chosen, set to Activate.) •• Off Time: Set the hour, minute, and Activate / Inactivate. (To activate timer with the setting you’ve chosen, set to Activate.) •• Volume: Set the required volume level. •• Source : Selects TV, TV Memory or USB device. NN When you select the TV, you can set the Antenna and Channel.
Supported Program ❑ Product Guide (Not available in all locations) The Product Guide gives you information on the most important features of this TV. • Mediⓐ2.0: Content Library Flash, USB2.0 Movie, DLNA Wireless • Picture Quality: 1080 Full HD Motion, Ultra FilterBright, 100Hz Motion Plus, Cinema Smooth, Picture Mode • Eco-Friendly: Energy Saving ❑ Self Diagnosis Picture Test If you think you have a picture problem, perform the picture test.
Media Play Connecting a USB Device 1. 2. Press the POWER button to turn the TV on. Connect a USB device containing photo, music and movie files to the USB jack on the side of the TV. NN If you enter the Media Play mode with no USB device connected the message No NN NN NN NN NN NN NN NN NN NN NN NN NN NN NN TV Side Panel 4 USB Drive external storage device found. Check the connection status. will appear. In this case, insert the USB device, exit the screen by pressing the MEDIA.
Using the Media Play Function This function enables you to view and listen to photo, music and movie files saved on a USB Mass Storage Class (MSC) device. It might not work properly with unlicensed multimedia files. ❑❑ Entering the Media Play Menu 1. Press the MENU button. Press the ▲ or ▼ button to select Application, then press the ENTERE button. 2. Press the ENTERE button to select Media Play (USB&DLNA), then press the ENTERE button. NN The Media Play menu is displayed. OO Press the MEDIA.
Using and Sorting Photo List You can sort photos in the Photo List by a particular standard. Photo Press the ▲ button twice, then press the ◄ or ► button to select a sorting standard in the Photo list. (Basic View, Timeline, Colour, Folder, Preference) Preference Basic View 2009 Mar Folder Nov ▶ 1/67 ◀ ▶ Press the by the user. Colour Apr Jun Mar.01.2009 ▶ NN The photos are sorted according to the newly selected sorting standard.
Information The photo file information including the name, the size, the resolution, the date modified and the path is displayed. NN You can view the information of photo files during a Slide Show using the same procedures. OO Alternatively, select a photo from the photo list and press the INFO button to view the information. Remove Safely You can remove the device safely from the TV. Viewing a Photo or Slide Show ❑❑ Viewing a Slide Show 1.
❑❑ Slide Show Tools Menu Stop Slide Show / Start Slide Show Tools You can start or stop a SlideShow. Slide Show Speed → Normal / Fast / Slow You can select the slide show speed only during the slide show. NN You can also change the speed of the Slide Show by pressing the (FF) button during the Slide Show.
Using and Sorting the Music List You can sort music files in the Music List by a particular standard. 1. Press the ▲ button twice, then press the ◄ or ► button to select a sorting standard in the Music list. (Basic View, Title, Artist, Mood, Genre, Folder, Preference) Music Folder Preference ▶ Press the expectations of the user. ▶ Artist 3/4 button to start playing music in the order selected by the user. NN The information of the music files is automatically set.
Playing a Music ❑❑ Playing a music file USB 00:00:02 / 00:04:55 r r Geek In The Pink r 1. Pressing the ◄ or ► button to select a music file to be played. 2. Press the (Play)/ENTERE button. NN This menu only shows files with the MP3 file extension. Files with other file extensions are not displayed, even if they are saved on the same USB device. (REW) or (FF) buttons do not function during play. NN NN The selected file is displayed at the top with its playing time.
▶ Using and Sorting the Movie List Movie Preference Basic View Timeline NN The movie files are sorted according to the newly selected sorting standard. NN To move to the previous/next group, press the (REW) or (FF) button. (Play)/ENTERE button to play the movie in the order selected by NN The movies are sorted according to the newly selected sorting standard. NN Movie information is automatically set. You can change the Preference. 1/5 ▶ Press the the user. Folder Mar.01.2009 ◀ 2.
Playing a Movie File r 1. Pressing the ◄ or ► button to select a movie to be played. 2. Press the (Play) / ENTERE button. 00:00:02 / 00:01:55 r ❑❑ Playing a movie file 1/3 MOVIE_000.avi NN The selected file is displayed at the top with its playing time. NN The playing duration of a movie file may be displayed as ‘00:00:00’ if its playing time information is not found at the start of the file. NN Press the ◄ button while playing a video file to rewind by 10 seconds.
❑❑ Playing the movie group 1. Press the ◄ or ► button to select a sorting standard. (Basic View, Timeline, Title, Folder, Preference) 2. Press the (REW) or (FF) button to select the desired group. 3. Press the ▼ button twice, then press the TOOLS button. 4. Press the ▲ or ▼ button to select Play Current Group, then press the ENTERE button. NN Only the movie files in the sorting group including the selected files will be played. ❑❑ Playing the selected movie files 1.
Picture / Music or Movie Settings Using Media Play When watching a SlideShow, listening to music or Movie using Media Play, you can set the picture and sound. ❑❑ Picture Setting Picture Setting 1. Press the TOOLS button during a Slide Show, while Music or Movie is playing. 2. Press the ▲ or ▼ button to select Picture Setting. 3. Press the ◄ or ► button to select the Picture Mode (Dynamic, Standard, Eco, or Movie). 4. Press the ▲ or ▼ button to move to an item.
Media Play-DLNA Setting the DLNA Network DLNA allows you to watch videos and pictures saved on your PC on your TV through a network connection in Media Play mode. This removes the need to copy them to a USB storage device and then connect the device to your TV. To use DLNA, the TV must be connected to the network and the DLNA application must be installed on your PC. ❑❑ Network Connections Diagram PC TV LAN LAN External Modem (ADSL/VDSL/Cable TV) 1 3 2 1. 2. 3.
Install the application 1. Run the Setup.exe file on the Programme CD supplied with the product. NN Alternatively, you can download the file from www.samsung.com. 2. Install the SAMSUNG PC Share Manager as shown in the figures below. ► ► ► ► ► 3. When the installation is complete, the PC Share Manager icon appears on your Desktop. NN Double-click the icon to run the programme. English - 39 BN68-02161A_Eng.
Using the DLNA Application The Programme Screen Layout 1 2 3 4 8 5 6 1. 2. 3. 4. 5. 6. 7. 8. 7 Menus: The following application menus are provided : File, Share, Server, and Help. Click to share the selected PC server folder. Click to cancel sharing. Click to refresh the PC folder and files. Click to synchronize the share status. The folders and files of the PC to be shared are listed. Folders shared by the user are listed.
❑❑ Share Sharing a Folder You can share a folder from your PC to the TV. The maximum number of folders that can be shared is 32. NN Your PC will operate as a server to the TV. •• Method 1: Select a folder in My Computer, select the Share menu and then select the Share Folder sub-menu. •• Method 2: Select a folder in My Computer, right-click over the selected folder and then select Share Folder from the pop-up menu.
Setting the Access Permission To enable the TV to find your PC, the TV must be set to Set Device Policy in the Access Permission Settings window. In addition, the PC server and the TV must be on the same subnet. •• Method: Select the Share menu and select Set Device Policy. Rejected items are represented in gray. You can change the access permissions by using the Allow Accept / Deny button. To delete an item, select the item and select Delete Item.
Using the DLNA Function Using the DLNA Menu DLNA (Digital Living Network Alliance) enables content saved on a DLNA server (usually your PC) connected to your TV or over a network to be played. Media Play Media Play enables playing content saved on a USB memory device connected to the TV, while DLNA enables playing content saved on a DLNA server (your PC) connected to your TV or over the network. The procedures to use the content are the same as those for Media Play.
About Anynet+ Connecting Anynet+ Devices Anynet+ is a function that enables you to control all connected Samsung devices that support Anynet+ with your Samsung TV’s remote. The Anynet+ system can be used only with Samsung devices that have the Anynet+ feature. To be sure your Samsung device has this feature, check if there is an Anynet+ logo on it. ❑ To connect to a TV TV Anynet+ Device 1 HDMI 1.3 Cable 1. Anynet+ Device 2 HDMI 1.3 Cable Anynet+ Device 3 HDMI 1.3 Cable Anynet+ Device 4 HDMI 1.
Setting Up Anynet+ The following settings help set the Anynet+ functions. You can also display Anynet+ menu by selecting Tools → Anynet+(HDMI-CEC). Application TT Press the TOOLS button to display Tools menu. Media Play (USB & DLNA) Anynet+ (HDMI-CEC) ► Content Library Home Network Center ❑❑ Setup Anynet+(HDMI-CEC) → Off / On To use the Anynet+ Function, Anynet+ (HDMI-CEC) must be set to On. NN When the Anynet+ (HDMI-CEC) function is disabled, all the Anynet+ related operations are deactivated.
❑❑ Anynet+ Menu The Anynet+ menu changes depending on the type and status of the Anynet+ devices connected to the TV. Anynet+ Menu Description View TV Anynet+ mode changes to TV broadcast mode. Device List Shows the Anynet+ device list. (device_name) Menu Shows the connected device menus. E.g. If a DVD recorder is connected, the disc menu of the DVD recorder will appear. (device_name) INFO Shows the play menu of the connected device. E.g.
Listening through a Receiver (Home theater) You can listen to sound through a receiver instead of the TV speaker. 1. 2. Press the TOOLS button. Press the ENTERE button to select Anynet+ (HDMI-CEC). Press the ▲ or ▼ button to select Receiver. Press the ◄ or ► button to select On or Off. NN If your receiver supports audio only, it may not appear in the device list.
Content Library Activating the Content Library 1. 2. Press the MENU button. Press the ▲ or ▼ button to select Application, then press the ENTERE button. Press the ▲ or ▼ button to select Content Library, then press the ENTERE button. The Content Library main menu is displayed. Media Play (USB & DLNA) Anynet+ (HDMI-CEC) Application The Content Library enables you to view or play the built-in contents on the TV or stored on your USB device.
Using the Content Library ❑❑ Gallery This function plays a Slide Show with high resolution images and background music and produces various atmospheres. Using the Gallery function of the TV, you can change your home atmosphere. NN Press INFO button to see the credit and detail information in English for the imagery. Press INFO button again or press ► button for the credit information to go away (currently, the credit supports English only).
Network Network Connection ❑❑ Network Connection - Cable LAN Connection for a DHCP Environment The procedures to set up the network using Dynamic Host Configuration Protocol (DHCP) are described below. Since an IP address, subnet mask, gateway, and DNS are automatically allocated when DHCP is selected, you do not have to enter them manually. TV Rear Panel The Modem Port on the Wall External Modem (ADSL/VDSL/Cable TV) 1 LAN Cable 2 Modem Cable 1. 2.
LAN Connection for Static IP Environment The procedures to set up the network using a static IP address are described below. You have to manually enter the IP address, subnet mask, gateway, and DNS that are provided by your Internet Service Provider (ISP). TV Rear Panel The LAN Port on the Wall 1 LAN Cable 1. Connect the port on the rear panel of the TV and the LAN port on the wall using the LAN cable. You can connect the LAN via a Sharer (Router).
❑❑ Network Connection - Wireless You can connect to the network wirelessly through a wireless IP sharer. TV Side Panel The LAN Port on the Wall Samsung Wireless LAN Adapter Wireless IP sharer LAN Cable 1. Connect the ‘Samsung Wireless LAN Adapter’ into the USB1(HDD) or USB2 terminal of the TV. NN You must use the ‘Samsung Wireless LAN Adapter to use a wireless network. NN Samsung’s Wireless LAN adapter is sold separately.
Network Setup ❑❑ Network Type Select Cable or Wireless as the method to connect to the network. NN The menu is activated only if the ‘Samsung Wireless LAN Adapter’ is connected. •• Cable: Connect to network using a cable. •• Wireless: Connect to network wirelessly.
Select a network -- Access Point: You can select the IP sharer to use when using a wireless network. NN If a wireless network is not in the Select a network list, press the Red button. NN When the connection is made, you will be returned to the screen automatically. NN If you have selected an Access Point with a security authentication: Wireless* Network*Setup A The Security Key input screen appears. Enter the security key and press the Blue button on the remote control.
Ad-hoc: You can connect to a mobile device without an access point through the ‘Samsung Wireless LAN Adapter’ by using a peer to peer network. •• How to connect to new Ad-hoc 1. Choose Select a network, then a device list is displayed. 2. While in the device list, press the Blue button on the remote or select Ad-hoc. NN The message The existing network system may have limited functionality. Do you want to change the network connection? is displayed.
Home Network Center Home Network Center About the Home Network Center The Home Network Center connects the TV and mobile phones through a network. You can view call arrivals, text message contents, and schedules set on the mobile phone on the TV using the Home Network Center. In addition, you can play the media contents saved on the mobile phones such as videos, photos and music by controlling them onto the TV via the network.
Setting Up the Home Network Center ❑❑ Message Shows a list of mobile phones which have been set up with this TV to use the message function (the call arrivals, text message contents and schedules set on the mobile phone). Allowed Allows the mobile phone. Home Network Center Message 111-1234-5671 : Access Media 111-1234-5672 : Access Setup 111-1234-5673 : Denied 111-1234-5674 : Denied Denied Blocks the mobile phone. Delete Return Exit Deletes the mobile phone from the list.
Using the Message Function Using this function, you can view the call arrivals, text message contents and schedules set on the mobile phone through the alarm window while watching TV. husband SMS NN To disable this Message alarm window, set Message to Off in Setup of the Home NN NN NN NN Network Center. The alarm window appears for 20 seconds. If no key is pressed or if Cancel is selected, it appears up to three times at 5 minute intervals.
Using the Media Function An alarm window appears informing the user that the media contents (videos, photos, music) sent from the mobile phone will be displayed on the TV. The contents are played automatically 3 seconds after the alarm window appears. If you press the RETURN or EXIT button when the alarm window appears, the Media Contents are not played. NN To turn off the media contents transmission from the mobile phone, set Media to Off in Setup of the Home Network Center.
Recommendations for Use Teletext Feature Most television stations provide written information services via Teletext. The index page of the teletext service gives you information on how to use the service. In addition, you can select various options to suit your requirements by using the remote control buttons. NN For teletext information to be displayed correctly, channel reception must be stable. Otherwise, information may be missing or some pages may not be displayed.
The teletext pages are organized according to six categories: Part Contents A Selected page number. B Broadcasting channel identity. C Current page number or search indications. D Date and time. E Text. F Status information. FASTEXT information.
Preparing before installing Wall- Mount on the wall Case A. Installing SAMSUNG Wall-Mount Case B. Installing other company’s Wall-Mount 1. Install Wall Mount with the torque range of 15kgf·cm or less. The parts can be damaged if the torque is out of the specified range. 2. Accessory Kit contains Holder–Ring [①] for installing other company’s Wall-Mount on Samsung TV.
경고 주의 Securing the TV to the Wall Pulling, pushing, or climbing on the TV may cause the TV to fall. In particular, ensure your children do not hang over or destabilize the TV; doing so may cause the TV to tip over, causing serious injuries or death. Follow all safety precautions provided on the included Safety Flyer. For added stability, install the anti-fall device for safety purposes, as follows. 주의 경고 Wall Wall To avoid the TV from falling 1.
Troubleshooting Before contacting the Samsung after-sales service, perform the following simple checks. If you cannot solve the problem using the instructions below, note the model and serial number of the television and contact your local dealer. No sound or picture •• •• •• •• •• Normal picture but no sound •• Check the volume. •• Check whether the M MUTE button has been pressed on the remote control. No picture or black and white picture •• Adjust the colour settings.
Specifications The descriptions and characteristics in this booklet are given for information purposes only and are subject to modification without notice.
Software License This product uses parts of the software from the Independent JPEG Group. This product uses parts of the software owned by the Freetype Project (www.freetype.org). This product uses some software programs which are distributed under the GPL/LGPL license. Accordingly, the following GPL and LGPL software source codes that have been used in this product can be provided after asking to vdswmanager@samsung.com.
specific operating system (if any) on which the executable work runs, or a compiler used to produce the work, or an object code interpreter used to run it. The “Corresponding Source” for a work in object code form means all the source code needed to generate, install, and (for an executable work) run the object code and to modify the work, including scripts to control those activities.
7. 8. d) Convey the object code by offering access from a designated place (gratis or for a charge), and offer equivalent access to the Corresponding Source in the same way through the same place at no further charge. You need not require recipients to copy the Corresponding Source along with the object code.
copyright holder is reinstated permanently if the copyright holder notifies you of the violation by some reasonable means, this is the first time you have received notice of violation of this License (for any work) from that copyright holder, and you cure the violation prior to 30 days after your receipt of the notice. Termination of your rights under this section does not terminate the licenses of parties who have received copies or rights from you under this License.
14. Revised Versions of this License. The Free Software Foundation may publish revised and/or new versions of the GNU General Public License from time to time. Such new versions will be similar in spirit to the present version, but may differ in detail to address new problems or concerns. Each version is given a distinguishing version number.
❑❑ GNU Lesser General Public License (LGPL) GNU GENERAL PUBLIC LICENSE Version 3, 29 June 2007 Copyright (C) 2007 Free Software Foundation, Inc. Everyone is permitted to copy and distribute verbatim copies of this license document, but changing it is not allowed. Preamble The GNU General Public License is a free, copyleft license for software and other kinds of works.
subprograms that the work is specifically designed to require, such as by intimate data communication or control flow between those subprograms and other parts of the work. The Corresponding Source need not include anything that users can regenerate automatically from other parts of the Corresponding Source. The Corresponding Source for a work in source code form is that same work. 2. Basic Permissions.
7. 8. e) Convey the object code using peer-to-peer transmission, provided you inform other peers where the object code and Corresponding Source of the work are being offered to the general public at no charge under subsection 6d. A separable portion of the object code, whose source code is excluded from the Corresponding Source as a System Library, need not be included in conveying the object code work.
9. 10. 11. 12. 13. 14. Acceptance Not Required for Having Copies. You are not required to accept this License in order to receive or run a copy of the Program. Ancillary propagation of a covered work occurring solely as a consequence of using peer-to-peer transmission to receive a copy likewise does not require acceptance. However, nothing other than this License grants you permission to propagate or modify any covered work. These actions infringe copyright if you do not accept this License.
15. Disclaimer of Warranty. THERE IS NO WARRANTY FOR THE PROGRAM, TO THE EXTENT PERMITTED BY APPLICABLE LAW. EXCEPT WHEN OTHERWISE STATED IN WRITING THE COPYRIGHT HOLDERS AND/OR OTHER PARTIES PROVIDE THE PROGRAM “AS IS” WITHOUT WARRANTY OF ANY KIND, EITHER EXPRESSED OR IMPLIED, INCLUDING, BUT NOT LIMITED TO, THE IMPLIED WARRANTIES OF MERCHANTABILITY AND FITNESS FOR A PARTICULAR PURPOSE. THE ENTIRE RISK AS TO THE QUALITY AND PERFORMANCE OF THE PROGRAM IS WITH YOU.
THIS SOFTWARE IS PROVIDED BY THE OpenSSL PROJECT ``AS IS’’ AND ANY EXPRESSED OR IMPLIED WARRANTIES, INCLUDING, BUT NOT LIMITED TO, THE IMPLIED WARRANTIES OF MERCHANTABILITY AND FITNESS FOR A PARTICULAR PURPOSE ARE DISCLAIMED.