FTQ352IWX FTQ352IWB FTQ352IWW Electric Range user manual imagine the possibilities Thank you for purchasing this Samsung product. To receive more complete service, please register your product at www.samsung.com/global/register FTQ352IWX_XAC DG68-00106A.
features of your new range Enhanced convenience. Better cooking. Easy maintenance. Your new electric range has been designed to bring you these benefits and more. • The latest in heat-distribution technology Other ranges with just one fan tend to make a swirl of heat that fails to cover the whole inside of the oven. This means uneven heat distribution and uneven cooking.
important safety instructions Read and follow all instructions before using your oven to prevent the risk of fire, electric shock, personal injury, or damage when using the range. This guide does not cover all possible conditions that may occur. Always contact your service agent or manufacturer about problems that you do not understand. SAFETY SYMBOLS WARNING: This symbol alerts you to hazards or unsafe practices that could cause serious bodily harm or death.
FOR YOUR SAFETY When using electrical appliances, basic safety precautions should be followed, including the following: Use this appliance only for its intended purpose as described in this Owner’s Manual. Potentially hot surfaces include the cooktop, areas facing the cooktop, oven vent opening, surfaces near the opening, crevices around the oven door. Be sure your appliance is properly installed and grounded by a qualified technician.
SURFACE COOKING UNITS Never leave surface units unattended at high heat settings. Boilovers cause smoking and greasy spillovers that may ignite. Do not lift the cooktop. Lifting the cooktop can lead to damage and improper operation of the range. Do not operate the cooktop when there is no cookware. If the cooktop operates without a cookware, the control knob will become hot. Never use the glass cooktop surface as a cutting board. Use care when touching the cooktop.
OVEN DO NOT TOUCH HEATING ELEMENTS OR INTERIOR SURFACES OF THE OVEN. Heating elements may be hot even though they are dark in color. Interior surfaces of an oven become hot enough to cause burns. During and after use, do not touch or let clothing or other flammable materials contact heating elements or interior surfaces of oven until they have had sufficient time to cool. Other surfaces of the appliance may become hot enough to cause burns.
SELF-CLEANING OVENS Do not clean door gasket. The door gasket is essential for a good seal. Care should be taken not to rub, damage, or move the gasket. Never keep pet birds in the kitchen. The health of birds is extremely sensitive to the fumes released during an oven self-clean cycle. Fumes may be harmful or fatal to birds. Move birds to a well-ventilated room. Clean in the self-clean cycle only parts listed in this manual. Before self-clean the oven, remove the broil pan , rack, utensils, and food.
contents introducing your new range 9 9 Overview What’s included with your range 10 12 14 14 15 About surface cooking How to set the appliance for surface cooking Using the proper cookware Choosing the proper cookware Protecting the smoothtop surface using the warming drawer 16 17 About the warming drawer Turning the warming drawer on or off operating the oven 18 19 20 20 21 22 23 25 27 28 29 31 32 33 33 34 The oven control panel Setting the clock Minimum and maximum settings Setting the kitchen t
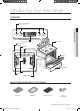
introducing your new range OVERVIEW Surface control knobs See page 11 for more information 01 INTRODUCING Oven control panel See page 18 for more information Glass surface Automatic oven light switch Oven light Self/steam clean latch Oven door Warming drawer Convection fan Gasket Shelf position WHAT’S INCLUDED WITH YOUR RANGE Wire racks Broil pan Broil pan insert Cleaner & cleaning pad Introducing your new range _9 FTQ352IWX_XAC DG68-00106A.
surface cooking About surface cooking BEFORE COOKING CAUTION • Do not use the glass cooktop surface as a cutting board. • Do not place or store items that can melt or catch fire on the glass cooktop, even when it is not being used. • Turn the surface units on only after placing the cookware. • Do not store heavy items above the cooktop surface. They could fall and damage it.
Location of the radiant surface elements and controls The radiant control knobs operate the radiant surface elements on the cooktop as shown below. 5 2 1. Single element: Left rear 2. Single element: Right rear 4 3 02 SURFACE COOKING 1 . Dual element: Left front . Dual element: Right front 5. Warming center: Center rear 6 . Hot surface indicator Hot surface indicator • Comes on when the unit is turned on or hot to the touch. • Stays on even after the unit is turned off.
How to set the appliance for surface cooking • The surface elements may be hot and burns may occur. Do not touch surface elements until they have cooled down sufficiently. CAUTION • At high or medium-high settings, never leave food unattended. Boilovers cause smoking and greasy spillovers may catch on fire. • Be sure you turn the control knob to OFF when you finish cooking. • The area between the high and off settings, are not appropriate for cooking.
Using the warming center The warming center, located in the back center of the glass surface, will keep hot, cooked food at serving temperature. • Do not warm food on the warming center for more than two hours. • Use only cookware and dishes recommended as safe for oven and cooktop use. CAUTION • Always use potholders or oven mitts when removing food from the warming center as cookware and plates will be hot. • When warming pastries and breads the cover should have an opening to allow moisture to escape.
USING THE PROPER COOKWARE Using the right cookware can prevent many problems, such as uneven cooking or extended cooking times. Using the proper pans will reduce cooking times and cook food more evenly. CORRECT Flat bottom and straight sides. • Tight fitting lids. Check for flatness by rotating a ruler across the bottom of the cookware. INCORRECT Curved and warped pan bottoms. • Weight of handle does not tilt pan. • Pan is well balanced.
Protecting the smoothtop surface Cleaning • Clean the cooktop before using it for the first time. • Clean your cooktop daily or after each use. This will keep your cooktop looking good and can prevent damage. • If a spillover occurs while cooking, immediately clean the spill from the cooking area while it is hot to prevent a tough cleaning chore later. Using extreme care, wipe the spill with a clean dry towel. • Do not allow spills to remain on the cooking area or the cooktop trim for a long period of time.
using the warming drawer About the warming drawer The warming drawer will keep hot, cooked foods warm. Always start with hot food. Do not use to heat cold food other than crisping crackers, chips or dry cereal. Allow approximately 25 minutes for the warming drawer to preheat. • Do not line the warming drawer or pan with aluminum foil. Foil is an excellent heat insulator and will trap heat beneath it. This will upset the performance of the drawer and could damage the interior finish.
TURNING THE WARMING DRAWER ON OR OFF 1. Set the warming drawer to the heat level you want. Press the WARMING DRAWER pad once for low, twice for medium, or 3 times for high. The warming drawer starts automatically once you have finished selecting the level you want. 2. Turn the warming drawer off. Press the WARMING DRAWER pad when the warming level is high. 03 WARMING DRAWER • Pressing the CLEAR/OFF pad does not turn the warming drawer off. • The warming drawer cannot be used during a self-cleaning cycle.
operating the oven THE OVEN CONTROL PANEL READ THE INSTRUCTIONS CAREFULLy BEFORE USING THE OVEN. For satisfactory use of your oven, become familiar with the various features and functions of the oven as described below. Detailed instructions for each feature and function follow later in this user manual. 15 16 17 18 1 14 2 13 12 11 10 9 8 7 6 5 4 3 1.
SETTING THE CLOCK The clock must be set to the correct time of day for the automatic oven timing functions to work properly. • The time of day cannot be changed during a timed cooking, a delay-timed cooking or a selfcleaning cycle. • You can choose between a 12-hour or 24-hour display. The default is 12-hour. How to set the clock 1. Start the set up. 04 OPERATING THE OVEN Press the CLOCK AM/PM pad. 2. Select AM or PM. Press the CLOCK AM/PM pad again, once to select AM or twice to select PM.
MINIMUM AND MAXIMUM SETTINGS All of the features listed have minimum and maximum time or temperature settings. A beep will sound each time a pad on the control panel is pressed and the entry is accepted. An error tone will sound in the form of a long beep if the entered temperature or time is below the minimum or above the maximum setting for the feature. FEATURE MINIMUM MAXIMUM Bake 150°F (65°C) 550°F (285°C) Broil LO (375°F) HI (480°F) 2 Hr. 4 Hr.
USING THE OVEN RACKS Oven rack positions The oven has 7 rack positions (1~7). TyPE OF FOOD 7 6 5 4 3 2 1 RACK POSITION Angel food cake 2 Bundt or pound cakes Biscuits, muffins, brownies, cookies, cupcakes, layer cakes, pies Casseroles Small roast, ham 2 Turkey, large roast 1 Baking layer cakes Centering the baking pans in the oven as much as possible will produce better results. If baking with more than one pan, place the pans so each has at least 1” to 1½” of air space around it.
BAKING The oven can be programmed to bake at any temperature from 150°F to 550°F. How to set the thermostat 1. Start the set up. Press the BAKE pad. The default temperature is 350°F. 2. Enter the temperature you want on the number pad, eg. 3, 7, 5. . Start the bake function. Press the SET/START pad. The temperature display will start to change once the oven temperature reaches 150°F. . If you want to cancel baking or if you have finished, press the CLEAR/OFF pad.
CONVECTION BAKING 7 6 By using the convection bake feature, you will be able to cook faster. You can program the oven for convection baking at any temperature between 175°F and 550°F. 5 Convection baking uses a fan to circulate the oven’s heat evenly and continuously within the oven. This improved heat distribution allows for even cooking and excellent 2 1 results using multiple racks at the same time. Foods cooked on a single oven rack will generally cook faster and more evenly with convection baking.
Recommended convection baking guide Rack Position Temp.
CONVECTION ROASTING Convection roasting is good for cooking large tender cuts of meat, uncovered. Heat comes from the top heating element. The convection fan circulates the heated air evenly over and around the food. Meat and poultry are browned on all sides as if they were cooked on a rotisserie. The heated air seals in juices quickly for a moist and tender product while, at the same time, creating a rich golden brown exterior. How to set the oven for convection roasting 1.
Recommended convection roasting guide Roasting time* (min per lb) Internal temp.
TIMED COOKING In a timed cooking, the oven turns on immediately and cooks for the length of time you select. At the end of the cooking time, the oven turns off automatically. • You can use the timed cooking feature only with another cooking operation (bake, convection bake, or convection roast). • You can set the oven for a timed cooking before setting other cooking operations. • The clock must be set for the correct time of day. How to set the oven for timed cooking 04 OPERATING THE OVEN 1.
DELAY TIMED COOKING In a delay timed cooking, the oven’s timer turns the oven on and off at times you select in advance. • You can use the delay timed cooking feature only with another cooking operation (bake, convection bake, convection roast and self clean) • You can set the oven for a delay timed cooking before setting other cooking operations. • The clock must be set for the correct time of day. How to set the oven for delay timed cooking 1. Position the oven rack(s) and place the food in the oven. 2.
BROILING Always operate broil mode with door closed. CAUTION Using the broil pan The broil pan and the insert allow grease to drain and be kept away from the high heat of the broiler. • Do not use the pan without the insert. CAUTION Should an oven fire occur, close the oven door and turn the oven off. If the fire continues, throw baking soda on the fire or use a foam-type fire extinguisher. Do not put water or flour on the fire.
Recommended broiling guide The size, weight, thickness, starting temperature, and your preference of doneness will affect broiling times. This guide is based on meats at refrigerator temperature. Food Ground Beef Well Done First Quantity and/ Shelf side time or thickness position (min.) 1 lb. (4 patties) ½ to ¾” thick Second side time (min.) Medium Well Done Rare Medium Well Done Chicken Lobster Tails Fish Fillets Ham Slices (precooked) Pork Chops Well Done Space evenly.
USING THE CUSTOM COOK FEATURE By using the custom cook feature, you can record up to 3 different recipe settings. The feature may be used for baking, convection baking, or convection roasting. It will not work with any other function, including the delay start feature. How to record a recipe setting 1. Press the pad for the cooking operation you want to store, eg. BAKE. The default temperature is 350°F. 2. Use the number pad to enter the temperature you want, eg. 375°F. 04 OPERATING THE OVEN .
PROOFING The proofing feature maintains a warm environment useful for rising yeast-leavened products. How to set the oven for proofing 1. Enter the proofing mode. Press the PROOF pad. 2. Start the proofing function. Press the SET/START pad. The proofing feature automatically provides the optimum temperature for the proof process, and therefore does not have a temperature adjustment. . Press the CLEAR/OFF pad at any time to turn off the proofing feature.
USING THE KEEP WARM FUNCTION The keep warm feature will maintain an oven temperature of 170°F. You should not use this feature to reheat cold foods. The keep warm feature will keep cooked food warm for serving up to 3 hours after cooking has finished. After 3 hours, the feature will shut the oven off automatically. The feature may be used without any other cooking operations or may be set to activate after a timed or delay timed cooking operation. How to use the keep warm feature 1.
EXTRA FEATURES 12 hour energy saving With this feature, should you forget and leave the oven on, the control will automatically turn off the oven after 12 hours during baking functions or after 3 hours during a broil function. How to turn 12 hour energy saving feature on or off 1. Press COOKING TIME and 0 on the number pad at the same time for 3 seconds. The display will show 12 Hr (12 hour shut-off) or -- Hr (no shutoff). The default is 12 Hr. 2. Press 0 on the number pad to select OFF or ON.
Convection auto conversion feature When using convection bake, the convection auto conversion feature will automatically convert entered regular baking temperatures to convection baking temperatures. This feature is activated so that the display will show the actual converted (reduced) temperature. For example, if you enter a regular recipe temperature of 350°F and press the Set/Start pad, the display will show the converted temperature of 325°F. How to disable or enable the auto conversion feature 1.
Sound on/off By using this feature, you can set the oven controls to operate silently. How to turn the sound on or off 1. Press Oven Light and 0 on the number pad at the same time for 3 seconds. The display will show Snd On (sound on) or Snd OFF (sound off). The default setting is Snd On. 2. Press 0 on the number pad to select OFF or ON. Pressing 0 on the number pad changes the mode between Snd On and Snd OFF. . Press the SET/START pad.
Setting the Sabbath (For use on the Jewish Sabbath & Holidays) The Sabbath feature can be used with baking only. The oven temperature may be set higher or lower after setting the Sabbath feature (the oven temperature adjustment feature should be used only during Jewish holidays). The display, however, will not change and tones will not sound when a change occurs. Once the oven is properly set for baking with the Sabbath feature active, the oven will remain continuously on until cancelled.
maintaining your appliance SELF-CLEANING A self-cleaning oven uses high temperatures (well above cooking temperatures) to burn off leftover grease and residue completely or reduce them to a finely powdered ash that you can wipe away with a damp cloth. CAUTION • During the self-cleaning cycle, the outside of the range can become very hot to touch. Do not leave small children unattended near the appliance.
How to set the oven for self-cleaning 1. Select the length of time for the self-cleaning operation, eg. 3 hours. Press the SELF CLEAN pad once for a 3 hour clean time, twice for a 4 hour clean time, or 3 times for a 2 hour clean time. The default setting is 3 hours. 2. Start the self-cleaning cycle. Press the SET/START pad. The motor-driven door lock will engage automatically. • The oven door locks automatically. The display will show the clean time remaining.
STEAM-CLEANING How to set the oven for steam-cleaning Steam-cleaning saves time and energy for light cleaning. For heavier-duty cleaning of debris and grease, use the self-cleaning function. 1. Remove all accessories from the oven. 2. Pour approximately 10 oz. (300 ml) of water onto the bottom of the empty oven and close the oven door. Use normal water only, no distilled water. . Press the STEAM CLEAN pad. . Press the SET/START pad.
CARE AND CLEANING OF THE OVEN WARNING • Be sure all controls are OFF and all surfaces are COOL before cleaning any part of the range. • If your range is removed for cleaning, servicing or any reason, be sure the Anti-Tip device is re-engaged properly when the range is replaced. Failure to take this precaution could result in tipping of the range and cause injury. Oven vent • The oven vent is located above the right rear surface unit. • This area could become hot during oven use.
Cleaning the broil pan and insert • Do not attempt to clean the broil pan or insert by leaving it in the oven during a self-cleaning cycle. • After broiling, remove the broil pan from the oven. Remove the insert from the pan. Carefully pour out the grease from the pan into a proper container. • Wash and rinse the broil pan and grid in hot water with a soap-filled scouring pad. • Soaking the pan will remove burned-on foods.
CARE AND CLEANING OF THE GLASS COOKTOP Normal daily use cleaning Use only a ceramic cooktop cleaner or the cleaner supplied with this appliance on the glass cooktop. Other creams may not be as effective. By following these steps, you can maintain and protect the surface of your glass cooktop. 1. Before using the cooktop for the first time, clean it with a ceramic cooktop cleaner or the included cleaner. This helps protect the top and makes cleanup easier. 2.
Removing metal marks and scratches 1. Be careful not to slide pots and pans across your cooktop. It will leave marks on the cooktop surface. You can remove these marks by applying ceramic cooktop cleaner or the included cleaner with a cleaning pad for ceramic cooktops. 2. If pots with a thin overlay of aluminum or copper are allowed to boil dry, the overlay may leave black discoloration on the cooktop. You should remove this discoloration immediately or it may become permanent.
REMOVING AND REPLACING THE OVEN DOOR How to remove the door • The door is very heavy. Be careful when removing and lifting the door. Do not lift the door by the handle. CAUTION • Turn the power OFF before removing the door. 1. Open the door completely. 2. Pull the hinge locks down toward the door frame to the unlocked position. Locked position Unlocked position 3. Firmly grasp both sides of the door at the top. 4.
3. Open the door fully. If the door will not open fully, the indentation is not inserted correctly in the bottom edge of the slot. 4. Push the hinge locks up against the front frame of the oven cavity to the locked position. Hinge lock Unlocked position Locked position 5. Close the oven door. REMOVING AND REPLACING THE WARMING DRAWER CAUTION Turn the power OFF before removing the warming drawer. How to remove the warming drawer 1. Open the drawer to the fully opened position. 2.
CHANGING THE OVEN LIGHT The oven light is a standard 40-watt appliance bulb. It will come on when the oven door is open. When the oven door is closed, press the OVEN LIGHT pad to turn it on or off. It will not work during a self-cleaning cycle. 1. Make sure the oven and the bulb are cool. 2. Unplug the range or disconnect power. 3. Turn the glass bulb cover in the back of the oven counterclockwise to remove. 4. Turn the bulb counterclockwise to remove it from its socket. Glass bulb cover Bulb 5.
troubleshooting Troubleshooting Samsung works hard to ensure that you don’t have problems with your new electric range. If you run into unexpected trouble, look first for a solution in the table below. If, after trying the suggested solution, you’re still having trouble, call Samsung at 1-800-SAMSUNG (1-800-726-7864). PROBLEM The range is not level. POSSIBLE CAUSE The appliance has been installed improperly. The floor is sagging or sloping.
PROBLEM POSSIBLE CAUSE Areas of Food spillover was not cleaned. discoloration on the cooktop The surface is hot and the model features a light-colored cooktop. The appliance will not turn on. • Make sure the electrical plug is inserted into a live, properly grounded outlet. • Replace the fuse or reset the circuit breaker. • See the chapter on operating the oven. • Allow the oven to cool.
PROBLEM Food does not broil properly. The oven temperature is too hot or too cold. Scratches or abrasions on cooktop surface Brown streaks or specks Areas of discoloration with metallic sheen The oven will not self-clean. “Crackling” or “popping” sound Excessive smoking during a selfcleaning cycle The oven door will not open after a self-cleaning cycle. POSSIBLE CAUSE The oven controls have been set incorrectly. The rack has not been properly positioned. Cookware not suited for broiling.
PROBLEM POSSIBLE CAUSE Oven not clean after The oven controls were not set a self-cleaning cycle correctly. The oven was heavily soiled. Strong odor Fan noise Oven racks are difficult to slide. Display goes blank. Display flashes. Drawer does not slide smoothly or drags. • To speed the process, set a self-cleaning cycle for a minimum of 3 hours. • See the section on self-cleaning on page 38. An odor from the insulation around • This is temporary.
warranty PLEASE DO NOT DISCARD THIS REPLACES THE WARRANTY PAGE IN THE USE & CARE GUIDE SAMSUNG ELECTRIC RANGE LIMITED WARRANTY TO ORIGINAL PURCHASER This SAMSUNG brand product, as supplied and distributed by SAMSUNG ELECTRONICS CANADA INC.
FTQ352IWX_XAC DG68-00106A.
FTQ352IWX_XAC DG68-00106A.
FTQ352IWX_XAC DG68-00106A.
QUESTIONS OR COMMENTS? COUNTRY CALL OR VISIT US ONLINE AT IN THE US 800-SAMSUNG (800-726-7864) www.samsung.com IN CANADA 800-SAMSUNG (800-726-7864) www.samsung.com/ca DG68-00106A FTQ352IWX_XAC DG68-00106A.
FTQ352IWX FTQ352IWB FTQ352IWW Cuisinière électrique Manuel d’utilisation Un monde de possibilités Merci d’avoir choisi ce produit Samsung. Afin de bénéficier du meilleur du service après-vente, enregistrez votre appareil sur le site suivant : www.samsung.com/global/register FTQ352IWX_XAC DG68-00106A.
Caractéristiques de votre nouvelle cuisinière Plus de commodité. Cuisson de meilleure qualité. Entretien facile. Votre nouvelle cuisinière électrique a été conçue pour vous offrir tous ces avantages et plus encore. • Toute nouvelle technologie en matière de distribution de chaleur Les cuisinières équipées d’un seul ventilateur ont tendance à former un tourbillon de chaleur qui ne se répartit pas dans l’ensemble du four.
Consignes de sécurité importantes Lisez et suivez toutes les consignes avant d’utiliser votre four afin d’éviter tout risque d’incendie, d’électrocution, de blessure ou de dommage lors de l’utilisation de la cuisinière. Le présent guide ne couvre pas toutes les situations susceptibles de se produire. Contactez toujours votre réparateur ou le fabricant en cas de fonctionnement anormal de l’appareil.
POUR VOTRE SECURITE Lorsque vous utilisez des appareils électriques, respectez les consignes de sécurité de base suivantes : Utilisez ce four uniquement pour l’usage auquel il est destiné, tel que décrit dans ce manuel d’utilisation. Les surfaces potentiellement chaudes comprennent la table de cuisson, les zones faisant face à la table de cuisson, l’orifice de ventilation du four, les surfaces situées à proximité de cette ouverture, les rainures situées autour de la porte du four.
TABLE DE CUISSON Ne laissez jamais la table de cuisson sans surveillance lorsqu’un foyer fonctionne à puissance élevée. En cas de débordement, les particules graisseuses provenant des aliments risquent de s’enflammer. Ne soulevez pas la table de cuisson. Soulever la table de cuisson peut provoquer des dommages et un dysfonctionnement de la cuisinière. Ne vous servez pas de la surface de cuisson lorsque aucun récipient ne se trouve dessus.
FOUR NE TOUCHEZ PAS LES ELEMENTS CHAUFFANTS OU LES SURFACES INTERNES DU FOUR. Les éléments chauffants peuvent être chauds même s’ils sont noirs. Les surfaces internes d’un four deviennent suffisamment chaudes pour provoquer des brûlures. Pendant et après le fonctionnement, ne touchez pas les éléments chauffants et les surfaces internes du four ou ne laissez aucun vêtement ou produit inflammable entrer en contact avec ces derniers tant qu’ils ne sont pas refroidis.
FOURS AUTO-NETTOYANTS Ne nettoyez pas le joint de la porte. Le joint de la porte est indispensable pour assurer une bonne étanchéité. Veillez à ne pas frotter, endommager ou déplacer le joint. Ne laissez jamais vos oiseaux de compagnie dans la cuisine. Les oiseaux sont extrêmement sensibles à la fumée émise durant les cycles d’auto-nettoyage du four. La fumée peut être dangereuse, voire mortelle, pour les oiseaux. Déplacez les oiseaux dans une pièce bien aérée.
Sommaire Présentation de votre nouvelle cuisinière 9 9 Présentation Accessoires fournis 10 12 14 14 15 A propos de la table de cuisson Comment régler la cuisinière pour utiliser la table de cuisson ? Utilisation des ustensiles de cuisine appropriés Choix des ustensiles de cuisine appropriés Protection de la surface lisse Utilisation du tiroir chauffe-plat 16 17 A propos du tiroir chauffe-plat Activation ou désactivation du tiroir chauffe-plat Utilisation du four 18 19 20 21 22 23 24 26 28 29 30 33
Présentation de votre nouvelle cuisinière PRéSENTATION Boutons de commande de la table Reportez-vous à la page 11 pour plus d’informations. 01 INTRODUCTION Tableau de commande du four Reportez-vous à la page 18 pour plus d’informations.
Table de cuisson A propos de la table de cuisson AVANT LA CUISSON ATTENTION • N’utilisez pas la table de cuisson vitrée comme planche à découper. • Ne placez et ne rangez rien qui soit susceptible de fondre ou de s’enflammer sur la surface vitrée, même si elle n’est pas utilisée. • Allumez les foyers uniquement après y avoir placé la casserole. • Ne stockez pas d’objets lourds au-dessus de la table de cuisson. Ils pourraient tomber et l’endommager.
Emplacement des foyers radiants et des commandes Les boutons de commande permettent d’activer les foyers radiants de la table de cuisson comme indiqué ci-dessous. 5 2 1. Elément unique : arrière gauche 2. Elément unique : arrière droit . Elément double : avant gauche 4 3 02 TABLE DE CUISSON 1 . Elément double : avant droit 5. Zone chauffe-plat : arrière centre 6 . Témoin de surface chaude Témoin de surface chaude • S’allume lorsque la surface est allumée ou est chaude au toucher.
Comment régler la cuisinière pour utiliser la table de cuisson ? ATTENTION • Les foyers de la table de cuisson peuvent être chauds et provoquer des brûlures. Ne touchez pas les foyers avant qu’ils n’aient suffisamment refroidi. • Ne laissez jamais la cuisson sans surveillance à température élevée ou moyennement élevée. En cas de débordement, les particules graisseuses provenant des aliments risquent de s’enflammer. • Veillez à tourner le bouton de commande sur OFF (DESACTIVE) à la fin de la cuisson.
Utilisation de la zone chauffe-plat La zone chauffe-plat, située dans la partie centrale arrière de la surface vitrée, conserve les aliments cuits à température de consommation. • Ne réchauffez pas les aliments pendant plus de deux heures sur la zone chauffe-plat. • Utilisez uniquement des ustensiles et plats recommandés pour une utilisation sûre dans le four et sur la table de cuisson.
UTILISATION DES USTENSILES DE CUISINE APPROPRIéS L’utilisation de l’ustensile de cuisine approprié permet d’éviter de nombreux problèmes tels qu’une cuisson inégale ou un temps de cuisson trop long. Utiliser une casserole adaptée permet de réduire les temps de cuisson et de cuire uniformément les aliments. APPROPRIE Fond plat et côtés droits. • Couvercles hermétiques. Vérifiez que le fond de la casserole est plat en y faisant tourner une règle. NON APPROPRIE Fond de casserole bombé et déformé.
Protection de la surface lisse Nettoyage • Nettoyez la table de cuisson avant de l’utiliser pour la première fois. • Nettoyez votre table de cuisson quotidiennement ou après chaque utilisation. Ainsi, vous conserverez votre table de cuisson en bon état et éviterez les dommages. • Si la casserole déborde durant la cuisson, nettoyez immédiatement la zone de cuisson tant qu’elle est chaude afin d’éviter un nettoyage ultérieur plus ardu. Nettoyez prudemment les éclaboussures à l’aide d’un chiffon sec.
Utilisation du tiroir chauffe-plat A propos du tiroir chauffe-plat Le tiroir chauffe-plat conserve les aliments cuits chauds. Les aliments doivent être déjà chauds. Ne l’utilisez pas pour réchauffer des aliments froids, à l’exception des craquelin, chips ou céréales déshydratées. Environ 25 minutes sont nécessaires pour préchauffer le tiroir chauffe-plat. • Ne tapissez pas le tiroir chauffe-plat ou la casserole de papier d’aluminium.
ACTIVATION OU DéSACTIVATION DU TIROIR CHAUFFE-PLAT 1. Réglez le tiroir chauffe-plat sur la puissance souhaitée. Appuyez une fois sur la touche WARMING DRAWER (TIROIR CHAUFFE-PLAT) pour une puissance faible, deux fois pour une puissance moyenne ou trois fois pour une puissance élevée. Le tiroir chauffe-plat démarre automatiquement une fois le réglage sélectionné. 2. Eteignez le tiroir chauffe-plat. • Appuyer sur la touche CLEAR/OFF (EFFACER/ARRET) ne permet pas d’éteindre le tiroir chauffe-plat.
Utilisation du four TABLEAU DE COMMANDE DU FOUR LISEZ ATTENTIVEMENT LES CONSIGNES D’UTILISATON AVANT DE VOUS SERVIR DU FOUR. Afin de profiter au mieux de votre four, familiarisez-vous avec les fonctionnalités décrites ci-dessous. Vous trouverez un descriptif détaillé de chaque fonction et de chaque caractéristique plus loin dans ce manuel. 15 16 17 18 1 14 2 13 12 11 10 9 8 7 6 5 4 3 1.
11. DELAy START (DEPART DIFFERE) : utilisez cette touche en même temps que les touches Bake (Cuisson), Conv. Bake (Cuisson par conv.), Conv. Roast (Rôtissage par conv.), Cooking Time (Temps de cuisson) et Self Clean (Auto-nettoyage) afin de régler le départ et l’arrêt automatiques du four selon l’heure définie. 12. COOKING TIME (TEMPS DE CUISSON) : appuyez sur cette touche puis utilisez le pavé numérique pour définir le temps de cuisson des aliments. Le four s’éteint une fois le temps de cuisson écoulé. 1 .
Comment passer du format 12 heures au format 24 heures ? 1. Démarrez le réglage. Appuyez simultanément sur la touche CLOCK AM/PM (HORLOGE AM/PM) et la touche numérique 0 (pavé numérique) pendant 3 secondes. Le format actuel s’affiche (ex. : 12 heures). 2. Sélectionnez le format d’affichage de votre choix. Appuyez sur la touche numérique 0 pour sélectionner 12 heures ou 24 heures. Appuyer sur la touche numérique 0 permet de passer de l’affichage 12 heures à l’affichage 24 heures. . Quittez le réglage.
RéGLAGE DE LA MINUTERIE La minuterie émet un signal sonore une fois que le temps réglé est écoulé. Elle ne permet pas de démarrer ou d’arrêter les fonctions de cuisson. La minuterie peut être utilisée en parallèle avec toutes les autres fonctions du four. Comment régler la minuterie ? 1. Activez la minuterie. Appuyez sur la touche KITCHEN TIMER ON/OFF (ACTIVATION/DESACTIVATION DE LA MINUTERIE). 04 UTILISATION DU FOUR 2. Sélectionnez l’unité de temps de votre choix.
UTILISATION DES GRILLES DU FOUR Hauteurs de grille Le four comporte 7 hauteurs de grille (1 à 7). 7 6 5 4 3 2 1 TyPE D’ALIMENTS HAUTEUR DE GRILLE Tartes surgelées Gâteau des anges 2 Couronne ou quatre-quarts Biscuits, muffins, brownies, cookies, petits gâteaux, gâteaux étagés, tartes Plats mijotés Grands rôti, jambon 2 Dinde, petits rôti 1 Cuisson de gâteaux étagés Positionnez les moules à gâteaux le plus au centre possible du four pour assurer de meilleurs résultats.
CUISSON Le four peut être programmé pour cuire à toute température comprise entre 150°F et 550°F. Comment régler le thermostat ? 1. Démarrez le réglage. Appuyez sur la touche BAKE (CUISSON). La température par défaut est de 350°F. 04 UTILISATION DU FOUR 2. Saisissez la température de votre choix à l’aide du pavé numérique (ex. : 3, 7, 5). . Lancez la fonction de cuisson. Appuyez sur la touche SET/START (REGLAGE/DEPART).
CUISSON PAR CONVECTION 7 6 5 La fonction de cuisson par convection permet d’accélérer la cuisson. Vous pouvez programmer la cuisson par convection sur toute température comprise entre 175°F et 550°F. La cuisson par convection utilise un ventilateur pour que la chaleur circule de façon homogène et continue dans le 2 four. Cette distribution efficace de la chaleur vous permet 1 d’obtenir une cuisson homogène et excellente lorsque vous utilisez plusieurs grilles dans le même temps.
Guide de cuisson par convection Aliments Hauteur de grille Temp.
RÔTISSAGE PAR CONVECTION Le rôtissage par convection est conseillé pour la cuisson de morceaux de viande très tendres qu’il faut préparer sans couvrir. La chaleur provient de l’élément chauffant supérieur. Le ventilateur de convection distribue l’air chauffé de manière uniforme sur la nourriture et autour. La viande et la volaille sont dorées de toute part, comme après une cuisson en rôtissoire.
Guide de rôtissage par convection recommandé Poids (lb) Temp. du four ( ˚F) Temps de rôtissage* (min./lb) Temp.
CUISSON MINUTéE Durant la cuisson minutée, le four s’allume immédiatement et fonctionne pendant la durée que vous avez sélectionnée. A la fin du temps de cuisson, le four s’éteint automatiquement. • Vous ne pouvez utiliser la fonction de cuisson minutée qu’en parallèle avec une autre option de cuisson (Cuisson, Cuisson par convection ou Rôtissage par convection). • Vous pouvez régler la cuisson minutée avant de régler les autres options de cuisson. • L’horloge doit être réglée sur l’heure correcte.
CUISSON MINUTéE DIFFéRéE Durant la cuisson minutée différée, la minuterie du four permet d’allumer et d’éteindre le four aux heures que vous avez sélectionnées préalablement. • Vous ne pouvez utiliser la fonction de cuisson minutée différée qu’en parallèle avec une autre option de cuisson (Cuisson, Cuisson par convection, Rôtissage par convection et Autonettoyage). • Vous pouvez régler la cuisson minutée différée avant de régler les autres options de cuisson.
CUISSON AU GRIL ATTENTION Préservez toujours la porte du four fermée lorsque vous utilisez le mode de cuisson au gril. Utilisation de la lèchefrite La lèchefrite et son gril permettent à la graisse de s’écouler et d’être maintenue éloignée de la chaleur élevée du gril. • N’utilisez pas la lèchefrite sans le gril. • Ne couvrez pas le gril de papier d’aluminium. La graisse exposée risque de s’enflammer. ATTENTION En cas d’incendie à l’intérieur du four, fermez la porte du four et éteignez-le.
Guide de cuisson au gril Les temps de cuisson au gril dépendent de la taille, du poids, de l’épaisseur, de la température de départ ainsi que de vos préférences de cuisson. Ce guide se base sur des viandes sortant du réfrigérateur. Aliments Bœuf haché 1 lb (4 boulettes) ½ à ¾” d’épaisseur Temps Temps pour Hauteur pour le 1er le 2ème côté (min.) côté (min.
Aliments Quantité et/ou épaisseur Temps Temps pour Hauteur pour le 1er le 2ème côté (min.) côté (min.) 2 (½” d’épaisseur) 6 2 (1” d’épaisseur) environ 1 lb. 5 9-10 7-9 2 (1” d’épaisseur) environ 10 à 12 oz. 6 6 4-6 6 8 7-9 6 11 9 Bien cuit 2 (1½” d’épaisseur) environ 1 lb. 6 13 9-11 Saumon 2 (1” d’épaisseur) 6 8 3-4 4 (1” d’épaisseur) environ 1 lb. 6 9 4-6 Côtelettes de porc Bien cuit 7 Remarques 6-8 Incisez pour extraire la graisse.
UTILISATION DE LA FONCTION CUISSON PERSONNALISéE Le fonction Cuisson personnalisée vous permet d’enregistrer jusqu’à 3 différentes recettes préréglées. Cette fonction peut être utilisée en parallèle avec les modes Cuisson, Cuisson par convection ou Rôtissage par convection. Elle est incompatible avec toute autre fonction, y compris le départ différé. Comment enregistrer une recette préréglée ? 1. Appuyez sur la touche correspondant à la cuisson que vous souhaitez mémoriser, par exemple BAKE (CUISSON).
LEVéE La fonction Levée sert à maintenir un niveau de chaleur permettant le gonflement des produits nécessitant une fermentation à la levure. Comment régler le four pour la levée ? 1. Sélectionnez le mode de levée. Appuyez sur la touche PROOF (LEVEE). 2. Démarrez la fonction Levée. Appuyez sur la touche SET/START (REGLAGE/DEPART). La fonction de levée fournit automatiquement la température optimale pour le processus de levée. Par conséquent, aucun réglage de température n’est nécessaire. .
UTILISATION DE LA FONCTION DE MAINTIEN AU CHAUD La fonction de maintien au chaud conserve la température à 170°F. N’utilisez pas cette fonction pour réchauffer de la nourriture froide. La fonction de maintien au chaud permet de conserver des aliments cuits au chaud jusqu’à 3 heures après leur cuisson en vue de les servir. Au bout de 3 heures, le four s’éteint automatiquement.
FONCTIONS COMPLéMENTAIRES Economie d’énergie après 12 heures Si vous oubliez d’éteindre votre four, cette fonction assure la désactivation automatique des commandes après 12 heures d’utilisation des fonctions de cuisson ou après 3 heures d’utilisation de la fonction Gril. Comment activer ou désactiver la fonction d’économie d’énergie après 12 heures ? 1. Appuyez simultanément sur la touche COOKING TIME (TEMPS DE CUISSON) et la touche numérique 0 pendant 3 secondes.
Fonction de convection par conversion automatique Lorsque vous utilisez la cuisson par convection, la fonction de convection par conversion automatique permet de convertir automatiquement les températures de la cuisson classique en températures de cuisson par convection. Lorsque cette fonction est activée, l’affichage indique la température réelle convertie (réduite).
Activation/désactivation du son Cette fonction vous permet de régler le four de sorte à ce que les commandes fonctionnent de manière silencieuse. Comment activer ou désactiver le son ? 1. Appuyez simultanément sur les touches Oven Light (Eclairage du four) et 0 (pavé numérique) pendant 3 secondes. L’affichage indique alors Snd On (Son activé) ou Snd OFF (Son désactivé). Par défaut, le son est activé. 2. Appuyez sur la touche 0 du pavé numérique pour sélectionner OFF (DESACTIVATION) ou ON (ACTIVATION).
Réglage de la fonction Shabbat (utilisée pour les fêtes et le Shabbat juifs) Comment utiliser la fonction Shabbat ? 1. Appuyez sur la touche BAKE (CUISSON). La température par défaut est de 350°F. 2. Saisissez la température de votre choix (ex. : 375°F) à l’aide du pavé numérique. . Appuyez sur la touche SET/START (REGLAGE/DEPART). La température affichée se modifie dès que le four atteint la température de 150° F. 04 UTILISATION DU FOUR La fonction Shabbat peut être utilisée uniquement avec la cuisson.
Entretien de votre appareil AUTO-NETTOYAGE Le cycle d’auto-nettoyage émet une température très élevée (bien supérieure aux températures de cuisson) pour brûler complètement les résidus de graisse ou les réduire en poudre qu’il vous suffit d’essuyer à l’aide d’un torchon humide. ATTENTION • Durant l’auto-nettoyage, les parois externes de la cuisinière peuvent devenir extrêmement chaudes au toucher. Ne laissez jamais d’enfants en bas âge sans surveillance à proximité de l’appareil.
Comment régler le four pour l’auto-nettoyage ? 1. Sélectionnez la durée d’auto-nettoyage (ex. : 3 heures). Appuyez sur la touche SELF CLEAN (AUTO-NETTOyAGE) une fois pour un cycle de 3 heures, deux fois pour un cycle de 4 heures ou trois fois pour un cycle de 2 heures. Par défaut, le cycle dure 3 heures. 2. Démarrez le cycle d’auto-nettoyage. Appuyez sur la touche SET/START (REGLAGE/DEPART). Le verrouillage entraîné par moteur de la porte s’enclenche automatiquement.
NETTOYAGE VAPEUR Comment régler le four pour le nettoyage vapeur ? Le nettoyage vapeur permet d’effectuer un nettoyage superficiel en économisant du temps et de l’énergie. Pour nettoyer plus efficacement des résidus et particules graisseuses, utilisez la fonction d’auto-nettoyage. 1. Retirez tous les accessoires du four. 2. Versez environ 10 oz (300 ml) d’eau dans la sole du four vide et fermez la porte. Utilisez uniquement de l’eau claire normale et non de l’eau distillée. .
ENTRETIEN ET NETTOYAGE DU FOUR AVERTISSEMENT • Avant de nettoyer une quelconque partie de la cuisinière, assurez-vous que toutes les commandes sont DESACTIVEES et que toutes les surfaces sont FROIDES. Ventilation du four Ventilation du four • L’orifice de ventilation est situé au-dessus de l’élément de surface arrière droit. • Pendant le fonctionnement du four, cette zone peut devenir extrêmement chaude. • Il est normal que la vapeur s’échappe de cet orifice.
Nettoyage de la lèchefrite et de son gril • N’essayez pas de nettoyer la lèchefrite ou le gril en les laissant dans le four durant le cycle d’autonettoyage. • Après une cuisson au gril, retirez la lèchefrite du four. Retirez le gril de la lèchefrite. Déversez soigneusement la graisse du plat dans un récipient adéquat. • Lavez et rincez la lèchefrite et le gril à l’eau chaude en utilisant une éponge à récurer imbibée de savon. • Faire tremper le plat vous permettra d’éliminer les aliments brûlés.
ENTRETIEN ET NETTOYAGE DE LA TABLE DE CUISSON VITRéE Nettoyage après une utilisation quotidienne AVERTISSEMENT Vous risquez d’ENDOMMAGER votre surface vitrée si vous utilisez d’autres tampons de nettoyage que ceux recommandés. Suppression des résidus brûlés 05 ENTRETIEN DE L’APPAREIL Utilisez uniquement un nettoyant pour surface de cuisson en céramique ou le nettoyant fourni avec l’appareil pour le nettoyage de la table de cuisson vitrée. L’utilisation d’autres crèmes n’a pas la même efficacité.
Suppression des rayures et traces de métal 1. Evitez de faire glisser les casseroles et plats sur la table de cuisson. Vous risquez ainsi de rayer la table de cuisson. Vous pouvez supprimer ces traces en appliquant un nettoyant pour surface de cuisson en céramique, ou le nettoyant fourni, à l’aide d’un tampon de nettoyage pour surface de cuisson en céramique. 2.
RETRAIT ET REMISE EN PLACE DE LA PORTE DU FOUR Comment retirer la porte ? ATTENTION • La porte est très lourde. Soyez prudent lorsque vous retirez et soulevez la porte. Ne soulevez pas la porte par la poignée. • Mettez la cuisinière hors tension avant de retirer la porte. 1. Ouvrez la porte au maximum. 2. Abaissez les verrous de la charnière vers l’encadrement de porte pour les mettre en position de déverrouillage. Position de verrouillage Position de déverrouillage 3.
3. Ouvrez la porte au maximum. Si la porte ne s’ouvre pas complètement, c’est que la partie creuse n’est pas correctement insérée dans la partie inférieure du logement. 4. Poussez les verrous de la charnière vers le haut contre le cadre de la cavité du four pour les mettre en position de verrouillage. Verrou de la charnière Position de déverrouillage Position de verrouillage 5. Fermez la porte du four.
REMPLACEMENT DE L’AMPOULE DU FOUR L’éclairage du four nécessite une ampoule standard de 40 watts. L’éclairage s’active à l’ouverture de la porte. Lorsque la porte du four est fermée, appuyez sur la touche OVEN LIGHT (ECLAIRAGE DU FOUR) pour activer ou désactiver l’éclairage. L’éclairage ne s’active pas durant un cycle d’auto-nettoyage. 1. Assurez-vous que le four et l’ampoule sont froids. 2. Débranchez la cuisinière ou mettez-la hors tension. 3.
dépannage Dépannage Samsung veille à ce que vous ne rencontriez pas de problèmes lors de l’utilisation de votre nouvelle cuisinière électrique. En cas de problème inattendu, recherchez en premier lieu une solution dans le tableau ci-dessous. Si, après avoir essayé la solution proposée, vous ne parvenez pas à résoudre le problème, contactez Samsung au 1-800-SAMSUNG (1-800-726-7864). PROBLEME La cuisinière n’est pas à niveau. CAUSE POSSIBLE La cuisinière n’a pas été installée correctement.
PROBLEME Les foyers ne s’allument pas. Le foyer s’éteint et se rallume fréquemment. Le four ne s’allume pas. La cuisinière ne s’allume pas. L’éclairage du four ne s’allume pas. Des éclaboussures n’ont pas été nettoyées. • Reportez-vous au chapitre traitant de l’entretien et du nettoyage de la table de cuisson vitrée, page 45. La surface est chaude et la table • Ce phénomène est tout à fait normal. Il est de cuisson paraît de couleur claire.
PROBLEME Le four émet une fumée excessive durant la cuisson. Les aliments ne cuisent pas ou ne sont pas rôtis correctement. Les aliments ne grillent pas correctement. CAUSE POSSIBLE Les réglages n’ont pas été effectués correctement. La viande a été placée trop près de l’élément. SOLUTION • Reportez-vous au chapitre concernant le réglage des commandes du four. • Repositionnez la grille de façon à ménager un espace suffisant entre la viande et l’élément. Préchauffez le gril pour saisir la viande.
PROBLEME Traînées ou tâches brunes Zones de décoloration à reflets métalliques Bruit de « craquement » ou de « crépitement » Fumée excessive durant un cycle d’auto-nettoyage La porte du four ne s’ouvre pas après un cycle d’autonettoyage. Le four est toujours sale après un cycle d’auto-nettoyage. Des dépôts minéraux d’eau et d’aliments sont restés sur la table de cuisson. • Reportez-vous au chapitre relatif à l’entretien et au nettoyage de la table de cuisson vitrée, page 45.
PROBLEME Odeur forte CAUSE POSSIBLE SOLUTION Il est normal de constater une • Cette odeur est provisoire. odeur provenant de l’isolation de la cavité du four lors des premières utilisations de votre four. Bruit au niveau du Un ventilateur de convection • Ce phénomène est tout à fait normal. ventilateur peut se déclencher ou s’arrêter automatiquement.
garantie NE PAS JETER LE PRÉSENT DOCUMENT, QUI REMPLACE LA PAGE SUR LA GARANTIE QUI FIGUREDANS LE GUIDE D’UTILISATION ET D’ENTRETIEN CUISINIÈRE ÉLECTRIQUE SAMSUNG GARANTIE LIMITÉE DE L’ACHETEUR INITIAL Ce produit de marque SAMSUNG, qui est fourni et distribué par SAMSUNG ELECTRONICS CANADA INC.
UNE QUESTION ? UN COMMENTAIRE ? PAYS TELEPHONE SITE INTERNET AUX ETATS-UNIS 800-SAMSUNG (800-726-7864) www.samsung.com AU CANADA 800-SAMSUNG (800-726-7864) www.samsung.com/ca DG68-00106A FTQ352IWX_XAC DG68-00106A.