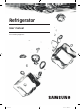
Refrigerator User manual Free Standing Appliance Untitled-11 1 2021-12-20 2:50:10
Contents Safety information Contents 2 Untitled-11 2 4 What you need to know about the safety instructions Important safety symbols and precautions: State of California Proposition 65 Warning Important safety precautions Severe warning signs for transportation and site Critical installation warnings Installation cautions Critical usage warnings Usage cautions Cleaning cautions Critical disposal warnings 4 5 5 5 7 8 9 10 12 13 14 Installation 15 Refrigerator at a glance Step-by-step installation 16
Regulatory Notice 73 FCC Notice IC Notice 73 74 Contents English Untitled-11 3 2021-12-20 3 2:50:10
Safety information Before using your new Samsung Refrigerator, please read this manual thoroughly to ensure that you know how to operate the features and functions that your new appliance offers safely and efficiently.
Important safety symbols and precautions: Please follow all safety instructions in this manual. This manual uses the following safety symbols. WARNING Hazards or unsafe practices that may result in severe personal injury, property damage, and/or death. Safety information CAUTION Hazards or unsafe practices that may result in severe personal injury and/or property damage. NOTE Useful information that helps users understand or benefit from the refrigerator.
Safety information • • • • • Safety information • • • If you use two products side by side, for safety reason, be sure to use certified products in explosive gas atmospheres. Never start up an appliance showing any signs of damage. If in doubt, consult your dealer. If the supply cord is damaged, it must be replaced by the manufacturer, its service agent or similarly qualified persons in order to avoid a hazard.
CAUTION • • • • • Safety information • Risk Of Fire Or Explosion. Flammable Refrigerant Used. Do Not Use Mechanical Devices To Defrost Refrigerator. Do Not Puncture Refrigerant Tubing. Risk Of Fire Or Explosion. Flammable Refrigerant Used. To Be Repaired Only By Trained Service Personnel. Do Not Puncture Refrigerant Tubing. Risk Of Fire Or Explosion. Flammable Refrigerant Used. Consult Repair Manual/Owner’s Guide Before Attempting to Service This Product. All Safety Precautions Must Be Followed.
Safety information Critical installation warnings WARNING • • • Safety information • • • • • • • • • • • • • • • • 8 Untitled-11 8 Do not install the refrigerator in a damp location or place where it may come in contact with water. - Deteriorated insulation on electrical parts may cause an electric shock or fire. Do not place this refrigerator in direct sunlight or expose it to the heat from stoves, room heaters, or other appliances.
• • • • • • • Safety information • If large amounts of dust or water enter the refrigerator, disconnect the power plug and contact a Samsung Electronics service center. - Otherwise there is a risk of fire. Do not stand on top of the appliance or place objects (such as laundry, lighted candles, lighted cigarettes, dishes, chemicals, metal objects, etc.) on the appliance. - This may result in an electric shock, fire, problems with the product, or injury.
Safety information Critical usage warnings WARNING • • • Safety information • • • • • • • • • • • • • • 10 Untitled-11 10 Do not insert the power plug into a wall socket with wet hands. - This may result in an electric shock. Do not store articles on the top of the appliance. - When you open or close the door, the articles may fall and cause personal injury and/or material damage. Do not insert hands, feet, or metal objects (such as chopsticks, etc.) into the bottom or the back of the refrigerator.
• • • • • • • • • • • • • • • • • Safety information • Do not overfill the refrigerator with food. - When you open the door, an item may fall out and cause personal injury or material damage. Do not spray volatile material such as insecticide onto the surface of the appliance. - As well as being harmful to humans, it may also result in an electric shock, fire, or problems with the product. Never put fingers or any objects into the water dispenser outlet, ice chute, or ice maker bucket.
Safety information • • • • Safety information • • If the refrigerator emits a burning smell or smoke, unplug the refrigerator immediately and contact a Samsung service center. - Failing to do so may result in an electric or fire hazards. Pull the power plug out of the socket before changing the interior lamps of the refrigerator. - Otherwise, there is a risk of electric shock. If you experience difficulty changing a non-LED light, contact a Samsung service center.
• • If the refrigerator is flooded, shut off the power to the refrigerator and contact your nearest Samsung service center. - There is a risk of electric shock or fire. Do not keep vegetable oil in your refrigerator’s door bins. The oil can solidify, making it foul-tasting and difficult to use. In addition, the open container can leak and the leaked oil can cause the door bin to crack. After opening an oil container, it is best to keep the container in a cool and shaded place such as a cupboard or pantry.
Safety information Critical disposal warnings WARNING • • • • Safety information • • • 14 Untitled-11 14 Children trapped inside a refrigerator can hurt themselves or suffocate to death. Please dispose of the packaging material from this product in an environmentally friendly manner. Ensure that none of the pipes on the back of the refrigerator are damaged prior to disposal. This product contains R-600a, a flammable gas, which is used as the refrigerant.
Installation Follow these instructions carefully to ensure a proper installation of this refrigerator and to prevent accidents before using it. WARNING • • • • Use the refrigerator only for its intended purpose as described in this manual. Any servicing must be performed by a qualified technician. Dispose of the product packaging material in compliance with the local regulations. To prevent electric shock, unplug the power plug before servicing or replacing parts.
Installation Refrigerator at a glance The actual refrigerator and provided component parts of your refrigerator may differ from the illustrations in this manual, depending on the model and the country.
01 AutoFill pitcher * 02 Water dispenser ** 03 Fridge door bin A. Fridge B. Beverage Center ** * Applicable models only ** Dispenser models only 04 Fridge shelf 05 Quick Space shelf * 06 Crisper+ / Fridge Drawers 07 Control panel 08 Water filter * 09 Freezer Installation 10 Ice maker NOTE • • • • • • For energy efficiency, keep all shelves, drawers, and baskets in their original positions.
Installation Door bins Your refrigerator ships with door bins of different types and sizes. If the door bins for your refrigerator were packaged separately, use the figure below to help you position the bins properly. NOTE The actual refrigerator and provided component parts of your refrigerator may differ from the illustrations in this manual, depending on the model and the country.
Step-by-step installation STEP 1 Select a site The site must: • Have a solid level surface without carpeting or flooring that may obstruct ventilation • Be out of direct sunlight • Have adequate room for opening and closing the door • Be away from any heat source • Provide room for maintenance and servicing • Have a temperature range between 50 °F (10 °C) and 110 °F (43 °C) Clearance See the following figures and tables for installation space requirements.
Installation Model 01 01 04 02 02 03 125° 03 58 /4" (1485 mm) 04 11 3/8" (289 mm) 05 06 RF30BB6***** more than 50 mm recommended 02 06 05 RF24BB6***** 2 24" (610 mm) 29 3/8" (748 mm) 2 1/8" (54 mm) 07 43" (1093 mm) 48 2/4" (1231 mm) 08 44 2/4" (1131 mm) 53 1/4" (1353 mm) 07 08 Installation NOTE The measurements in the tables may differ slightly from the actual measurements, depending on the measuring and rounding method.
STEP 2 Flooring If the refrigerator cannot pass through the entrance due to its size, see Door removal for entrance. NOTE Installation To prevent floor damage, make sure the front leveling legs are in the upright position. • The surface you install the refrigerator on must support a fully loaded refrigerator. • To protect the floor, put a large piece of cardboard along the path to the refrigerator's final installation location.
Installation STEP 3 Door removal for entrance If the refrigerator cannot pass through the entrance to your home or kitchen due to its size, follow these instructions to remove and then re-install the refrigerator's doors. If you do not need to remove the doors, go to page 28 to continue the installation procedure. WARNING Unplug the power cord of the refrigerator before removing the doors.
2. Disconnect the two wire connectors on the left door. The position of the connectors differs with the model. CAUTION • Installation Do not remove both doors simultaneously. Make sure to remove one door at a time. Otherwise, any of the doors may fall and cause physical injury. • Make sure the refrigerator is off before disconnecting the connectors. 3. Disconnect the water tube from the coupler on the left door as shown.
Installation 6. Open the door 90 degrees. While holding the door, pull up and remove the top hinge. Be careful not to damage the connector wires when you remove the hinge. Installation 7. Gently pull up the door vertically to remove. Do not apply excessive force to the door. The door may fall, causing physical injury. 8. Lay the door down on a flat surface. 9. Repeat steps 1-8 for the other door, except for step 3. There is no water tube on the right side door.
To reattach the fridge doors 1. While holding the door open by more than 90 degrees, insert the shaft on the middle hinge into the hole on the bottom of the door. Installation 2. Put the top hinge into position on the top of the refrigerator, and then insert the hinge shaft into the top hole of the door. Make sure the wires from the door pass through the hole in the hinge shaft. 3. Insert the clamp in the direction of the arrow. 4. Push back the clamp as shown.
Installation 5. Connect the wire connectors. CAUTION • Make sure the wire connectors are connected properly. Otherwise, the display will not operate. 6. Connect the water tube. - This step does not apply to the models without the AutoFill Pitcher and the water dispenser. CAUTION • • To prevent water leaks, make sure the red clips tighten the coupler properly. Keep the clips out of children’s reach. Installation 7. Repeat steps 1-5 for the other door.
To detach the freezer drawer 1. Lift up the front of the upper basket and pull up to remove. 2. Then, pull up to remove the lower basket from the rail assembly. Installation 3. Press down the hooks to unlock the rail assembly. 4. While holding the upper area of the freezer drawer front, slide the drawer out all the way to remove the freezer drawer from the rail assembly.
Installation CAUTION • • • Be careful not to scratch or dent the rail assembly. Make sure you mount the freezer baskets in the correct position. Otherwise, the door will not open or close properly, which causes frost to build up. Do not store too much food in the freezer drawer. This prevents the freezer drawer from closing properly, resulting in frost buildup.
STEP 5 Adjust the door height and the door gap Snap rings The height of a door can be adjusted using the provided snap rings, which come in 4 different sizes (1 mm, 1.5 mm, 2 mm, and 2.5 mm). To adjust the height of a door 1. Check the height difference between the doors, and then lift up and hold the door with the lower height. Installation B 2. Insert a suitable-sized snap ring (A) between the door grommet (B) and the hinge as shown. A CAUTION • • • Insert only one snap ring.
Installation STEP 6 Connect the water dispenser line (applicable models only) A water dispenser with a filter is one of the helpful features on your new refrigerator. To help promote better health, the water filter removes unwanted particles from your water. However, it does not sterilize or destroy microorganisms. You may need to purchase a water purifying system to do that. The water line also connects to the ice maker.
Connect the water supply line to the refrigerator There are several items you must purchase to complete this connection. You may find these items sold as a kit at your local hardware store. • • • 1 Copper Tubing /4" copper tubing /4" compression nut (1 pc) Ferrule (2 pc) Plastic Tubing • • 1 1 /4" plastic tubing Molded end (Bulb) /4" compression nut (1 pc) 1 A. Refrigerator B. Household water supply line C. Water Line: must be kept straight.
Installation CAUTION Do not mount the water filter on any part of the refrigerator. This may damage the refrigerator. 1. Connect the household water line to the assembled compression fitting. - If you are using copper tubing, slip the compression nut (B) (not supplied) and ferrule (not supplied) on the copper tubing (not supplied) as shown. - If you are using plastic tubing (A), insert the molded end (Bulb) of the plastic tubing (A) into the compression fitting. Installation CAUTION • • 2. 3. 4. 5.
STEP 7 Initial settings By completing the following steps, the refrigerator should be fully functioning. 1. Plug the power cord into the wall socket to turn the refrigerator on. 2. Open the door, and check if the interior light lights up. 3. Set the temperature to the coldest setting, and wait for about an hour. Then, the freezer will be slightly chilled, and the motor should be running smoothly. 4. Wait until the refrigerator reaches the set temperature. Now the refrigerator is ready for use.
Operations User interface NOTE • • • • For more information about other menus and apps available on the Refrigerator app. See the Online manual of your refrigerator. The content of apps and widgets, or their design is subject to change or support may be discontinued without notice, depending on the content provider’s policy. Children's use of the refrigerator's functions, apps, and services must be supervised by adults. Underage transactions with the services must be supervised by adults.
01 Home screen • Tap a desired app or widget to launch it. • On the home screen, you can add or remove items such as apps, widgets, pictures, videos, drawings, and texts. • Tap and hold an item to enter Edit mode. In Edit mode, you can drag and drop an item to a new location on the home screen. When you move the item to a new location, the item turns red if the location is not available. 02 Soft buttons 01 02 03 04 05 06 Operations 01 Bixby - Tap to use Bixby.
Operations Fridge Manager On the Home screen, tap the Fridge Manager app. • You can set the desired temperature or modes for each compartment. • For more detailed information on the Fridge Manager app, check the online manual. • To access the online manual from your Family Hub refrigerator, tap Setting > Help & Contact Us > Online Manual. Display reset (applicable models only) If you encounter an abnormal symptom on the display, try resetting the display. This may solve the symptom. 1.
SmartThings Installation Visit the Google Play Store, Galaxy Apps, or Apple App Store and search for “SmartThings”. Download and install the SmartThings app provided by Samsung Electronics to your smart device. NOTE • • • • • • • • • English Untitled-11 37 2021-12-20 Operations • The supporting software version of the SmartThings app is subject to change according to the OS supporting policy the manufacturer provides.
Operations Samsung account You are required to register your Samsung account to use the app. If you don’t have a Samsung account, follow the app’s onscreen instructions to create a free Samsung account. Getting started Turn on the device you want to connect, open the SmartThings app on your phone, and then follow the instructions below. If a pop-up appears saying that a new device has been found, tap ADD NOW.
Refrigerator settings Category Monitor & Control Item You can set and monitor the desired temperature of the fridge. Freezer Temperature You can set and monitor the desired temperature of the freezer. Power Cool You can turn Power Cool on or off, and check the current settings. Power Freeze You can turn Power Freeze on or off, and check the current settings. Ice making You can turn the ice making function on or off. AutoFill Pitcher You can turn the AutoFill Pitcher function on or off.
Operations Recommendations for voice recognition For the voice recognition function, there is a built-in microphone at the top of the refrigerator’s display. To use the voice recognition function: • Stand no more than 3 feet (1 meter) from the refrigerator and speak loudly and clearly towards the built-in microphone. • Speak at a regular pace. Reduce ambient noises, such as noises from a living-room TV.
- • DAL mode is automatically deactivated after it lasts for the amount of time stipulated by the DAL signal (max. 4.5 hours) or when the Peak Demand Off key is pressed. Temporary Appliance Load Reduction (TALR): The refrigerator responds to a TALR signal by aggressively reducing the load for a short time period. This function reduces energy consumption by stopping the compressor and controlling the functions that consume a lot of energy such as the defrost cycle and making ice.
Operations NOTE The energy consumption report may differ from the power consumption specifications of the product depending on the operating environment and the stored food. 3. Delay Defrost Capability - The Delay Defrost Capability function saves energy by delaying the defrost operation to a time specified by the user. You can configure the time. and this function will save energy during the specified period in a 24 hour cycle. If the time is not set, the function works with the default time settings.
Special features Beverage Center The left fridge door has two handles on the bottom. To use the autofill pitcher, drink cold or purified water, press handle (B) to open the Beverage Center. B A A. Fridge door handle B. Beverage Center handle Water pitcher (AutoFill Pitcher) (applicable models only) Cold, purified water is always ready in the AutoFill Pitcher. You can put tea or fruits in the infuser to enjoy the various infused water you like.
Operations To fill the Water pitcher 1. Grasp a handle groove of the lid, and then pull up to open the lid. 2. Put tea leaves or fruit to your taste into the infuser. NOTE If you want to keep the infused water in its initial concentration, turn the AutoFill Pitcher function off. 3. Enable the AutoFill Pitcher function on the control panel. Open the Beverage Center door (Type A) or the left door of the fridge (Type B), and then mount the water pitcher onto the holder.
CAUTION • • We recommend consuming fruit infused water within 24 hours. After that, the infused water can spoil over time. You must clean the water pitcher after you have consumed the infused water. Also clean the water pitcher if you haven't used it for a long time. To prevent the water pitcher from tipping over or leaking, make sure the water pitcher fits in the water pitcher holder. • To prevent the water pitcher from spilling over or leaking, make sure the infuser holder is properly inserted.
Operations A NOTE • • • B Wipe around the water pitcher holder if the water pitcher overflows or leaks. Water drops off if the rubber cap is opened. An alert message appears on the control panel if there is a leak. In case of a leak, open the rubber cap so that the leaked water drains. If the alert message does not disappear after draining, there might be a system failure. Contact your local Samsung service center. A. Type A models B.
Water dispenser (applicable models only) To dispense chilled water, open the Beverage Center and press the dispenser lever. NOTE • • • The dispenser will stop dispensing if you keep pushing the dispenser lever for about 1 minute. To dispense more water, release and push the lever again. Make sure the glass is in line with the dispenser to prevent the dispensed water from spilling out. If you do not use the water dispenser for 2-3 days, the dispensed water may have an abnormal smell or taste.
Operations Ice maker The refrigerator has a built-in ice maker that automatically dispenses ice. • The overall design and/or accessories may differ with the model. • This product has two types of ice makers. WARNING Choking hazard: Ice may cause choking in small children. Ice making After you have installed your refrigerator and plugged it in, follow these instructions to ensure proper ice making and to keep the ice bucket full of ice. For first-time use • Let the ice maker make ice for 1-2 days.
Ice accumulating on one side of the tray is normal. Arrange the ice evenly in the tray to store more ice. • Take caution when removing the ice bucket, the ice cubes may pour down from the tilt. When reinserting the ice bucket, remove any ice lump that are left over in the tray. • Operations • CAUTION • • • • • • • Leaving the water line disconnected may cause the water valve to produce a buzzing sound over time.
Maintenance Handling and care Ice bucket (applicable models only) If you do not dispense ice for an extended period, ice may form clumps inside the bucket. If this happens, remove and empty the ice bucket. CAUTION • • • To prevent injury, make sure to clean up any ice or water that has fallen on the floor. To prevent accidents or injury, do not let children play with the water dispenser or the ice maker. Use only the provided ice bucket. Third-party ice buckets may cause a system failure.
AutoFill Pitcher (applicable models only) 1. Grasp a handle groove of the lid, and then pull up to remove. 2. Grasp both sides of the infuser holder, and then lift to remove. Maintenance 3. While slightly twisting the infuser, pull it out of the sealed mouth. 4. Clean the infuser with neutral agents and running water. Rinse and dry well. 5. Reassemble the AutoFill Pitcher in the reverse order of disassembly.
Maintenance Fridge shelves The appearance of the shelves differs by model. Top shelf 1. Lift the rear side of the shelf with one hand, and then pull it out. 2. Tilt the shelf vertically as shown in the figure. 3. Carefully pull out the shelf as shown in the figure.
Quick Space shelf * • To remove a shelf, fully open the corresponding door. Hold the front of the shelf, and then gently lift up and pull out. NOTE Do not lift up the shelf fully when removing or reinserting the shelf. The rear wall of the fridge room can be dented. • To reinsert, hold the shelf at an angle so the front is higher than the back, and then insert the top hook into the top shelf notch. Then, lower the shelf and insert the bottom shelf hook into the bottom shelf notch.
Maintenance 2. Press the front of the shelf to lift the rear side of it. 3. Hold the rear side of the shelf and tilt it vertically. 4. Carefully pull out the shelf as shown in the figure. Maintenance Door bins • • 54 Untitled-11 54 To remove the door bin, hold the front sides of the bin, and then gently lift up to remove. To reinsert, insert the door bin slightly above its final location making sure that the back of the bin is against the door.
CAUTION • • • Do not remove a bin that is filled with food. Empty the bin beforehand. Use caution when opening the door if the bottom bin contains larger bottles, which may fall over. Do not allow children to play with the bins. Sharp corners of the bin may cause injury. Crisper+ / Fridge Drawers Gently lift up the front of the drawer and slide out. • We recommend that you remove the door bins before removing the drawer. This is to prevent damage to the door bins.
Maintenance Lower basket • • To remove, first remove the upper basket. Then, tilt up the front of the lower basket to pull out. To reinsert, put the basket onto the rail assembly rear side first. CAUTION • • • • Do not twist the basket when removing or reinserting the basket. The basket can be scratched. To prevent physical injury, property damage, or suffocation, keep children away from freezer baskets that have been removed. Do not remove the divider.
4. Plug in the power cord. Inner-view camera NOTE Use a cotton swab or microfiber cloth to clean the camera on the left-side door of the fridge. Dispenser nozzle (applicable models only) A 1. Hold the end of the dispenser nozzle (A). 2. While turning the dispenser nozzle (A) left, pull it down to remove it from the dispenser. 3. Clean the dispenser nozzle thoroughly, and then assemble it back. CAUTION • Maintenance • Fully insert the dispenser nozzle, so it is back to its original position.
Maintenance Rear panel To keep cords and exposed parts of the rear panel free of dirt, vacuum the panel once or twice a year. CAUTION Do not remove the rear panel cover. Electric shock may occur. Replacement Water filter WARNING • • Maintenance Do not use third-party water filters. Use only Samsung-provided or -approved filters. Unapproved filters may leak and damage the refrigerator, causing electric shock. Samsung is not responsible for any damage that may occur from use of third-party water filters.
3. Turn the knob of the filter cartridge counter clockwise 90 degrees (1/4 turn). The filter cartridge unlocks. 4. Pull out to remove the cartridge. - If the water filter is severely contaminated, the cartridge may not be easy to remove. If that is the case, use force to remove the cartridge. - To prevent water leaks from the filter opening, pull the cartridge straight out while removing it. 5. Insert a new filter cartridge. Use only Samsung-provided or approved filters. Maintenance 6.
Maintenance Reverse osmosis water filtration system The water pressure of the water supply system to a reverse osmosis water filtration system must be between 30-125 psi (206-861 kPa). The water pressure of the reverse osmosis water filtration system to the refrigerator’s cold water line must be at least 30 psi (206 kPa). If the water pressure is below these specifications: • Check if the sediment filter in the reverse osmosis system is blocked. Replace the filter if necessary.
Troubleshooting Before calling for service, review the symptoms and recommended solutions below. If none of the suggested solutions resolve your problem, please visit our website at www. samsung.com or call Samsung Customer Care at 1-800-SAMSUNG (726-7864). Note that you will be charged for any service visits in which no defects were found. General Temperature Symptom Fridge/freezer does not operate. Fridge/freezer temperature is warm. Fridge/freezer is over-cooling.
Troubleshooting Odors Symptom Refrigerator has odors. Possible causes • Spoiled food. • Food with strong odors. Solution • Clean the refrigerator and remove any spoiled food. • Make sure strong smelling food is wrapped airtight. • Make sure no food blocks the refrigerator vents. • Make sure food does not block the door. Clean the door gasket. Frost Symptom Possible causes Frost around the vents. • Food is blocking the vents. Frost on interior walls. • Door is not closed properly.
Symptom Ice maker does not make ice. Possible causes • Ice maker has just been installed. • Freezer temperature is too high. • Ice maker is off. • Ice may jam if the ice dispenser is not used for a long time (approx. 3 weeks). • Ice bucket is not properly inserted. Ice does not dispense. • Solution • You must wait for 12 hours for the refrigerator to make ice. • Set the freezer temperature below 0 °F (-18 °C) or -4 °F (-20 °C) in warm ambient air. • Turn on the ice maker.
Troubleshooting Symptom Possible causes • Water line is not connected properly or water supply is not on. • A third-party water filter was installed. • The "Replace water filter" message appears on the control panel. Solution • Check if the water line is installed correctly. Check if the water line stop valve is closed. • Use only Samsung-provided or approved filters. Unapproved filters may leak and damage the refrigerator. Water does not dispense. • • Replace the water filter.
Do you hear abnormal sounds from the refrigerator? Before calling for service, review the information below. If you still have questions about sounds your refrigerator is making, please call Samsung Customer Care at 1-800-SAMSUNG (726-7864). Note that you will be charged for any service visits related to normal operating sounds in which no defects were found. These sounds are normal. • When starting or ending an operation, the refrigerator may make sounds similar to a car engine ignition.
Troubleshooting • During a defrost cycle, water may drip on the defrost heater, causing sizzling sounds. HiSS! • As the refrigerator cools or freezes, refrigerant gas moves through sealed pipes, causing bubbling sounds. Bubbling! • As the refrigerator temperature increases or decreases, plastic parts contract and expand, creating knocking noises. These noises occur during the defrosting cycle or when electronic parts are working.
SmartThings Symptom Action The supporting software version of the SmartThings app is subject to change according to the OS supporting policy the manufacturer provides. In addition, as for the SmartThings app or the functions that the app supports, the new application update policy on the existing OS version can be suspended due to usability or security reasons. • • The SmartThings app is available for applicable models only.
Troubleshooting LCD Symptom Action • Cannot connect to my TV. • • The inner view picture looks bulged out or incomplete. The displayed measurement on the Fridge Manager is not correct. • • This refrigerator can connect only with Samsung Smart TV 6400 series or higher models released since 2015. Please check the model name of your TV first. Network connections may suffer temporary interruptions. Turn your TV off, and then try again. The edges of the inner view may look bulged out.
Smart Grid (applicable models only) Symptom Action What Do I Need to use the Energy Management and Smart Grid functions? To use the Smart Grid (Demand Response) and Energy Management functions on your refrigerator, you need the following: Devices • A wireless access point (router) • A Samsung Energy Management-supported refrigerator • A smartphone Registration • Connect your refrigerator to your home Wi-Fi network. • Register for the EMS service with your electric company.
LIMITED WARRANTY (U.S.A.) SAMSUNG REFRIGERATOR LIMITED WARRANTY TO ORIGINAL CONSUMER PURCHASER WITH PROOF OF PURCHASE This SAMSUNG brand product, as supplied and distributed by Samsung Electronics America, Inc.
This limited warranty covers manufacturing defects in materials or workmanship encountered in normal household, noncommercial use of this product and shall not cover the following: damage that occurs in shipment, delivery, installation, and uses for which this product was not intended; damage caused by unauthorized modification or alteration of the product; product where the original factory serial numbers have been removed, defaced, changed in any way, or cannot be readily determined; cosmetic damage inclu
LIMITED WARRANTY (U.S.A.) LIMITATION OF REMEDIES YOUR SOLE AND EXCLUSIVE REMEDY IS PRODUCT REPAIR, PRODUCT REPLACEMENT, OR REFUND OF THE PURCHASE PRICE AT SAMSUNG’S OPTION, AS PROVIDED IN THIS LIMITED WARRANTY.
Regulatory Notice FCC Notice FCC CAUTION: Any changes or modifications not expressly approved by the party responsible for compliance could void the user’s authority to operate the equipment. Contains Transmitter Module FCC ID: A3LCCBQ730M This device complies with Part 15 of FCC Rules. Operation is Subject to the following two conditions: (1) This device may not cause harmful interference, and (2) This device must accept any interference received including interference that cause undesired operation.
Regulatory Notice IC Notice Contains Transmitter Module IC: 649E-CCBQ730M The term "IC" before the radio certification number only signifies that Industry Canada technical specifications were met. Operation is subject to the following two conditions : (1) this device may not cause interference, and (2) this device must accept any interference, including interference that may cause undesired operation of the device. This Class B digital apparatus complies with Canadian ICES-003.
Model RF24BB69006M, RF30BB69006M Variant Model RF24BB6900**, RF30BB6900** (The symbol “*” can be any alphanumeric character.) Responsible Party - U.S. Contact Information Samsung Electronics America, Inc. 85 Challenger Road. Ridgefield Park. NJ 07660 Phone: 1-800-SAMSUNG (726-7864) FCC Compliance Statement This device complies with Part 15 of the FCC Rules.
Scan the QR code* or visit www.samsung.com/spsn to view our helpful How-to Videos and Live Shows * Requires reader to be installed on your smartphone Contact SAMSUNG WORLD WIDE If you have any questions or comments relating to Samsung products, please contact the SAMSUNG Customer Care Center. Country Contact Center Web Site U.S.A 1-800-SAMSUNG (726-7864) 1-844-SAM-PAYS (726-7297) www.samsung.com/us/support CANADA 1-800-SAMSUNG (726-7864) 1-844-SAM-PAYS (726-7297) www.samsung.
Refrigerador Manual del usuario Electrodoméstico independiente Untitled-12 1 2021-12-20 2:53:56
Contenido Información sobre seguridad Contenido 2 Untitled-12 2 4 Qué debe saber sobre las instrucciones de seguridad Símbolos y advertencias de seguridad importantes: Advertencia sobre la State of California Proposition 65 Precauciones importantes de seguridad Señales de advertencia importantes para el transporte y el emplazamiento Advertencias muy importantes para la instalación Precauciones para la instalación Advertencias muy importantes para el uso Precauciones de uso Precauciones para la limpieza
Aviso regulatorio 73 Aviso de la FCC Aviso de la IC 73 74 Contenido Español Untitled-12 3 2021-12-20 3 2:53:56
Información sobre seguridad Antes de utilizar su nuevo refrigerador Samsung, lea detenidamente este manual a fin de aprender a usar las funciones que ofrece de manera segura y eficiente.
Símbolos y advertencias de seguridad importantes: Sírvase seguir todas las instrucciones de seguridad del presente manual. En el presente manual se utilizan los siguientes símbolos de seguridad. ADVERTENCIA Riesgos o prácticas inseguras que pueden causar graves lesiones personales, daños a la propiedad y/o incluso la muerte. Información sobre seguridad PRECAUCIÓN Riesgos o prácticas inseguras que pueden causar lesiones personales leves y/o daños materiales.
Información sobre seguridad • • • • Información sobre seguridad • • • Nunca debe poner en marcha un electrodoméstico que presente signos de haber sido dañado. Si tiene alguna inquietud, consulte a su distribuidor. Si el cable de alimentación está dañado, debe ser reemplazado por el fabricante, su agente de servicios o personas igualmente calificadas para evitar riesgos.
PRECAUCIÓN • • • • • Información sobre seguridad • Riesgo de incendio o explosión. Se utiliza refrigerante inflamable. No utilice dispositivos mecánicos para descongelar el refrigerador. No perfore la tubería del refrigerante. Riesgo de incendio o explosión. Se utiliza refrigerante inflamable. Reparación únicamente por parte de personal de servicio técnico capacitado. No perfore la tubería del refrigerante. Riesgo de incendio o explosión. Se utiliza refrigerante inflamable.
Información sobre seguridad Advertencias muy importantes para la instalación ADVERTENCIA • • Información sobre seguridad • • • • • • • • • • • • • • • • 8 Untitled-12 8 No instale el refrigerador en un lugar húmedo o donde pueda entrar en contacto con agua. - El aislamiento deficiente de las piezas eléctricas puede provocar una descarga eléctrica o un incendio. No exponga este refrigerador a la luz solar directa ni al calor de estufas, calefactores u otros electrodomésticos.
• • • • • • • Información sobre seguridad • • No instale este electrodoméstico en un lugar húmedo, engrasado o sucio, o en un sitio con exposición directa al sol o al agua (lluvia). - El aislamiento deficiente de las piezas eléctricas puede provocar una descarga eléctrica o un incendio. Si ingresaran grandes cantidades de polvo o agua al refrigerador, desenchufe el cable de alimentación y comuníquese con un Centro de Servicio de Samsung Electronics.
Información sobre seguridad Advertencias muy importantes para el uso ADVERTENCIA • • Información sobre seguridad • • • • • • • • • • • • • • • 10 Untitled-12 10 No conecte el enchufe en un tomacorriente con las manos mojadas. - Esto podría causar una descarga eléctrica. No coloque objetos en la parte superior de la unidad. - Cada vez que abra o cierre la puerta, estos podrían caerse y provocar lesiones personales o daños materiales.
• • • • • • • • • • • • • • • • Información sobre seguridad • No sobrecargue el refrigerador con comida. - Cuando abra la puerta, algún elemento podría caerse y provocar lesiones personales o daños materiales. No pulverice material volátil, tal como un insecticida, sobre la superficie del electrodoméstico. - Además de ser perjudicial para los seres humanos, puede causar una descarga eléctrica, un incendio o problemas con el producto.
Información sobre seguridad • • • • Información sobre seguridad • • • Si la lámpara LED interior o exterior se ha apagado, comuníquese con el Centro de Servicio más cercano. En caso de sentir olor a quemado o a humo en el refrigerador, desenchúfelo de inmediato y comuníquese con un Centro de Servicio Samsung. - No seguir esta recomendación podría causar una descarga eléctrica o un incendio. Desenchufe el refrigerador antes de cambiar las lámparas internas.
• • • Información sobre seguridad Llene el tanque de agua y la charola para el hielo solamente con agua potable (agua de la llave, agua mineral o agua purificada). - No llene el tanque con té, jugo ni bebidas isotónicas. Pueden dañar el refrigerador. Si el refrigerador se inunda, desconecte la alimentación del refrigerador y comuníquese con el centro de servicios Samsung más cercano. - Existe el riesgo de que se produzca una descarga eléctrica o un incendio.
Información sobre seguridad Advertencias muy importantes para la eliminación de residuos ADVERTENCIA • • • Información sobre seguridad • • • • 14 Untitled-12 14 Si algún niño queda atrapado dentro del refrigerador, puede lastimarse o asfixiarse hasta morir. Deseche el material de empaque de este producto de forma tal que no resulte nocivo para el medio ambiente. Asegúrese de que ninguno de los tubos que se encuentran en la parte trasera del refrigerador estén dañados antes de desecharlos.
Instalación Siga las instrucciones cuidadosamente a fin de garantizar la instalación adecuada del refrigerador y de evitar accidentes antes de utilizarlo. ADVERTENCIA • • • • Utilice el refrigerador solamente para su uso previsto como se describe en este manual. Todas las reparaciones deben estar a cargo de un técnico calificado. Descarte el material de empaque del producto de acuerdo con la normativa local.
Instalación Descripción breve del refrigerador El refrigerador y los componentes provistos pueden diferir de las ilustraciones en este manual según el modelo y el país.
01 Llenado automático de la jarra * 02 Dispensador de agua ** 03 Compartimiento de la puerta del refrigerador A. Refrigerador B.
Instalación Compartimientos de las puertas Su refrigerador se despacha con compartimientos de las puertas de distintos tipos y tamaños. Si los compartimientos se empacaron por separado, utilice la siguiente figura como guía para colocarlos correctamente. NOTA El refrigerador y los componentes provistos pueden diferir de las ilustraciones en este manual según el modelo y el país.
Instalación paso a paso PASO 1 Seleccione un lugar El lugar debe: • Tener una superficie sólida, nivelada y sin alfombrado ni pisos que puedan obstruir la ventilación • Estar fuera del alcance de la luz solar directa • Contar con espacio suficiente para abrir y cerrar la puerta • Estar alejado de las fuentes de calor • Contar con lugar para realizar mantenimiento y reparaciones • Contar con un rango de temperatura de entre 50 °F (10 °C) y 110 °F (43 °C) Espacio libre Consulte las siguientes cifras y tablas
Instalación Modelo 01 01 04 02 02 125° 03 58 /4" (1485 mm) 04 11 3/8" (289 mm) 06 05 2 24" (610 mm) 29 3/8" (748 mm) 2 1/8" (54 mm) 07 43" (1093 mm) 48 2/4" (1231 mm) 08 44 2/4" (1131 mm) 53 1/4" (1353 mm) 06 07 08 RF30BB6***** se recomienda más de 50 mm 02 05 03 RF24BB6***** Instalación NOTA Las medidas de las tablas pueden variar ligeramente de las medidas reales según el método de medición y redondeo.
PASO 2 Piso Si el refrigerador no pasa por la puerta por su tamaño, consulte Extracción de la puerta para la entrada. NOTA Instalación Para evitar que se dañe el piso, asegúrese de que las patas de nivelación delanteras estén en posición vertical. • La superficie sobre la que se instalará el refrigerador debe soportar un refrigerador completamente cargado. • A fin de proteger el piso, coloque un trozo de cartón por el recorrido del refrigerador hasta su ubicación final.
Instalación PASO 3 Extracción de la puerta para la entrada Si el refrigerador no pasa por la entrada de su casa o de la cocina por una cuestión de tamaño, siga estas instrucciones para extraer y colocar nuevamente las puertas del refrigerador. Si no necesita retirar las puertas, vaya a la página 28 para continuar con el procedimiento de instalación. ADVERTENCIA Desenchufe el cable de alimentación del refrigerador antes de retirar las puertas.
2. Desconecte los dos conectores de cables de la puerta izquierda. La posición de los conectores varía entre modelos. PRECAUCIÓN • No retire ambas puertas simultáneamente. Asegúrese de retirar una puerta por vez. De lo contrario, alguna podría caerse y provocar lesiones. • Asegúrese de que el refrigerador esté apagado antes de desconectar los conectores. 3. Desconecte el tubo de agua del acoplador en la puerta izquierda como se muestra.
Instalación 6. Abra la puerta a 90 grados. Mientras sostiene la puerta, levante y retire la bisagra superior. Tenga cuidado de no dañar los cables de los conectores al retirar la bisagra. Instalación 7. Levante suavemente la puerta en sentido vertical para retirarla. No use fuerza excesiva. La puerta puede caerse y provocarle lesiones. 8. Coloque la puerta en una superficie plana. 9. Repita los pasos 1 a 8 para la otra puerta, excepto el paso 3. La puerta derecha no tiene tubo de agua.
Para volver a colocar las puertas del refrigerador 1. Mientras sostiene la puerta abierta a más de 90 grados, inserte el eje de la bisagra del medio en el orificio de la parte inferior de la puerta. Instalación 2. Coloque la bisagra superior en su posición en la parte de arriba del refrigerador y, luego, inserte el eje de la bisagra en el orificio superior de la puerta. Asegúrese de que los cables de la puerta pasen a través del orificio del eje de la bisagra. 3.
Instalación 5. Conecte los conectores de cables. PRECAUCIÓN • Asegúrese de que los conectores de cables estén bien conectados. De lo contrario, el visor no funcionará. 6. Conecte el tubo de agua. - Este paso no se aplica a los modelos sin la función Llenado automático de la jarra y el dispensador de agua. PRECAUCIÓN • • Instalación Para evitar fugas de agua, asegúrese de que las grapas rojas ajusten el acoplador adecuadamente. Mantenga las grapas fuera del alcance de los niños. 7.
Para retirar el cajón del congelador 1. Levante la parte delantera de la cesta superior y jale hacia arriba para retirarla. 2. Luego levante la cesta inferior para retirarla del conjunto de riel. Instalación 3. Presione los ganchos para desbloquear el conjunto de riel. 4. Mientras sostiene la parte superior del frente del cajón del congelador, deslícelo hacia afuera para retirar el cajón del congelador del conjunto de riel.
Instalación PRECAUCIÓN • • • Tenga cuidado de no rayar ni abollar el conjunto de riel. Asegúrese de instalar las cestas del congelador en la posición correcta. De lo contrario, la puerta no podrá abrirse ni cerrarse correctamente, lo que provocará la acumulación de escarcha. No almacene demasiados alimentos en el cajón del congelador. Esto hará que el cajón del congelador no se cierre correctamente y se acumule escarcha.
PASO 5 Ajuste de la altura y del espacio de la puerta Anillos elásticos Es posible ajustar la altura de la puerta mediante los anillos elásticos provistos que vienen en 4 tamaños diferentes (1 mm, 1.5 mm, 2 mm y 2.5 mm). Para ajustar la altura de una puerta 1. Controle la diferencia de altura entre las puertas y, luego, eleve y sostenga la puerta más baja. Instalación B 2. Inserte un anillo elástico (A) del tamaño adecuado entre el anillo de caucho (B) de la puerta y la bisagra como se ilustra.
Instalación PASO 6 Conecte la tubería del dispensador de agua (solo para los modelos correspondientes) El dispensador de agua con filtro es una de las funciones útiles de su nuevo refrigerador. Con el fin de promover la buena salud, el filtro de agua elimina las partículas no deseadas del agua. No obstante, no la esteriliza ni destruye los microorganismos. Para eso, necesita adquirir un sistema de purificación de agua. La tubería del agua también se conecta a la fábrica de hielo.
Conecte la tubería de suministro de agua al refrigerador Para llevar a cabo la conexión, necesita adquirir varios elementos. Posiblemente su ferretería local los venda todos juntos en un equipo. Tubería de cobre • • • Tubería de cobre de 1/4" Tuerca de compresión de 1/4" (1 pc) Férula (2) Tubería de plástico • • Tubería de plástico de 1/4" Extremo moldeado (bulbo) Tuerca de compresión de 1/4" (1 pc) A. Refrigerador B. Tubería de suministro del agua corriente C. Tubería de agua: debe mantenerse recta.
Instalación PRECAUCIÓN No instale el filtro de agua en ninguna parte del refrigerador. Esto podría dañar el refrigerador. 1. Conecte la tubería de agua corriente al acople de compresión ensamblado. - Si utiliza una tubería de cobre, deslice la tuerca de compresión (B) (no provista) y la férula (no provista) por la tubería de cobre (no provista) como se muestra en el gráfico.
PASO 7 Configuración inicial Al completar los siguientes pasos, el refrigerador quedará en perfectas condiciones de funcionamiento. 1. Enchufe el cable de alimentación al tomacorriente para encender el refrigerador. 2. Abra la puerta y verifique que la luz interna se encienda. 3. Coloque la temperatura en el valor más frío y espere una hora. Luego, el congelador comenzará a enfriarse y el motor funcionará adecuadamente. 4. Espere a que el refrigerador llegue a la temperatura configurada.
Funcionamiento Interfaz del usuario NOTA • • • • Para obtener más información acerca de otros menús y aplicaciones disponibles en la aplicación del refrigerador, consulte el Manual en línea del refrigerador. El contenido de aplicaciones y widgets, y su diseño, está sujeto a cambios y el soporte puede interrumpirse sin previo aviso, según la política del proveedor de contenidos. Los adultos deben supervisar el uso de funciones, aplicaciones y servicios del refrigerador por parte de los niños.
01 Pantalla de inicio • Toque la aplicación o el widget deseado para iniciarlo. • En la pantalla de inicio, puede agregar o quitar elementos como aplicaciones, widgets, imágenes, videos, dibujos y textos. • Mantenga pulsado un elemento para ingresar al modo de edición. En este modo, puede arrastrar y soltar un elemento en una nueva ubicación de la pantalla de inicio. Al desplazar el elemento a una nueva ubicación, se pone rojo si la ubicación no está disponible.
Funcionamiento Administrador del refrigerador En la pantalla de inicio, toque la aplicación Administrador del refrigerador. • Puede configurar la temperatura o los modos deseados para cada compartimiento. • Consulte el manual en línea para obtener más información sobre la aplicación Administrador del refrigerador. • Para acceder al manual en línea de su refrigerador Family Hub, toque Ajustes > Ayuda y Contáctenos > Manual en línea.
SmartThings Instalación Visite Google Play Store, Galaxy Apps o Apple App Store y busque “SmartThings”. Descargue e instale la aplicación SmartThings provista por Samsung Electronics en su dispositivo inteligente. NOTA • • • • • • • • • Funcionamiento • La versión de software de soporte de la aplicación SmartThings está sujeta a cambios de acuerdo con la política de soporte del sistema operativo que proporciona el fabricante.
Funcionamiento Cuenta Samsung Debe registrar su cuenta Samsung para utilizar la aplicación. Si no tiene una cuenta Samsung, siga las instrucciones en pantalla de la aplicación para crear una gratuita. Cómo comenzar Encienda el dispositivo que desea conectar, abra la aplicación SmartThings en su teléfono y siga las instrucciones que figuran a continuación. Si aparece un mensaje emergente que indica que se encontró un nuevo dispositivo, presione ADD NOW (AGREGAR AHORA).
Ajustes del refrigerador Categoría Supervisión y control Elemento Puede configurar y controlar la temperatura deseada del refrigerador. Temperatura del Congelador Puede configurar y controlar la temperatura deseada del congelador. Refrigeración rápida Puede activar o desactivar Refrigeración rápida y ver la configuración actual. Congelación rápida Puede activar o desactivar Congelación rápida y ver la configuración actual.
Funcionamiento Recomendaciones relativas al reconocimiento de voz Para la función de reconocimiento de voz, en la parte superior del visor del refrigerador hay un micrófono incorporado. Para usar la función de reconocimiento de voz: • Desde una distancia no superior a 3 pies (1 metro) del refrigerador, hable fuerte y claro hacia el micrófono incorporado. • Hable a un ritmo regular. Reduzca los ruidos ambientales, como los provenientes del televisor de la sala de estar.
- • El modo DAL se desactiva automáticamente pasado el periodo establecido por la señal DAL (máx. 4.5 horas) o cuando se presiona la tecla Peak Demand Off (Pico de demanda desactivado). Reducción temporal de la carga del aparato (TALR): El refrigerador responde a una señal TALR reduciendo drásticamente la carga durante un corto periodo.
Funcionamiento NOTA El informe del consumo de energía puede diferir de las especificaciones de consumo energético del producto según el entorno de funcionamiento y los alimentos almacenados. 3. Capacidad de demora del descongelamiento - La función de capacidad de demora del descongelamiento ahorra energía al demorar el descongelamiento hasta la hora especificada por el usuario. Se puede configurar la hora y esta función ahorrará energía durante el tiempo especificado en ciclos de 24 horas.
Funciones especiales Centro de bebidas La puerta izquierda del refrigerador tiene dos manijas en la parte inferior. Para usar el llenado automático de la jarra y beber agua fría o purificada, presione la manija (B) para abrir el centro de bebidas. B A A. Manija de la puerta del refrigerador B.
Funcionamiento Para llenar la jarra de agua 1. Sujete una de las ranuras de la manija de la tapa y jale hacia arriba para abrir la tapa. 2. Coloque hojas de té o frutas a gusto en el infusor. NOTA Si desea mantener el agua de la infusión en su concentración inicial, desactive la función Llenado automático de la jarra. 3. Active la función Llenado automático de la jarra en el panel de control.
PRECAUCIÓN • • Se recomienda consumir el agua infusionada de frutos antes de que transcurran 24 horas. Después de este tiempo, el agua infusionada podría echarse a perder. Debe limpiar la jarra después de consumir el agua infusionada. Asimismo, limpie la jarra de agua si no la ha utilizado durante un tiempo prolongado. Para evitar que la jarra se caiga o tenga fugas, asegúrese de que encaje bien en el soporte.
Funcionamiento A NOTA • • • B Limpie el soporte si la jarra de agua se desbordó o tuvo fugas. Si la tapa de goma está abierta, caerá agua. Aparece un mensaje de alerta en el panel de control si hay una fuga. En caso de fuga, abra la tapa de goma para que el agua drene. Si el mensaje de alerta no desaparece después del drenaje, es posible que haya una falla en el sistema. Comuníquese con el centro de servicio local de Samsung. A. Modelos tipo A B.
Dispensador de agua (solo para los modelos correspondientes) Para dispensar agua fría, abra el centro de bebidas y presione la palanca del dispensador. NOTA • • • El dispensador dejará de dispensar si se mantiene la palanca presionada durante aproximadamente 1 minuto. Para dispensar más agua, libere y presione la palanca nuevamente. Asegúrese de que el vaso esté alineado con el dispensador para evitar que el agua se derrame.
Funcionamiento Fábrica de hielo El refrigerador cuenta con una fábrica de hielo incorporada que dispensa hielo automáticamente. • El diseño general y/o los accesorios pueden diferir dependiendo del modelo. • Este producto dispone de dos tipos de fábricas de hielo. ADVERTENCIA Peligro de asfixia: Los niños pequeños podrían asfixiarse con el hielo.
• La acumulación de hielo en un lado de la charola es normal. Distribuya el hielo de la charola de manera uniforme para almacenar más hielo. • Tenga cuidado al retirar la cubeta, los cubos de hielo podrían caerse debido a la inclinación. Al volver a insertar la cubeta, retire los depósitos de hielo que queden en la charola. • Funcionamiento PRECAUCIÓN • • • • • • • Dejar la tubería de agua desconectada puede causar que, con el tiempo, la válvula de agua emita un zumbido.
Mantenimiento Manipulación y cuidado Cubeta de hielo (solo para los modelos correspondientes) Si no usa el hielo durante un período prolongado, puede apelmazarse en la cubeta. Si esto ocurriera, retire y vacíe la cubeta de hielo. PRECAUCIÓN • • • Para evitar lesiones, asegúrese de limpiar el hielo o el agua que pueda haber caído en el suelo. A fin de evitar lesiones o accidentes, no permita que los niños jueguen con el dispensador de agua ni la fábrica de hielo.
Llenado automático de la jarra (solo para los modelos correspondientes) 1. Sujete una de las ranuras de la manija de la tapa y jale hacia arriba para retirar. 2. Sujete ambos lados del soporte del infusor y levántelo para retirarlo. Mantenimiento 3. Quite el infusor de la boca sellada girándolo ligeramente. 4. Limpie el infusor con agentes neutros y agua corriente. Enjuague y seque bien. 5. Vuelva a ensamblar Llenado automático de la jarra en el orden inverso al del desensamble.
Mantenimiento Estantes del refrigerador El aspecto de los estantes varía según el modelo. Estante superior 1. Levante la parte trasera del estante con una mano y jale hacia afuera para extraerlo. 2. Incline el estante en sentido vertical como se muestra en la figura. 3. Extraiga con cuidado el estante como se muestra en la figura.
Estante espacio rápido * • Para retirar un estante, abra la puerta correspondiente por completo. Sostenga la parte delantera del estante y, luego, levántelo suavemente y jale hacia afuera. NOTA No levante el estante por completo al retirarlo o reinsertarlo. La pared posterior del refrigerador podría abollarse. • Para insertarlo nuevamente, sostenga el estante en ángulo de modo que la parte frontal esté más elevada que la trasera y, luego, inserte el gancho superior en la muesca superior del estante.
Mantenimiento 2. Presione el frente del estante para levantar la parte trasera. 3. Sostenga la parte trasera del estante e inclínelo en sentido vertical. 4. Extraiga con cuidado el estante como se muestra en la figura. Mantenimiento Compartimientos de las puertas • • 54 Untitled-12 54 Para retirar el compartimiento de la puerta, sostenga ambos lados delanteros y levántelo suavemente para retirarlo.
PRECAUCIÓN • • • No retire un compartimiento lleno de alimentos. Antes, vacíe el compartimiento. Tenga cuidado al abrir la puerta si el compartimiento inferior contiene botellas grandes que podrían caer. No permita que los niños jueguen con los compartimientos. Las esquinas filosas del compartimiento pueden causar lesiones. Cajón para vegetales+ / Cajones del refrigerador Levante suavemente el frente del cajón y deslícelo hacia afuera.
Mantenimiento Cesta inferior • • Para retirarla, primero debe retirar la cesta superior. Luego, incline el frente de la cesta inferior hacia arriba para retirarla. Para volver a colocarla, inserte primero la parte posterior de la cesta en el conjunto de riel. PRECAUCIÓN • • • • No gire la cesta al retirarla o colocarla. Se puede rayar. Para evitar lesiones personales, daños materiales o sofocación, mantenga a los niños alejados de las cestas del congelador que han sido retiradas. No retire el separador.
Cámara de visión interna NOTA Limpie con un hisopo de algodón o un paño de microfibra la cámara de la puerta izquierda del refrigerador. Boquilla del dispensador (solo para los modelos correspondientes) A 1. Sujete el extremo de la boquilla del dispensador (A). 2. Mientras gira la boquilla del dispensador (A) hacia la izquierda, jálela hacia abajo para retirarla del dispensador. 3. Limpie bien la boquilla y, luego, vuelva a colocarla.
Mantenimiento Panel posterior Para mantener los cables y las partes expuestas del panel posterior libres de polvo, aspire el panel una o dos veces al año. PRECAUCIÓN No retire la cubierta del panel posterior. Podría producirse una descarga eléctrica. Reemplazo Filtro de agua ADVERTENCIA • • Mantenimiento No utilice filtros de agua de terceros. Utilice únicamente filtros provistos o aprobados por Samsung. Los filtros no aprobados pueden provocar pérdidas y daños al refrigerador y descargas eléctricas.
3. Gire la perilla del cartucho del filtro en sentido antihorario unos 90 grados (giro de 1/4). El cartucho del filtro se destraba. 4. Tire para retirar el cartucho. - Si el filtro de agua estuviera muy contaminado, es posible que el cartucho no pueda retirarse fácilmente. En dicho caso, retírelo por la fuerza. - A fin de evitar pérdidas de agua a través de la abertura del filtro, jale el cartucho en línea recta al retirarlo. 5. Inserte un nuevo cartucho de filtro.
Mantenimiento Sistema de filtración por ósmosis inversa La presión de agua del sistema de suministro hacia un sistema de filtrado por ósmosis inversa debe ser de entre 30-125 psi (206-861 kPa). La presión de agua del sistema de filtrado por ósmosis inversa a la tubería de agua fría del refrigerador debe ser de al menos 30 psi (206 kPa). Si la presión de agua estuviera por debajo de estas especificaciones: • Verifique si el filtro de sedimentos en el sistema de ósmosis inversa está bloqueado.
Solución de problemas Antes de solicitar servicio técnico revise los síntomas y las soluciones recomendadas que se especifican a continuación. Si ninguna de estas soluciones recomendadas resuelve su problema, visite nuestro sitio web www.samsung.com o llame al Servicio de Atención al Cliente de Samsung al 1-800-SAMSUNG (726-7864). Tenga presente que se le cobrará por las visitas de servicio cuando no se detecte ningún desperfecto. General Temperatura Síntoma El refrigerador/ congelador no funciona.
Solución de problemas Síntoma Causas posibles Solución • La pared interna está caliente. • El refrigerador cuenta con tuberías a prueba de calor en la pared interna. A fin de evitar que se forme condensación, el refrigerador cuenta con tuberías a prueba de calor en los ángulos frontales. Si la temperatura aumenta, es posible que el equipo no funcione eficazmente. No se trata de una falla del sistema. Olores Síntoma Causas posibles • Alimentos descompuestos. • Alimentos con olores fuertes.
Condensación Síntoma Se forma condensación en las paredes internas. Causas posibles • Si se deja la puerta abierta, entra humedad en el refrigerador. • Alimentos con elevado contenido de humedad. Solución • Retire la humedad y no deje la puerta abierta durante períodos prolongados. • Asegúrese de que los alimentos estén envueltos al vacío. Agua/hielo (solo para modelos con dispensador) Síntoma Sale menos agua de lo normal. Causas posibles • La presión del agua es demasiado baja.
Solución de problemas Síntoma Causas posibles Solución • El hielo puede atascarse si el dispensador no se utiliza durante un periodo prolongado (aprox. 3 semanas). • Si no utilizará el refrigerador por un periodo prolongado, vacíe la cubeta de hielo y apague la fábrica de hielo. • La cubeta de hielo no está insertada correctamente. • Asegúrese de que la cubeta de hielo esté bien insertada. • Verifique que la tubería de agua esté instalada correctamente.
¿Se oyen ruidos anómalos procedentes del refrigerador? Antes de llamar al servicio técnico, revise la siguiente información. Si aún tiene alguna duda respecto de algún ruido relacionado con su refrigerador, llame al Servicio de Atención al Cliente de Samsung al 1-800-SAMSUNG (726-7864). Tenga presente que se le cobrará por las visitas de servicio relacionadas con ruidos normales cuando no se detecte ningún desperfecto. Estos ruidos son normales.
Solución de problemas • Durante un ciclo de descongelación, pueden caer gotas de agua sobre el calefactor y producir ruidos de chisporroteo. Silbido • Cuando el refrigerador enfría o congela, el gas refrigerante circula por las tuberías selladas y produce ruidos de burbujas. Burbujeo • Cuando la temperatura del refrigerador aumenta o disminuye, las partes plásticas se contraen y se expanden y producen ruidos de golpeteo.
SmartThings Síntoma Acción • La versión de software de soporte de la aplicación SmartThings está sujeta a cambios de acuerdo con la política de soporte del sistema operativo que proporciona el fabricante. Además, en cuanto a la aplicación SmartThings o las funciones que admite la aplicación, la nueva política de actualización de la aplicación en la versión del sistema operativo existente puede suspenderse por razones de seguridad o de usabilidad.
Solución de problemas LCD Síntoma Acción • No puedo conectarme al televisor. • • La imagen de la vista interior se ve deformada o incompleta. La medición que se muestra en el Administrador del refrigerador no es correcta. • • Este refrigerador solo puede conectarse con modelos Samsung Smart TV de la serie 6400 o superior comercializados a partir de 2015. Revise primero el nombre de modelo de su televisor. Las conexiones de red pueden interrumpirse temporalmente.
Smart Grid (solo para los modelos correspondientes) Síntoma ¿Qué necesito para utilizar las funciones de gestión de energía y Smart Grid? Acción Para usar las funciones Smart Grid (respuesta a la demanda) y de gestión de energía del refrigerador, se necesita lo siguiente: Dispositivos • Un punto de acceso inalámbrico (enrutador) • Un refrigerador que admita Samsung Energy Management • Un teléfono inteligente Registro • Conecte el refrigerador a su red Wi-Fi doméstica.
GARANTÍA LIMITADA (EE.UU.) REFRIGERADOR SAMSUNG GARANTÍA LIMITADA AL COMPRADOR ORIGINAL CON COMPROBANTE DE COMPRA Este producto de marca SAMSUNG, suministrado y distribuido por Samsung Electronics America, Inc.
Esta garantía limitada cubre defectos de fabricación en materiales o de mano de obra bajo condiciones de uso doméstico normal, no comercial, del producto y no cubrirá lo siguiente: daños ocasionados durante el transporte, la entrega o la instalación o por uso distinto al previsto para este producto; producidos por modificación o alteración no autorizada del producto; productos a los que se le borraron, desfiguraron o cambiaron de forma alguna los números de serie de fabricación originales, o en los que no s
GARANTÍA LIMITADA (EE.UU.) LIMITACIÓN DE COMPENSACIÓN SU ÚNICA COMPENSACIÓN ES LA REPARACIÓN DEL PRODUCTO, EL REMPLAZO DEL PRODUCTO O LA DEVOLUCIÓN DEL MONTO DE LA COMPRA, SEGÚN DECIDA SAMSUNG, DE ACUERDO A LO ESTIPULADO EN ESTA GARANTÍA LIMITADA.
Aviso regulatorio Aviso de la FCC PRECAUCIÓN DE LA FCC: Todos los cambios y modificaciones que no cuenten con la aprobación expresa de la parte responsable del cumplimiento pueden invalidar la autoridad del usuario para operar el equipo. Contiene módulo transmisor FCC ID: A3LCCBQ730M Este dispositivo cumple con la sección 15 de las normas de la FCC.
Aviso regulatorio Aviso de la IC Contiene módulo de transmisor IC: 649E-CCBQ730M El término “IC” antes del número de certificación de radio solo significa que cumple con las especificaciones técnicas de la Industria de Canadá. El funcionamiento se encuentra sujeto a las siguientes dos condiciones: (1) este dispositivo no puede causar interferencia dañina, y (2) este dispositivo debe aceptar la recepción de cualquier interferencia, incluidas aquellas que puedan causar un funcionamiento indeseado.
Modelo RF24BB69006M, RF30BB69006M Modelo alternativo RF24BB6900**, RF30BB6900** (El símbolo “*” puede ser cualquier carácter alfanumérico). Parte responsable - Información de contacto en EE. UU. Samsung Electronics America, Inc. 85 Challenger Road. Ridgefield Park. NJ 07660 Teléfono: 1-800-SAMSUNG (726-7864) Declaración de cumplimiento con las Normas de la FCC Este dispositivo cumple con la sección 15 de las Normas de la FCC.
Scan the QR code* or visit www.samsung.com/spsn to view our helpful How-to Videos and Live Shows * Requires reader to be installed on your smartphone Contacte a SAMSUNG WORLD WIDE Si tiene preguntas o comentarios relacionados con los productos Samsung, póngase en contacto con el Servicio de Atención al Cliente de SAMSUNG. País Centro de contacto Sitio web U.S.A 1-800-SAMSUNG (726-7864) 1-844-SAM-PAYS (726-7297) www.samsung.