Refrigerator user manual imagine the possibilities Thank you for purchasing this Samsung product. Free Standing Appliance DA68-02952A-11.indb 1 2018. 7. 9.
contents SAFETY INFORMATION…………………………………………………………………………… 2 SETTING UP YOUR FRENCH DOOR REFRIGERATOR……………………………………… 9 OPERATING YOUR FRENCH DOOR REFRIGERATOR……………………………………… 18 TROUBLESHOOTING…………………………………………………………………………… 34 safety information SAFETY INFORMATION • Before using your new Samsung Refrigerator, please read this manual thoroughly to ensure that you know how to operate the features and functions that your new appliance offers safely and efficiently.
Note. These warning symbols are here to prevent injury to you and others. Please follow them carefully. After reading this section, keep it in a safe place for future reference. WARNING STATE OF CALIFORNIA PROPOSITION 65 WARNING (US ONLY) • Cancer and Reproductive Harm - www. P65Warnings.ca.gov. WARNING CRITICAL INSTALLATION WARNINGS • • - • • • Do not install the refrigerator in a damp location or place where it may come in contact with water.
• Children should be supervised to ensure that they do not play with the fastener. -- There is a risk of death from suffocation if a child swallows the fastener. Pay special attention to children because it can be dangerous. Keep the fastener out of reach of children. • The refrigerator must be safely grounded. - Always make sure that you have grounded the refrigerator before attempting to investigate or repair any part of the appliance. Power leakages can cause severe electric shock.
WARNING CRITICAL USAGE WARNINGS • • • • - • • • • • • • • • • Do not insert the power plug into a wall socket with wet hands. Do not store articles on the top of the appliance. When you open or close the door, the articles may fall and cause personal injury and/or material damage. Do not insert hands, feet or metal objects (such as knives, etc.) into the bottom or the back of the refrigerator. This may result in an electric shock or injury.
• Do not let children hang on the door. A serious injury may occur. • Do not let children go inside the refrigerator. They could become trapped. • Bottles should be stored tightly together so that they do not fall out. • This product is intended only for the storage of food in a domestic environment. • If a gas leak is detected, avoid any naked flames or potential sources of ignition, and air the room in which the appliance is standing for several minutes. - Do not touch the appliance or power cord.
the water valve, wipe excess moisture from the inside walls, and leave the doors open to prevent odors and mold. • Fill the water tank and ice cube trays with potable water only (tap water, mineral water, or purified water). - Do not fill the tank with tea or a Sports drink. This may damage the refrigerator. • Do not strike or apply excessive force to any glass surface. - Broken glass may result in a personal injury and/or property damage.
suffocate to death. • Cyclopentane is used in the insulation. The gases in the insulation material require a special disposal procedure. Please contact your local authorities in regard to the environmentally safe disposal of this product. • Keep all packaging materials well out of the reach of children, as packaging materials can be dangerous to children. - If a child places a bag over his or her head, the child could suffocate.
Setting up your French Door Refrigerator GETTING READY TO INSTALL THE REFRIGERATOR B Congratulations on your purchase of the Samsung refrigerator. We hope you enjoy the state-of-art features and efficiencies that this new appliance offers. 01 setting up A E D C Selecting the best location for the refrigerator Choose: • A location with easy access to a water supply. • A location without direct exposure to sunlight. • A location with level (or nearly level) flooring.
FLOORING For proper installation, you must place this refrigerator on a level, hard surface that is the same height as the rest of the floor. This surface should be strong enough to support a fully loaded refrigerator. To protect the finish of the flooring, cut a large section of the cardboard carton and place it under the refrigerator where you are working. When moving a refrigerator, you need to pull and push it straight forwards or back. Do not wiggle it from side to side.
WARNING Disassembling the refrigerator doors Be careful not to drop and scratch the doors while removing them. 2. Disconnect the two connectors ( 2 ) on the left side door. To remove the water coupler from the hinge, twist and pull it from the hinge. Remove the water line ( 3 ) while pressing the marked part ( 4 ) of the water line coupler.
5. Remove the screw ( 8 ) attached to the lower left and right door hinges with a philips screwdriver (+). Remove the 2 hex head bolts ( 9 ) attached to the lower left and right door hinges with an allen wrench (3/16”). Remove the lower left and right door hinges ( 10 ). DISASSEMBLING THE FLEX DOOR 1. Take out the Flex Zone ( 1 ) by lifting it up. 1 8 10 9 Allen wrench 2. Take off the cover ( 2 ) w/harness with a flatblade screwdriver (-).
4. Remove 1 hex head bolt from each side with a socket wrench (10 mm). DISASSEMBLING THE FREEZER DOOR 1. Take out the upper drawer by lifting it up. 01 setting up 2. Remove the freeze room guard ( 1 ) by lifting the guard up. 5. Lift up the Flex door from the rails. 1 3. Take out the lower basket ( 2 ) by lifting the basket up from the rail system. 2 RE-ASSEMBLING THE FLEX DOOR To reattach the flex doors, assemble parts in reverse order.
5. Holding the top of the Freezer Drawer, pull it out all the way, and then remove it from the rail system. RE-ASSEMBLING THE FREEZER DOOR To reattach the drawer after you have moved the fridge to its final location, assemble the parts in reverse order. ADJUSTING THE LEVEL CAUTION Be careful not to scratch or dent the sliding rail by letting it strike the floor. CAUTION Make sure that you mount the freezer basket in the right position when removing / installing the freezer door.
MAKING MINOR ADJUSTMENTS TO THE DOOR OR IN DOOR Remember, a leveled refrigerator is necessary for getting the doors perfectly even. If you need help, review the previous section on leveling the refrigerator. CAUTION • Insert only one snap ring for this purpose. Two or more snap rings may slip out or make a rubbing noise. • Keep the snap rings out of children’s reach, and keep them for future use. • Do not raise the door too much. The door can contact and damage the top cover.
required. If the refrigerator is installed in an area with low water pressure (below 20 psi), you can install a booster pump to compensate for the low pressure. After you have connected the water line, make sure the water storage tank inside the refrigerator is properly filled. To do this, press the water dispenser lever until the water runs from the water outlet. • Water line installation kits are available at extra cost from your dealer.
2. Tighten the compression nut ( B ) onto the compression fitting. Do not over-tighten the compression nut ( B ). 3. Turn the water on and check for any leakage. If you find water drops or leakage in the connection areas, turn off the main water supply. Check the connections and, if necessary, tighten. 5. After you turn on the refrigerator, let the ice maker make ice for 1 to 2 days.
Operating your French Door Refrigerator USING THE CONTROL PANEL 1 4 2 5 3 10 8 7 (1) Freezer/ Power Freeze (3sec) (2) Alarm/ Filter Reset (3sec) 6 9 The Freezer button serves two purposes: -- To set the Freezer to your desired temperature. -- To turn the Power Freeze function on and off. 1) To set the Freezer temperature, touch the Freezer button. You can set the temperature between 5 °F (-15 °C) and -8 °F (-23 °C).
(4) Fridge/ Power Cool (3sec) 2) Control Lock Function Touch and hold this button for 3 seconds to lock the display, the Flex Zone panel, and the dispenser buttons so the buttons can not be used. When Control Lock is on, the refrigerator does not dispense ice or water, even if the Dispenser Lever is pressed. The Control Lock icon lights up to indicate you’ve activated the Control Lock function. Press 3 seconds to unlock.
To save electricity, the Panel Display turns off automatically under the following conditions: When no button has been pressed, when no doors are open, or when no Dispenser Lever has been pushed. However, the icon indicating your cubed or crushed ice selection, will stay on. When you press a button, open a door, or push a Dispenser Lever, the Panel Display will turn on again.
Removing any residual matter inside the water supply line after installing the water filter. 2 3 1. Turn ON the main water supply and supply water from water supply line. 3. Additional flushing may be required in some households. 4 4. Push the filter, and then turn it clockwise until it locks. 02 operating 2. Run water through the dispenser until the water runs clear (approx. 6 to 7 minutes). This will clean the water supply system and remove air from the lines. 3.
CONTROLLING THE TEMPERATURE Controlling the fridge temperature Basic temperature of Freezer and Refrigerator Compartments The basic and recommended temperatures of the Freezer and Fridge compartments are 0 °F and 37 °F (or -18 °C and 3 °C) respectively. If the temperature of the Freezer and Fridge compartments are too high or low, adjust the temperature manually.
USING THE ONE LEVER DISPENSER check the water level Push the appropriate ice type button to select what you want dispensed. NO ICE Select this if you want to turn ice maker off Using the ice Dispenser Place a glass underneath the ice dispenser and push gently against the dispenser lever with your glass. Make sure the glass is in line with the dispenser to prevent the ice from bouncing out. • Do not press the test button continuously when the tray is filled with ice or water.
If There is a Power Failure If a power failure occurs, ice cubes may melt then freeze together when the power comes back on, causing the dispenser to be out of order. To prevent this problem, after a power failure, pull out the ice bucket and discard the residual ice or water. After you dump the ice from the ice bucket, you should press the dispenser lever once with the ‘Water’ or ‘Ice Type’ function ON. The ice maker will make new ice faster after you return the ice bucket to the refrigerator.
Water clouding phenomenon 02 operating All water provided to the refrigerator flows through the core filter which is an alkaline water filter. In the filtering process, the pressure of the water that has flowed out of the filter is increased, and the water becomes saturated with oxygen and nitrogen. When this water flows out into the air, the pressure plummets and the oxygen and nitrogen get supersaturated, which results in gas bubbles.
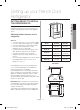
PARTS AND FEATURES Review the illustration below to become more familiar with the parts and features of your refrigerator. Light FF Ice-Maker Slide-Shelf Foldable-Shelf Fixed-Shelf Quick-Space Glass Shelf Vertical Hinged Section Vegetable & Fruit Drawers Water Filter Door Bins Light Convertible Room Auto Pull Out Drawer Guard Freezer Drawer Bin When closing the door, make sure the Vertical Hinged Section is in the correct position to avoid scratching the other door.
USING THE FLEX ZONE Flex Zone Modes 1. When “Wine/Party Dishes” is selected, the temperature of the Flex Zone will be kept around 42 °F (5 °C). This feature helps keep food fresh for a long time. 2. When “Deli/Snack” is selected, the temperature of the Flex Zone will be kept around 37 °F (3 °C). This feature helps keep food fresh for a longer time. 3. When “Cold Drink” is selected, the temperature of the Flex Zone will be kept around 33 °F (1 °C). This feature helps keep drinks cold and refreshing.
REMOVING THE REFRIGERATOR ACCESSORIES To re-install - Tilt the front of the shelf up and guide the shelf hooks into the slots at a desired height. Then lower the front of the shelf so that the hooks can drop into the slots. 1. Door Bins • Door Bins (1) To remove - Simply lift the bin up and pull straight out. To relocate - Slide it in above the desired location and push down until it stops.
• Tilt up the front of the drawer and pull straight towards you. Then, move the drawer slightly in the direction of the arrow in the illustration below, and then pull out. If the Flex Zone or LED lighting is not working, check the connectors [ ( 1 ), ( 2 ) shown below ] for cracks or leaks. 2 02 operating To re-install • Insert the drawer into the frame rails and push back into place. • Slide the bin in above the desired location and push down until it stops.
REMOVING THE FREEZER ACCESSORIES CAUTION 1. Freezer Room Guard To remove - Remove the freezer room guard ( 1 ) by lifting the guard up. To re-install - Push down until the guard ( 1 ) locks into place. You can scratch the side of the bin if you twist it left or right when disassembling or re-assembling it. CAUTION Do not allow babies or children to go inside the freezer drawer. They could damage the refrigerator and seriously injure themselves. Do not sit on the freezer door. The door may break.
Cleaning the Rubber door seals Wipe the control panel and digital display with a damp, clean, soft cloth. Do not spray water directly on the surface of the refrigerator. The doors, handles, and cabinet surfaces should be cleaned with a mild detergent and then wiped dry with a soft cloth. To keep your appliance looking its best, polish the exterior once or twice a year. If the rubber door seals are dirty, the doors may not close properly, and the refrigerator will not operate efficiently.
FOOD STORAGE TIPS Foods Refrigerator Freezer Storage Tips DAIRY PRODUCTS Butter 2-3 Weeks 6-9 Months Wrap or cover tightly. Check date code. Most milk and similar products are sold in date-coded cartons that indicate a products’s peak freshness. Re-seal with cap or wrap tightly. Do not return unused portions to original container.
Foods Refrigerator Freezer Storage Tips FISH AND SHELLFISH Fish 1-2 Days 2-3 Months Lean Fish (cod, flounder, etc) 1-2 Days 6 Months Frozen or Breaded na 3 Months Shrimp (uncooked) 1-2 Days 12 Months Crab 3-5 Days 10 Months Cooked Fish or Shellfish 2-3 Days 3 Months Chops 2-4 Days 6-12 Months Ground 1 Day 3-4 Months Roast 2-4 Days 6-12 Months Bacon 1-2 Weeks 1-2 Months Sausage 1-2 Days 1-2 Months Steak 2-4 Days 6-9 Months Poultry 1 Day 12 Months Lunch meat 3-5 Days
Troubleshooting PROBLEM SOLUTION The refrigerator does not work at all or it does not chill sufficiently. • Check if the power plug is properly connected. • Check if the set temperature on the digital display is warmer than the freezer or fridge inner temperature. If it is, set the freezer or fridge to a colder temperature. • Is the refrigerator in direct sunlight or located near a heat source? If so, it may not be able to cool sufficiently.
SOLUTION Frost forms on the walls of the freezer. • Is the air vent blocked? Remove any obstructions so air can circulate freely. • Allow sufficient space between the stored foods for efficient air circulation. • Is the freezer drawer closed properly? If the freezer drawer is not completely closed or is blocked, humidity from outside may enter and cause severe frost to form. The water dispenser is not functioning. • • • • The auto close system does not work with the freezer door.
Warranty (USA) WARRANTY ON SAMSUNG REFRIGERATOR LIMITED WARRANTY (U.S.A.) SAMSUNG REFRIGERATOR LIMITED WARRANTY TO ORIGINAL CONSUMER PURCHASER WITH PROOF OF PURCHASE This SAMSUNG brand product, as supplied and distributed by Samsung Electronics America, Inc.
EXCLUSION OF IMPLIED WARRANTIES IMPLIED WARRANTIES, INCLUDING THE IMPLIED WARRANTIES OF MERCHANTABILITY OR FITNESS FOR A PARTICULAR PURPOSE, ARE LIMITED TO ONE YEAR OR THE SHORTEST PERIOD ALLOWED BY LAW. Some states do not allow limitations on how long an implied warranty lasts, so the above limitations or exclusions may not apply to you. This warranty gives you specific rights, and you may also have other rights, which vary from state to state.
If your refrigerator needs service Do not hesitate to call any Samsung Authorized Service Center nearby giving them your name, address and telephone number when your product is not functioning properly. Warranty Information (CANADA) Limited Warranty for Original Purchaser This Samsung product is warranted by Samsung Electronics Canada Inc.
Memo DA68-02952A-11.indb 39 2018. 7. 9.
Scan the QR code* or visit www.samsung.com/spsn to view our helpful How-to Videos and Live Shows * Requires reader to be installed on your smartphone Contact SAMSUNG WORLD WIDE If you have any questions or comments relating to Samsung products, please contact the SAMSUNG customer care center. Country Contact Center Web Site Subsidiaries office address U.S.A 1-800-SAMSUNG (726-7864) 1-844-SAM-PAYS (726-7297) www.samsung.com/us/support Samsung Electronics America, Inc.
Refrigerador Manual del usuario Imagine las posibilidades Gracias por adquirir este producto Samsung. Electrodoméstico independiente DA68-02952A-11.indb 1 2018. 7. 9.
Contenido INFORMACIÓN SOBRE SEGURIDAD…………………………………………………………… 2 PUESTA A PUNTO DEL REFRIGERADOR DE PUERTA FRANCESA………………………… 9 FUNCIONAMIENTO DEL REFRIGERADOR DE PUERTA FRANCESA…………………… 18 SOLUCIÓN DE PROBLEMAS………………………………………………………………… 34 Información sobre seguridad INFORMACIÓN SOBRE SEGURIDAD • Antes de utilizar su nuevo refrigerador Samsung, lea detenidamente este manual a fin de aprender a usar las funciones que ofrece de manera segura y eficiente.
Asegúrese de que el refrigerador esté conectado a tierra para evitar una descarga eléctrica. Comuníquese con el centro de contacto para obtener ayuda. Nota. • • Estas señales de advertencia se incluyen aquí para evitarles lesiones a usted y a terceros. Sígalas atentamente. Después de leer esta sección, consérvela en un lugar seguro para referencia futura. • • • • ADVERTENCIA - ADVERTENCIA SOBRE LA STATE OF CALIFORNIA PROPOSITION 65 (SOLO EE.UU.) • - • Cáncer y Daño Reproductivo - www.P65Warnings.
• Mantenga los materiales de embalaje fuera del alcance de los niños. - Existe el riesgo de muerte por asfixia si un niño se coloca los materiales de embalaje en la cabeza. • El refrigerador debe colocarse de manera tal que se pueda acceder al enchufe después de la instalación. - No seguir esta recomendación puede causar una descarga eléctrica o un incendio debido a una fuga de electricidad. • Es necesario quitar toda la película plástica protectora antes de enchufar el producto por primera vez.
daños materiales. • No coloque las manos, los pies ni objetos metálicos (como cuchillos, etc.) en la parte inferior o posterior del refrigerador. - Esto podría causar una descarga eléctrica o lesiones personales. - Es posible que las puntas filosas provoquen lesiones. • No coloque un recipiente con agua sobre el refrigerador. - Si se derrama, existe el riesgo de que se produzca un incendio o una descarga eléctrica. • Se deberá vigilar a los niños para asegurarse de que no jueguen con el refrigerador.
• No permita que los niños se cuelguen de la puerta. Pueden producirse lesiones graves. no permita que los niños ingresen al refrigerador. Podrían quedar atrapados. • Las botellas se deben almacenar una junto a otra de manera tal que no se caigan. • Este producto se debe utilizar solo para almacenar alimentos en un entorno doméstico. • Si se detecta una fuga de gas, evite llamas o posibles fuentes de inflamación y ventile durante varios minutos el ambiente en el que se encuentra el refrigerador.
- Cumpla con los tiempos máximos de almacenamiento y las fechas de vencimiento de los alimentos congelados. - No es necesario desenchufar el refrigerador si se ausentará menos de tres semanas. Sin embargo, si se ausentará durante más de tres semanas, debe retirar todos los alimentos y el hielo de la cubeta de hielo, desenchufar el refrigerador, cerrar la válvula de agua, retirar el exceso de humedad de las paredes internas y dejar las puertas abiertas para que no aparezcan olores y moho.
• Asegúrese de que ninguno de los tubos que se encuentran detrás del electrodoméstico estén dañados antes de desecharlos. • Se utiliza R-600a o R-134a como refrigerante. Controle la etiqueta del compresor en la parte posterior del refrigerador o la etiqueta del voltaje dentro del refrigerador para constatar qué refrigerante fue utilizado en su refrigerador. Si este producto contiene gas inflamable (Refrigerante R-600a), comuníquese con las autoridades locales para desechar este producto en forma segura.
Puesta a punto del refrigerador de puerta francesa PREPARACIÓN PARA LA INSTALACIÓN DEL REFRIGERADOR B 01 puesta a punto A E Felicitaciones por haber adquirido este refrigerador Samsung. Esperamos que disfrute las funciones y ventajas de vanguardia que ofrece este nuevo electrodoméstico.
PISO Para realizar una instalación adecuada, se debe colocar el refrigerador sobre una superficie nivelada de material rígido que tenga la misma altura que el resto del piso. Esta superficie debe ser lo suficientemente resistente como para soportar el peso de un refrigerador completamente cargado. Para proteger el acabado del piso, corte una hoja grande del cartón y colóquela debajo del refrigerador mientras trabaja.
-- Humedad por fuga de aire. -- Alineación incorrecta de la puerta. -- Pérdida de energía a causa de una puerta mal cerrada. ADVERTENCIA 2. Desconecte los dos conectores (2) de la puerta izquierda. Para retirar el acoplador del agua de la bisagra, gire y tire de él desde la bisagra. Retire la tubería de agua (3) presionando la pieza marcada (4) del acoplador de la tubería de agua.
5. Retire el tornillo (8) conectado a las bisagras inferiores de las puertas izquierda y derecha con un destornillador Philips (+). Retire los 2 tornillos de cabezal hexagonal (9) conectados a las bisagras inferiores de las puertas izquierda y derecha con una llave Allen (3/16”). Retire las bisagras inferiores de las puertas izquierda y derecha (10). DESARMADO DE LA PUERTA DEL CAJÓN FLEX 1. Retire el cajón Flex Zone (1) levantándolo. 1  8 10 9 Llave Allen 2.
4. Retire el tornillo de cabeza hexagonal de los laterales con una llave de tubo (10 mm). DESARMADO DE LA PUERTA DEL CONGELADOR 1. Retire el cajón superior levantándolo. 2. Retire la guarda del compartimento del congelador (1) levantándola. 01 puesta a punto 5. Levante la puerta del cajón Flex de los rieles. 1 3. Extraiga la cesta inferior (2) levantándola de los rieles. 2 CÓMO VOLVER A ARMAR LA PUERTA DEL CAJÓN FLEX Para rearmar las puertas del cajón Flex, coloque las piezas en orden inverso.
5. Mientras sostiene el cajón del congelador por la parte superior, extráigalo completamente y retírelo de los rieles. CÓMO VOLVER A ARMAR LA PUERTA DEL CONGELADOR Para volver a colocar el cajón después de mover el refrigerador hasta su ubicación final, monte las piezas en orden inverso. AJUSTE DEL NIVEL  PRECAUCIÓN Tenga cuidado de no rayar ni abollar el riel deslizante dejando que se golpee contra el suelo.
HACER AJUSTES MENORES EN LA PUERTA O EN LA PUERTA INTERIOR Recuerde que se necesita que el refrigerador esté nivelado para que las puertas estén perfectamente alineadas. Si necesita ayuda, revise la sección anterior sobre la nivelación del refrigerador. • Inserte solo un anillo elástico con este fin. Colocar dos o más anillos elásticos puede hacer que se deslicen o hagan ruido por el rozamiento. • Mantenga los anillos elásticos fuera del alcance de los niños y consérvelos para uso futuro.
microorganismos. Para eso, necesita adquirir un sistema de purificación de agua. La tubería del agua también se conecta a la fábrica de hielo. Para que la fábrica de hielo funcione correctamente, se necesita una presión de agua de 20-125 psi (138 ~ 862 kPa). Si el refrigerador se instala en una zona con baja presión de agua (inferior a los 20 psi), puede instalar una bomba cebadora para compensar la baja presión.
1. Conecte la tubería del agua corriente al acople de compresión ensamblado. Si utiliza una tubería de cobre, deslice la tuerca de compresión (B) (no suministrada) y la férula (no suministrada) por la tubería de cobre (no suministrada) como se muestra en el gráfico. Si utiliza una tubería de plástico (B), inserte el extremo moldeado (lámpara) de la tubería de plástico (B) en el acople de compresión. No la utilice sin el extremo moldeado (lámpara) de la tubería de plástico (B). 2.
Funcionamiento del refrigerador de puerta francesa USO DEL PANEL DE CONTROL 1 4 2 5 3 10 8 7 (1) Freezer/ Power Freeze (3sec) (Congelador/ Congelación rápida [3 s.]) (2) Alarm/ Filter Reset(3sec) (Alarma/ Restablecer filtro [3 s.]) 6 9 El botón Freezer (Congelador) cumple dos propósitos: -- Ajustar el congelador a la temperatura deseada. -- Encender y apagar la función de poder de congelación.
(3) Energy Saver (Ahorro de energía) (5) Lighting/ ºC ↔ ºF (3sec) (Luz / ºC ↔ ºF [3 s.]) El botón Fridge (Refrigerador) cumple dos propósitos: -- Ajustar el refrigerador a la temperatura deseada. -- Encender y apagar la función de Poder de enfriamiento. 1) Para ajustar la temperatura del refrigerador Pulse el botón Fridge (Refrigerador) para ajustar el refrigerador a la temperatura deseada. Puede ajustar la temperatura entre 44 °F (7 °C) y 34 °F (1 °C).
(7) Water (Agua) (8) Filter (Filtro) (9) Ice Type (Tipo de hielo) Presione este botón para dispensar agua. Este modo no puede utilizarse simultáneamente con el modo Ice Type (Tipo de hielo). El modo Water (Agua) se desactivará si toca el botón Cubed/ Crushed Ice (Hielo en cubos/Hielo triturado). Uso del filtro de agua Este ícono se enciende cuando es necesario cambiar el filtro, normalmente después de que el refrigerador haya dispensado 300 galones de agua (después de aproximadamente 6 meses).
• Al jalar el filtro de agua, puede filtrarse algo de agua de la abertura. Esto es normal. Para minimizar las filtraciones de agua, mantenga el cartucho del filtro de agua en posición horizontal al extraerlo. • Para evitar derrames, vacíe la charola del filtro de agua (3) y seque alrededor del compartimento (2). ADVERTENCIA CAMBIO DEL FILTRO DE AGUA 2 (Rojo) 3 3.
6. Si desactivó el suministro de agua, actívelo nuevamente. Para reemplazar el filtro del agua, visite su centro de ventas de artículos para el hogar local o el distribuidor oficial de piezas Samsung en línea en: http://www.samsungparts.com Asegúrese de que el filtro de agua de reemplazo tenga el logotipo SAMSUNG en la caja sobre el filtro de agua. Remoción de los materiales residuales que se encuentran dentro de la tubería del suministro de agua después de instalar el filtro de agua. 1.
CONTROL DE LA TEMPERATURA Control de la temperatura del refrigerador Temperatura básica de los compartimentos del congelador y del refrigerador Control de la temperatura del congelador Temperatura recomendada (congelador): 0 °F (o -18 °C) La temperatura del congelador puede establecerse entre -8 °F y 5 °F (o entre -23 ºC y -15 ºC) para satisfacer sus necesidades particulares. Presione el botón Freezer (Congelador) varias veces hasta que aparezca la temperatura deseada en el visor.
USO DEL DISPENSADOR DE UNA PALANCA Presione el botón del tipo de hielo adecuado para seleccionar lo que desea. • Cuando presione el botón Test (Probar), escuchará el repique del refrigerador (talán, talán). Cuando escuche el sonido, suelte el botón Test (Probar). • Se escuchará automáticamente un sonido que indica que la máquina de hielo está funcionando correctamente. • Uso normal. Fábrica de hielo SIN HIELO Seleccione esta opción si desea apagar la fábrica de hielo.
Si utiliza todo el hielo de una sola vez, repita los pasos 2 y 3 de la página anterior. Sin embargo, espere solamente 8 horas antes de extraer los primeros 4 a 6 cubos. Este procedimiento repondrá cubos de hielo y garantizará su máxima producción. Durante las vacaciones... Si viaja por vacaciones o negocios y no utilizará los dispensadores de agua o de hielo por un período prolongado: - Cuando selecciona el modo Ice Off (Hielo desactivado), retire todos los cubos de hielo de la cubeta.
PIEZAS Y FUNCIONES Mire esta ilustración para familiarizarse con las piezas y las funciones del refrigerador.
USO DEL CAJÓN FLEX ZONE 1. Cuando se selecciona “Wine/Party Dishes” (Vino/Platos para fiestas), la temperatura del cajón Flex Zone se mantendrá alrededor de los 42 °F (5 °C). Esta función resulta útil para mantener los alimentos frescos durante mucho tiempo. 2. Cuando se selecciona “Deli/Snack” (Comidas selectas/Aperitivos), la temperatura del cajón Flex Zone se mantendrá alrededor de los 37 °F (3 °C). Esta función resulta útil para mantener los alimentos frescos durante mucho más tiempo. 3.
REMOCIÓN DE LOS ACCESORIOS DEL REFRIGERADOR 2. Estantes de vidrio templado 1. Compartimentos de las puertas • Compartimentos de las puertas (1) Para retirarlos: simplemente levante el compartimento y jale hacia afuera. Para volver a colocarlos: deslícelos por encima de la ubicación deseada y empuje hacia abajo hasta que se traben.
Cuando el cajón Flex Zone o la luz de LED no funcionen, verifique si los conectores Rewrite: ([1], [2] a continuación) tienen grietas o fugas. 2 02 funcionamiento • Incline el frente del cajón hacia arriba y retírelo, y extraiga el cajón después de moverlo suavemente en la dirección de la flecha. Para volver a colocarlos • Inserte el cajón dentro de los rieles y empújelo hasta colocarlo nuevamente en su lugar.
REMOCIÓN DE LOS ACCESORIOS DEL CONGELADOR 1. Guarda del compartimento del congelador Para retirarla: retire la guarda del compartimento del congelador (1) levantando la guarda. Para volver a colocarla: empuje hacia abajo hasta que la guarda (1) se trabe en su lugar. PRECAUCIÓN 1 Puede rayar el lateral del compartimento si lo gira a izquierda o derecha al armarlo o desarmarlo. PRECAUCIÓN 2. Cajón superextensible Para retirarlo: retire el cajón totalmente hacia afuera.
PRECAUCIÓN Limpieza del exterior Limpieza de los burletes de goma de la puerta 02 funcionamiento Limpie el panel de control y el visor digital con un paño húmedo, limpio y suave. No pulverice con agua directamente sobre la superficie del refrigerador. Las puertas, manijas y superficies del gabinete se deben limpiar con un detergente suave y luego secar con un paño suave. Para que el refrigerador luzca mejor que nunca, recomendamos pulir el exterior una o dos veces al año.
RECOMENDACIONES DE ALMACENAMIENTO DE ALIMENTOS Alimentos Refrigerador Congelador Recomendaciones de almacenamiento LÁCTEOS Mantequilla 2-3 semanas 6-9 meses Envolver o cubrir muy bien. Verificar el código de fecha. La leche y casi todos los productos derivados se venden en envases de cartón con código de fecha de vencimiento del producto. Cerrar con tapa o envolver muy bien. No volver a colocar el producto que no se ha ingerido en el envase original.
Alimentos Refrigerador Congelador Recomendaciones de almacenamiento PESCADOS Y MARISCOS Pescados 1-2 días 2-3 meses Pescado magro (bacalao, platija, etc.
Solución de problemas PROBLEMA SOLUCIÓN El refrigerador no funciona en absoluto o no enfría lo suficiente. • Verifique que el enchufe esté conectado correctamente. • Verifique si la temperatura en el visor digital es más alta que la temperatura interna del refrigerador o del congelador. En ese caso, ajuste el congelador o el refrigerador a una temperatura inferior. • ¿El refrigerador está ubicado bajo la luz solar directa o cerca de una fuente de calor? Si es así, es posible que no enfríe lo suficiente.
SOLUCIÓN Hay mal olor en el refrigerador. • Verifique si hay alimentos descompuestos. • Los alimentos con olores fuertes (por ejemplo, pescado) se deberían tapar muy bien. • Limpie el congelador periódicamente y deseche los alimentos descompuestos. Cuando limpie el interior del refrigerador, almacene los alimentos en otra parte y desenchufe el electrodoméstico. Pase un paño de cocina seco después de 2-3 horas y deje que circule el aire dentro del refrigerador.
Garantía (E.U.A.) GARANTÍA DEL REFRIGERADOR SAMSUNG GARANTÍA LIMITADA (EE.UU.) REFRIGERADOR SAMSUNG GARANTÍA LIMITADA AL COMPRADOR ORIGINAL CON COMPROBANTE DE COMPRA Este producto de marca SAMSUNG, suministrado y distribuido por Samsung Electronics America, Inc.
Las visitas de un técnico de servicio autorizado para explicar las funciones, el mantenimiento o la instalación del producto no están cubiertas por esta garantía limitada. Comuníquese con SAMSUNG al número que figura a continuación si necesita asistencia en los anteriores casos. EXCLUSIÓN DE GARANTÍAS IMPLÍCITAS GARANTÍAS TÁCITAS, INCLUYENDO LAS GARANTÍAS DE COMERCIABILIDAD O APTITUD PARA UN PROPÓSITO ESPECIAL, POSEEN UN TÉRMINO LIMITADO DE UN AÑO O EL PERÍODO MÁS CORTO PERMITIDO POR LA LEY.
Contacte con SAMSUNG WORLD WIDE Si tiene alguna pregunta o comentario acerca de productos Samsung, por favor contacte con el servicio de atención al cliente de SAMSUNG. PAÍS LLAME AL O VISÍTENOS EN LÍNEA EN ESCRIBA A EE. UU. 1-800-SAMSUNG (726-7864) 1-844-SAM-PAYS (726-7297) www.samsung.com/us/support Samsung Electronics America, Inc. 85 Challenger Road Ridgefield Park, NJ 07660 CANADÁ 1-800-SAMSUNG (726-7864) 1-844-SAM-PAYS (726-7297) www.samsung.com/ca/support (English) www.samsung.
Réfrigérateur Guide d'utilisation un monde de possibilités Merci d'avoir choisi ce produit Samsung. Appareil amovible DA68-02952A-11.indb 1 2018. 7. 9.
Table des matières CONSIGNES DE SÉCURITÉ……………………………………………………………………… 2 INSTALLATION DE VOTRE RÉFRIGÉRATEUR À PORTES FRANÇAISES…………………… 9 FONCTIONNEMENT DE VOTRE RÉFRIGÉRATEUR À PORTES FRANÇAISES………… 18 DÉPANNAGE……………………………………………………………………………………… 34 Consignes de sécurité CONSIGNES DE SÉCURITÉ • Avant d’utiliser votre nouveau réfrigérateur Samsung, veuillez lire attentivement ce guide afin de vous assurer que vous savez comment utiliser de manière sûre et efficace ses différentes fonctionnalités.
NE PAS toucher. Suivre scrupuleusement les consignes. • Débrancher la fiche de la prise murale. S'assurer que le réfrigérateur est relié à la terre afin d'éviter tout choc électrique. -- Communiquer avec le service d'assistance technique pour obtenir de l'aide. • Remarque. • Ces symboles d'avertissement ont pour but d'éviter tout risque de blessure. Respectez-les en toutes circonstances.
• • • • • • -- Si vous branchez la prise d'alimentation à l'envers, le fil est susceptible de se rompre et de provoquer un incendie ou un choc électrique. Lorsque vous déplacez le réfrigérateur, assurezvous qu’il ne roule pas sur le cordon d’alimentation, et prenez garde de ne pas endommager ce dernier. Il pourrait y avoir un risque d'incendie. Assurez-vous que la fiche d’alimentation ne risque pas d’être écrasée ou endommagée par le dos du réfrigérateur.
• N 'entreposez pas d'objets sur le dessus de rangement de produits alimentaires. l'appareil. - Cela pourrait entraîner un incendie ou une explosion. - Lors de l'ouverture ou de la fermeture de la porte, • Ne rangez pas de produits pharmaceutiques, les objets risqueraient de tomber et de provoquer chimiques ou sensibles aux températures dans le des blessures corporelles et/ou des dommages réfrigérateur. matériels.
• • • • lorsque vous ouvrez les portes en présence d’enfants. Ne laissez pas les enfants se suspendre à la porte de l’appareil. Ils risqueraient de se blesser. Ne laissez pas les enfants entrer dans le réfrigérateur au risque qu’ils y demeurent enfermés. Serrez les bouteilles les unes contre les autres pour éviter qu'elles tombent. Cet appareil est destiné au rangement des aliments dans un environnement domestique uniquement.
- Respectez les durées de congélation et les dates de péremption associées aux aliments surgelés. - Il n'est pas nécessaire de débrancher le réfrigérateur lorsque vous vous absentez moins de trois semaines. Cependant, si vous vous absentez pendant plus de trois semaines, videz le réfrigérateur et le bac à glace et débranchez le réfrigérateur. Fermez le robinet d’adduction d’eau, essuyez l’excédent d’humidité à l’intérieur et laissez les portes ouvertes afin d’éviter la formation d’odeurs et de moisissure.
Vérifiez l'étiquette du compresseur à l'arrière de l'appareil ou l'étiquette signalétique à l'intérieur du réfrigérateur pour savoir quel réfrigérant est utilisé dans votre réfrigérateur. Si ce produit contient un gaz inflammable (réfrigérant R-600a), communiquez les autorités locales pour obtenir des renseignements sur la mise au rebut en toute sécurité de votre appareil.
Installation de votre réfrigérateur à portes françaises AVANT D'INSTALLER LE RÉFRIGÉRATEUR B Nous vous félicitons d’avoir choisi ce réfrigérateur Samsung. Nous espérons que vous appréciez les fonctionnalités de pointe offertes par ce nouvel appareil.
SOL Pour une installation correcte, ce réfrigérateur doit être placé sur une surface plane et dure à la même hauteur que le reste du plancher. Cette surface doit être suffisamment résistante pour supporter le poids d’un réfrigérateur plein. Afin de protéger la finition du plancher, coupez un grand morceau de carton et placez-le sous le réfrigérateur, à l'endroit où vous travaillez. Lors du déplacement du réfrigérateur, tirez-le et poussezle directement vers l'avant ou vers l'arrière.
- l’humidité suite à une fuite d’air ; un alignement irrégulier des portes ; une perte d’énergie causée par une jointure de porte non hermétique. AVERTISSEMENT 2. Débranchez les deux connecteurs ( 2 ) sur la porte gauche. Pour retirer le coupleur d'eau de la charnière, tournez-le et dégagez-le de la charnière. Retirez le tuyau d'eau ( 3 ) tout en appuyant sur la partie marquée ( 4 ) du coupleur du tuyau d'eau.
5. Retirez les vis ( 8 ) fixées aux charnières inférieures des portes de gauche et de droite à l'aide d'un tournevis cruciforme (+). Retirez les deux boulons à tête hexagonale ( 9 ) fixés aux charnières inférieures des portes droite et gauche à l'aide d'une clé hexagonale (3/16 po). Retirez les charnières inférieures des portes de gauche et de droite ( 10 ). DÉMONTAGE DE LA PORTE DU TIROIR FLEX ZONE 1. Soulevez le tiroir Flex Zone ( 1 ) pour le sortir. 1 8 10 9 Clé hexagonale 2.
4. Retirez 1 boulon à tête hexagonale de chaque côté à l'aide d'une clé à douille (10 mm). 2. Retirez la barre de retenue du compartiment du congélateur ( 1 ) en la soulevant. 1 01 Installation 5. Soulevez la porte du tiroir Flex Zone pour la retirer des coulisses. 3. Enlevez le bac inférieur ( 2 ) en le soulevant du système de coulisses.
RÉGLAGE DU NIVEAU ATTENTION Assurez-vous de ne pas rayer ou déformer le système de coulisses en le laissant heurter le sol. ATTENTION Veillez à fixer le panier du congélateur dans la position appropriée au moment du retrait / de la réinstallation de la porte du congélateur. Le nonrespect de cette instruction peut entraîner une ouverture ou une fermeture incorrecte de la porte. Assurez-vous que le réfrigérateur est de niveau afin de pouvoir procéder aux derniers réglages.
LÉGERS RÉGLAGES AU NIVEAU DE LA PORTE ET DE LA PORTE INTÉRIEURE • Insérez un seul circlip pour ce processus. Si vous insérez deux circlips ou plus, ils pourraient glisser et tomber ou émettre un bruit de frottement. • Tenez les circlips hors de la portée des enfants et conservez-les pour une utilisation ultérieure. • Ne soulevez trop la porte non plus. La porte peut entrer en contact avec le cache supérieur et l’endommager.
connecté à la machine à glaçons. Pour que la machine à glaçons puisse fonctionner correctement, la pression de l’eau doit se situer entre 20 et 125 psi (138 et 862 kPa). Si le réfrigérateur est installé dans une zone où la pression de l’eau est faible (inférieure à 20 psi), vous pouvez installer une pompe de surpression pour compenser la faible pression. Après avoir raccordé le tuyau d’eau, assurez-vous que le réservoir d’eau à l’intérieur du réfrigérateur est bien rempli.
Si vous utilisez un tube en cuivre, faites glisser l'écrou de serrage ( B ) (non fourni) et la bague (non fournie) sur le tube en cuivre (non fourni) comme illustré. Si vous utilisez un tube en plastique ( B ), insérez l'extrémité moulée (en forme de poire) du tube en plastique ( B ) dans le raccord à compression. N'installez pas le tube en plastique ( B ) sans l'extrémité moulée (en forme de poire). 2. Serrez l'écrou de serrage ( B ) sur le raccord à compression.
Fonctionnement de votre réfrigérateur à portes françaises UTILISATION DU PANNEAU DE COMMANDE 1 4 2 5 3 10 8 7 (1) Freezer/ Power Freeze (3sec) (Congélateur/ Congélation rapide (3 s)) (2) Alarm/Filter Reset(3sec) (Alarme/ Réinitialisation du filtre (3 s)) 6 9 Le bouton Freezer (Congélateur) a deux fonctions : -- Il permet de régler le congélateur à la température souhaitée. -- Il permet d’activer et de désactiver la fonction de congélation rapide.
(4) Fridge/ Power Cool(3sec) (Réfrigérateur/ Refroidissement rapide (3 s)) (6) Ice Maker Off/Control Lock (3sec) (Arrêt machine à glaçons/ Verrouillage de commande (3 s)) 2) F onction Control Lock (de verrouillage de commande) Appuyez sur ce bouton pendant 3 secondes pour verrouiller l’écran, le panneau du tiroir Flex Zone et les boutons du distributeur. Les boutons ne peuvent alors plus être utilisés.
(9) Ice Type (Type de glace) Ce bouton permet de choisir sous quelle forme vous souhaitez obtenir de la glace. Vous alternez entre les modes Cubed Ice (Glaçons) et Crushed Ice (Glace pilée) lorsque vous appuyez sur ce bouton. Ce mode ne peut pas être utilisé en même temps que le mode Water (Eau). Pour économiser l'électricité, l'affichage du panneau s'éteint automatiquement lorsqu’aucun bouton n'est actionné, lorsqu'aucune porte n'est ouverte ou lorsqu'aucun levier de distributeur n'a été poussé.
que le filtre ne soit totalement usé. Remplacer le filtre à temps permet d'avoir toujours une eau fraîche et pure. 4. Poussez le filtre et tournez-le dans le sens des aiguilles d'une montre jusqu'à ce qu'il s'enclenche. 1. Coupez l’alimentation en eau. Faites ensuite tourner le filtre à eau ( 1 ) d’environ un quart de tour dans le sens inverse des aiguilles d’une montre. • Si vous ne parvenez pas à insérer le filtre en raison de la pression élevée de l’eau, coupez l’alimentation en eau.
RÉGLAGE DE LA TEMPÉRATURE 2. Laissez l'eau s'écouler par le distributeur jusqu'à ce qu'elle soit claire (environ 6 à 7 minutes). Cela permet de nettoyer le système d’alimentation en eau et de faire sortir les bulles d'air des tuyaux. Température de base des compartiments congélateur et réfrigérateur 3. Il peut s'avérer nécessaire de laisser l'eau s'écouler plus longtemps selon les installations.
Réglage de la température du réfrigérateur -- En cas d'erreur de communication entre l'écran et les commandes principales, il est possible que la lumière de l'affichage du bac convertible clignote. S'il continue à clignoter longtemps, communiquez avec un centre de réparation Samsung Electronics. Température recommandée (réfrigérateur) : 37 °F (ou 3 °C) La température du réfrigérateur peut être réglée entre 34 °F et 44 °F (ou entre 1 °C et 7 °C) en fonction de vos besoins.
En cas de panne de courant vérifiez le niveau d'eau Bouton de test • Ne maintenez pas le bouton de test enfoncé si le bac est plein de glace ou d'eau. Ce dernier risquerait de déborder. • Si vous appuyez sur le bouton de test, le réfrigérateur émet un signal sonore (sonnette). À ce moment-là, relâchez le bouton de test. • Le signal sonore retentit à nouveau automatiquement pour signaler que tout fonctionne normalement.
UTILISATION DE LA FONCTION Si vous partez en vacances… ICE OFF (DÉSACTIVATION Si vous devez vous absenter et que le distributeur d'eau et de glace restera inutilisé pendant une GLACE) période prolongée : Si le bac à glaçons n’est pas bien remis en place, la glace dans le bac peut fondre. S’il est impossible de remettre le bac en place, tournez la rampe hélicoïdale de 90 degrés (voir l’illustration de droite ci-dessous) et réessayez.
PIÈCES ET CARACTÉRISTIQUES Consultez l'illustration ci-dessous pour vous familiariser avec les pièces et les caractéristiques de votre réfrigérateur.
UTILISATION DU TIROIR FLEX ZONE Modes du tiroir Flex Zone 1. Une fois le mode « Wine/Party Dishes » (Vin/ plats de réception) sélectionné, la température du tiroir Flex Zone est maintenue aux alentours de 42 °F (5 °C). Cette fonction permet de conserver les aliments au frais plus longtemps. 2. Une fois le mode « Deli/Snacks » (Épicerie fine/collations) sélectionné, la température du tiroir Flex Zone est maintenue aux alentours de 37 °F (3 °C).
2. Tablettes en verre trempé ATTENTION N'entreposez pas de bouteilles en verre dans le tiroir Flex Zone en mode « Cold Drinks » (Boissons fraîches) ou « Meat/Fish » (Viande/poisson). S’il y a congélation, elles risquent de se briser et d'entraîner des blessures. RETRAIT DES ACCESSOIRES DU RÉFRIGÉRATEUR Pour les retirer : inclinez l'avant de la tablette dans le sens indiqué ( 1 ), puis soulevez-la verticalement ( 2 ). Sortez la tablette.
• Inclinez l'avant du bac vers le haut, puis tirez-le directement vers vous. Retirez ensuite le tiroir après avoir l'avoir légèrement déplacé dans le sens de la flèche sur l’illustration. 2 02 Fonctionnement Pour les remettre en place • Insérez le bac dans les coulisses et poussez dessus pour le remettre en place. • Faites glisser le bac à l'emplacement souhaité et poussez jusqu'à la butée. ATTENTION La tablette en verre trempé ne peut être soulevée et retirée que lorsque les bacs sont retirés. 1 4.
Pour la remettre en place : poussez la barre vers le bas jusqu'à ce qu'elle ( 1 ) se verrouille en position. ATTENTION Vous pouvez rayer le côté du réservoir si vous le tordez vers la gauche ou vers la droite lors de son montage ou démontage. 1 ATTENTION 2. Tiroir grande capacité Pour le retirer : ouvrez le bac à complètement. Inclinez l’arrière du tiroir vers le haut, puis tirez-le pour le sortir. Pour le remettre en place : replacez le tiroir sur les coulisses ( 4 ) en l'inclinant vers le haut.
Nettoyage de la partie extérieure ATTENTION Lorsque vous utilisez la fonction de glace pilée du distributeur, des morceaux de glace peuvent tomber et s’accumuler dans la gouttière. Afin d'éviter que la glace fonde et déborde, veillez à vider la gouttière régulièrement (dès que vous voyez qu'elle commence à se remplir). Nettoyage des joints des portes en caoutchouc ATTENTION Évitez de vaporiser de l'eau directement sur le réfrigérateur. Utilisez un chiffon humide et propre pour le nettoyer.
CONSEILS DE CONSERVATION DES ALIMENTS Aliments Réfrigérateur Congélateur Conseils de conservation PRODUITS LAITIERS Beurre 2 à 3 semaines 6 à 9 mois Emballez ou couvrez bien. Vérifiez la date limite de consommation. La plupart des produits laitiers sont vendus en boîtes datées indiquant leur date limite de consommation. Refermez ou emballez soigneusement. Ne replacez pas de portions non consommées dans le récipient d'origine.
Aliments Réfrigérateur Congélateur Conseils de conservation POISSONS ET FRUITS DE MER Poissons 1 à 2 jours 2 à 3 mois Poissons maigre (cabillaud, filet, etc.) 1 à 2 jours 6 mois Congelé ou pané s. o.
Dépannage PROBLÈME SOLUTION Le réfrigérateur ne fonctionne pas du tout ou ne refroidit pas suffisamment. • Vérifiez si la fiche du cordon d'alimentation est correctement branchée. • Vérifiez si la température affichée à l'écran est plus élevée que celle à l'intérieur du congélateur ou du réfrigérateur. Si cela est le cas, réglez le congélateur ou le réfrigérateur sur une température inférieure.
SOLUTION Vous entendez de l'eau gargouiller dans le réfrigérateur. • Ceci est tout à fait normal. Ce son provient du réfrigérant qui circule dans le réfrigérateur. Le réfrigérateur dégage une odeur désagréable. • Vérifiez qu'il n'y a pas d'aliments gâtés. • Les aliments ayant une forte odeur (le poisson, par exemple) doivent être hermétiquement emballés. • Nettoyez régulièrement le congélateur et jetez tout aliment périmé.
Si votre réfrigérateur doit être réparé N'hésitez pas à appeler un centre de service agréé Samsung proche en lui communiquant votre nom, adresse et numéro de téléphone lorsque votre appareil ne fonctionne pas correctement. Informations relatives à la garantie (CANADA) Garantie limitée à l'acheteur initial Cet appareil Samsung est garanti par Samsung Electronics Canada, Inc.
notes DA68-02952A-11.indb 37 2018. 7. 9.
Comment contacter Samsung dans le monde Si vous avez des suggestions ou des questions concernant les produits Samsung, veuillez contacter le Service Consommateurs Samsung. PAYS APPELEZ LE OU RENDEZ-VOUS SUR LE SITE ÉCRIVEZ À É.-U. 1-800-SAMSUNG (726-7864) 1-844-SAM-PAYS (726-7297) www.samsung.com/us/support Samsung Electronics America, Inc. 85 Challenger Road Ridgefield Park, NJ 07660 CANADA 1-800-SAMSUNG (726-7864) 1-844-SAM-PAYS (726-7297) www.samsung.com/ca/support (English) www.samsung.