RF268** Refrigerator user manual English imagine the possibilities Thank you for purchasing this Samsung product. To receive more complete service, please register your product at www.samsung.com/register DA68-01861A.indb 1 2010.10.
Features of your new Refrigerator Key features of your new refrigerator Your Samsung French Door Refrigerator comes equipped with various innovative storage and energy-efficient features. • Twin Cooling System The Refrigerator and Freezer have separate evaporators. Due to this independent cooling system, the Freezer and Refrigerator cool more efficiently. Additionally, this separate air flow system prevents food odor of one compartment from seeping into other compartments.
Safety Information SAFETY INFORMATION Before using your new Samsung French Door Refrigerator, please read this manual thoroughly to ensure that you know how to safely and efficiently operate the features and functions that your new appliance offers.
Safety Information • If the wall socket is loose, do not insert the power plug. - There is a risk of electric shock of fire. • Do not use a cord that shows cracks or abrasion damage along its length or at either end. • Do not bend the power cord excessively or place heavy articles on it. • Never unplug your refrigerator by pulling on the power cord. Always grip plug firmly and pull straight out from the outlet. - Damage to the cord may cause a short-circuit, fire and/or electric shock.
WARNING sEVERE wARninG siGns FoR using • Do not insert your hands into the bottom area under the appliance. - Any sharp edges may cause personal injury. • Do not let children step on drawer’s cover. - The drawer may break and cause them to slip. • Do not overfill the refrigerator with food. - When you open the door, an item may fall out and cause personal injury or material damage. • Do not touch the inside walls of the freezer or products stored in the freezer with wet hands.
Safety Information • Service warranty and Modification. - Any changes or modifications performed by a 3rd party on this finished appliance is not covered under Samsung warranty service, nor can Samsung be responsible for safety issues that result from 3rd party modifications. • Do not block air holes. - If the air holes are blocked, especially with a plastic bag, the refrigerator can be over cooled. If this cooling period lasts too long, the water filter may break and cause water leakage.
Contents Setting up your French Door Refrigerator 08 Operating your SAMSUNG Refrigerator 21 TROUBLESHOOTING 08 09 09 11 12 14 15 16 17 18 19 Getting ready to install the refrigerator Setting up the refrigerator Removing the refrigerator doors Disassemble the Freezer Drawer Reattaching the refrigerator doors Assemble the Freezer Drawer Adjusting the doors Making minor adjustments between doors Adjusting the freezer drawer level Checking the water dispenser line Installing the water line 21 22 23 24 26
Setting up your French Door Refrigerator GETTING READY TO INSTALL THE REFRIGERATOR Congratulations on your purchase of the Samsung French Door Refrigerator. We hope you enjoy the state-of-art features and efficiencies that this new appliance offers. Selecting the best location for the Refrigerator • A location with easy access to the water supply. • A location without direct exposure to sunlight. • A location with level (or nearly level) flooring.
SETTING UP THE REFRIGERATOR Now that you have your new Refrigerator installed in place, you are ready to set up and enjoy the features and functions of the appliance. By completing the following steps, your Refrigerator should be fully operational. Check the accessories listed below. Water filter Hex wrench Fastener Compression fitting Compression nut 01 SETTING UP 1. P lace the Refrigerator in an appropriate location with reasonable clearance between it and the wall.
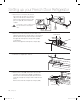
Setting up your French Door Refrigerator 2. D isconnect 2 connectors ( 3 ) at each side of the top cap and one connector ( 4 ) on the left side door. Remove the water line ( 5 ) while pressing the dark gray color part ( 6 ) of the water line coupler. CAUTION If a red clip is on the coupler, it must be removed before removing the tube. 3 4 3 5 6 3. Remove the 3 hex head bolts ( 7 ) attached to the upper left and right door hinges with a socket wrench (10mm).
DISASSEMBLE THE FREEZER DRAWER 1. Take out the upper drawer by lifting it up. 01 SETTING UP SlotSlot 2. Remove the tilting pocket ( 1 ) by pulling both support guards ( 2 ) upward at the same time. 1 2 3. Take out the lower basket( 3 ) by lifting the basket up from the rail system. 3 4. R emove 4 hex head bolts from both sides with a socket wrench(10mm). 5. Lift up the freezer door from the rails. Setting up _11 DA68-01861A.indb 11 2010.10.
Setting up your French Door Refrigerator REATTACHING THE REFRIGERATOR DOORS Assemble the Refrigerator doors 1. Reattach the lower left and right door hinges ( 12 ). With a Philips head screwdriver, insert and tighten the screw ( 10 ) into the lower left and right door hinges. 12 10 With a allen wrench(3/16”), insert and tighten the 2 hex head bolts ( 11 ) into the lower left and right door hinges. 11 Allen wrench 2. P lace the hole in the bottom of the door over the door hinge ( 12 ).
REATTACHING THE REFRIGERATOR DOORS 4. C onnect the dispenser door tube ( 5 ) and then insert a clip on the coupler with pulling tube. 4 3 3 The clip is enveloped inside of the top cap. 01 SETTING UP Connect the connector ( 4 ) on the left side door and two connectors ( 3 ) at each side of the top cap. 5 dispenser door tube CAUTION The dispenser door tube ( 5 ) must be fully inserted to the marked line to prevent water leakage from the dispenser. coupler 5.
Setting up your French Door Refrigerator ASSEMBLE THE FREEZER DRAWER 1. Pull out the rails fully on each side of the cabinet. SlotSlot 2. Attach the freezer door front onto the open slots on the sides. SlotSlot SlotSlot 3. Tighten 4 hex head bolts completely with a socket wrench(10mm). 4. Insert the lower basket ( 6 ) into the rail system. 6 5. H ook the ends of the tilting pocket ( 7 ) onto the support guards ( 8 ) and push down until they lock into place. 7 8 6. Insert the upper drawer.
ADJUSTING THE DOORS CAUTION 01 SETTING UP After putting the doors back on the refrigerator, make sure the refrigerator is level so that you can make final adjustments. If the Refrigerator is not level, it will not be possible to get the doors perfectly even, which may cause moisture condensation and increased energy bills. For example, when the left side is lower than the right side, insert a flat-blade screwdriver(-) into a notch on the left control lever, and turn it counterclockwise to level the door.
Setting up your French Door Refrigerator MAKINg MINOR ADJUSTMENTS BETWEEN DOORS Remember, a level Refrigerator is necessary for getting the doors perfectly even. If you need help, review the previous section on leveling the Refrigerator. When the left door is lower than the right door. When the left door is higher than the right door. Adjustment part Adjustment part 1. Pull out the freezer drawer ( 1 ), then you can see the middle hinge ( 2 ) . 2.
ADJUSTING THE FREEZER DRAWER LEVEL Adjustment part 01 SETTING UP Freezer Drawer 1. Locate the height-adjuster ( 1 ) in the freezer drawer. Unscrew the 8 Phillips screws ( 2 ) slightly to loosen the door. 1 2 2. Loosen the controller screw( 3 ) with a Phillips screwdriver(+). 3 3. Find the best level to align the door slope. Example) The slope is about 0.08inch(2mm) as shown below. - Rotate the height adjuster to -2.0 to reduce the door slope.
Setting up your French Door Refrigerator CHECKING THE WATER DISPENSER LINE A water dispenser is one of the helpful features on your new Refrigerator. To help promote better health, the water filter removes unwanted particles from your water. However, it does not sterilize or destroy microorganisms. You may need to purchase a water purifying system to do that. In order for the ice maker to operate properly, a water pressure of 20~125 psi is required. Under normal conditions, a 170 cc (5.75 oz.
INSTALLING THE WATER LINE Connecting the water supply line to the refrigerator. There are several items that you need to purchase to complete this connection. You may find these items sold as a kit at your local hardware store.
Setting up your French Door Refrigerator 4. R emove the filter cap ( 4 ) and insert the filter into the filter housing. Cover filter. 4 5. S lowly turn the water filter 90º clockwise to align with the printing mark on the cover, locking the filter in position. Make sure to align the water filter label mark ( 5 ) with center of cover filter printing as illustrated. Remember, do not over-tighten. 5 Separation of filter cap(red) Turn until the label is aligned.
Operating your French Door Refrigerator USINg THE CONTROL PANEL 4 2 5 3 6 02 operating 1 ( 1 ) Energy Saver Press the Energy Saver button for better energy efficiency. If water drops appear on the doors, turn the Energy Saver function off. ( 2 ) Freezer / Power Freeze Press the Freezer / Power Freeze button to set the Freezer to your desired temperature.
Operating your French Door Refrigerator USINg THE CONTROL PANEL Freezer Temp ( 1 ) indicates the current Freezer temperature. Fridge Temp ( 2 ) indicates the current Refrigerator temperature. If you do not press any button, the freezer & fridge temperature indicator will turn off in a few seconds. If any button is pressed, the display will light up again. 1 2 Power Freeze This icon will light up when you press the Freezer / Power Freezer button for 3 seconds.
Energy saver This icon will light up when you press the Energy Saver button. The Energy Saver function is automatically set to “ON” when power is supplied to the Refrigerator. If condensation occurs on the doors, turn the Energy Saver mode off. Lighting This icon will light up when you press the Lighting button. In this case, the dispenser light(under the display) will be on constantly. If you would like the dispenser light to come on only when using the dispenser, turn the Lighting mode off.
Operating your French Door Refrigerator Controlling the fridge temperature The fridge temperature can be set between 46°F and 34°F to suit your particular needs. Press the Fridge button repeatedly until the desired temperature is shown in the temperature display. The temperature will move 2°F degrees with each press(38°F ➝ 36°F ➝ 34°F ➝ 46°F ➝ 44°F ➝ 42°F ➝ 40°F ➝ 38°F). The temperature control process for the Fridge works just like the Freezer process.
CAUTION Check the water level Test button 02 operating • In case ice doesn’t come out, pull out the ice bucket and press the test button located on the right side of ice maker. • Do not press the test button continuously when the tray is filled with ice or water. Water may overflow or ice jamming may occur. • Normal Use To fill the ice bucket to maximum capacity after installation, make sure to do the following steps. 1. Allow your refrigerator to operate and cool down for 24 hours (or 1 full day). 2.
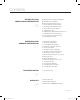
Operating your French Door Refrigerator PARTS AND FEATURES Use this page to become more familiar with the parts and features of the Refrigerator.
STORINg FOOD IN THE REFRIgERATOR The Samsung French Door Refrigerator has been designed to provide you with maximum space saving features and functions. Here are some of the customized compartments we have created to keep your food fresher longer. In order to further prevent odor from seeping into the ice compartment, stored food should be wrapped securely and as airtight as possible.
Operating your SAMSUNG Refrigerator USING THE COOL SELECT PANTRYPLUS The Cool Select PantryPLUS is a full-width drawer with an adjustable temperature control. This pantry can be used for large party trays, deli items, pizzas, beverages or miscellaneous items. There is a temperature sensor which can adjust the amount of cold air allowed into the pantry. The control buttons are located on the right side of the pantry. • P ress the Temp button repeatedly until your desired mode is lit.
REMOVING THE REFRIGERATOR ACCESSORIES 1. Door Bins & Dairy Compartment To remove - Simply lift the bin up and pull straight out. 02 operating To relocate - S lide it in above the desired location and push down until it stops. Injury may occur if the door bins are not firmly assembled. not allow children to play with bins. Sharp corners of the bins may cause injury. CAUTION Do Do not adjust a bin full of foods. Dust removal method -Remove the guard and wash in water. 2.
Operating your SAMSUNG Refrigerator 4. Cool Select PantryPLUS To remove the pantry - P ull the pantry out to full extension. Tilt up the front side of pantry and pull straight out. To relocate the pantry - P ush the rails to the back of the Refrigerator. Place the drawer onto the rails and slide the pantry back until it is in place.
REMOVING THE FREEZER ACCESSORIES 1. Tilting Pocket To remove - Pull both brackets( 1 ) upward until you hear a clicking sound and remove the pocket To replace - Hook the ends of the pocket into both brackets ( 1 ) and push down until it locks into place. 02 operating 1 2. ICE BUCKET 1 2 To remove - Lift the ice bucket( 1 ). To relocate - P lace the ice bucket into the Super extended drawer( 2 ). 3. Auto Pull Out Drawer To remove - Pull the drawer out to full extension.
Operating your SAMSUNG Refrigerator FOOD STORAGE TIPS Foods Refrigerator Freezer Storage Tips DAIRY PRODUCTS Butter 2-3 Weeks 6-9 Months Wrap or cover tightly. Milk 1-2 Weeks Not recommended Check date code. Most milk and similar products are sold in date-coded cartons that indicate a products’s peak freshness. Re-seal with cap or wrap tightly. Do not return unused portions to original container.
Foods Refrigerator Freezer Storage Tips Fish 1-2 Days 2-3 Months 1-2 Days 6 Months n/a 3 Months Shrimp (uncooked) 1-2 Days 12 Months Crab 3-5 Days 10 Months Cooked Fish or Shellfish 2-3 Days 3 Months Chops 2-4 Days 6-12 Months Ground 1 Day 3-4 Months Roast 2-4 Days 6-12 Months Bacon 1-2 Weeks 1-2 Months Sausage 1-2 Days 1-2 Months Steak 2-4 Days 6-9 Months Poultry 1 Day 12 Months Lunch meat 3-5 Days 1 Month Meat 2-3 Days 2-3 Months Poultry 2-3 Days 4-5 Months
Operating your SAMSUNG Refrigerator Cleaning the refrigerator Caring for your Samsung French Door Refrigerator prolongs the life of your appliance and helps keep the refrigerator free of odor and germs. Cleaning the Interior Clean the inside walls and accessories with a mild detergent and then wipe dry with a soft cloth. You can remove the drawers and shelves for a more thorough cleaning. Just make sure to dry drawers and shelves before putting them back into place.
CHANGING THE INTERIOR LIGHTS CAUTION If Users randomly exchange the LED lamp by yourself, this may result in electric shock or personal injury. When the interior or exterior LED lamp has gone out, please contact your service agents. 02 operating CAUTION Do not disassemble or replace the LED type Lighting. To change the LED Type Lighting contact Samsung service center or your authorised Samsung dealer. SAMSUNG CUSTOMER CARE CENTER Samsung Electronics America, Inc.
Operating your SAMSUNG Refrigerator CHAnGinG tHE wAtER FiLtER To reduce risk of water damage to your property DO NOT use generic brands of water filters in your SAMSUNG warning Refrigerator. USE ONLY SAMSUNG BRAND WATER FILTERS. SAMSUNG will not be legally responsible for any damage, including, but not limited to property damage caused by water leakage from use of a generic water filter. SAMSUNG Refrigerators are designed to work ONLY WITH SAMSUNG WATER Filter.
Troubleshooting SOLUTION The Refrigerator does not work at all or it does not chill sufficiently. • Check that the power plug is properly connected. • Check the set temperature on the digital display is warmer than the freezer or fridge inner temperature. • Try setting it to a lower temperature.
Warranty Water Filter Chart Performance Data Sheet For Samsung Model DA97-06317A Using Replacement Cartridge DA29-00003G This system has been tested according to NSF/ANSI Standards 42 and 53 for the reduction of the substances listed below. The concentration of the indicated substances in water entering the system was reduced to a concentration less than or equal to the permissible limit for water leaving the system, as specifi ed in NSF/ANSI 42 and 53.
Water Filter Certification 04 WARRANTY warranty _39 DA68-01861A.indb 39 2010.10.
Warranty WARRANTY ON SAMSUNG REFRIGERATOR LIMITED WARRANTY TO ORIGINAL PURCHASER This Samsung brand product, as supplied and distributed by Samsung Electronics America, Inc.
04 WARRANTY THERE ARE NO EXPRESS WARRANTIES OTHER THAN THOSE LISTED AND DESCRIBED ABOVE, AND NO WARRANTIES WHETHER EXPRESS OR IMPLIED, INCLUDING, BUT NOT LIMITED TO, ANY IMPLIED WARRANTIES OF MERCHANTABILITY OR FITNESS FOR A PARTICULAR PURPOSE, SHALL APPLY AFTER THE EXPRESS WARRANTY PERIODS STATED ABOVE, AND NO OTHER EXPRESS WARRANTY OR GUARANTY GIVEN BY ANY PERSON, FIRM OR CORPORATION WITH RESPECT TO THIS PRODUCT SHALL BE BINDING ON SAMSUNG.
In an effort to promote recycling this user manual is printed on recycled paper. DA68-01861A.indb 42 2010.10.