
Installation Guide


English - 12
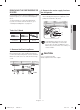
3. Remove the freezer door
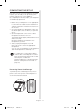
A few things to mention fi rst.
• Make sure that you lift the door straight up so
the hinges are not bent or broken.
• Be careful not to pinch the water tubing and
wire harness on the door.
• Place doors on a protected surface to prevent
scratching or damage.
• Is necessary, have two people disassemble the
doors.
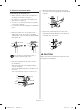
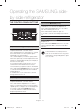
1. With the Freezer door closed, remove the
upper hinge cover (1) using a screwdriver,
and then disconnect the wires by gently pulling
them apart (2).
(2)
(1)
Be careful not to damage the sensor
harness with the hinge cover.
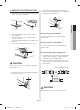
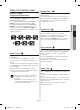
2. Remove the hinge bolts (3) with a 10mm
Socket Wrench.
Remove the ground screw (4) by turning it
counter-clockwise.
Take off the upper hinge (5) in the direction of
the arrow.
Take care that the door does not fall on you.
(4)
(3)
(5)
Pressing
Pressing
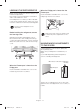
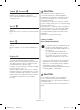
3. Open the Freezer door, and then remove the
door from the lower hinge (6) by carefully lifting
it up (7).
(7)
(6)
4. Remove the lower hinge (8) from the lower
hinge bracket (9) by lifting the lower hinge up
in the direction of the arrow.
(8)
(9)
CAUTION
Make sure to put the water line through the lower
hinge before assembling it.
SSEDA Drop In- EN.indd 12SSEDA Drop In- EN.indd 12 2015. 2. 6. 9:392015. 2. 6. 9:39