
Installation Guide


English - 13
SETTING UP
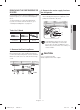
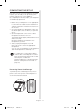
4. REMOVE THE FRIDGE DOOR
1. With the door closed, remove the upper hinge
cover (1) using a screwdriver.
(1)
(1)
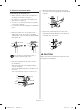
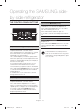
2. Remove the hinge bolts (2) with a 10mm
Socket Wrench.
Remove the ground screw (3) by turning it
counter-clockwise.
Take off the upper hinge (4) in the direction of
the arrow.
Take care that the door does not fall on you.
(3)
(2)
(4)
CAUTION
Do not remove the sensor assembly in the right
upper hinge cover.
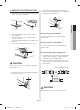
3. Remove the door from the lower hinge (6) by
lifting the door (7).
(7)
(6)
4. Remove the lower hinge (8) from the lower
hinge bracket (9) by lifting the lower hinge up
in the direction of the arrow.
(8)
(9)
Re-attaching the Fridge Door
To re-attach the fridge door, replace parts in
reverse order.
Re-attaching the Freezer Door
To re-attach the freezer door, replace parts in
reverse order.
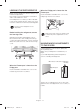
Re-attaching the Water Supply Lines
1. The Water Lines must be fully Inserted into the
center of the transparent coupler to prevent
water leakage from the dispenser.
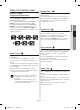
2. Insert the 2 clips in the install pack as shown
below, and then confi rm that each clip holds
the line fi rmly.
Center of Transparent coupler
Center of Transparent coupler
Clip A (1/4”)
Clip A (1/4”)
(6.35mm)
(6.35mm)
CAUTION
Make sure the color of the water lines match.
SSEDA Drop In- EN.indd 13SSEDA Drop In- EN.indd 13 2015. 2. 6. 9:392015. 2. 6. 9:39