Digital Presenter User Manual SDP-760
Digital Presenter User Manual Copyright ©2012 Samsung Techwin Co., Ltd. All rights reserved. Trademark is the registered logo of Samsung Techwin Co., Ltd. The name of this product is the registered trademark of Samsung Techwin Co., Ltd. Other trademarks mentioned in this manual are the registered trademark of their respective company. Restriction Samsung Techwin Co., Ltd shall reserve the copyright of this document.
overview Important Safety Instructions 1. Read these instructions. 2. Keep these instructions. 4. Follow all instructions. 5. Do not use this apparatus near water. 6. Clean only with dry cloth. 7. Do not block any ventilation openings, Install in accordance with the manufacturer’s instructions. 8. Do not install near any heat sources such as radiators, heat registers, stoves, or other apparatus (including amplifiers) that produce heat. 9.
overview WARNING TO REDUCE THE RISK OF FIRE OR ELECTRIC SHOCK, DO NOT EXPOSE THIS PRODUCT TO RAIN OR MOISTURE. DO NOT INSERT ANY METALLIC OBJECT THROUGH THE VENTILATION GRILLS OR OTHER OPENNINGS ON THE EQUIPMENT. Apparatus shall not be exposed to dripping or splashing and that no objects filled with liquids, such as vases, shall be placed on the apparatus. CAUTION CAUTION RISK OF ELECTRIC SHOCK. DO NOT OPEN CAUTION : TO REDUCE THE RISK OF ELECTRIC SHOCK. DO NOT REMOVE COVER (OR BACK).
English _5 ● overview This equipment has been tested and found to comply with the limits for a Class A digital device, pursuant to part 15 of the FCC Rules. These limits are designed to provide reasonable protection against harmful interference when the equipment is operated in a commercial environment. This equipment generates, uses, and can radiate radio frequency energy and, if not installed and used in accordance with the instruction manual, may cause harmful interference to radio communications.
overview CONTENTS overview 3 7 8 9 9 10 11 Important Safety Instructions Product Features What's Included Product at a Glance Front View Rear View Control Panel installation & connection 12 13 13 13 14 15 Preparations Connecting the Output device Connecting to the monitor Connecting the TV Connecting to the PC Kensington Lock setup & application 16 16 16 20 21 Getting Started Setup Image Adjustment Setting the Output Resolution Setting Supplemental Functions appendix 25 27 28 Specifications Menu
Product Features Thanks for purchasing the product. This product is high quality video presenter which enables simple and easy video display from all sources onto a computer monitor and video projector devices. English _7 ● overview •• 3M pixel CMOS Imaging Device By adopting 1/2.8” 3M pixel CMOS, it implements high-resolution and color reproduction.
overview What's Included Check if the main unit and all the following accessories are included in the product package. SDP-760 SAMSUNG DIGITAL PRESENTER SAMSUNG DIGITAL PRESENTER SDP-760 Main Unit Software / User Manual CD Power Adapter VGA Cable USB Cable Diffusing Sheet Accessories RS-232C Cable Microscope adapter JJ `` RS-232C cables and adapter lenses from other brands may not be compatible with this product.
Product at a Glance Front View ● overview Main Pole Lens LED Lighting SDP-760 SAMSUNG DIGITAL PRESENTER Control Panel SAMSUNG DIGITAL PRESENTER SDP-760 Rear Panel English _9
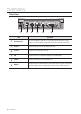
overview Rear View RS-232C USB C-VIDEO VGA OUT d e f DC 5V IN a Item b c Description a Kensington Lock Insert the Kensington security cable. For preventing a product theft or the security purpose, use the Kensington security cable to tie up this product with a fixed object. b DC 5V IN Connect the power jack of the DC adapter to this port. c RS-232C Connect the RS-232C cable to this port. d USB Connect this port to a computer that supports USB communications.
Control Panel ● overview SDP-760 SAMSUNG DIGITAL PRESENTER SAMSUNG DIGITAL PRESENTER SDP-760 Item LIVE Description Power On/Off When powered, the LED turns to blue. Menu setup mode Adjust the screen brightness Move up or down Zoom In/Out Move left or right Open the menu Run the selected menu Lighting On/Off Press and hold the button to run MASK function. Auto Color Adjustment Auto Focus Press and hold the button to run manual focusing.
installation & connection Preparations 1. Connect the necessary cables of VGA OUT, C-VIDEO, USB and Power. VGA OUT USB RS-232C USB C-VIDEO VGA OUT DC 5V IN SAMSUNG DIGITAL PRESENTER SDP-760 C-VIDEO 2. Press of the presenter to turn on the digital presenter.
Connecting the Output device Connecting to the monitor Monitor Cable VGA OUT RS-232C USB C-VIDEO VGA OUT DC 5V IN Digital Presenter Monitor, projector, etc Connecting the TV To display video on a TV, the TV should be connected to the presenter with C-VIDEO cable. Video Cable C-VIDEO RS-232C USB C-VIDEO VGA OUT DC 5V IN Digital Presenter TV English _13 ● installation & connection To display video on a monitor, the monitor should be connected to the presenter with monitor cable.
installation & connection Connecting to the PC To connect the presenter and PC, use USB or RS-232C cable. Using USB cable enables control as well as video transfer, while RS-232C only enables control as defined in the protocol. Connecting a PC with USB Cable 1. Connect the cable to the USB port of the PC. 2. Connect the USB cable’s the other end to the presenter’s [USB] port.
Connecting a PC with RS-232C Cable 1. Connect the cable to the RS-232C port of the PC. 2. Connect the RS-232C cable’s the other end to the presenter’s [RS-232C] port. ● installation & connection RS-232C Cable (Purchased separately) RS-232C RS-232C USB C-VIDEO VGA OUT DC 5V IN Digital Presenter PC RS-232C cable is optional that is not included in the product package. Purchase it if needed.
setup & application Getting Started 1. Press the button. The power LED turns to blue. button. 2. Press the 3. The main menu appears. PRESENTER MAIN MENU IMAGE ADJUSTMENT OUTPUT MODE } } CONFIGURATION } SAVE AND EXIT } Setup Image Adjustment Setting the White Balance (WB MODE) You can adjust the color tones of the image automatically in Live mode. 1. From the menu, select IMAGE ADJUSTMENT WB MODE.
•• Auto color adjustment 2: AWB(KEY) You can adjust the color tones of the displayed video automatically each time you press button in LIVE screen to adjust color -- Select AWB(KEY) from the menu and press automatically. . -- Use the [◄►] button to change the settings to your preference. -- When done, return to the Live screen. Compensating Images (IMG Mode) This will optimize the display of the image. 1. From the menu, select IMAGE ADJUSTMENT IMG MODE.
setup & application •• COLOR : Select a GAIN setting. Each time you press [►], the gain of color will switch to . •• SHARPNESS : Set the sharpness of the displayed image. Each time you press [►], the sharpness level will switch to . JJ `` If you increase the sharpness level, the image may be displayed abnormally or it can cause a noise.
Setting the Mask You can mask a portion or the whole of the screen so that it is hidden. 1. From the menu, select IMAGE ADJUSTMENT MASK SETUP. ● setup & application MASK SETUP MENU BOUNDS VGA/USB WIDTH ··· * ··· ··· ··· 25 TONE HEIGHT Return } LEVEL 4 ··· * ··· ··· ··· 25 2. Select MASK SETUP to display the sub menu items. •• BOUNDS : With BOUNDS, select the display device currently using. Press [►] button to select BOUNDS mode in the order of .
setup & application Setting the Output Resolution You can set a different resolution according to the output device (monitor, projector). 1. Select OUTPUT MODE from the menu. PRESENTER OUTPUT MODE 1080P 1920X1080 30fps UXGA 1600x1200 20fps } WXGA 1280x800 720P SXGA XGA USB 1280X720 1280x1024 1024x768 } 30fps } 30fps } 30fps } 30fps } USB OUT MODE } Return } CURRENT: 1080P MODE } 2. Move the cursor (►) to a desired resolution and set the output resolution of the digital presenter.
Setting Supplemental Functions Setting the Freeze Mode ● setup & application 1. From the menu, select CONFIGURATION FREEZE. PRESENTER CONFIGURATION FREEZE ALL DISPLAY PROTOCOL 10BYTE USB TWAIN C-VIDEO DISABLED NTSC SYSTEM INFO. } SYSTEM RESET } Return } 2. Select ALL DISPLAY or EXCEPT C-VIDEO mode. •• If selecting mode , both VGA/ C-VIDEO connected video and USB connected video will -- If you press be frozen.
setup & application Setting the USB TWAIN The USB TWAIN mode is available if you use the USB cable to connect between presenter and PC that has installed a graphic application in compliance with TWAIN (ex: Photoshop (Except CS5), ACDSEE, MS Office word 2003, etc). 1. From the menu, select CONFIGURATION USB TWAIN. PRESENTER CONFIGURATION FREEZE ALL DISPLAY PROTOCOL 10BYTE USB TWAIN C-VIDEO DISABLED NTSC SYSTEM INFO. } SYSTEM RESET } Return } 2. To activate TWAIN, set it to ENABLED.
Setting the Protocol Select the protocol appropriately for communicating with other devices. 1. From the menu, select CONFIGURATION PROTOCOL. ● setup & application PRESENTER CONFIGURATION FREEZE ALL DISPLAY PROTOCOL 10BYTE USB TWAIN C-VIDEO DISABLED NTSC SYSTEM INFO. } SYSTEM RESET } Return } 2. Press to select 10BYTE or 6BYTE. JJ `` The selected protocol will be applied after exiting the menu by SAVE AND EXIT.
setup & application SYSTEM INFO. You can check the current version information. 1. From the menu, select CONFIGURATION SYSTEM INFO.. VERSION INFORMATION Return } uCOM : 0.08_120529 SYSTEM RESET Configured settings for all menu items will be initialized. 1. From the menu, select CONFIGURATION SYSTEM RESET. Are You Sure? 2. Press Yes, Reset to Default Setting Now! } No, Back to the Previous Menu } button to select Yes or No. to perform the operation. 3. Press 4.
appendix Specifications For enhanced performance, the product specification is subject to change without prior notice. Optical Lens Recording Lens F=2.0, f=5.0mm Zoom Digital 16X Effective Range Focus Exposure Recording Device Gross pixels Valid pixels Video System Frame Rate VGA Out Auto/Manual AUTO (fine-tuning) 1/2.8" Progressive Scan CMOS image sensor 2,144(H) x 1,588(V), 3.40M pixels 2,096(H) x 1,561(V), 3.
appendix Item Others Kensington Lock Integrated Operation Temperature +5°C ~ +40°C (+41°F ~ +104°F) Security Thread on Base Operation Humidity Adapter General Operation Power consumption Dimension (WXHXD) Weight Accessories 26_ appendix Description Integrated Below 90% 5V DC (Adaptor input : AC 100V~240V free voltage, 50/60Hz, output : DC 5V,2.2A) ABOUT 7W (MAX : 9W ) - In-use : 235 (W) x431 (H) x 115 (D) mm/9.25" (W) x 16.97" (H) x 4.53" (D) - Off-use : 235 (W) x115 (H) x 290 (D) mm/9.
Menu Settings & Default I Menu Item II III Default IV 720p (1280X720) 30fps OUTPUT MODE UXGA (1600x1200) 20fps SXGA (1280x1024) 30fps 1080P WXGA (1280x800) 30fps XGA (1024x768) 30fps USB OUT MODE WB MODE ATW(Auto Tracking)/AWB(KEY)/MANUAL WB ATW (Auto Tracking) TEXT IMAGE IMG MODE CUSTOM IMAGE ADJUSTMENT IMAGE COLOR - HIGH/BW/LOW/MIDDLE SHARPNESS - MIDDLE/HIGH/LOW DNR ON/OFF ON ANTI FLK OFF/ON OFF BOUNDS - VGA/USB C-VIDEO VGA/USB TONE - LEVEL 1/LEVEL 2/LEVEL 3/LEVEL 4 LEVEL 4 WID
appendix Troubleshooting Problem No video is displayed. Solution Check if the resolution of the output device matches with the presenter. Ex) If the projector’s highest video mode is SVGA and the presenter’s output resolution has been set to XGA or SXGA, no image will be displayed on the screen. yy Check if the output device has set a proper input source. yy Check if brightness and focus are adjusted properly. yy Check if video cable is properly connected to output port.
SALES NETWORK SAMSUNG TECHWIN CO., LTD. Samsungtechwin R&D Center, 701, Sampyeong-dong, Bundang-gu, Seongnam-si, Gyeonggi-do, Korea, 463-400 TEL : +82-70-7147-8740~60 FAX : +82-31-8018-3745 SAMSUNG TECHWIN AMERICA Inc. 100 Challenger Rd. Suite 700 Ridgefield Park, NJ 07660 Toll Free : +1-877-213-1222 Direct : +1-201-325-6920 Fax : +1-201-373-0124 1480 Charles Willard St, Carson, CA 90746, UNITED STATES Toll Free : +1-877-213-1222 FAX : +1-310-632-2195 www.samsungpresenterusa.com www.samsungtechwin.