DJ68-00330K(neop)-EN 12/12/05 3:20 AM Page 2 Operating Instructions VACUUM CLEANER ❈ Before ❈ Indoor operating this unit, please read the instructions carefully. use only. Register your product at www.samsung.
DJ68-00330K(neop)-EN 12/12/05 3:20 AM Page 3 IMPORTANT SAFEGUARDS 1. Read all instructions carefully. Before switching on, make sure that the voltage of your electricity supply is the same as that indicated on the rating plate on the bottom of the cleaner. 2. WARNING : Do not use the vacuum cleaner when rug or floor is wet. Do not use to suck up water. 3. Close supervision is necessary when any appliance is used by or near children. Do not allow the vacuum cleaner to be used as a toy.
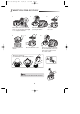
DJ68-00330K(neop)-EN 12/12/05 3:20 AM Page 4 1 ASSEMBLING THE CLEANER OPTION ▼ OPTION Features may vary according to model. CAUTION : Please do not use dust bin handle when carrying machine. For storage, park the floor nozzle.
DJ68-00330K(neop)-EN 12/12/05 3:20 AM Page 5 2 OPERATING THE CLEANER 2-1 POWER CORD NOTE When removing the plug from the electrical outlet, grasp the plug, not the cord. Please make sure your cable is fully extended before use. 2-2 POWER CONTROL (INFRARED CONTROL) 1. Vacuum cleaner ON/OFF Press the ON/OFF button to operate the vacuum cleaner. Press again to stop the vacuum cleaner. - HOSE SENDER HANDLE CONTROL [The cleaner is controlled by using infrared signals.] - BODY 2.
DJ68-00330K(neop)-EN 12/12/05 3:20 AM Page 6 ▼ 2-3 HOW TO USE AND MAINTAIN THE ACCESSORIES Features may vary according to model. PIPE Adjust the length of the telescopic pipe by sliding the length control button located in the center of the telescopic pipe back and forth. To check for blockages, separate the telescopic pipe and adjust to shorten. This allows for easier removal of waste clogging the tube. ACCESSORY Push the accessory on to the end of the hose handle.
DJ68-00330K(neop)-EN 12/12/05 3:20 AM Page 7 OPTION Vacuum dust in wide area at once Remove waste matter completely if the inlet is blocked. OPTION Frequent vacuuming of hair or pet fur may cause a falling-off of the rotation due to matters tangled around the drum. In this case, clean the drum with care. 1 2 3 Remove waste matter Remove the brushbar such as dust and hair Push the Open button of from the transparent tangled around the the transparent screen brushbar using scissors.
DJ68-00330K(neop)-EN 12/12/05 3:21 AM Page 8 3 EMPTYING THE DUST BIN 1 2 Once dust reaches the dust full mark, or once the filter check light is on, empty the dust bin. 4 3 Take the dust bin out by pressing the button. 5 Throw away dust in the bin. 6 Close the dust bin cover. CLICK Before use, push the dust bin into the main body of the vacuum cleaner until you hear the "click" sound.
DJ68-00330K(neop)-EN 12/12/05 3:21 AM Page 9 4 CLEANING THE DUST PACK 4-1. WHEN TO CLEAN THE DUST PACK - If suction is noticeably reduced during cleaning, please check the dust pack as indicated below. Suction is significantly weakened during cleaning. Shaking sound of inlet stuck to the floor (soft mats, blankets, etc.) is heard. Turn the vacuum power to 'MAX' HANDLE CONTROL If the filter check indicator turns red with the inlet floating 10 cm above flat floor, clean it.
DJ68-00330K(neop)-EN 12/12/05 3:21 AM Page 10 4-2 CLEANING THE DUST PACK 1 3 2 Remove the dust bin and dust pack as shown. 4 Remove the fixed frame of the dust pack cover. Remove the sponge pad from the dust pack. 5 Wash the sponge and the filter of the dust pack with water. 7 6 Let the sponge and dust pack dry in the shade for more than 12 hours. Put the sponge into the dust pack. 8 Before reassembly, align the dust pack cover and dust pack correctly.
DJ68-00330K(neop)-EN 12/12/05 3:21 AM Page 11 5 CLEANING THE MOTOR PROTECTION FILTER Remove the motor protection filter from the vacuum cleaner. Shake and tap the dust from it and put back in machine. Take out both the dust bin and the dust pack. 6 CLEANING THE OUTLET FILTER CLICK Lift the handle. Hold the handle of the outlet filter and lift to remove. Remove the fixed frame of the outlet filter cover. CLICK CLICK Dust off the outlet filter by gently tapping.
DJ68-00330K(neop)-EN 12/12/05 3:21 AM Page 12 7 CHANGE THE BATTERY(OPTIONAL) BATTERY TYPE : AA Size NOTE 1. When the vacuum cleaner does not work, replace the batteries. If the problem persists, please contact our authorized dealer. 2. Use 2 batteries of size AA. WARNING 1. Never disassemble or recharge the batteries. 2. Never heat up the batteries or throw them into fire. 3. Do not reverse (+),(-) poles. 4. Dispose of the batteries properly. - IF YOU HAVE A PROBLEM PROBLEM Motor does not start.
DJ68-00330K(neop)-EN 12/12/05 3:20 AM Page 1
٧ ﺗﻐﻴﻴﺮ اﻟﺒﻄﺎرﻳﺔ )اﺧﺘﻴﺎري( ﻧﻮع اﻟﺒﻄﺎرﻳﺔ :ﺣﺠﻢ AA ﻣﻼﺣﻈﺔ .١إن ﻛﺎﻧﺖ اﳌﻜﻨﺴﺔ اﻟﻜﻬﺮﺑﺎﺋﻴﺔ ﻻ ﺗﻌﻤﻞ ،اﺳﺘﺒﺪل اﻟﺒﻄﺎرﻳﺎت. إن اﺳﺘﻤﺮت اﳌﺸﻜﻠﺔ ،اﺗﺼﻞ ﲟﻮزﻋﻨﺎ اﳌﻌﺘﻤﺪ. .٢اﺳﺘﻌﻤﻞ ﺑﻄﺎرﻳﺘﲔ ﻣﻦ ﺣﺠﻢ .AA ﲢﺬﻳﺮ أﺑﺪا أو ﺗﻌﻴﺪ ﺷﺤﻨﻬﺎ. .١ﻻ ﺗﻔﻚ اﻟﺒﻄﺎرﻳﺎت ً .٢اﺣﺮص ﻋﻠﻰ ﻋﺪم ﺗﺴﺨﲔ اﻟﺒﻄﺎرﻳﺎت أو إﻟﻘﺎﺋﻬﺎ ﺑﺎﻟﻨﺎر. .٣ﻻ ﺗﻌﻜﺲ اﻟﻘﻄﺒﲔ ).(-) ،(+ .٤ﺗﺨﻠﺺ ﻣﻦ اﻟﺒﻄﺎرﻳﺎت ﺑﺸﻜﻞ ﺻﺤﻴﺢ. إن ﻛﺎﻧﺖ ﻟﺪﻳﻚ ﻣﺸﻜﻠﺔاﻟﺴﺒﺐ اﳊﻞ اﶈﺮك ﻻ ﻳﻌﻤﻞ . ﻻ ﻳﻮﺟﺪ ﺗﻴﺎر ﻛﻬﺮﺑﺎء. اﻧﻘﻄﺎع ﺑﺴﺒﺐ ارﺗﻔﺎع اﳊﺮارة.
٥ ﺗﻨﻈﻴﻒ ﻓﻠﺘﺮ ﺣﻤﺎﻳﺔ اﶈﺮك اﻧﺰع ﻓﻠﺘﺮ ﺣﻤﺎﻳﺔ اﶈﺮك ﻣﻦ اﳌﻜﻨﺴﺔ اﻟﻜﻬﺮﺑﺎﺋﻴﺔ. اﻧﻔﺾ اﻟﻐﺒﺎر ﻣﻨﻪ وﺿﻌﻪ ﻣﺮة أﺧﺮى ﺑﺎﳉﻬﺎز. أﺧﺮج ﻛﻼً ﻣﻦ ﺻﻨﺪوق اﻟﻐﺒﺎر وﻛﻴﺲ اﻟﻐﺒﺎر. ٦ ﺗﻨﻈﻴﻒ ﻓﻠﺘﺮ اﻟﺘﻔﺮﻳﻎ CLICK ارﻓﻊ اﳌﻘﺒﺾ. اﻣﺴﻚ ﻣﻘﺒﺾ ﻓﻠﺘﺮ اﻟﺘﻔﺮﻳﻎ وارﻓﻌﻪ ﻟﺘﻨﺰﻋﻪ. اﻧﺰع اﻹﻃﺎر اﻟﺜﺎﺑﺖ ﻣﻦ ﻏﻄﺎء ﻓﻠﺘﺮ اﻟﺘﻔﺮﻳﻎ. CLICK CLICK CL اﻧﻔﺾ اﻟﻐﺒﺎر ﻋﻦ ﻓﻠﺘﺮ اﻟﺘﻔﺮﻳﻎ ﺑﻮاﺳﻄﺔ ﻧﻘﺮه ﺑﺮﻓﻖ.
٢-٤ﺗﻨﻈﻴﻒ ﻛﻴﺲ اﻟﻐﺒﺎر ١ ٢ ٣ اﻧﺰع ﺻﻨﺪوق اﻟﻐﺒﺎر وﻛﻴﺲ اﻟﻐﺒﺎر ﻛﻤﺎ ﻫﻮ ﻣﻮﺿﺢ. اﻧﺰع اﻹﻃﺎر اﻟﺜﺎﺑﺖ ﻟﻐﻄﺎء ﻛﻴﺲ اﻟﻐﺒﺎر. اﻧﺰع اﻟﻮﺳﺎدة اﻹﺳﻔﻨﺠﻴﺔ ﻣﻦ ﻛﻴﺲ اﻟﻐﺒﺎر. ٤ ٥ ٦ اﻏﺴﻞ اﻹﺳﻔﻨﺠﺔ وﻓﻠﺘﺮ ﻛﻴﺲ اﻟﻐﺒﺎر ﺑﺎﳌﺎء. اﺗﺮك اﻹﺳﻔﻨﺠﺔ وﻛﻴﺲ اﻟﻐﺒﺎر ﻟﻴﺠﻔﺎ ﻓﻲ ﻣﻜﺎن ﻇﻠﻴﻞ ﻷﻛﺜﺮ ﻣﻦ ١٢ﺳﺎﻋﺔ. ﺿﻊ اﻹﺳﻔﻨﺠﺔ داﺧﻞ ﻛﻴﺲ اﻟﻐﺒﺎر. ٨ ٧ ﻗﺒﻞ إﻋﺎدة اﻟﺘﺮﻛﻴﺐ ،ﺿﻊ ﻏﻄﺎء ﻛﻴﺲ اﻟﻐﺒﺎر ﲟﺤﺎذاة ﻛﻴﺲ اﻟﻐﺒﺎر. ﺿﻊ ﻛﻴﺲ اﻟﻐﺒﺎر اﻟﺬي ﰎ ﺗﺮﻛﻴﺒﻪ داﺧﻞ ﺟﺴﻢ اﳌﻜﻨﺴﺔ.
٤ ﺗﻨﻈﻴﻒ ﻛﻴﺲ اﻟﻐﺒﺎر ١-٤ﻣﺘﻰ ﻳﻨﺒﻐﻲ ﺗﻨﻈﻴﻒ ﻛﻴﺲ اﻟﻐﺒﺎر -إن ﻗﻠﺖ ﻗﻮة اﻟﺸﻔﻂ ﺑﺸﻜﻞ ﻣﻠﺤﻮظ أﺛﻨﺎء اﻟﺘﻨﻈﻴﻒ ،اﻓﺤﺺ ﻛﻴﺲ اﻟﻐﺒﺎر ﻛﻤﺎ ﻫﻮ ﻣﻮﺿﺢ.
٣ ﺗﻔﺮﻳﻎ ﺻﻨﺪوق اﻟﻐﺒﺎر ٣ ١ ٢ ﻓﻮر أن ﻳﺼﻞ اﻟﻐﺒﺎر إﻟﻰ ﻋﻼﻣﺔ اﻻﻣﺘﻼء، أو ﻓﻮر إﺿﺎءة ﻣﺼﺒﺎح اﻻﻣﺘﻼء ،ﻳﺠﺐ ﺗﻔﺮﻳﻎ ﺻﻨﺪوق اﻟﻐﺒﺎر. اﻧﺰع ﺻﻨﺪوق اﻟﻐﺒﺎر ﺑﺎﻟﻀﻐﻂ ﻋﻠﻰ اﻟﺰر. ٦ ٤ ٥ ﺗﺨﻠﺺ ﻣﻦ اﻟﻐﺒﺎر اﳌﻮﺟﻮد ﺑﺎﻟﺼﻨﺪوق. أﻏﻠﻖ ﻏﻄﺎء ﺻﻨﺪوق اﻟﻐﺒﺎر. ﻓﺮغ اﻟﻐﺒﺎر ﻓﻲ ﻛﻴﺲ ﺑﻼﺳﺘﻴﻚ.)ﻳﻨﺼﺢ ﺑﻬﺬا ﻟﺼﺎﻟﺢ ﻣﺮﺿﻰ اﻟﺮﺑﻮ واﳊﺴﺎﺳﻴﺔ( ﻣﻼﺣﻈﺔ ﳝﻜﻨﻚ ﺷﻄﻒ ﺻﻨﺪوق اﻟﻐﺒﺎر ﺑﺎﳌﺎء اﻟﺒﺎرد. ٦ اﻓﺼﻞ ﻏﻄﺎء ﺻﻨﺪوق اﻟﻐﺒﺎر.
اﺧﺘﻴﺎري اﻛﻨﺲ اﻷﺗﺮﺑﺔ ﻓﻲ اﳌﻨﺎﻃﻖ اﻟﻮاﺳﻌﺔ ﻣﺮة واﺣﺪة. ﺗﺨﻠﺺ ﻣﻦ أي ﻓﻀﻼت ﲤﺎﻣًﺎ إن ﻛﺎﻧﺖ ﻓﺘﺤﺔ اﻟﺸﻔﻂ ﻣﺴﺪودة. اﺧﺘﻴﺎري إن اﻟﻜﻨﺲ اﳌﺴﺘﻤﺮ ﻟﺸﻌﺮ أو ﻓﺮو اﳊﻴﻮاﻧﺎت ﻗﺪ ﻳﺆﺛﺮ ﻋﻠﻰ اﻟﺪوران ﺑﺴﺒﺐ ﺗﺸﺎﺑﻚ ﺗﻠﻚ اﳌﻮاد ﺣﻮل اﻟﻘﻄﻌﺔ اﻟﺪوارة .ﻓﻲ ﻫﺬه اﳊﺎﻟﺔ ﻧﻈﻒ اﻟﻘﻄﻌﺔ اﻟﺪوارة ﺑﻌﻨﺎﻳﺔ. ١ ٢ اﺿﻐﻂ ﻋﻠﻰ زر OPEN ﺑﻐﻄﺎء اﳊﺎﺟﺰ اﻟﺸﻔﺎف ﻟﻔﺼﻞ اﻟﻐﻄﺎء. ٤ ﻟﺘﺤﺴﲔ اﻟﺘﻘﺎط ﺷﻌﺮ اﳊﻴﻮاﻧﺎت واﳋﻴﻮط ﻣﻦ اﻟﺴﺠﺎد. اﺧﺘﻴﺎري اﻟﻔﺮﺷﺎة ﻟﻠﺒﻄﺎﻧﻴﺎت ﻻﻟﺘﻘﺎط ﺷﻌﺮ اﳊﻴﻮاﻧﺎت واﳋﻴﻮط ﻣﻦ اﻷﺛﺎث وأﻏﻄﻴﺔ اﻟﺴﺮﻳﺮ.
٣-٢ﻛﻴﻔﻴﺔ اﺳﺘﻌﻤﺎل اﻟﻜﻤﺎﻟﻴﺎت واﻻﺣﺘﻔﺎظ ﺑﻬﺎ bﻗﺪ ﺗﺨﺘﻠﻒ اﳋﺼﺎﺋﺺ ﺑﺎﺧﺘﻼف اﳌﻮدﻳﻞ. اﻷﻧﺒﻮب ﻗﻢ ﺑﺘﻌﺪﻳﻞ ﻃﻮل اﻷﻧﺒﻮب اﳌﺘﺪاﺧﻞ ﻋﻦ ﻃﺮﻳﻖ ﲢﺮﻳﻚ زر اﻟﺘﺤﻜﻢ ﺑﺎﻟﻄﻮل اﳌﻮﺟﻮد ﻟﻠﺘﺤﻘﻖ ﻣﻦ وﺟﻮد اﻧﺴﺪاد ،اﻓﺼﻞ اﻷﻧﺒﻮب اﳌﺘﺪاﺧﻞ وﻗﻢ ﺑﺘﻘﺼﻴﺮه .ﻫﺬا ﻳﺴﻤﺢ ﺑﺴﻬﻮﻟﺔ ﻓﻲ ﻣﻨﺘﺼﻒ اﻷﻧﺒﻮب اﳌﺘﺪاﺧﻞ ﻧﺤﻮ اﻟﺘﺨﻠﺺ ﻣﻦ اﻟﻔﻀﻼت اﻟﺘﻲ ﺗﺴﺪ اﻷﻧﺒﻮب. اﻷﻣﺎم واﳋﻠﻒ. ﻗﻄﻌﺔ ﻛﻤﺎﻟﻴﺎت ﻗﻢ ﺑﺘﺜﺒﻴﺖ ﻗﻄﻌﺔ اﻟﻜﻤﺎﻟﻴﺎت ﻓﻲ ﻧﻬﺎﻳﺔ ﻣﻘﺒﺾ اﳋﺮﻃﻮم. اﺳﺤﺐ ﻓﺮﺷﺎة اﻟﻐﺒﺎر ﺛﻢ أدرﻫﺎ ﻟﺘﻨﻈﻴﻒ اﻷﻣﺎﻛﻦ اﻟﺮﻗﻴﻘﺔ.
٢ ﺗﺸﻐﻴﻞ اﳌﻜﻨﺴﺔ ١-٢ﺳﻠﻚ اﻟﻜﻬﺮﺑﺎء ﻣﻼﺣﻈﺔ ﻋﻨﺪ ﻧﺰع اﻟﻔﻴﺸﺔ ﻣﻦ ﻣﺼﺪر اﻟﺘﻴﺎر ،اﻣﺴﻚ ﺑﺎﻟﻔﻴﺸﺔ وﻟﻴﺲ ﺑﺴﻠﻚ اﻟﻜﻬﺮﺑﺎء. ﺗﺄﻛﺪ ﻣﻦ ﲤﺪﻳﺪ اﻟﻜﺎﺑﻞ ﺑﺎﻟﻜﺎﻣﻞ ﻗﺒﻞ اﻻﺳﺘﻌﻤﺎل. ٢-٢اﻟﺘﺤﻜﻢ ﻓﻲ اﻟﻘﻮة ) اﻟﺘﺤﻜﻢ ﺑﺎﻷﺷﻌﺔ ﲢﺖ اﳊﻤﺮاء( -اﳋﺮﻃﻮم ○ ○ ○ ○ وﺣﺪة اﻹرﺳﺎل ○ ○ ○ .١ﺗﺸﻐﻴﻞ/إﻳﻘﺎف اﳌﻜﻨﺴﺔ اﻟﻜﻬﺮﺑﺎﺋﻴﺔ اﺿﻐﻂ زر ON/OFFﻟﺘﺸﻐﻴﻞ اﳌﻜﻨﺴﺔ اﻟﻜﻬﺮﺑﺎﺋﻴﺔ. اﺿﻐﻂ ﺛﺎﻧﻴﺔ ﻹﻳﻘﺎف ﺗﺸﻐﻴﻞ اﳌﻜﻨﺴﺔ. .٢زر وﺿﻊ اﳌﻜﻨﺴﺔ اﻟﻜﻬﺮﺑﺎﺋﻴﺔ )MODE(+/- ارا ﻻﺧﺘﻴﺎر اﻟﻮﺿﻊ اﻟﺼﺤﻴﺢ.
١ ﲡﻤﻴﻊ اﳌﻜﻨﺴﺔ اﺧﺘﻴﺎري اﺧﺘﻴﺎري bﻗﺪ ﺗﺨﺘﻠﻒ اﳋﺼﺎﺋﺺ ﺑﺎﺧﺘﻼف اﳌﻮدﻳﻞ. ﺗﻨﺒﻴﻪ :ﻻ ﺗﺴﺘﻌﻤﻞ ﻣﻘﺒﺾ ﺻﻨﺪوق اﻟﻐﺒﺎر ﻋﻨﺪ ﺣﻤﻞ اﳉﻬﺎز. ارﻛﻦ ﻓﻮﻫﺔ اﻟﺒﻼط ﻟﺘﺨﺰﻳﻦ اﳌﻜﻨﺴﺔ اﻟﻜﻬﺮﺑﺎﺋﻴﺔ.
اﺣﺘﻴﺎﻃﺎت ﻫﺎﻣﺔ .١اﻗﺮأ ﻛﻞ اﻟﺘﻌﻠﻴﻤﺎت ﺑﻌﻨﺎﻳﺔ .ﻗﺒﻞ ﺗﺸﻐﻴﻞ اﳉﻬﺎز ،ﺗﺄﻛﺪ ﻣﻦ أن ﻓﻮﻟﺖ اﻟﻜﻬﺮﺑﺎء ﻟﺪﻳﻚ ﳝﺎﺛﻞ اﻟﻔﻮﻟﺖ اﳌﺸﺎر إﻟﻴﻪ ﻋﻠﻰ اﻟﻠﻮﺣﺔ اﳌﻮﺟﻮدة أﺳﻔﻞ اﳌﻜﻨﺴﺔ. .٢ﲢﺬﻳﺮ :ﻻ ﺗﺴﺘﻌﻤﻞ اﳌﻜﻨﺴﺔ اﻟﻜﻬﺮﺑﺎﺋﻴﺔ إن ﻛﺎﻧﺖ اﻷرض ﻣﺒﻠﻠﺔ. ﻻ ﺗﺴﺘﺨﺪﻣﻬﺎ ﻟﺸﻔﻂ اﳌﺎء. .٣ﻳﺠﺐ ﺗﻮﺧﻲ اﳊﺬر ﻋﻨﺪ اﺳﺘﻌﻤﺎل اﳉﻬﺎز ﻓﻲ وﺟﻮد أﻃﻔﺎل .ﻻ ﺗﺘﺮك ﻟﻬﻢ اﻟﻔﺮﺻﺔ ﻻﺳﺘﻌﻤﺎل اﳉﻬﺎز ﻛﻠﻌﺒﺔ .وﻻ ﺗﺴﻤﺢ ﺑﺘﺸﻐﻴﻞ اﳉﻬﺎز ﺑﺪون ﺣﻀﻮر أﺣﺪ اﻟﺒﺎﻟﻐﲔ .اﺳﺘﻌﻤﻞ اﳌﻜﻨﺴﺔ اﻟﻜﻬﺮﺑﺎﺋﻴﺔ ﻓﻘﻂ ﻓﻲ اﻷﻏﺮاض اﶈﺪدة ﻟﻬﺎ اﳌﻮﺿﺤﺔ ﺑﺎﻟﺘﻌﻠﻴﻤﺎت. .
ﺗﻌﻠﻴﻤﺎت اﻟﺘﺸﻐﻴﻞ اﳌﻜﻨﺴﺔ اﻟﻜﻬﺮﺑﺎﺋﻴﺔ ❋ اﻗﺮأ ﺗﻌﻠﻴﻤﺎت اﻟﺘﺸﻐﻴﻞ ﺑﻌﻨﺎﻳﺔ ﻗﺒﻞ ﺗﺸﻐﻴﻞ ﻫﺬه اﻟﻮﺣﺪة. ❋ ﻟﻼﺳﺘﺨﺪام اﻟﺪاﺧﻠﻲ ﻓﻘﻂ. ﻟﺘﺴﺠﻴﻞ اﳌﻨﺘﺞ ﻗﻢ ﺑﺰﻳﺎرة www.samsung.com/grobal/register )DJ68-00330K REV(0.