SCH-r610 Series P O R T A B L E M O B I L E D U A L - M O D E P H O N E User Manual Please read this manual before operating your phone, and keep it for future reference.
Intellectual Property All Intellectual Property, as defined below, owned by or which is otherwise the property of Samsung or its respective suppliers relating to the SAMSUNG Phone, including but not limited to, accessories, parts, or software relating there to (the “Phone System”), is proprietary to Samsung and protected under federal laws, state laws, and international treaty provisions.
Licensed by Qualcomm Incorporated under one or more of the following patents: U.S. Patent No. 4, 901, 307; 5, 056, 109; 5, 099, 204; 5, 101, 501; 5, 103, 459; 5, 107, 225; 5, 109, 390. Printed in Korea. Openwave® is a registered Trademark of Openwave, Inc. RSA® is a registered Trademark RSA Security, Inc.
Table of Contents Getting Started .............................................................................................7 Understanding this User Manual ...............................................................................7 Charging the Battery .................................................................................................8 Activating Your Phone ...............................................................................................9 Setting Up Your Voicemail ......
Memory Info ...........................................................................................................69 Games & Apps ........................................................................................... 70 Accessing Games & Apps .......................................................................................70 Applications Shopping and Downloading .................................................................70 Changing Your Games & Apps Settings ..........................
World Time ...........................................................................................................140 Calculator .............................................................................................................142 Stop Watch ...........................................................................................................142 Converter ..............................................................................................................143 Tip Calculator .....
Understanding this User Manual Section 1: Getting Started Topics Covered • Understanding this User Manual • Charging the Battery • Activating Your Phone • Setting Up Your Voicemail This section explains how to start using your r610 phone by activating your service, setting up your Voicemail, or getting an understanding of how this manual is put together. Understanding this User Manual The chapters of this guide generally follow the same order as the menus and submenus in your phone.
Charging the Battery Your phone is powered by a rechargeable standard Li-Ion battery. Only use Samsung-approved charging devices and batteries. Samsung accessories are designed to maximize battery life. Use of other accessories may invalidate your warranty and may cause damage. Use the Travel Adapter The travel adapter included with your phone is a convenient, light-weight charger that rapidly charges your phone from any 120/220 VAC outlet. 1.
Activating Your Phone Low battery indicator The battery indicator ( ) in the upper-right corner of the display indicates power level. Monitor the battery strength and ensure your battery is adequately charged. • Three bars ( ) indicate a full charge. • An empty battery icon ( ) indicates a near empty battery. • A blinking empty battery icon ( ) and a tone sounding indicate you have two to three minutes before the battery is too low to operate the phone.
3. Place the battery cover so that the tabs on the bottom (3) align with the slots at the bottom of the battery compartment. Push the top end of the battery cover (4) down until it snaps into place. . 4 3 Remove the Battery 1. Press and hold the key to turn off the phone (if on). 2. Press up on the battery cover release latch (1) and lift the top end of the cover (2) away from the phone. 2 1 3. Lift the battery (3) up and away from the phone, top end first.
Setting Up Your Voicemail Turn Your Phone On 1. Open the slide on your phone, as shown. 2. Press and hold the key for two or more seconds. Note: As with any other radio-transmitting device, do not touch the antenna while using your phone as this can affect call quality and can cause the phone to operate at a higher power level than is necessary. 3. The phone begins searching for a network signal. 4.
Listen to Voicemail 1. In idle mode, press and hold the key or dial your own mobile number to dial Voicemail. After connecting, you will hear your voice greeting. 2. You are prompted to enter your password. Memory Card (Optional) Your phone has a memory card slot on the lower left side of the phone. You can install a microSDTM card to provide additional memory for storing files (such as, sound files and photos) in your phone. Install a Memory Card 1.
Features of Your Phone Section 2: Understanding Your Phone Topics Covered • Features of Your Phone • Closed View (Front) of Your Phone • Open View (Front) of Your Phone • Command Keys • Understanding the Display Screen • Your Phone’s Modes This section outlines some key features of your phone. It also describes the screen format and the icons that will be displayed when the phone is in use.
Closed View (Front) of Your Phone 1. Earpiece 2. Display 3. Volume Key 13. Camera Key 4. Left Soft Key 5. Memory Card Slot 6. SEND Key 7. CLR Key 8. OK Key 12. Right Soft Key 11. Power/Accessory Connector 10. END Key 9. Navigation/Shortcut/ Music Player Key Features 1. Earpiece — Lets you hear keypad tones and phone calls. 2. Display — Indicates the status of your phone, including numbers dialed, feature and function screens, status icons, message indicators, signal strength, and so on. 3.
Closed View (Front) of Your Phone 7. CLR Key — With the keypad unlocked, press this key to return to the previous menu or screen when navigating features on your phone. 8. OK Key — With the keypad unlocked, pressing when navigating through a menu accepts the highlighted choice in a menu. With the keypad locked, pressing this key completes the keypad unlock sequence. 9. Navigation/Shortcut/Music Player Key — With the keypad unlocked and in Menu mode, lets you scroll through the phone menu options.
Closed View (Rear) of Your Phone 1. Stereo Speakers 2. Battery Cover Release 3. Battery Cover Features 1. Stereo Speakers — Let you listen to audio from your phone, such as music files, alerts, and ringtones. 2. Battery Cover Release — Releases the Battery Cover latch that holds the Battery Cover in place. 3. Battery Cover — Protects the battery and holds it in place.
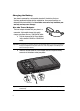
Open View (Front) of Your Phone Open View (Front) of Your Phone 1. Earpiece 2. Display 3. Volume Key 4. Navigation/Shortcut/ Music Player Key 5. Left Soft Key 17. Right Soft Key 16. OK Key 6. SEND Key 15. END Key 7. CLR Key 14. Camera Key 13. Alpha-numeric Keys 8. Memory Card Slot 12. Power Accessory Connector 9. Special Function Keys 11. Voice Recognition Key 10. Microphone Features 1. Earpiece — Lets you hear keypad tones and phone calls. 2.
3. Volume Key — In standby mode, lets you adjust the ringer volume or lets you select a vibrate mode. During a call, lets you adjust the Earpiece volume. 4. Navigation/Shortcut/Music Player Key — With the keypad unlocked and in Menu mode, lets you scroll through the phone menu options. In standby mode, lets you access preset functions. In Music Player mode, lets you access Music Player functions. 5.
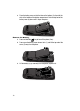
Open View (Rear) of Your Phone 17. Right Soft Key — Used to navigate through menus and applications and to select the choice indicated at the bottom right corner of the Main Display. Open View (Rear) of Your Phone 1. Mirror 4. Flash 2. Camera Lens 3. Camera Key Features 1. Mirror — Used when taking self-portrait photographs. 2. Camera Lens — The lens of your built-in camera. 3. Camera Key — Lets you launch the camera and switch between camera and camcorder modes. 4.
Command Keys Functions for the soft keys are defined by what appears above each in the display. There are two soft keys, the (left) soft key and the (right) soft key . Left Soft Key Some functions of the left soft key are as follows. • With the slide closed, the function is Unlock. Press to Unlock the keys. • In standby mode, press the Settings (left) soft key ( ) to open the Settings menu. • When the left soft key function is Edit, press the Edit (left) soft key ( ) to edit a Contact.
Command Keys 3. To back up one menu level, briefly press . 4. To return to standby mode, press and hold until you return to standby mode. End Key 1. Press and hold the End key 2. Briefly press 3. Press to turn on your phone. once to disconnect a call. to return to standby mode from any menu, or to cancel the last input. Send Key The Send key is used to answer calls, dial calls, and to recall the last number(s) dialed, received, or missed. 1. Press once to answer calls. 2.
Camera Key Use the Camera key ( ) — located on the right side of your phone — to activate the camera built into your phone and to take pictures, and to switch between camera and camcorder functions. Understanding the Display Screen The top line of your phone’s display contains icons that indicate network status, battery power, signal strength, connection type, and more. The following list contains icons that may appear in your display.
Your Phone’s Modes • Warning • Example: “Battery Low,” “Memory Full!” Backlights Backlights illuminate the internal and external displays and the keypad. When you press any key or open the phone, the backlights come on. They go off when no keys are pressed within a period of time set in the Backlight menu. Note: During a phone call, the display backlights dim and turn off after 10 seconds to conserve battery power, regardless of the Backlight setting. See “Backlight” on page 151 for more information.
Lock Mode When the phone is in Lock Mode, restrictions are placed on phone use. You can receive calls and messages, but cannot place outgoing calls (except for emergency numbers) until you unlock the phone. Lock Mode also restricts access to menus and the volume key. Unlock your phone by entering the lock code when prompted. (See “Change Lock” on page 159 for more information.) Standby Mode Standby mode is the state of the phone once it has found service and is idle.
Your Phone’s Modes Vibrate Mode 䊳 In standby mode, repeatedly press the Volume key ( ) down until Vibrate appears in the display. The Volume key is on the upper left side of phone, near the (left) soft key ( ). Adjust the Ringer 1. In standby mode, press the Volume key ( ) on the left side of the phone up or down. Options are: • • • • Ringer Off Vibrate Low Low/Medium • • • • Medium Medium/High High Vibrate/High 2. When you are satisfied with the setting, press the key.
To disable speakerphone mode, do one of the following: • During a call, do Steps 1 and 2 above to switch from Speakerphone mode to using the earpiece. • End a call by pressing the key. Your phone automatically switches from Speakerphone mode to using the earpiece. Camera Mode Camera mode lets you activate your phone’s camera to take pictures. In Camera mode, you can also adjust the resolution and appearance of your pictures. See “Multimedia” on page 101 for more information.
Making a Call Section 3: Call Functions Topics Covered • Making a Call • Answering a Call • Recent Calls This section provides procedures for making and answering calls. This section also describes features, such as call logs and call timers, that help you make calls and manage your call time. Making a Call 1. With the phone on, enter the number you wish to call using the keypad. Tip: When making an international call, begin by pressing and holding the Star key ( ).
Three-way Calling Call two other numbers and connect them to your call using three-way calling. 1. In standby mode, enter the number for the first party in your call, then press . 2. When connected, ask the other party to remain on the line. Press to place them on hold. 3. Enter the second party’s phone number and press 4. When the second party answers, press . to connect all three parties. Manual Pause Calling To manually call a number with pause(s) without storing it in your Contacts list: 1.
Making a Call 2-Touch Dialing Use 2-touch dialing to speed dial Contacts from 010 through 099. 1. In standby mode, press and release the number key representing the first digit of the desired Contact’s Location number. 2. Press and hold the number key representing the second digit of the desired Contact’s Location number. Example: To speed dial the Contact assigned Location 035, press , then press and hold the key. 3-Touch Dialing Use 3-touch dialing to speed dial Contacts from 100 through 999. 1.
Voice Dialing Tips: • Wait for the beep before speaking. • Speak clearly at a normal volume, as if you were talking to someone on the phone. • When saying a name, say the first name then the last name. Dialing a Name To dial a name, do the following: 1. In standby mode, press and hold the key. “Say a Command” appears in the display and is pronounced through the earpiece. 2. Say, “Call”. You are prompted to “Say the name or #”. 3.
Answering a Call Dialing a Number To dial a number using Voice Dial, do the following: 1. In standby mode, press and hold the key. “Say a Command” appears in the display and is pronounced through the speaker. 2. Say “Call”. VoiceSignal prompts you to “Say the name or #.” 3. Speak clearly and say the telephone number of the person you want to call. For example, say “7 8 1 9 7 0 5 2 0 0." If it recognizes the number, Voice Dial repeats it and dials the number.
Tip: Assign pictures to Contacts entries. The entry’s assigned picture appears in the display when you receive a call from that entry. See “Assigning a Picture to a Contacts Entry” on page 60. The phone continues to notify you of the call until one of the following events occur: • You answer the call. • The calling party ends the call. • The call is sent to voicemail. Call Notification Features Your phone notifies you of a call in a variety of ways.
Answering a Call Call Answer Select from three methods for answering calls. This option can be changed in the Settings menu. 1. In standby mode, press the Menu key ( ), then press (for Settings), (for Call Settings), and for Call Answer. The following options appear in the display: • Any Key — Pressing any key except or answers a call. • Send Only — Only pressing answers a call. • Slide Up — Sliding the phone open or pressing answers a call. 2.
Ignore an Incoming Call Ignored calls are immediately forwarded to Voicemail. 䊳 During an incoming call, press the Ignore (right) soft key ( incoming call is forwarded to Voicemail. ). The In-Use Menu You can access a number of menus and features even while in a call. 1. While in a call, press the Mute/Unmute (left) soft key ( ) to disable/ enable the microphone. 2. While in a call, press the Options (right) soft key ( ).
Recent Calls Tip: To quickly view a list of your most recent calls (outgoing, incoming, and missed), briefly press the key in standby mode. The All Calls screen listing up to 270 of your most recent calls appears in the display. Outgoing Calls The last 90 outgoing calls are stored in the Outgoing calls log. Review the Outgoing calls log for the time and date of a call, as well as other information. 1. In standby mode, press the Menu key ( Calls) and the display.
• Save — Save the number to your Contacts. • Details — Contacts calls only — Lets you view the Contacts entry for the originator of this call. • Erase — Erase the selected call from your Incoming call list. • Lock/Unlock — Blocks/permits erasure of the selected call from your Incoming call list. • Erase All — Erase all unlocked calls from your Incoming call list. • View Timer — Call Timer screen appears in the display listing the number and types of calls and their total durations.
Recent Calls Erase All Calls 1. In standby mode, press the Menu key ( ), then press (for Recent Calls) and for All Calls. The All Calls list appears in the display with the first call in the list highlighted. 2. Press the Options (right) soft key ( ) to display a pop-up menu that contains the following options: • Save — Save the number to your Contacts. • Details — Contacts calls only — Lets you view the Contacts entry for the originator of this call.
• Last Reset — Shows date and time all call timers were last reset. • Lifetime Calls — Shows the duration of all calls on your phone since activation (Lifetime timers cannot be reset). 2. Use the Up and Down navigation keys to highlight a particular timer. 3. Press the Reset (left) soft key ( ) to reset the highlighted timer. Press the Reset All (right) soft key ( Lifetime Calls. 4. Press ) to reset all of the timers except to exit the Call Timer screen.
Recent Calls Store Numbers from Call Logs Store numbers from your Outgoing, Incoming, Missed, and All calls logs to Contacts. Tip: In standby mode, briefly press to save to Contacts. to display the All Calls list. You can then select any call in the list 1. In standby mode, press the Menu key ( ), then press for Recent Calls. 2. Press the corresponding number on the keypad to view call logs for the following call types.
Section 4: Menu Navigation Topics Covered • Menu Navigation • Menu Shortcuts • Navigate Using a Shortcut • Menu Shortcuts Outline This section explains the menu navigation for your phone. It also includes an outline of all the available menus associated with your phone. Menu Navigation Access the menus and sub-menus in your phone using the navigation key ( and soft keys ( ), or use a shortcut. 1. In standby mode, press the Menu key ( ) ). The first of several menus appear in the display.
Menu Shortcuts Menu Shortcuts Use shortcuts to quickly access menus and sub-menus. Press the Menu key ( ), then press the number to the left of the menu to jump to the desired menu, submenu, or feature. For example, to jump to the Outbox sub-menu, press the Menu key ( ), then press (for Messages) and for Outbox. Navigate Using a Shortcut You can also access menus and sub-menus using menu numbers. Enter the menu number after pressing the Menu key ( ) to go directly to the menu or sub-menu of your choice.
2.3 2.4 2.5 2.6 Outbox Drafts Voicemail Erase messages 2.6.1 2.6.2 2.6.3 2.6.4 2.7 Msg Settings 2.7.1 2.7.2 2.7.3 2.7.4 2.7.5 2.7.6 2.7.7 2.7.8 2.7.9 2.7.0 2.7.* 3 Find Add New Entry Speed Dial Group 3.4.1 3.4.2 3.4.3 3.4.4 3.4.5 3.5 No Group Business Colleague Family Friends Memory Info Multimedia 4.1 42 Notification Auto Save Auto Erase Auto View Entry Mode CB# VM# Signature Preset Msgs Auto Scroll Messaging Font Size Contacts 3.1 3.2 3.3 3.
Menu Shortcuts Outline 4.2 4.3 4.4 4.5 4.6 Camcorder My Images My Videos My Ringtones My Sounds 4.6.1 4.7 4.8 5 Browser 5.1 6 Go to Web Games & Apps 6.1 7 Record New Music Library Ringback Tones Games & Apps Tools/Utilities 7.1 Bluetooth 7.1.1 7.1.2 7.1.3 Add New Device Registered List Bluetooth Settings 7.1.3.1 7.1.3.2 7.1.3.3 7.1.3.4 7.2 7.3 7.4 Calendar Memo Pad Alarm Clock 7.4.1 7.4.2 7.4.3 7.5 7.6 7.7 7.
7.8.2 7.8.3 7.8.4 7.8.5 7.8.6 7.9 8 Length Weight Volume Area Temperature Tip Calculator Voice SVC 8.1 8.2 Voice Commands Voice Settings 8.2.1 8.2.2 8.2.3 Choice Lists Sensitivity Digit Dialing 8.2.3.1 8.2.3.2 8.2.4 Adapt Digits Reset Digits Sound 8.2.4.1 8.2.4.2 8.2.4.3 8.2.4.4 Prompts Digits Names Name Settings 8.2.4.4.1 8.2.4.4.2 8.2.5 8.2.6 9 Voice Launch About Settings 9.1 9.2 Location Display Settings 9.2.1 9.2.2 Menu Style Wallpaper 9.2.2.1 9.2.2.2 9.2.2.3 9.2.2.4 9.2.3 9.2.4 9.2.
Menu Shortcuts Outline 9.2.5.1 9.2.5.2 9.2.6 9.2.7 Banner Backlight 9.2.7.1 9.2.7.2 9.2.7.3 9.3 Style Size Main Display Keypad Brightness Sound Settings 9.3.1 Volume 9.3.1.1 9.3.1.2 9.3.1.3 9.3.2 Voice Calls Messages Alarms Ringer Type 9.3.2.1 Voice Calls 9.3.2.1.1 9.3.2.1.2 9.3.2.2 Messages 9.3.2.2.1 9.3.2.2.2 9.3.2.2.3 9.3.2.2.4 9.3.3 Minute Beep Roaming Call Connect Power On/Off 9.3.3.4.1 9.3.3.4.2 9.3.3.5 Power On Power Off Charge Alert Key Tone 9.3.4.1 9.3.4.2 9.
9.4.6 9.5 Data Settings Phone Settings 9.5.1 9.5.2 9.5.3 Airplane Mode Language Security 9.5.3.1 9.5.3.2 9.5.3.3 Lock Phone Change Lock Emergency # 9.5.3.3.1 9.5.3.3.2 9.5.3.3.3 9.5.3.4 9.5.3.5 9.5.3.6 Reset Phone Erase All Entries Restriction 9.5.3.6.1 9.5.3.6.2 9.5.4 9.5.5 9.5.6 Quick Search Save Options 9.6.1.1 9.6.1.2 9.6.2 9.6.3 Images Videos Phone Memory 9.6.2.1 9.6.2.2 9.6.2.3 9.6.2.4 9.6.2.5 Memory Usage My Images My Videos My Ringtones My Sounds Card Memory 9.6.3.1 9.6.3.2 9.6.3.
Menu Shortcuts Outline 9.7.1 9.7.2 9.7.3 9.7.4 9.7.
Section 5: Entering Text Topics Covered • Text Entry Screens • Changing the Text Entry Mode • Using T9® Mode • Using Abc Mode • Entering Numbers • Entering Symbols This section outlines how to select the desired text entry mode when entering letters, numbers, and symbols into your phone. This section also describes how to use the T9 predictive text entry system to reduce the number of key strokes you must make when entering text.
Changing the Text Entry Mode Changing the Text Entry Mode Text messages can be made up of alphabetical characters, numbers, and symbols. You can use the following text entry modes to simplify text entry: • T9 Word — Press each key only once to enter the letter of the word that you’re spelling.
1. In standby mode, press the Up navigation key, then press Message), and (for Send for Text Message. 2. Enter the phone number of the recipient, then press the key. Note: See “Using T9® Mode” on page 49 for instructions on changing the text entry mode to T9 Word. 3. While in T9 Word mode, press each key that corresponds to a desired letter, in sequence, one time. The most frequently used word that matches your key entries appears in the display. Example: If you press the key sequence entry field.
Entering Numbers Note: See “Changing the Text Entry Mode” on page 49 for instructions on changing the text entry mode to Abc. 3. Enter characters while in Abc mode by pressing the key labeled with the desired characters (such as, press for “G”). 4. Press the key repeatedly until the desired character appears in the display (such as, press twice for “H”). 5. Pause briefly and the displayed character is accepted and inserted into your message. 6. Repeat Steps 3 – 5 as needed for each letter of a word.
4. Press the key that corresponds with the symbol that you wish to enter. For example, press for an exclamation point (!). 5. Repeat Steps 3 and 4 to insert as many symbols into your message as desired.
Contacts Section 6: Understanding Your Contacts Topics Covered • Contacts • Finding a Contacts Entry • Adding a New Contacts Entry • Editing a Contacts Entry • Saving a Number After a Call • Speed Dial • Contacts Groups • Sending Contacts Entries (V-card) • Deleting a Contacts Entry • Memory Info This section details how you can manage your daily contacts by storing their names and numbers in your Contacts list. You can have your Contacts entries sorted by name.
Open Contacts 1. In standby mode, press the Menu key ( ), then press The following options appear in the display: • Find — Find a phone number By Name. for Contacts. Tip: You can also access the Find option from standby mode, by pressing the Contacts (right) soft key ( ). • Add New Entry — Add a number or e-mail address to your Contacts. • Speed Dial — Assign a Contacts entry to a Speed Dial number. (See “Speed Dial” on page 63 for more information.
Finding a Contacts Entry 3. Speak clearly and say the full name of the person you want to call, exactly as it is entered in your Contacts list. • If VoiceSignal recognizes the name you said, the contact information for that name appears in the display. • If VoiceSignal does not recognize the name you said, a choice list of up to three names appears in the display, and VoiceSignal prompts you with “Did you say?” followed by the first name on the list. 4.
3. When the desired entry is listed in the display, use the navigation keys to highlight the entry. • Press to dial the number associated with the name. (To select another of the Contact’s numbers to dial, use the Right and Left navigation keys.) • Press the Edit (left) soft key ( ) to add or change information for this entry. • Press the key to view information about the entry. • Press the Options (right) soft key ( ).
Editing a Contacts Entry Fax 4. Use the Up and Down navigation keys to highlight the number type that matches your new entry, then press the key. The Add New Entry screen appears in the display with the Name field highlighted. 5. Use the keypad to enter a name to associate with the Contacts entry. (See “Entering Text” on page 48 for more information.) 6. Press the key to save the entry. Menu Method 1. In standby mode, press the Menu key ( Contacts) and ), then press (for for Add New Entry.
2. Use the navigation keys to highlight the entry and press the key. The View Contact screen appears in the display showing the highlighted entry’s information. 3. Use the navigation keys to review the information for the entry that you wish to change, then press the EDIT key ( appears in the display. ). The Edit Contact screen 4. Use the navigation keys to highlight the particular information you want to add or change. • Press to backspace and delete numbers or letters.
Editing a Contacts Entry To add pauses to a Contacts entry number, do the following: 1. Find the Contacts entry associated with the number you want to include one or more pauses. See “Finding a Contacts Entry” on page 54 for more information. 2. Select and edit the desired number. See “Editing a Contacts Entry” on page 57 for more information. 3. Press the Options (right) soft key ( ). The following pause options appear in the display: • Wait — A hard pause (waits for input from you).
Assigning a Picture to a Contacts Entry When you assign a picture to a Contacts entry, the picture that you assigned to the entry appears in the display when you receive a call from that Contact. 1. Find the Contacts entry you want to edit. See “Finding a Contacts Entry” on page 54 for more information. 2. Use the navigation keys to highlight the desired Contact, then press the Edit (left) soft key ( ). The Edit Contract screen appears in the display. 3.
Saving a Number After a Call 3. Use the navigation keys to highlight the Ringtone field, then press the Set (left) soft key ( ). The Contact Tone menu showing the following options appears in the display: • My Ringtones • My Sounds 4. Use the Up and Down navigation keys to highlight the desired option, then press the key. The My Ringtones or the My Sounds file list appears in the display. 5. Use the navigation keys to highlight the ringtone or sound that you wish to assign to the Contacts entry. 6.
Create a New Entry 1. Use the navigation keys to highlight Create New and press the key. The Create New screen appears in the display showing the following number type options: Mobile Home Work Pager Fax 2. Use the navigation keys to highlight the number type that matches your new entry, then press the key. 3. Enter a name for the new entry (see “Entering Text” on page 48 for more information). 4. Press the key. The new entry is saved to your Contacts list. Add to an Existing Entry 1.
Speed Dial Fax Number types that are already assigned a number show the number instead of the number type label. 4. Use the navigation keys to highlight the desired unassigned number type, then press the key. The Contacts entry information appears in the display with the new number posted in the appropriate number type field. 5. Press the key again to save your changes to the existing entry.
4. Use the navigation keys to highlight an Unassigned Speed Dial number or enter an Unassigned Speed Dial number in the Go To field using the keypad. Important!: Do not enter Speed Call numbers 001, 311, 411, or 911. These numbers are already assigned to Voicemail (001), to special network features (311 and 411), and to emergency use (911). 5. Press the SET key ( ). You are prompted to confirm your Speed Dial number assignment. 6.
Contacts Groups 7. Do steps 4 through 7 of the “Assignment During Entry Creation” procedure on page 63. Contacts Groups Contact Groups let you easily send messages to multiple, selected Contacts. You can also use Groups to find Contact entries and to add/remove Contacts names in a Group or to create or rename a Group. Add Contacts Entry to a Group Using Add New/Edit Contact Option To add a Contact to a Group using either the Add New Contact option or the Edit Contact option, do the following: 1.
• Business • Colleague • Family • Friends 2. Use the Up and Down navigation keys to highlight a Group, then press the Options (right) soft key ( ). The following options popup in the display: • Send Text Msg • Send PIC Msg • Send Video Msg • Rename • Erase • Add 3. Use the Up and Down navigation keys to highlight Add, then press the key. The Add Contacts screen appears in the display showing a list of Contacts entries. 4.
Contacts Groups • Send Video Msg • Rename • Erase • Add 3. Use the Up and Down navigation keys to highlight Rename, then press the key. The Rename Group screen appears in the display. 4. Enter changes to the group name using the keypad. (See “Entering Text” on page 48 for more information.) 5. When you have completed your changes to the Group name, press the SAVE key ( ). “Group Renamed” appears in the display followed by the Group List screen showing your renamed Group.
2. Use the Up and Down navigation keys to highlight the Group that you wish to delete, then press the Options (right) soft key ( ). The following options popup in the display: • Send Text Msg • Send PIC Msg • Send Video Msg • Rename • Erase • Add 3. Use the Up and Down navigation keys to highlight Erase, then press the key. You are prompted to confirm the Group erasure. 4. Press the Yes (left) soft key ( the No (right) soft key ( ) to confirm erasure of the Group. Press ) to retain the Group.
Deleting a Contacts Entry Your phone automatically connects with the other device and sends the selected Contact entries. Note: For information on turning off the Bluetooth connection, see “Bluetooth” on page 131. Deleting a Contacts Entry 1. Find the Contacts entry you want to delete. (See “Finding a Contacts Entry” on page 54 for more information.) 2. Use the navigation keys to highlight the desired entry. 3. Press the Options (right) soft key ( ).
Section 7: Games & Apps Topics Covered • Accessing Games & Apps • Applications Shopping and Downloading • Changing Your Games & Apps Settings • Using On-line Help With Games & Apps, you can download full featured applications over the air including games, personalized ring tones, pictures, and more. You can send and receive instant messages and email, or browse the web to catch up on all the latest news. This section outlines how to obtain games and other applications for your phone.
Changing Your Games & Apps Settings Changing Your Games & Apps Settings Use the Settings menu in Games & Apps to manage, move, order applications, and much more. 1. In the Games & Apps screen, use the Left and Right navigation keys to highlight the Settings icon ( ), then press the key. The following options appear in the display: • Order Apps — Download applications over the network. • Move Apps — Move previously downloaded applications between available folders.
Section 8: Messaging Topics Covered • Accessing Messaging • Types of Messages • Create and Send Text Messages • Receive Text Messages • Send Picture Messages in Camera Mode • Send Picture Messages in Standby Mode • Receive Picture Messages • Send Video Messages in Camcorder Mode • Send Video Messages in Standby Mode • Message Boxes • Erase Messages • Message Settings This section explains how to send or receive different types of messages.
Types of Messages • Msg Settings Types of Messages Your phone is able to send and receive Text, Picture, and Video messages to compatible phones and devices. Text messages can be up to 150 characters in length. Note: Available memory is shared between all messages. You can store up to 100 messages. However, the exact number is dependent upon message lengths. Create and Send Text Messages 1. In standby mode, press the Up navigation key, then press (for Send Message) and for Text Message.
• Press the Options (right) soft key ( ) to help complete the message text, to set message send options, and to dispose of this message other than sending it. The following options appear in the display: – Preset Msgs — Insert pre-composed text in your message. – Save As Draft — Save the message to your Draft folder. – Save As Preset — Save the message text as a Preset Message. – Add To Contacts — Save the recipient’s number or e-mail address as a Contacts list entry.
Send Picture Messages in Camera Mode Send Picture Messages in Camera Mode Picture messages can be sent to recipients with compatible phones or devices. You can even accompany a Picture message with a voice memo or preloaded sound. Tip: You can send a Picture message to up to 10 recipients. Enter each recipient’s address or phone number in a separate Send To, CC, or BCC field of the Create Pic Msg screen. 1. In standby mode, press and hold the Camera key ( ).
Note: You can record and insert a voice memo of up to 60 seconds in length, if you record first before attaching a picture. If a picture is attached before recording, the size of the voice memo is limited to the amount of remaining memory. – Audio files list — Select from the list of previously recorded voice memos and preloaded audio files on your phone. Use the Up/Down navigation keys to highlight an option, then press the key to select the option and insert a sound into your message.
Send Picture Messages in Standby Mode 2. Select or enter the phone number(s) or e-mail address(es) for 1 to 10 recipients. (For more information, see Step 2 of “Create and Send Text Messages” on page 73.) As needed, use the Left/Right navigation keys to select to add CC (Carbon Copy) and BCC (Blind Carbon Copy) recipients to your message. Tip: Press the Add (right) soft key ( ) to display a pop-up menu containing: Contacts, Groups, and Recent Calls.
– Audio files list — Select from the list of previously recorded voice memos and preloaded audio files on your phone. Use the Up/Down navigation keys to highlight an option, then press the key to select the option and insert a sound into your message. Press to exit the pop-up menu without inserting a sound. 8. Press the Options (right) soft key ( ) to complete the message text and set message send options.
Receive Picture Messages 2. If the new picture message is not highlighted, use the Up and Down navigation keys to highlight the new message. 3. Press the key. “Connecting” appears in the display followed by “Retrieving” and a progress bar indicating that the message is downloading to your phone. 4. Once a Picture message has been downloaded to your phone, the new Picture message appears in the display. If the message includes a sound file, the phone begins playing it.
Send Video Messages in Camcorder Mode Newly recorded Video clips can be sent in Video messages to recipients with compatible phones or devices . Tip: You can send a Video message to up to 10 recipients. Enter each recipient’s address or phone number in a separate Send To, CC, or BCC field of the Create Video Msg screen. 1. In standby mode, press and hold the Camera key ( ). The camera viewfinder screen appears in the display. 2. Press and hold the Camera key ( ) a second time.
Send Video Messages in Standby Mode • Save As Draft — Save the message to your Draft folder. • Priority Level — Choose High, Normal, or Low. • Validity Period — Enter the Date when this message will cease to be valid, then use the Left and Right navigation keys to choose the Time. • Delivery Ack — Returns a message acknowledging that this message has been delivered. (Contact your Wireless Provider for availability.) • Remove Video — Remove the video clip from your message.
4. Press the Down navigation key to highlight the Text: field, then enter the message text using the keypad. (See “Entering Text” on page 48 for more information.) 5. Press the Down navigation key to highlight the Video: field, then press the My Videos (left) soft key ( appears in the display. ). A video gallery of thumbnail images 6.
Receive Video Messages Receive Video Messages When you receive a Video Message in standby mode, the ringer sounds (unless turned off) and New Message appears in the display along with the closed envelope icon ( ). The date and time of the message also appear in the display along with the following options: • View Now — Retrieves and opens the message, where you have the option to Reply, Forward, Delete, Save Text, Save Video, or Save Msg.
• Reply With Copy — Compose and send a reply message to the originator of the received message and include a copy of the original message. • Save Video — Save the video included in this message to the My Videos folder. • Save Quick Text — Save the text in this message as a new Preset Message. • Lock / Unlock — Block/permit erasure of the highlighted message. • Add To Contacts — Save the sender’s number to your Contacts. • Message Info — Shows message delivery status, addressee, size, and so on. 4.
Message Boxes • Save Preset Message — Save the text in this message as a new Preset Message. • Add To Contacts — Save the sender’s number to your Contacts. • Erase Inbox — Deletes selected unlocked messages from the Inbox. • Message Info — Shows message delivery status, addressee, size, and so on. 5. Use the navigation keys to highlight an option. Press the key to perform the function for the highlighted option. Managing Inbox Messages 1. In standby mode, press the Up navigation key, then press for Inbox.
3. While viewing your message press the Options (right) soft key ( ). The following options appear in the display: • Play Again — Replays the selected message. • Forward — Send the highlighted message to another recipient. • Erase — Deletes the selected message. • Lock / Unlock — Block/permit erasure of the highlighted message. • Save Preset Message — Save the message text as Preset Message for insertion into other messages. • Add To Contacts — Save the recipient’s number to your Contacts.
Message Boxes Create a Draft Message 1. In standby mode, press the Up navigation key, then press (for Send Message) and (for Text Message) or (for Picture Message). The Create Text Msg screen or Create Pic Msg screen appears in the display showing the To: list. 2. Enter the phone Number or E-Mail address of the recipient, then press the key. 3. Compose your message using the keypad, then press the Options (right) soft key ( ). 4.
6. When you have completed composing your message, press the key to send it. View and Edit Draft Picture/Video Messages 1. In standby mode, press the Up navigation key, then press for Drafts. A list of any draft messages that you’ve composed appears in the display. 2. Use the navigation keys to highlight the Picture/Video message that you wish to view, then press the EDIT ( appears in the display. ) key. The message edit screen 3. Make any needed changes and press the Options (right) soft key ( ).
Erase Messages • Add To Contacts — Save the recipient’s number and/or e-mail address to your Contacts. • Save Preset Msg — Save the message text as Preset Message for insertion into other messages. • Erase Drafts — Delete all unlocked draft messages. 4. Use the navigation keys to highlight an option. Press the key to perform the function for the highlighted option. Voicemail Messages in your voice mailbox are logged in the Voicemail box of the Messages menu.
1. In standby mode, press the Up navigation key, then press for Erase Messages. The following options appear in the display: • Inbox — Deletes all unlocked messages stored in the Inbox. • Outbox — Deletes all unlocked messages stored in the Outbox. • Drafts — Deletes all unlocked messages stored in the Drafts box. • All Messages — Deletes all unlocked messages stored in all of the message boxes, except Voicemail. 2.
Message Settings Editing and Entering Preset Messages 1. In standby mode, press the Up navigation key, then press Settings) and in the display. (for Msg for Preset Msgs. The Preset Msgs sub-menu appears 2. Use the navigation keys to highlight a Preset Message you want to change, then press the key. (You cannot change the pre-defined Preset Message included with your phone.) Press the New (right) soft key ( ) to create a new Preset Message.
Section 9: Browser Topics Covered • Browser • Launching Browser • Using Browser • Using Links • How Browser Keys Work This section outlines how to launch Browser, how to navigate to other pages on the web, and how the keys on the keypad are used with the web application. Additionally, links to other sites are briefly discussed. Browser With Browser, you can conveniently surf the web and download ringtones and wallpapers using your phone.
Using Browser 3. Use the navigation keys to browse the categories. 4. Once the desired category is highlighted, press the to enter the category list. (left) soft key ( ) Exit Browser 䊳 Press to exit Browser. Using Browser When you use Browser, some of the keys operate differently than during a normal phone call. Browser presents on-screen items in any of the following ways: • Text or numeric input. • Links (embedded in content). • Numbered options (some may not be numbered). • Simple text.
Asterisk/Shift Key — Press before entering text to enable uppercase characters. Next Key — Press to enter a zero (0), or to display another word in the dictionary when in T9 Word entry mode. Pound/Space Key — Press to insert a space when entering text. Number 1 thru 9 — Use the number keys to select items in a menu if they are numbered. End Key — Press to exit the Browser and return the phone to standby mode. Left Soft Key — Press to activate the command that appears above it in the display.
Voice SVC Options Section 10: Voice SVC Topics Covered • Voice SVC Options • Voice Commands • Voice Settings This section explains how you can use and customize your phone’s VoiceSignal voice recognition feature. Voice SVC Options Your r610 includes VoiceSignal, state-of-the-art voice recognition software that lets you use your voice to dial numbers, access your Contacts list, and open Tools/ Utilities. To access your phone’s voice recognition, do the following: 1.
Note: You can also set your phone to start VoiceSignal when you open the phone. See “Voice Launch” on page 100 for more information. The following voice commands appear in the display: • Call — Lets you dial the phone by saying any name stored in your contact list, without ever having to record, or “train” that name. VoiceSignal automatically voice-activates all your contacts, even if you have hundreds of them stored on your phone.
Voice Settings Voice Settings Choice Lists When VoiceSignal cannot recognize a name or number, it displays a choice list of up to three possible choices, and prompts you to confirm the correct one. You can select how VoiceSignal will use choice lists with name dialing, digit dialing, and contacts. To change the way VoiceSignal uses choice lists: 1. In standby mode, press the Menu key ( SVC), (for Voice Settings), and ), then press (for Voice for Choice Lists. 2.
Adaptation involves recording several sequences of four digits each. The recording process takes about a minute. Tips for Adapting Digit Dialing • Use Adapt Digits in a quiet place. • Make sure you wait for the beep before starting to speak. • Speak clearly, and say each digit distinctly. • If you make a mistake while recording a sequence of digits, or if there is an unexpected noise that spoils the recording, re-record that sequence.
Voice Settings 7. Repeat steps 4 and 5 for another 10 sets of digits. After the second group of 10 sets of digits, “Adaptation complete” plays through the speaker and you are returned to the Digit Dialing menu. Reset Digits To reset digit dialing to factory default settings, do the following: 1. In standby mode, press the Menu key ( ), then press (for Voice SVC), (for Voice Settings), and for Digit Dialing. The following options appear in the display: • Adapt Digits • Reset Digits 2.
Voice Launch To set the key or action that launches VoiceSignal, do the following: 1. In standby mode, press the Menu key ( ), then press (for Voice SVC), (for Voice Settings), and for Voice Launch. The following options appear in the display: • Key Only — Press and hold to activate VoiceSignal for one call. • Key/EarMic — Attach a headset to your phone. Press and hold or press and hold the button on a headset (wired or Bluetooth) to activate VoiceSignal. 2.
Accessing Multimedia Section 11: Multimedia Topics Covered • Accessing Multimedia • Camera-Camcorder • Using My Images Gallery • Using My Videos Gallery • Using My Ringtones Gallery • Using My Sounds Gallery • Using Music Library Use your r610 phone to take full color digital pictures and videos, display them on your phone’s vivid color display, and instantly share them with family and friends.
• My Ringtones — Accesses the folder(s) where ringtones (preloaded and downloaded) are stored. • My Sounds — Accesses the folder(s) where sound files (preloaded and recorded) are stored. • Music Library — Accesses the folder(s) where music files (manually copied and downloaded) are stored. • Ringback Tones — Accesses your Wireless Carrier’s server where ringback tones are stored. (For more information and availability, contact your Wireless Carrier.
Camera-Camcorder Taking Multi Shot Pictures When taking pictures of moving subjects or subjects you cannot pose, such as children and pets, the camera’s Multi Shot mode simplifies the process of taking multiple pictures in quick succession. After taking Multi Shot pictures, the camera automatically displays thumbnail views of the pictures you have just taken so you can select the best picture(s) and discard the rest. 1. In standby mode, press and hold the Camera key ( ) on the right side of the phone.
The Series Shot progress bar ( or ) or the Divided Shot icon ( or ) (which acts as a progress bar while pictures are being taken) appears in the display. 6. Using the display as a viewfinder, point the camera lens at your subject. 7. Press the key when the image that you wish to capture appears in the display. The camera takes one picture (Manual) or multiple pictures in quick succession (Auto), then the Series Shot Select to Save screen or the Divided Shot multiple-photo screen appears in the display.
Camera-Camcorder 4. Press the Save (left) soft key ( 5. Press the Erase (right) soft key ( ) to save the video to memory. ) to erase the video. Screen Layouts Camera Screen When you choose the Display All option for your phone’s Icon Display camera setting, the top line of the display shows most of the current camera settings icons and the picture counter. (For more information, see “Icon Display” on page 114.
Photo Limit — Indicates the available number of photos you can take. (Depending on the camera resolution setting.) White Balance — Indicates camera’s white balance setting. (You can change the camera white balance setting. See “White Balance” on page 118 for more information.) Phone Memory — Indicates photos will be stored in the phone’s memory. Card Memory — Indicates photos will be stored on a microSD Memory Card. Flash — Indicates flash is active, allowing you to take pictures in low light.
Camera-Camcorder Camcorder Screen When you choose the Display All option for your phone’s Icon Display camcorder setting, the first line of the display is shows current camcorder settings icons. (For more information, see “Icon Display” on page 119.) The center of the display shows a viewfinder image of the subject at which the camcorder is pointed. A small shaded area on the right hand side of the screen shows the current white balance and memory settings.
Zoom — Enlarges the image from X0 to X9 before you take a video. (Depending on the camcorder quality setting.) Brightness — Brightens or darkens the image from -4 to +4. Self Timer in use — Delays the camcorder from recording for from 2 to 10 seconds after you press the key. Recording Mode — Indicates camcorder is in MMS mode (as shown) with Quality and recording time limits or in Normal mode ( ).
Camera-Camcorder • Multi Shot • Quality • Resolution • White Balance • Fun Tools • Metering • Settings • Camcorder 3. Use the Left and Right navigation keys to highlight the desired option and/ or setting, then press the key to save the selected setting. Flash Flash lets you take pictures in low light. 1. In camera mode, press the Options (right) soft key ( menu bar appears in the display. ).
3. Press the key. If you select 2 Sec., 5 sec., or 10 sec., the Self Timer icon appears in the camera screen in the display. The next time you press the key, the countdown timer indicates the time remaining before the camera takes the picture. The phone reads the countdown timer value beginning with two or three and continuing to zero, when the picture is taken. Tip: To stop the countdown timer without resetting it, press the key.
Camera-Camcorder Resolution Change the size (in bytes) of your pictures using the Resolution setting. 1. In camera mode, press the Options (right) soft key ( menu bar appears in the display. ). The options Use the navigation keys to highlight one of the following Resolution options: • 1280 X 960 (pixels) • 640 X 480 (pixels) • 320 X 240 (pixels) • 176 X 144 (pixels) • 160 X 120 (pixels) • Picture ID — lets you take pictures the correct size and resolution for Contacts list picture IDs. 3.
Fun Tools Color Effects Change the look of your pictures with Color Effects. Choose from eight available settings such as Gray, Negative, and Sepia. The selected color effect previews in the display before you take the picture. 1. In camera mode, press the Options (right) soft key ( menu bar appears in the display. ). The options 2. Use the navigation keys to highlight Fun Tools, and then highlight Color Effects. 3. Press the key.
Camera-Camcorder 3. Press the key. A pop-up menu of the available numbered Fun Frame appears in the display. 4. Use the Up and Down navigation keys to show the various Fun Frames. 5. When you decide on the frame you wish to use, press the key. The camera screen appears in the display with your selected Fun Frame in place. The next time you press the Frame in your picture. key, the camera includes the selected Fun Metering 1.
Auto Save 1. In camera mode, press the Options (right) soft key ( menu bar appears in the display. ). The options 2. Use the Left and Right navigation keys to highlight Settings. Use the Up and Down navigation keys to highlight Auto Save, then press the key. The following options appear in the display: • Off • On 4. Use the Up and Down navigation keys to highlight the automatic save setting of your choice, then press the key. You’re returned to the camera viewfinder screen. 3. Icon Display 1.
Camera-Camcorder Shutter Sound Choose from four different sounds whenever you take a picture. Aside from being a cool sound effect, Shutter Sounds acts as an audible reminder that your camera has taken a picture. 1. In camera mode, press the Options (right) soft key ( menu bar appears in the display. ). The options 2. Use the Left and Right navigation keys to highlight Settings. Use the Up and Down navigation keys to highlight Shutter Sound, then press the key.
Camcorder Options The Camcorder Options let you adjust the default camcorder settings to suite available lighting, the subject of the video, or the purpose of the video. To access Camcorder Options, do the following: 1. In camera mode, press and hold the Camera key ( ). The camcorder viewfinder screen appears in the display. Press the Options (right) soft key ( ).
Camera-Camcorder • Always On — Flash comes on every time you press the REC key ( ), regardless of light level. • Auto — Flash comes on only when the light level is low. 3. Use the Up and Down navigation keys to highlight the desired Flash option and/or setting, then press the key to save the selected setting. The camcorder applies the selected Flash setting to your next video. Self Timer Self Timer lets you delay taking a video long enough to let you join others in the video. 1.
White Balance White Balance allows you to adjust video quality according to available light. 1. In camcorder mode, press the Options (right) soft key ( menu bar appears in the display. ). The options Use the Left and Right navigation keys to highlight White Balance. The name of the current White Balance setting appears in the second line of the display. The options are: • Auto — The camcorder automatically adjusts color balance to available light.
Camera-Camcorder Aqua — Subjects and pictures appear in an aqua hue. Negative — Subjects and pictures appear in inverted colors. Sketch — Subjects and pictures appear as simple outlines. Emboss — Subjects and pictures appear as three-dimensional and in black and white. 3. After you highlight the color tone of your choice, then press the key. You’re returned to the camcorder viewfinder screen.
2. Use the Left and Right navigation keys to highlight Settings. 3. Use the Up and Down navigation keys to highlight Icon Display, then press the key. The following options appear in the display: • Display All — Shows camcorder icons as seen in “Camcorder Screen Icons” on page 107. • No Icons — Shows a nearly full-display subject image and without icons. 4. Use the Up and Down navigation keys to highlight the viewfinder screen setting of your choice, then press the key.
Camera-Camcorder • OK • Melody 4. Use the Up and Down navigation keys to highlight the desired end sound, then press the key. You’re returned to the camcorder viewfinder screen. Reset Settings 1. In camcorder mode, press the Options (right) soft key ( menu bar appears in the display. ). The options 2. Use the Left and Right navigation keys to highlight Settings. Use the Up and Down navigation keys to highlight Reset Settings, then press the key.
The next time you press the key, the camera takes a lighter or darker picture or the camcorder records a lighter or darker video according to your selected Brightness setting. Using My Images Gallery My Images lets you manage your photos and pictures you download, and lets you choose the pictures that appear in your phone’s display while in standby mode (wallpaper) and as image IDs for your contacts. 1. In standby mode, press the Menu key ( ), then press (for Multimedia) and for My Images.
Using My Videos Gallery Using My Videos Gallery My Videos lets you take videos, review your videos, send them as video messages, and assign your videos as wallpaper on your phone. 1. In standby mode, press the Menu key ( Multimedia) and for My Videos. ), then press (for If there are no videos stored in your phone or on a memory card, “No Video” appears in the My Videos screen.
Using My Ringtones Gallery My Ringtones lets you assign ringtones for calls, alarms, and other alerts. 1. In standby mode, press the Menu key ( ), then press (for Multimedia) and for My Ringtones. A list of ringtones appears in the display. 2. Use the navigation keys to highlight a ringtone. 3. Press the Set As (left) soft key ( ) to assign the highlighted ringtone to be used as a Ringtone, Contact ID, or as an Alert Tone. Press the PLAY key ( ) to hear the ringtone.
Using My Sounds Gallery When you highlight a saved voice memo file, you have the following options: • Press the Erase (left) soft key ( ) to erase the selected voice memo file, if it is unlocked. • Press the PLAY key ( ) to listen to the voice memo. • Press the Options (right) soft key ( ), and the following options appear in the display: – SEND — Send to someone as part of a Picture message. (See “Send Picture Messages in Standby Mode” on page 76 for more information.
3. Press the REC key ( ), then start speaking. As it is recording the phone displays a countdown timer that shows the seconds remaining for the recording. To pause the memo, press the Pause (left) soft key ( ). When a memo is paused, select Resume to continue recording. 4. Press the SAVE key ( ) once you’re finished recording. The new recording is saved, and the standby mode screen appears in the display. Review Voice Memos If you’ve saved any voice memos, you can review them anytime. 1.
Using Music Library • Lock/Unlock — Blocks/permits erasure of this voice memo. • Erase all — Erases all unlocked sound files that are not preloaded. • Sound Info — Shows you the Name, Size, Type, Date, and Time for this sound file. 4. Use the navigation keys to highlight Erase all, then press the key. “Erase All Sounds?” appears in the display. 5. Press the Yes (left) soft key ( ) to all of the sound files or press the No (right) soft key ( ) to return to the list of sound files.
Individual Music Files In standby mode, press the Down navigation key for Multimedia, then press for Music Library. The Library screen appears in the display, showing the following options: • All • Artists • Albums • Genres • Playlists 2. Use the Navigation key to highlight the desired option, press the VIEW key ( ), and then do one of the following: • All option — Use the Up and Down navigation keys to highlight a music file.
Using Music Library • All option: – Use the Up and Down navigation keys to highlight a music file. – Press the MARK key ( ) to select the file for playing or other options. – Repeat this process for each music file you wish to include in your temporary playlist. – When you have selected all the music files you wish to play, press the Play (left) soft key ( ) to play the files. • Artists, Albums, Genres, or Playlists options: – Use the Navigation key to highlight an Artist, Album, Genre, or Playlist.
– Memory Info — Displays the Memory Usage screen which lists Memory Card usage and availability amounts. • Press the Navigation key Up or Down to highlight the desired option, then press the OK key ( ) to launch the option or access the sub-menu. Adding Music Files Using the Browser or Games & Apps For information on downloading music files, contact your Wireless Provider. Manual Method You can add music files to My Music manually by directly copying music files onto a Memory Card.
Accessing Tools/Utilities Section 12: Tools/Utilities Topics Covered • Accessing Tools/Utilities • Bluetooth • Calendar • Memo Pad • Alarm Clock • World Time • Calculator • Stop Watch • Converter • Tip Calculator This section explains how you can use your phone’s Personal Information Manager (PIM) functions to view today’s calendar, schedule appointments, set an alarm, perform simple math calculations, and more.
The Bluetooth wireless technology settings menu provides the ability to view and change the device name, show the visibility, and set the security for the device. Turn Bluetooth On/Off When the Bluetooth is turned on, you can use the Bluetooth features available. When the Bluetooth is turned off, you cannot send or receive information via Bluetooth. To save battery life or in situations where Bluetooth use is prohibited, such as airline traveling, you can turn off the Bluetooth wireless technology headset.
Bluetooth 3. Place the Bluetooth device in discoverable mode. (See the device user manual for more information.) 4. Press the key. Names of the available devices appears in the display. 5. Use the navigation keys to highlight the device you want to pair with your phone. 6. Press the PAIR key ( ) to pair the selected device with the phone. You are prompted to enter the passkey or PIN for the selected device.
2. If you are unable to connect with the device a pop-up appears in the display. Press the Yes soft key to retry. Disconnecting from a Bluetooth Device In standby mode with Bluetooth on, 䊳 Turn the other, registered Bluetooth device off. The Bluetooth Connected (blue) icon ( ) is replaced by the Bluetooth On (black) icon ( ). From the Registered List, 䊳 Highlight the device and press the Off (left) soft key ( ). Managing Your Registered List From the Registered List, 1.
Calendar Calendar Calendar allows you to view the current, past, or future month in calendar format. While viewing the calendar, the current date is highlighted, and days with scheduled events are surrounded by a box. Add a New Event 1. In standby mode, press the Menu key ( Utilities) and ), then press (for Tools/ for Calendar. A calendar appears in the display with the current date highlighted. The month and year appear at the top of the display. 2. Press the Add (left) soft key ( ) to add an event.
• Alert tone (the Alert Tone screen appears in the display. See “Using My Ringtones Gallery” on page 124 and “Using My Sounds Gallery” on page 124 for more information.) • Reminder (Off, Once, Every 2 Minutes, Every 15 Minutes) • Alert time (15 Min. Before, 30 Min. Before, 1 Hour Before, 3 Hours Before, 5 Hours Before, 1 Day Before, On Time, 5 Min. Before, 10 Min. Before) 8. Press to save the new Event to your calendar.
Memo Pad Memo Pad Create notes (Memos) containing up to 160 characters and store them in Memo Pad. You cannot prioritize or assign an alert or date to Memos that you create in Memo Pad. Return to Memo Pad anytime to review and edit your Memos. Create a Memo 1. In standby mode, press the Menu key ( ), then press (for Tools/ Utilities) and for Memo Pad. The Memo Pad screen appears in the display. • If this is your first time using Memo Pad, “No Memos” appears in the Memo Pad screen.
2. Use the Up and Down navigation keys to highlight a Memo. 3. Press to VIEW the highlighted Memo. The contents of the highlighted Memo appears in the display. The following options are available: • Press the Edit (left) soft key ( ) to change the Memo text. • Press to return to the Memo Pad screen. • Press the Options (right) soft key ( ) to Erase this Memo (if unlocked), Add a New Memo, or to Lock/Unlock this Memo. 4. Press the Edit (left) soft key ( ) to change the text of the Memo you are viewing.
Alarm Clock 4. Press the Down navigation field to highlight the Time field, which is populated with the most current time, rounded up to the next half-hour. The following options are available: • To schedule the selected Alarm for the displayed Time, proceed to Step 5. • To schedule the selected Alarm for another time, use the keypad to enter the Start Time for the Event. – To set AM/PM, if needed, press the Down navigation key to highlight the AM/PM field.
• Alarm 3 Off 2. Use the Up and Down navigation keys to highlight the desired Alarm (O6:30 AM in the above sample), then press the Options (right) soft key ( ). The following options appear in the display: • Off • Reset Alarm • Reset All 3. Use the Up and Down navigation keys to highlight Off, then press . The selected Alarm is turned off. It will not sound again until you set the Alarm to On. Reset the Alarm 1.
World Time 2. Use the Left and Right navigation keys to browse cities and their current times. The following cities are supported. EST/EDT: Detroit Washington D.
Calculator You can perform calculations, including addition, subtraction, multiplication and division using your phone. 1. In standby mode, press the Menu key ( ), then press (for Tools/Utilities) and for Calculator. The Calculator screen appears in the display. 2. Enter the first number in your equation using the keypad. (Numbers can be up to nine digits long.) • Press to enter a decimal point. • Press to change the sign for a number to a negative.
Converter 4. Press the Reset (right) soft key ( ) to reset the stop watch and to erase all recorded stop watch (lap) times. Converter The conversion menu provides the following conversion categories: • Currency • Length • Weight • Volume • Area • Temperature To convert a currency, length, weight, volume, area, or temperature, do the following: 1. In standby mode, press the Menu key ( ), then press (for Tools/Utilities) and for Converter.
2. Press the Rate (left) soft key ( ). The Exchange Rate list appears in the display. 3. Press the EDIT key ( ). The Edit Exchange Rate list appears in the display. 4. Use the Up and Down navigation keys to highlight a currency whose exchange rate you wish to change. 5. Use the keypad keys to change the selected exchange rate value. 6. Press the key to save the changed exchange rate. The Exchange Rate list appears in the display. 7. To change any other exchange rates, repeat Steps 3 – 6. 8.
Tip Calculator Note: Press the key to enter the decimal point. The Exchange Rate field only accepts up to five digits after the decimal point. 9. Press the key to save the new exchange rate. Currency — Erasing Exchange Rates You cannot erase the preloaded currencies from the Exchange Rate list. You can erase a currency that you have added to the list by doing the following: 1. In standby mode, press the Menu key ( ), then press (for Tools/Utilities), (for Converter), and for Currency. 2.
1. In standby mode, press the Menu key ( ), then press (for Tools/ Utilities) and for Tip Calculator. The Tip Calculator screen appears with the Bill field is highlighted. 2. Use the keypad to enter the total amount of the bill. 3. If needed, press the Down navigation key to highlight the Tip field. 4. Use the keypad to enter a tip percentage. 5. If needed, press the Down navigation key to highlight the # Paying field. 6. Use the keypad to enter the number of persons paying. 7.
Accessing Your Phone’s Settings Section 13: Settings Topics Covered • Accessing Your Phone’s Settings • Location Setting • Display Settings • Sound Settings • Call Settings • Phone Settings • Memory Info • Phone Info This section explains how to configure your phone’s language, network preferences, security options, and other settings. Accessing Your Phone’s Settings To access your phone’s settings, do the following: 1. In standby mode, press the Settings (left) soft key ( ).
2. Use the Up/Down navigation keys to highlight the desired sub-menu, then press the key to access your selection. Tip: You can also access the Settings menu from standby mode by the Menu key ( for Settings. ), then pressing Location Setting You can set your phone to pass Global Positioning System (GPS) data to identify your location to the network continually or only when you make an emergency (911) call.
Display Settings 2. Use the Up/Down navigation keys to highlight a sub-menu, then press the key to enter the highlighted sub-menu. The following sub-sections describe the Display sub-menus in greater detail. Menu Style In standby mode, press the Settings (left) soft key ( ), then press (for Display Settings) and for Menu Style. The following options appear in the display: • Icon — Shows all main menus as an array of icons. • List — Shows main menus in scrollable list (text) format. 2.
1. In standby mode, press the Settings (left) soft key ( (for Display Settings) and for Clock Format. ), then press The following clock format options appear in the display: • Digital — Time, date, and day of the week are shown using an alternate, large digital format. • Analog — Time is shown using an analog clock face image. • Off — Time, date, and day of the week are shown using the default, small digital format. 2.
Display Settings – Sticky – Color Dial Use the Left and Right navigation keys to highlight the desired setting and press the key to save the selected setting. • If you select Size, the following Size options appear in the display: – Normal – Large Use the Up/Down navigation keys to highlight the desired setting and press the key to save the selected setting. Banner Create your own personalized greeting that appears in the display while your phone is in standby mode.
In standby mode, press the Settings (left) soft key ( ), then press (for Display Settings) and for Backlight. The following sub-menus appear in the display: • Main Display — Sets the time the internal display backlight remains on after a period of inactivity. Optional settings are: 7 seconds, 15 seconds, 30 seconds, Always On, and Always Off. • Keypad — Sets the amount of time the keypad backlight remains on after a period of inactivity.
Sound Settings 4. Press the key to save the option setting. Ringer Type You can assign ring tones and melodies for calls, alarms, and other alerts in the Ringer Type sub-menu. In standby mode, press the Settings (left) soft key ( ), then press (for Sound Settings) and for Ringer Type. The following ringer types appear in the display: • Voice Calls • Messages – Text Message – Picture Message – Voicemail – Msg Reminder 2. Use the navigation keys to highlight a ringer type, then press the key.
• Charge Alert — Sound an alert when you connect/disconnect the Travel Adapter or other battery charger. 2. Use the navigation keys to highlight a sub-menu, then press the key. The following options appear in the display: • On • Off 3. Use the Up and Down navigation keys to highlight active (On) or inactive (Off) for the selected alert. 4. Press the key to confirm your selection. Key Tone Key Tone lets you adjust the volume level and length of tone that the keypad generates each time you press a key. 1.
Call Settings In standby mode, press the Settings (left) soft key ( ), then press (for Call Settings) and for Call Answer. The following Call Answer options appear in the display: • Any Key — Press any key except or to answer an incoming call. • Send Key — Press to answer an incoming call. • Slide Up — Open the slide or press to answer an incoming call. 2. Use the navigation keys to highlight the method you wish to use for answering calls, then press the key. 1.
TTY Mode Your phone is fully Teletypewriter (TTY)/Telecommunication Device for the Deaf (TDD) compatible. You connect TTY/TDD equipment to the headset connector on the top of your phone, behind the folder hinge. Note: TTY Mode must be enabled (TTY Full selected) before you can use your phone with TTY/TDD equipment. In standby mode, press the Settings (left) soft key ( ), then press (for Call Settings) and for TTY Mode.
Phone Settings In standby mode, press the Settings (left) soft key ( ), then press (for Call Settings) and for Voice Privacy. The following options appear in the display: • Standard • Enhanced 2. Use the navigation keys to highlight the Voice Privacy option of your choice, then press the key. 1. Data Settings Use the Data Settings sub-menu to set your phone to detect data connections automatically.
Note: Press to return to the Phone Settings menu. 2. Use the navigation keys to highlight the desired option, then press the key. You are prompted to confirm your setting change. 3. Press the Yes (left) soft key ( ) to change to the new setting. Press the No (right) soft key ( ) to discard the change and keep the original setting. 4. If you press Yes, you are returned to standby mode. If you press No, the Airplane Mode screen remains in the display.
Phone Settings The “Enter Code” prompt disappears and the Security menu appears in the display. Press for Lock Phone. The following options appear in the display: • Lock — The phone locks immediately and stays locked until you enter the lock code. • Unlock — The phone remains unlocked. • On Power Up — The phone locks automatically the next time your phone is powered on and stays locked until you enter the lock code. 4. Use the navigation keys to highlight the Lock Phone option of your choice. 3. 5.
Note: Emergency number 911 is hard-coded into your phone. You can dial this number any time, even when the phone is locked or restricted. If you call 911 an audible tone is heard and an Emergency prompt appears in the display for the duration of the call. Important!: Because of various transmission methods, network parameters, and user settings used to complete a call from your wireless phone, a connection cannot always be guaranteed.
Phone Settings Reset Phone Reset Phone returns all setup parameters (except for the Contacts list entries) to their factory default values. Caution!: Before selecting Reset Phone, contact your Wireless Carrier. Invoking Reset Phone may erase settings made by your Wireless Carrier from your phone, resulting in loss of service. Note: To erase Contacts list entries, see “Erase All Entry” on page 161.
The “Enter Code” prompt disappears and the Security menu appears in the display. 3. Press display. for Erase All Entry. The “Enter code” prompt appears in the 4. Enter the four-digit lock code using the keypad. Note: The default lock code is the last four digits of your mobile phone number. The “Erase All Entries?” prompt appears in the display. 5. Press the Yes (left) soft key ( ) to erase all Contacts list entries. Press the No (right) soft key ( ) to keep the current Contacts list entries.
Phone Settings System Select The System Select feature enables you to automatically or manually select the network used when roaming outside of your home area. In standby mode, press the Settings (left) soft key ( ), then press for System Select. The following roaming (for Phone Settings) and options appear in the display: • Home — Roaming is off. If your home system is not available then your call will not be connected, and the no service icon ( ) appears in the display.
Enter the current time using your keypad: • The hour and minute must be entered using two digits each. You must enter the hour in 12-hour format. • Use the Left and Right navigation keys to select am or pm. 7. Press to save the time. 6. Quick Search Quick Search is an easy way to locate contacts in your Address Book and Menu items. In standby mode, press the Settings (left) soft key ( ), then press (for Phone Settings) and for Quick Search. The following options appear in the display: • On • Off 2.
Memory Info 3. Press the key to access the content of the menu item. Memory Info Memory Info shows the amounts of phone memory and Memory Card memory that are available and used, details the memory usage by file type, and lets you manage the files. 1. In standby mode, press the Settings (left) soft key ( for Memory Info.
Phone Memory Review and manage phone memory usage. In standby mode, press the Settings (left) soft key ( ), then press (for Memory Info) and for Phone Memory. The Phone Memory screen appears in the display showing the following options: • Memory Usage — Shows the Total Used phone memory, total Available phone memory, and the amounts of memory used by the various file types. • My Images — Lets you list, review, and manage the image files stored in your phone.
Phone Info • Format Card — Lets you prepare a Memory Card for use in your phone. 2. Use the Up/Down navigation keys to highlight the desired option (except Format Card), then press . Memory Usage information or file lists appear in the display. In the file lists, use the Up/Down navigation keys to highlight particular files, then press the Options (right) soft key ( ). The following options appear in the display: • Erase — Lets you delete a file from your phone.
Icon Glossary This option causes the Icon Glossary list to appear in the display and show the icons that can appear in the display and the names of the icons. 1. In standby mode, press the Settings (left) soft key ( ), then press (for Phone Info) and for Icon Glossary. A list of the icons that can appear on the top line of the display shows in the display. 2. Press to return to the Phone Info menu.
Health and Safety Information Section 14: Health and Safety Information Topics Covered • Health and Safety Information • Samsung Mobile Products and Recycling • UL Certified Travel Adapter • Consumer Information on Wireless Phones • Road Safety • Responsible Listening • Operating Environment • Using Your Phone Near Other Electronic Devices • Potentially Explosive Environments • Emergency Calls • FCC Notice and Cautions • Other Important Safety Information • Product Performance • Availability of Various Fea
These FCC exposure limits are derived from the recommendations of two expert organizations, the National Counsel on Radiation Protection and Measurement (NCRP) and the Institute of Electrical and Electronics Engineers (IEEE). In both cases, the recommendations were developed by scientific and engineering experts drawn from industry, government, and academia after extensive reviews of the scientific literature related to the biological effects of RF energy.
Samsung Mobile Products and Recycling Part 24 • Head: 0.545 W/Kg. • Body-worn: 0.703 W/Kg. SAR information on this and other model phones can be viewed on-line at http://www.fcc.gov/oet/ea. To find information that pertains to a particular model phone, this site uses the phone FCC ID number which is usually printed somewhere on the case of the phone. Sometimes it may be necessary to remove the battery pack to find the number.
What kinds of phones are the subject of this update? The term wireless phone refers here to hand-held wireless phones with built-in antennas, often called "cell," "mobile," or "PCS" phones. These types of wireless phones can expose the user to measurable radio frequency energy (RF) because of the short distance between the phone and the user's head.
Consumer Information on Wireless Phones Although the existing scientific data do not justify FDA regulatory actions, FDA has urged the wireless phone industry to take a number of steps, including the following: • Support needed research into possible biological effects of RF of the type emitted by wireless phones; • Design wireless phones in a way that minimizes any RF exposure to the user that is not necessary for device function; and • Cooperate in providing users of wireless phones with the best possibl
What are the results of the research done already? The research done thus far has produced conflicting results, and many studies have suffered from flaws in their research methods. Animal experiments investigating the effects of radio frequency energy (RF) exposures characteristic of wireless phones have yielded conflicting results that often cannot be repeated in other laboratories.
Consumer Information on Wireless Phones What is FDA doing to find out more about the possible health effects of wireless phone RF? FDA is working with the U.S. National Toxicology Program and with groups of investigators around the world to ensure that high priority animal studies are conducted to address important questions about the effects of exposure to radio frequency energy (RF).
What about children using wireless phones? The scientific evidence does not show a danger to users of wireless phones, including children and teenagers. If you want to take steps to lower exposure to radio frequency energy (RF), the measures described above would apply to children and teenagers using wireless phones. Reducing the time of wireless phone use and increasing the distance between the user and the RF source will reduce RF exposure.
Consumer Information on Wireless Phones In February 2002, the Federal trade Commission (FTC) charged two companies that sold devices that claimed to protect wireless phone users from radiation with making false and unsubstantiated claims. According to FTC, these defendants lacked a reasonable basis to substantiate their claim. What about wireless phone interference with medical equipment? Radio frequency energy (RF) from wireless phones can interact with some electronic devices.
• International Commission on Non-Ionizing Radiation Protection: http://www.icnirp.de • National Radiation Protection Board (UK): http://www.hpa.org.uk/radiation • US Food and Drug Administration http://www.fda.gov/cellphones Road Safety Your wireless phone gives you the powerful ability to communicate by voice, almost anywhere, anytime. But an important responsibility accompanies the benefits of wireless phones, one that every user must uphold. When driving a car, driving is your first responsibility.
Responsible Listening 8. Use your wireless phone to call for help. Dial 9-1-1 or other local emergency number in the case of fire, traffic accident or medical emergencies. 9. Use your wireless phone to help others in emergencies. If you see an auto accident, crime in progress or other serious emergency where lives are in danger, call 9-1-1 or other local emergency number, as you would want others to do for you. 10.
are used. As a result, there is no single volume setting that is appropriate for everyone or for every combination of sound, settings and equipment. You should follow some commonsense recommendations when using any portable audio device: • Set the volume in a quiet environment and select the lowest volume at which you can hear adequately. • When using headphones, turn the volume down if you cannot hear the people speaking near you or if the person sitting next to you can hear what you are listening to.
Operating Environment National Institute on Deafness and Other Communication Disorders National Institutes of Health 31 Center Drive, MSC 2320 Bethesda, MD 20892-2320 Voice: (301) 496-7243 Email: nidcdinfo@nih.gov Internet: http://www.cdc.gov/niosh/topics/noise/default.html National Institute for Occupational Safety and Health Hubert H. Humphrey Bldg. 200 Independence Ave., SW Washington, DC 20201 Voice: 1-800-35-NIOSH (1-800-356-4647) Internet: http://www.cdc.gov/niosh/topics/noise/default.
Implantable Medical Devices A minimum separation of six (6) inches should be maintained between a handheld wireless phone and an implantable medical device, such as a pacemaker or implantable cardioverter defibrillator, to avoid potential interference with the device.
Potentially Explosive Environments T-Ratings: Phones rated T3 or T4 meet FCC requirements and are likely to be more usable with a hearing device’s telecoil (“T Switch” or “Telephone Switch”) than unrated phones. T4 is the better/higher of the two ratings. (Note that not all hearing devices have telecoils in them.) Hearing devices may also be measured for immunity to this type of interference. Your hearing device manufacturer or hearing health professional may help you find results for your hearing device.
Areas with a potentially explosive atmosphere are often but not always clearly marked. They include below deck on boats, chemical transfer or storage facilities, vehicles using liquefied petroleum gas (such as propane or butane), areas where the air contains chemicals or particles, such as grain, dust or metal powders, and any other area where you would normally be advised to turn off your vehicle engine.
FCC Notice and Cautions FCC Notice and Cautions FCC Notice The phone may cause TV or radio interference if used in close proximity to receiving equipment. The FCC can require you to stop using the phone if such interference cannot be eliminated. Vehicles using liquefied petroleum gas (such as propane or butane) must comply with the National Fire Protection Standard (NFPA-58).
Product Performance Getting the Most Out of Your Signal Reception The quality of each call you make or receive depends on the signal strength in your area. Your phone informs you of the current signal strength by displaying a number of bars next to the signal strength icon. The more bars displayed, the stronger the signal. If you're inside a building, being near a window may give you better reception.
Availability of Various Features/Ring Tones Availability of Various Features/Ring Tones Many services and features are network dependent and may require additional subscription and/or usage charges. Not all features are available for purchase or use in all areas. Downloadable Ring Tones may be available at an additional cost. Other conditions and restrictions may apply. See your service provider for additional information.
accessories. If unsure about whether a replacement battery or charger is compatible, contact the manufacturer of the battery or charger. • Misuse or use of incompatible phones, batteries, and charging devices could result in damage to the equipment and a possible risk of fire, explosion, leakage, or other serious hazard. • Extreme temperatures will affect the charging capacity of your battery: it may require cooling or warming first.
Care and Maintenance Care and Maintenance Your phone is a product of superior design and craftsmanship and should be treated with care. The suggestions below will help you fulfill any warranty obligations and allow you to enjoy this product for many years. • Keep the phone and all its parts and accessories out of the reach of small children. • Keep the phone dry. Precipitation, humidity and liquids contain minerals that will corrode electronic circuits. • Do not use the phone with a wet hand.
Section 15: Warranty Information Topics Covered • Standard Limited Warranty Standard Limited Warranty What is Covered and For How Long? SAMSUNG TELECOMMUNICATIONS AMERICA, LLC ("SAMSUNG") warrants to the original purchaser ("Purchaser") that SAMSUNG's Phones and accessories ("Products") are free from defects in material and workmanship under normal use and service for the period commencing upon the date of purchase and continuing for the following specified period of time after that date: Phone 1 Year Ba
Standard Limited Warranty This Limited Warranty covers batteries only if battery capacity falls below 80% of rated capacity or the battery leaks, and this Limited Warranty does not cover any battery if (i) the battery has been charged by a battery charger not specified or approved by SAMSUNG for charging the battery, (ii) any of the seals on the battery are broken or show evidence of tampering, or (iii) the battery has been used in equipment other than the SAMSUNG phone for which it is specified.
• THE WORKMANSHIP OF THE PRODUCT OR THE COMPONENTS CONTAINED THEREIN; OR • COMPLIANCE OF THE PRODUCT WITH THE REQUIREMENTS OF ANY LAW, RULE, SPECIFICATION OR CONTRACT PERTAINING THERETO. NOTHING CONTAINED IN THE INSTRUCTION MANUAL SHALL BE CONSTRUED TO CREATE AN EXPRESS WARRANTY OF ANY KIND WHATSOEVER WITH RESPECT TO THE PRODUCT.
Standard Limited Warranty OR EQUIPMENT IS INCLUDED WITH THE PRODUCT DISTRIBUTED BY SAMSUNG OR OTHERWISE, INCLUDING THE ABILITY TO INTEGRATE ANY SUCH SOFTWARE OR EQUIPMENT WITH THE PRODUCT. THE QUALITY, CAPABILITIES, OPERATIONS, PERFORMANCE AND SUITABILITY OF ANY SUCH THIRD-PARTY SOFTWARE OR EQUIPMENT LIE SOLELY WITH THE PURCHASER AND THE DIRECT VENDOR, OWNER OR SUPPLIER OF SUCH THIRD-PARTY SOFTWARE OR EQUIPMENT, AS THE CASE MAY BE.
Samsung Telecommunications America, LLC 1301 East Lookout Drive Richardson, Texas 75082 Phone: 1-800-SAMSUNG (726-7864) Important!: If you are using a handset other than a standard numeric keypad, dial the numbers listed in brackets. Phone: 1-888-987-HELP (4357) ©2007 Samsung Telecommunications America. All rights reserved. No reproduction in whole or in part allowed without prior written approval. Specifications and availability subject to change without notice.
Index C Numerics 2-sec pause 58 A Adding a new Contacts entry Dial Method 56 Adjust key tone 154 ringer setting 25 32 Alarm clock reset the alarm 140 set the alarm 138 turn off the alarm 139 when an alarm sounds 139 Alerts 153 Auto Answer 155 Auto Retry 155 , B Backlight 151 Banner 151 Battery 9 charging 8 Low battery indicator 9 removal 10 Travel adapter 8 Bluetooth 131 Add New Device 132 Registered List 133 Settings 134 Turn On/Off 132 Browser 92 How Browser Keys Work 93 Launching Browser 92 Using Br
Editing and Entering 91 Change lock 159 Clear key 20 Contacts 53 add pauses 58 Adding a new Contacts entry 56 edit name and numbers 57 opening 54 Save a number after a call 61 Contacts List Memory 69 Create messages 73 Cricket Clicks On-line Help 71 Settings 71 D Data Counter 38 Data Settings 157 Data, view counters 38 Dialing Font 150 Display 148 Display screen icons 22 Display Settings 150 Backlight 151 Banner 151 Dialing Font 150 Menu Style 149 Wallpaper 149 Draft folder 86 Draft messages 86 Entering T
Lock code, changing 159 Lock mode 24 Lock phone 158 M Menu Navigation 40 Menu Outline 41 Menu Style 149 Message folder draft box 86 inbox 84 outbox 85 voice 89 voice mail 89 Message Folders Erase messages 89 Messages and lock mode 86 Messages, creating 73 Messages, receive in call 74 Messaging 72 Types of Messages 73 Missed calls menu 36 Mobile Shop 70 Shopping and downloading 70 Mode call answer 23 camcorder 26 camera 26 input 23 lock 24 silent 24 standby 24 talk 24 vibrate 25 Msg setting sub menu 90 Mult
Receive pic.
Tools calendar 135 Tools/Utilities 131 add new event 135 alarm clock 138 calculator 142 memo pad 137 world time 140 TTY Mode 156 U Understanding Your Contacts 53 Deleting a Contacts entry 69 Editing an existing Contacts entry 57 Finding a Contacts entry 54 Understanding Your Phone 13 Closed View of Your Phone 14 16 Command Keys 20 Display Screen 22 Features of Your Phone 13 Open View of Your Phone 17 19 Using Abc Mode 50 Utilities 131 , Record memos 125 Review memos 126 Voice Privacy 156 Voice Setting Ab