The Alltel SnapTM A L L D I G I T A L T r i - M o d e P H O N E User Guide Please read this manual before operating your phone, and keep it for future reference.
Intellectual Property All Intellectual Property, as defined below, owned by or which is otherwise the property of Samsung or its respective suppliers relating to the SAMSUNG Phone, including but not limited to, accessories, parts, or software relating there to (the “Phone System”), is proprietary to Samsung and protected under federal laws, state laws, and international treaty provisions.
The Alltel SnapTM is a Trademark of Alltel Communications, Inc.
Table of Contents Intellectual Property ..................................................................................................2 Samsung Telecommunications America (STA), LLC ...................................................2 Disclaimer of Warranties; Exclusion of Liability .........................................................3 Getting Started .............................................................................................7 Understanding this User Manual ......................
Finding a Contacts Entry .........................................................................................56 Editing an Existing Contact Entry .............................................................................59 Renaming a Contacts Group ....................................................................................62 Deleting a Contact Entry ..........................................................................................63 Memory ...........................................
Changing Your Settings ...........................................................................119 Display Settings ....................................................................................................120 Sounds Settings ....................................................................................................125 Call Options ..........................................................................................................129 Network Settings .............................
Section 1: Getting Started Topics Covered • Understanding this User Manual • Activating Your Phone • Charging the Battery • Setting Up Your Voice Mail This section explains how to start using your phone by activating your service, setting up your voice mail, or getting an understanding of how this manual is put together.
Understanding this User Manual The chapters of this guide generally follow the same order as the menus and submenus in your phone. A robust index for quick reference to most features begins on page 162. Also included is important safety information that you should know before using your phone. Most of this information is near the back of the guide, beginning on page 139. Notes and tips Throughout this guide are icons and text that are set apart from the rest.
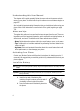
Activating Your Phone 3. Place the battery cover over the battery and slide the cover upward into place. Turn Your Phone On 1. Open the folder on your phone, as shown. 2. Press the END key. 3. The phone begins searching for a network signal. 4. Once the phone finds a signal, the time, date and day appear in the bottom of the display. 5. You’re now ready to place and receive calls. Press Tip: Your phone has an internal antenna.
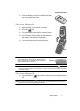
Remove the Battery Important!: You must unplug the Travel Adapter (if it is connected) before removing the battery from the phone during charging to avoid damage. 1. Press and hold the END key to turn off the phone (if on). 2. Press the battery cover at point (1) and slide the cover (2) toward the bottom end of the phone. 3. Lift the battery cover up and away from the phone, bottom end first. 4. Lift the battery (3) up and away from the 3 phone, bottom end first.
Setting Up Your Voice Mail 2. Insert the smaller end of the Travel Adapter into the charger/accessory connector at the bottom end of your phone. Note: With the phone turned OFF, a discharged battery recharges fully in approximately 4 hours. Low battery indicator The battery indicator ( ) in the upper-right corner of the display indicates power level. Monitor the battery strength and ensure your battery is adequately charged. • Three bars ( ) indicate a full charge.
Section 2: Understanding Your Phone Topics Covered • Features of Your Phone • Closed View of Your Phone • Open View of Your Phone • Command Keys • Understanding the Display Screen • Your Phone’s Modes This section outlines some key features of your phone. This section also explains the screen and the icons that are displayed when the phone is in use.
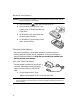
Closed View of Your Phone Closed View of Your Phone 1. Headset Connector 7. Camera Lens 6. Camera Key 2. Volume Key 5. Speakerphone Key 3. External LCD 4. Speaker 1. Headset Connector 6. Camera Key 2. Volume Key 5. Speakerphone Key Command Keys and Features 1. Headset Connector — Used for handsfree, Teletypewriter (TTY), and Telecommunication Device for the Deaf (TDD) equipment. 2.
5. Speakerphone Key — Lets you enable and disable speakerphone mode. 6. Camera Key — With the phone open and in standby mode, launches the camera. In camera mode, takes a picture. 7. Camera Lens — The lens of your built-in camera. Open View of Your Phone 15. Earpiece 14. Internal Display 13. Navigation Key 1. Left Soft Key 2. SEND Key 12. Right Soft Key 11. OK Key 10. END/Power/Menu Exit Key 3. Clear Key 4. Voice Mail Hot Key 9. Alpha-numeric Keys 5. Special Function Keys 6.
Command Keys 3. CLR (clear) Key — Deletes characters from the display when you are in text entry mode. When in a menu, press to return to the previous menu. 4. Voice Mail Hot Key — Press and hold to automatically dial your voicemail. 5. Special Function Keys — Enter special characters. Perform various functions. 6. Power/Accessory Connector — Used to plug in the Travel Charger and to connect any available accessory cable. 7.
• When the left soft key function is Edit, press the Edit (left) soft key ( ) to edit a Contact. Right Soft Key Some functions of the right soft key are as follows. • In standby mode, press the MESSAGE (right) soft key ( ) to open the Messages menu. • When the right soft key function is Back, press the Back (right) soft key ( ) to back up one menu level. OK Key • In a menu, press the OK key ( OK ) to accept the highlighted selection.
Understanding the Display Screen 3. Briefly press SEN D in standby mode to display a list of recent calls to and from your phone. 4. Press SEN 5. Press SEN D twice in standby mode to call the most recent number. to pick up a waiting call. Press the other call. D SEN D again to switch back to Navigation Key OK Use the directional keys on the navigation key to browse menus, sub menus, and lists. Each key also acts as a shortcut to launch applications.
Analog mode indicator — Indicates your phone is operating in an analog service area or that digital service has been interrupted. Also indicates that some network features are not available. Also, you may need to recharge your phone’s battery more often while in an analog service area. Roam — Extended roaming indicator. Roaming occurs when you use your phone outside your home area.
Understanding the Display Screen Ring — Your phone is in ring mode. When you receive a call, the phone rings. 1 Beep — Your phone is in 1 Beep mode. When you receive a call, the phone rings a single beep. Vibrate mode — Your phone is in vibrate mode. When you receive a call, the phone vibrates instead of ringing. Ringer off — The ringer is in Ringer off mode. When you receive a call, it is only indicated in the displays. Silent mode — Indicates your phone is in silent mode.
• Warning • Example: “Battery Low,” “Memory Full!” Backlights Backlights illuminate the internal and external displays and the keypad. When you press any key or open the phone, the backlights come on. They go off when no keys are pressed within a period of time set in the Backlight menu. Note: During a phone call, the display backlights dim and turn off after one minute to conserve battery power, regardless of the Backlight setting. See “Backlight” on page 122 for more information.
Your Phone’s Modes Input mode Input mode determines how you enter text, numbers and symbols. While at any text entry screen, press the Option (left) soft key ( ), then choose the input mode from the pop-up menu using the navigation keys. Optional input modes are T9 Word, Alpha, Symbol, Number, and Quick Text. (See “Entering Text” on page 46 for more information.) Tip: You can also cycle between T9 Word, Alpha, and Number by repeatedly pressing and holding .
Talk Mode You can place and receive calls only when your phone is on. While in a call your phone is in talk mode. Press the MENU (left) soft key ( ) to display a list of menu options. See “In Use Menu Outline” on page 39 for more information. Enter/Exit Silent Mode Silence the tones your keypad makes when you press a key. • In standby mode, press and hold . Entering Silent Mode briefly appears in the display and your phone does not play ring tones for incoming calls or sound alert tones.
Section 3: Call Functions Topics Covered • Making a Call — Number Entry Dialing • Making a Call — Speed Dialing • Making a Call — Voice Dialing • Answering a Call • Rejecting a Call • Adjusting the Call Volume • Calls Log • Phone Modes • Roaming This section explains how to make or answer a call. This section also includes the features and functionality associated with making or answering a call.
Making a Call — Number Entry Dialing 1. With the phone on, enter the number you wish to call using the keypad. 2. Press the SEN D key to place the call. Dialing Emergency Numbers You can dial any of the numbers 911, *911, or #911 to place an emergency call. If you dial 911, *911, or #911 and press the emergency number 911, automatically. SEN D key, your phone dials the Important!: Emergency number 911 is hard-coded into your phone.
Making a Call — Speed Dialing • Calling Voicemail from Mexico: Dial 001, plus your ten-digit wireless number. Once you hear the recorded prompt, press and enter your passcode. Manual Pause Calling When you call automated systems (like banking services), you are often required to enter a password or account number. Instead of manually entering the numbers each time, you can store the numbers in your Contacts along with special characters called pauses.
Two-Touch Dialing Memory locations 010 through 099 are special Two-Touch dialing locations. Example: For location number 013, briefly press the key, then press and hold the name and number appear in the display and the number is dialed. @ def key until the Three-Touch Dialing Memory locations 100 through 495 are special Three-Touch dialing locations.
Making a Call — Voice Dialing 2. Say, “Voice Dial”. You are prompted to “Say the name or number”. 3. Speak clearly and say the name of a person in your Contacts list, first name followed by last name. If the name is recognized, Voice Dial repeats the name and dials the number. If Voice Dial is not sure which name you said, it displays a choice list of up to three names and prompts you with “Did you say?” followed by the first name on the list. 4.
3. Speak clearly and say the telephone number of the person you want to call. For example, say “7 8 1 9 7 0 5 2 0 0." If it recognizes the number, Voice Dial repeats it and dials the number. If Voice Dial is not sure it has recognized the number, it displays a choice list of up to three numbers and prompts you with “Did you say?” followed by the first number on the list. 4. Say “Yes” to confirm the number or “No” to hear the next one, or use the keypad to select the correct number from the list.
Rejecting a Call Answering an Incoming Call 䊳 Press the key. The ring tone and/or vibration stop and the caller’s voice can be heard in the earpiece. SEN D Tip: You can set your phone to answer calls when you open the folder, when you press any key but the key, or automatically. (See see "Call Options" on page 129 for more information. END Rejecting a Call When you reject an incoming call, the call is immediately forwarded to your voice mail.
Outgoing Calls Your phone retains information about the last 20 outgoing calls and stores them in the Outgoing calls log. You can review the Outgoing calls log for the time and date of a call, as well as other information. Note: To quickly view your most recent calls, briefly press in standby mode. Up to 20 of your most recent outgoing, incoming, and missed calls appear in the display. SEND 1. In standby mode, press the MENU (left) soft key ( (for Calls) and the display. @ ) then press for Outgoing.
Calls Log • Erase — Erase the selected call from your Incoming call list. (If this is a recent call, it will no longer appear in the Recent Calls list.) 4. Use the navigation keys to highlight an option. 5. Press the key to perform the highlighted option’s function. OK Missed Calls Your phone retains information about the last 20 missed calls (calls that were never answered) and stores them in the Missed call log.
Call Timer View the duration of your last call, total calls, and calls made during the life cycle of you phone using the Call Timer feature. Note: Call Timer is not for billing purposes. 1. In standby mode, press the MENU (left) soft key ( ) then press (for Calls) and for Call Timer. The following options appear in the display: • Last Call — View the duration of your last call. • Total — View the duration of the total call, incoming and outgoing, made on your phone since the last erasure.
Phone Modes Phone Modes Standby Mode Standby mode is the state of your phone once it is powered on and has found a wireless service. Your phone goes into standby mode: • After you power the phone on. • When you press the key after a call or from within a menu or phone function screen. END When in standby mode, you will see the time, day, and date in the display as well as all currently active icons. When in standby mode, you can: • Make calls. • Receive calls and messages. • Access your phone’s menus.
Unlock your phone by following the prompts and entering the lock code. Silent Mode With a single press of the key you can silence the call ringer and tones that your keypad makes whenever you press a key. When you receive a call, the phone vibrates instead of ringing. Enter Silent Mode 䡲 In standby mode, press and hold the key. “Entering Silent Mode” briefly appears in the display and your phone returns to standby mode. The Silent Mode icon ( ) appears in the top line of the display.
Phone Modes Alpha Mode Enter characters while in Alpha mode by pressing the key with the desired characters (such as for “a”). • Press the key repeatedly until the desired character (letter, number, or symbol) appears in the display. • Pause briefly and the displayed character is accepted and inserted into your message. • Press to enter a space. abc Tip: To enter large numbers of symbols or numbers quickly, use Symbol mode or Number mode as described in the following sections.
Roaming What is Roaming? Roaming lets you use your Alltel Snap phone when you travel outside of your Wireless Provider’s coverage area. The Roaming icon ( ) appears in the top line of the display when Roaming is active, and extra charges may apply when making or receiving calls. Note: Some features may be unavailable while roaming. Roaming also consumes additional power from the battery requiring more frequent recharging. Contact your Wireless Provider for more information about Roaming.
Section 4: Menu Navigation Topics Covered • Menu Navigation • In Use Menu Outline • Menus and sub-menus This section explains the menu navigation for your phone. It also includes an outline of all the available menus associated with your phone.
Menu Navigation You access the menus and sub-menus in your phone by using the navigation keys ( OK ), soft keys ( ), or a shortcut. Navigate Using Keys 1. In standby mode, press the MENU (left) soft key ( ). The Main menu (the first of several menus) appears in the display. 2. Use the navigation keys to browse through the menus in your phone. 3. Press the OK key to select a menu or sub-menu that then appears in the display. Return to the Previous Menu There are two methods for exiting a menu or list.
In Use Menu Outline Navigation key shortcuts Some applications can be launched by pressing one of the four navigation keys (see the illustration) while in standby mode. Contacts Ringer Type OK Axcess Shop Axcess Web In Use Menu Outline Your phone includes both a Main menu and an In-Use menu. The In-Use menu is accessible only when you are in a call. 1.
2. Use the navigation keys to highlight an option. Press the OK key to select the In-Use menu option of your choice. You can also press the MUTE/Unmute (left) soft key ( cannot hear you) or unmute the current call. 3. Press the MSG (right) soft key ( ) to mute (caller ) to access the Messages menu to receive, review, and send messages during the current call. Menus and sub-menus 1 Messages 1.1 1.2 1.3 1.4 1.5 1.6 1.7 1.8 1.9 New Text Msg New Pic Msg New Handwr.
Menus and sub-menus 1.0 Erase Msg 1.0.1 1.0.2 1.0.3 1.0.4 2 Axcess Shop 2.1 3 Axcess Shop Axcess Web 3.1 4 Axcess Web Contacts 4.1 4.2 Find Add 4.2.1 4.2.2 4.3 4.4 Friend Family Colleague Business General Memory Calls 5.1 5.2 5.3 5.4 5.5 5.6 6 Number Email Rename Group 4.3.1 4.3.2 4.3.3 4.3.4 4.3.5 5 Inbox Outbox Drafts All Messages Outgoing Incoming Missed Erase Logs Call Timer Data Counter Gallery 6.1 Image Gallery 6.1.
6.1.2 6.1.3 6.2 Melody Gallery 6.2.1 6.2.2 6.2.3 7 Preloaded Downloaded Shuffle Camera 7.1 7.2 8 Downloaded Shuffle Take a Photo Photo Gallery Tools 8.1 Voice Kit 8.1.1 8.1.2 8.1.3 8.1.4 Voice Command Voice Memo TTS Voice Setting 8.1.4.1 Digit Dialing 8.1.4.1.1 8.1.4.1.2 8.1.4.2 8.1.4.3 8.1.4.4 Sensitivity Choice Lists Sound 8.1.4.4.1 8.1.4.4.2 8.1.4.4.3 8.1.4.4.4 8.1.4.5 8.1.4.6 8.2 8.3 8.4 8.5 8.
Menus and sub-menus 8.7 8.8 8.9 9 World Time Calculator Count Down Settings 9.1 Display 9.1.1 9.1.2 Menu Style Animation 9.1.2.1 Wallpaper 9.1.2.1.1 9.1.2.1.2 9.1.2.1.3 9.1.2.2 Opening 9.1.2.2.1 9.1.2.2.2 9.1.2.3 9.2 Preloaded My Image Banner Backlight 9.1.4.1 9.1.4.2 9.1.4.3 9.1.4.4 9.1.5 9.1.6 9.1.7 9.1.8 9.1.9 Preloaded My Image Closing 9.1.2.3.1 9.1.2.3.2 9.1.3 9.1.
9.2.3.3 9.2.3.4 9.2.3.5 9.2.4 Key Beep 9.2.4.1 9.2.4.2 9.2.5 9.3 Flip Tone Power On/Off Roam Ringer Whisper Mode Call Answer Auto Answer Auto Retry Data TTY Mode Network 9.4.1 9.4.2 9.5 9.6 9.7 Set NAM Roam Option Clock Set (Disabled in digital service mode.) Language Security 9.7.1 9.7.2 9.7.3 Lock Phone Change Lock Emergency # 9.7.3.1 9.7.3.2 9.7.3.3 44 Minute Beep Service Connect Disconnect Fade Roam Privacy Call Options 9.3.1 9.3.2 9.3.3 9.3.4 9.3.5 9.4 Volume Tone Length Alerts 9.2.5.
Menus and sub-menus 9.7.4 9.7.5 Voice Privacy Restriction 9.7.5.1 9.7.5.2 9.7.6 9.7.7 9.8 9.9 9.0 Outgoing Incoming Erase Memory Reset Phone Location Airplane Mode Phone Info 9.0.1 9.0.2 9.0.
Section 5: Entering Text Topics Covered • Text Entry Modes • Changing the Text Entry Mode • Entering Text in Alpha (ABC) Mode • Entering Text in T9 Word Mode • Entering Upper and Lower Case Letters • Entering Symbols • Entering Numbers This section outlines how to select the desired text input mode when entering characters into your phone. This section also describes how to use the T9 predictive text entry system to reduce the number of key strokes associated with entering text.
Text Entry Modes Text Entry Modes You can compose text messages using alphabetical characters, symbols, and numbers. Each method of character entry (symbol, number, and so on) is called a text entry mode. There are four text entry modes, as indicated: • Alpha — Alphabetical text entry mode. Options are: • ABC — All upper case • Abc — Initial capital • abc — All lower case • Symbol — Symbol entry mode. Enter symbols into your message by pressing the corresponding number that appears above it in the display.
Entering Text in Alpha (ABC) Mode Note: See “Changing the Text Entry Mode” on page 47 for instructions on changing text entry modes. 1. Enter characters while in ABC (Alpha) mode by pressing the key with the desired characters (such as, pressing ghi once for “G”). 2. Press the key repeatedly until the desired character appears in the display (such as, pressing ghi two times for “H”). 3. Pause briefly and the displayed character is accepted and inserted into your message. 4.
Entering Upper and Lower Case Letters T9 Word recognizes that the most commonly used word for the numeric sequence you just entered is “Samsung.” Entering Upper and Lower Case Letters In Abc and T9 Word modes, you can select to enter only upper case letters (ABC/T9 WORD), only lower case letters (abc/T9 word), or a mix of the two (Abc/T9 Word). 1. While in T9 Word or Abc mode, use the capitalization setting. Simply press the desired capitalization mode appears.
Entering Numbers Enter numbers into a text message while in number mode (123). Note: See “Changing the Text Entry Mode” on page 47 for instructions on changing text entry modes. 䊳 50 While in 123 mode, press the key containing the corresponding number that you wish to insert into your message.
Section 6: Understanding Your Contacts Topics Covered • Your Contacts List • Adding a New Contacts Entry • Finding a Contacts Entry • Editing an Existing Contact Entry • Renaming a Contacts Group • Deleting a Contact Entry • Memory This section explains how to manage your daily contacts by storing their name and number in your Contacts. Contacts entries can be sorted by name, entry, or group.
Your Contacts List Your Contacts list can store up to 500 numbers, with each contact having up to five associated phone numbers, an e-mail address, and a picture ID. Each phone number can be up to 32 digits in length, including hard pauses. Contact names can be up to 22 characters in length. You can also specify a memory location for each entry, and you can restrict access to the Contacts list to prevent unauthorized use.
Adding a New Contacts Entry 3. Enter the phone number or e-mail address for the new Contacts entry, then press the OK key. The following options appear in the display: • New Entry — Lets you create a new Contacts entry. • Find — Lets you add the number or e-mail address you just entered to an existing Contacts entry. 4. Use the navigation keys to highlight New Entry, then press the OK key. The following (number type) icons appear in the display: Home Work My Circle Fax Mobile 5.
2. Press the Option (left) soft key ( ). The following pause menu options appear in the display: • P pause — a hard pause (awaits input from you). • T pause — a two-second pause. 3. Use the navigation keys to highlight the pause option of your choice. 4. Press the OK key to enter the highlighted pause into your number sequence. 5. When you’re finished entering the number and pauses, press the Save (right) soft key ( ) to store the number in your Contacts.
Adding a New Contacts Entry 5. Enter a name or phrase to associate with the type using the keypad. (See “Entering Text” on page 46 for more information.) 6. Press the OK key to save the entry. Storing Number from a Calls Log You can store numbers from the Calls logs to your Contacts. 1. In standby mode, press the MENU (left) soft key ( ), then press jkl for Calls. 2.
8. Enter a name or phrase to associate with the type using the keypad. (See “Entering Text” on page 46 for more information.) 9. Press the OK key to save the entry. Finding a Contacts Entry Voice Method Use the VoiceSignal Contacts command to view contact information for any named contact stored in your Contacts list by saying the name. Note: The Contacts command shows the requested contact information in the display but does not dial any phone numbers for the contact.
Finding a Contacts Entry • Press the MENU (left) soft key ( ), then press (for Contacts) and for Find. The Find screen appears in the display with By Name showing. ghi @ 2. Use the navigation keys to select the method you wish to use to find the entry. The available Find methods are: • By Name — Search the Contacts alphabetically by name. • By Entry — Search the Contacts by entry number. • By Group — Search the Contacts by selecting from one of the five available groups.
4. Use the navigation keys to highlight an option, then press the OK key to enter that option’s sub-menu. Find by Entry This option lets you find a Contacts list entry by its Location number. 1. In the Find screen, use the navigation keys to show By Entry in the display. 2. When the desired Contacts entry is listed in the display, highlight the contact using the navigation keys (if necessary). Then do one of the following: • Press the key to dial the number associated with the named contact.
Editing an Existing Contact Entry • Edit — Lets you edit details of the highlighted contact. • Erase — Erases the selected contact. • Add New — Lets you add a new number to your Contacts list or to the selected contact. • Send Text Msg — Lets you send a text message to the selected contact. • Send Pic Msg — Lets you send a picture message to the selected contact. 5. Use the navigation keys to highlight an option, then press the OK key to enter that option’s sub-menu.
Assigning Speed Dial Numbers When you add an entry to the Contacts list, you have the option of letting the phone assign a Location (Speed Dial) number or of selecting or entering a Location number. You can also change a contact’s Location number. 1. In standby mode, press the Up navigation key (Contacts Find shortcut). The Find screen appears in the display with By Name showing. 2. Use the navigation keys to display the search method that you wish to use (By Name, By Group, By Entry, or By Number). 3.
Editing an Existing Contact Entry Add a Number or E-mail Address to an Existing Entry 1. In standby mode, press the MENU (left) soft key ( ), then press (for Contacts) and for Add. The following options appear in the display: • Number — Lets you enter a number to be dialed when calling the new contact. • Email — Lets you enter an e-mail address for the new contact. 2. Use the navigation keys to highlight the desired option and press the OK key. ghi abc 3.
Edit an Existing E-mail Address 1. In standby mode, press the Up navigation key (Contacts Find shortcut). The Find screen appears in the display with By Name showing. 2. Use the navigation keys to select the search method that you wish to use (By Name, By Group, By Entry, or By Number). 3. Enter information to fine the entry, or use the navigation keys to highlight the entry that you wish to edit. 4. Once the entry is highlighted, press the Option (left) soft key ( ).
Deleting a Contact Entry 2. Use the navigation keys to highlight the group that you wish to rename, then press the OK key. The current name of the group appears in the display with a flashing cursor at the end of the name. 3. Enter a new group name using the keypad, then press the OK key. (See “Entering Text” on page 46 for more information.) Deleting a Contact Entry 1. In standby mode, press the Up navigation key (Contacts Find shortcut). The Find screen appears in the display with By Name showing.
Section 7: Messaging Topics Covered • Creating and Sending New Messages • Message Send Options • Retrieving New Messages • Voicemail • Message Folders • Message Settings • Deleting Messages This section explains how to create, send, receive, and view different types of messages. This section also includes the features and functionality associated with messaging.
Creating and Sending New Messages Creating and Sending New Messages This section guides you through the procedure to create and send various types of messages. Creating and Sending a Text (TXT) Message 1. In standby mode, do one of the following: • Press the MESSAGE (right) soft key ( ). • Press the MENU (left) soft key ( ), then press 2. Press for New Text Msg. @ (for Messages). @ 3. Enter the phone number of the recipient, then press the OK key. 4.
2. Enter the phone number of the recipient, then press the OK key. 3. Enter the text for your message using the keypad. See “Entering Text” on page 46 for more information.) 4. At any point while composing a message, press the Option (left) soft key ( ). The following options appear in the display: • Alpha — The entry mode for your message. Other modes, which are hidden, are Symbol, Number, and T9 Word. Use the navigation keys to display each of the text entry modes.
Creating and Sending New Messages Press the Option (left) soft key ( ). The following options appear in the display: • Contacts — Find and select a recipient from your Contacts list. • Number — The entry mode for your message. Other modes, which are hidden, are T9 Word, Alpha, Symbol, and Number. Use the navigation keys to display each of the text entry modes. • .com — The domain name for the recipient e-mail address. Other domains, which are hidden, are .edu and .net.
• Quick Text — Insert a pre-composed message into the body of your current message. 6. Select a sound file to include with your message, then press the Down navigation key. Press the Option (left) soft key ( ). The following options appear in the display: • Sounds — Lets you add a preloaded melody or a recorded sound file to your message. • Erase — Lets you remove a melody or sound file from your message. 7. Once you’re finished composing your message, press the Next (right) soft key ( ).
Message Send Options 6. Complete and send your new Handwritten Pic message. See “Creating and Sending a Picture Message” on page 66 for more information. Message Send Options You can set priority, validity, and other options before you send a message. 1. After you’ve composed a message and pressed the OK key (for text messages) or the Next (right) soft key ( ) (for picture and handwritten messages), you’re returned to the New Message/SEND NEW menu. 2.
• Press the View (right) soft key ( ) to open the message, your call remains connected. Voicemail Voicemail allows callers to leave voice messages in your voice mailbox, and lets you review, play, and delete your voice messages any time you are in a network coverage area. Voicemail Setup Before callers can leave voice mail messages, you must first set up your account. See “Setting Up Your Voice Mail” on page 11 for more information. Check your Voicemail 1.
Message Folders • Save Contact — Save the sender’s number to your Contacts. • Save Media — Save any audio and/or image files. 5. Use the navigation keys to highlight an option. Press the OK key to perform the function for the highlighted option. Outbox Your phone stores outgoing messages in the Outbox, regardless of whether the message was successfully transmitted to, or received by, the addressee.
4. Press the left soft key ( ) Options, to display the options listed. • T9 Word / Alpha / Symbol / Number — Set the text entry mode. • Text Format — Change the size, alignment, and appearance of the message text. • Add Media — Add a picture, an image, and/or a sound file to the message. • Quick Text — Add precomposed text to the message. 5. Use the navigation keys to highlight the desired option. 6. Press the OK key to perform the function for the highlighted option. 7.
Message Folders 3. Change, compose, and send the picture message. (For more information, see “Creating and Sending a Picture Message” on page 66.) Voicemail New voice messages in your voice mailbox are logged in the Voicemail folder of the Messages menu. Open the Voice Mail folder to view the Callback # (if available), Urgency, and other details of new voice mail messages. 1. In standby mode, press the MESSAGE (right) soft key ( ), then press (for Voicemail).
Message Settings The Msg Settings folder lets you define numerous message settings such as ringer types and save options. 1. In standby mode, press the MESSAGE (right) soft key ( ), then press (for Msg Setting). The following Msg Setting sub-menus appear in the display: • Text Msg — Settings that apply to text messages. • Pic Msg — Settings that apply to picture messages. • General — Settings that apply to all messages. 2. Use the navigation keys to highlight the desired sub-menu.
Deleting Messages - Block Sender — Block or Unblock messages from a specified web address or phone number, and View the List of Blocked senders. 3. Use the navigation keys to highlight the desired option. Press the OK key to adjust the selected message setting. Deleting Messages You can erase all of the messages in each/all of your message folders from one convenient location. Note: This function erases all messages in a selected message folder or in all message folders.
Section 8: Axcess Shop Topics Covered • Axcess Shop Options • Axcess Shop Settings • Axcess Shop Help This section explains the Axcess Shop features where users can download multimedia, applications, games, and check news and sports.
Axcess Shop Options Axcess Shop Options With Axcess Shop, you can download full featured applications over the air including games, personalized ring tones, pictures, and more. Send and receive instant messages and email, or browse the web to catch up on all the latest news. 1. In standby mode, press the Right navigation key to launch Axcess Shop. The Axcess Shop menu appears in the display with the Axcess Shop icon ( ), highlighted. 2. Press OK . "Browsing online and downloading apps uses airtime.
2. At the Axcess Shop menu, press the Right navigation key once to highlight the Settings icon ( ), then press OK . The following options appear in the display: • Order Apps — Download applications over the network. • Move Apps — Move previously downloaded applications between available folders. • Manage Apps — Allow you to manage previously downloaded applications. • Main Menu View — Select whether you wish to view the main Axcess Shop menu in a list or icon format.
Axcess Shop Help Charges Charges will apply for network connections. A network connection is used when you are browsing the Axcess Shop, downloading and restoring apps, or cancelling subscription apps. Charges will also apply when you use apps that require network connections, such as downloading information and sending text messages. Cancelling Subscription To cancel a subscription to an app: 1. In standby mode, press the Right navigation key to launch Axcess Shop.
Disabled Apps You can install new apps even if the memory of your phone is full by partially removing (disabling) apps you haven’t used recently. When you need to use a disabled app, you can restore it at no additional purchase cost. Restoring Apps Disabled apps can be quickly restored at no additional purchase cost. To restore an app, run the application you want to restore from the Main Menu. You will be guided through the restoration process.
Section 9: Camera Topics Covered • Taking Pictures • The Photo Gallery Use your Alltel Snap phone to take full color digital pictures, display them on your phone’s vivid color display, and instantly share them with family and friends. It’s fun, and as easy to use as a traditional point-and-click camera. Depending on the resolution you choose, you can save dozens of pictures in your phone’s memory. This section explains how you can do the following: • Take pictures with your phone’s built-in digital camera.
Taking Pictures Taking pictures with the built-in camera is as simple as choosing a subject, pointing the lens [located on the outside of the folder (above the external display)], and pressing a button. Simple Snap Shot To take a single picture using the current camera settings, do the following: 1. In standby mode, press and hold the Camera key ( ) on the right side of the phone. The message “Camera Starting...” followed by a camera viewfinder screen appears in the display.
Taking Pictures 6. Press the OK key to send the Picture message to the intended recipient(s). Camera Screen When you activate your phone’s camera, the first and second lines of the display are reserved for the current camera setting and option icons. The center of the display shows a viewfinder image of the subject at which the camera is pointed. The soft key labels on the bottom line of the display change to the following: • Option — Pressing the left soft key ( ) opens a pop-up menu of camera options.
Counter — Indicates the remaining number of pictures you can take (up to 200). Multi Shot — Indicates the Multi Shot option is active and that you will take and save multiple pictures of the current subject in quick succession when you press the Camera key ( ) or the OK key. The number of pictures taken depends upon the Resolution setting (High = 3 shots, Med = 5 shots, Low = 7 shots).
Taking Pictures 2. Use the Up and Down navigation keys to change the Brightness setting and to brighten or darken the image. 3. When the image is at the desired brightness, press the Camera key ( OK key or the ) to take the picture. Camera Options The Camera Options let you temporarily override your default camera settings. Any settings you change using the Camera Options only apply to the current picture, to the current camera session, or until you make another change using the Camera Options.
1. In camera mode, press the Option (left) soft key ( ), then press for Resolution. The following options appear in the display: • High • Medium • Low 2. Use the Up and Down navigation keys to highlight the desired resolution. @ 3. Press the OK key to save the selected setting. You’re returned to the Settings menu. Note: The Zoom setting is affected by the Resolution setting (camera mode). When Resolution is set to High no zoom is available.
Taking Pictures press the OK key). Off and On options appear in the display. 2. Use the navigation keys to highlight On, then press the OK key. The camera viewfinder screen appears in the display. Note: When Multi Shot is set to On, the multi shot progress bar appears in the display in camera mode. The next time you press the Camera key ( takes several pictures in rapid succession.
1. In camera mode, press the Option (left) soft key ( ), then press for Color Tones (or use the navigation keys to highlight Color Tones, then press the OK key). The name of the current Color Tone appears in the top line of the display. jkl 2. Use the Left and Right navigation keys to show the various Color Tones and the effects they have on a picture. 3. When you decide on the Color Tone you wish to use, press the Select (left) soft key ( ) or the OK key.
Taking Pictures • Fine • Normal • Economy 2. Use the navigation keys to highlight the desired quality setting. 3. Press the OK key. You’re returned to the Settings menu. Shutter Sound The Shutter Sound setting lets you choose the sound our phone plays whenever you take a picture. Aside from being a cool sound effect, Shutter Sound acts as an audible reminder that your camera has taken a picture. 1. In camera mode, press the Option (left) soft key ( ), then press for Shutter Sound.
The Photo Gallery Saved pictures are stored in the Photo Gallery. You can browse the Photo Gallery one picture at a time (expanded mode), or view several pictures at once in thumbnail format. 1. In standby mode, briefly press the Camera key ( ). The following options appear in the display: • Take a Photo — Activates your phone’s camera and lets you take individual photos and multiple photos (multi shots). • Photo Gallery — Lets you view and manage your saved photos. 2.
The Photo Gallery Switch From Expanded to Thumbnail Mode 1. Once you’ve found a picture that you wish to view full size, press the Expand (right) soft key ( ). 2. While viewing pictures in the picture gallery, press the Thumb. (right) soft key ( ) to view several smaller pictures at a time.
Section 10: Axcess Web Topics Covered • Axcess Web Operations • Launch Axcess Web • Exit Axcess Web • Navigate the Web • Axcess Web Soft Keys • Using Links • How Axcess Web Keys Work Your phone is equipped with a WAP (Wireless Application Protocol) browser which allows you to access Internet specified for mobile phones. This section explains how to access the Axcess Web services of your Wireless Provider and navigate the WAP browser.
Axcess Web Operations Axcess Web Operations • Each time you launch Axcess Web, your phone connects to the Internet and the service indicator icon ( ) appears in the display. • Axcess Web ends your Internet connection after a certain period of inactivity; however, some information from your session remains stored in the phone (while your phone turned on).
Axcess Web Soft Keys At the bottom of the Axcess Web display is a bar that contains browser commands. The left ( ) and right ( ) soft keys on the keypad are used to execute the commands that appear above them in the display. These are called “soft keys” because their function changes depending on the application. Using Links Links have several purposes, such as jumping to a different page, to a different site, or even initiating a phone call. Links are shown inside of brackets ([...]).
How Axcess Web Keys Work Key Name End Key Press to exit the Axcess Web and return the phone to idle mode. Left Soft Key Press to activate the command that appears above it in the display. Right Soft Key Press to activate the command that appears above it in the display. Send Key Press to dial a highlighted number.
Section 11: Gallery Topics Covered • Gallery • Using Image Gallery • Using Melody Gallery This section outlines Gallery and key features associated with Gallery.
Gallery Gallery 1. In standby mode, press the MENU (left) soft key ( ), then press for Gallery. The following Gallery sub-menus appear in the display: • Image Gallery — Lets you choose the multi-media or pictures that appear in your phone’s display. • Melody Gallery — Lets you assign melody tones for calls, alarms, and other alerts. 2. Use the navigation keys to highlight a sub-menu. mno 3. Press OK to enter the highlighted sub-menu.
5. Use the navigation keys to highlight Assign and press the OK key. The following options appear in the display: • Wallpaper — Choose the graphic or animation that appears in your display when the phone is in standby mode. • Opening — Choose the animation that appears in your display when you turn on your phone. • Closing — Choose the animation that appears in you display when you turn off your phone. • Contacts — Choose the graphic or animation that appears in the display when selected contacts calls.
Using Melody Gallery Using Melody Gallery Melody Gallery lets you assign ringer types and melody tones for calls, alarms, and other alerts. Note: In analog mode, the phone plays the Bell 2 ringtone in place of any assigned MP3 or QCP type ringtones; including the Preloaded ringtone, Bell 1. 1. In standby mode, press the MENU (left) soft key ( (for Gallery) and abc ), then press mno for Melody Gallery. 2.
If Alarm is selected additional options appear in the display. Proceed to Step 6. • Alarm 1 • Alarm 2 • Alarm 3 6. Use the navigation keys to highlight an option and press the OK key. 7. Press the Back (right) soft key ( the END ) to return to previous menu or press key to return to standby mode. Melody Gallery Options Note: In analog mode, the phone plays the Bell 2 ringtone in place of any assigned MP3 or QCP type ringtones; including the Preloaded ringtone, Bell 1.
Section 12: Tools Topics Covered • Tools Menu • Voice Kit • Today • Calendar • To Do List • Alarm Clock • Memo Pad • World Time • Calculator • Count Down This section explains how to use your phone’s digital assistant functionality to schedule events, set reminders, create a “to do” list, perform calculations, and more.
Tools Menu Tools is a suite of Personal Digital Assistant (PDA) applications such as a Calendar, To Do List, and Memo Pad that run on your phone. You can use your phone to schedule events, set reminders, create a to do list, perform calculations, and more with the functions provided by this useful feature. Opening Tools Menu 1. In standby mode, press the MENU (left) soft key ( ), then press for Tools.
Voice Kit Also see “Making a Call — Voice Dialing” on page 26 and “Voice Method” on page 56 for more information. • Voice Memo — Lets you record, review, and erase voice memos. • TTS — Text To Speech — Lets you enable or disable spoken main menu options. • Voice Setting — Lets you tailor VoiceSignal to better respond to your voice and your phone use preferences. 2. Use the navigation keys to highlight the desired sub-menu, then press OK .
Note: Speaking clearly, say the command that you want to use. If, after a few seconds, the device has not recognized a command, it prompts you to repeat the command. If, after a few more seconds, it still has not recognized a command, it tells you “Sorry, no match found,” and cancels voice recognition. Voice Command Tips: • Make sure you wait for the beep before speaking. • Speak clearly at a normal volume, as if you were talking on the phone.
Voice Kit 4. Press the Play (right) soft key ( ) to review the newest memo. 5. For other options, press the Option (left) soft key ( ). The following options appear in the display: • Erase — Erase a selected voice memo. • Erase All — Erase all voice memos. • Edit Caption — Change the name assigned to a selected voice memo. • Info — Shows the Memo Title, Length and Size, and date and time Recorded for a selected voice memo. 6. Use the navigation keys to highlight an option.
2. Use the navigation keys to highlight TTS On, then press the OK key to save and exit. Voice Setting Voice Setting lets you tailor VoiceSignal to better respond to your voice and your phone use preferences. To access your phone’s voice settings, do the following: 1. In standby mode, press the MENU (left) soft key ( ), then press (for Tools), (for Voice Kit), and for Voice Setting.
Voice Kit Tips for Adapting Digit Dialing • Use Adapt Digits in a quiet place. • Make sure you wait for the beep before starting to speak. • Speak clearly, and say each digit distinctly. • If you make a mistake while recording a sequence of digits, or if there is an unexpected noise that spoils the recording, re-record that sequence. • Only adapt digits if you are regularly having problems with digit dialing. Once you adapt, digit dialing will not work as well for other people using your phone.
Reset Digits To reset digit dialing to factory default settings, do the following: 1. In standby mode, press the MENU (left) soft key ( ), then press (for Tools), (for Voice Kit), (for Voice Setting), and for Digit Dialing. The following options appear in the display: • Adapt Digits • Reset Digits 2. Use the navigation keys to highlight Reset Digits, then press the OK key. The phone prompts you to confirm digit reset. @ ghi tuv @ 3.
Voice Kit To change the way VoiceSignal uses choice lists: 1. In standby mode, press the MENU (left) soft key ( (for Tools), Choice Lists. @ (for Voice Kit), ghi ), then press (for Voice Setting), and for tuv def 2. Use the navigation keys to highlight Name Dialing, Digit Dialing, or Contacts, then press the OK key. 3.
• Voice Key or Flip Open — Press the key to activate VoiceSignal for repeated calls. Open and close folder to make and end calls using Voice Kit. Press to release VoiceSignal. • Voice Key or EarMic — Attach a headset to your phone. Press the key to activate VoiceSignal. Now, you can make and end calls using VoiceSignal by pushing the button on the headset. 2. Use the navigation keys to highlight the option you want, then press the OK key to save and exit.
Calendar 3. Press the Option (left) soft key ( ). A pop-up menu containing the following text entry mode options appears in the display: • T9 Word • Alpha • Symbol • Number Note: The current mode of text entry is indicated in the lower right of the display. See “Text Entry Modes” on page 47 for more information on text entry modes. 4. Use the navigation keys to highlight the entry mode that you wish to use and press the OK key, or press the BACK key to exit the pop-up menu. 5.
2. Use the navigation keys to move around within the calendar. • • • • Press the OK key to open the highlighted date. Press the volume up key ( ) to view previous months. Press the volume down key ( ) to view future months. Press the Option (left) soft key ( ) while viewing the calendar to display the following options. - View — View events for any date surrounded by a box. - Add new — Add a new event for the date. - Jump To Date — Lets you jump to any date you specify.
Alarm Clock 2. Use the navigation keys to browse tasks in your To Do List. Events are presented in order of priority. 3. Press the Option (left) soft key ( ) while viewing your To Do List. A pop-up menu containing the following options appears in the display: • Add new — Add new task to the To Do List. • Edit — Edit the task currently appearing in the display. • Erase — Erase the task currently appearing in the display. • Erase All — Erase all tasks from your To Do List. 4.
When an Alarm Sounds An animated alarm clock appears in the display and an alert sounds when the specified time for the alarm arrives. 䊳 Press any key to silence the alarm. • If the alarm was set as Once, the alarm icon disappears from the top of the display. • If the alarm was set as Daily, the alarm icon remains in the top of the display. • If the alarm was set as Mon-Fri, the alarm icon remains in the top of the display.
World Time 3. Enter a memo using the keypad. (See “Entering Text” on page 46 for more information.) 4. Press the Option (left) soft key ( ). A pop-up menu containing the following text entry mode options appears in the display: • T9 Word • Alpha • Symbol • Number 5. Use the navigation keys to highlight the entry mode that you wish to use and press the OK key, or press the key to exit the pop-up menu. BACK 6. When you’re finished entering details for the memo, press the OK key. The memo is stored.
2. Use the navigation keys to display the city and time that you wish to view. The following cities/time zones are supported: • New York • Caracas • Brasilia • Mid Atlantic • Cape Verde • London • Paris/Berlin • Athens/Helsinki • Moscow • Abu Dhabi • Tashkent • Alma-ata • Bangkok/ • Hongkong/Beijing • Seoul/Tokyo • Guam/Sydney • Okhotsk • Wellington • Samoa/Midway • Honolulu, Hawaii • Alaska • San Francisco • Denver/Arizona • Chicago/Mexico Jakarta 3.
Count Down 5. Press the OK key to perform the calculation and view the result. Count Down Count Down lets you view the amount of time between the current date and any event that you wish to schedule. You can create up to twenty Count Down events. 1. In standby mode press the MENU (left) soft key ( (for Tools) and wxyz ), then press tuv for Count Down. Note: If you have multiple Count Down timers, the event that is scheduled closest to the current date appears in the display.
Event details, including the days, hours and minutes left until the occurrence of the scheduled event appear in the display. The day, date, and time of the scheduled event appear in the bottom of the display. 3. Press the Option (left) soft key ( ), while viewing your memos. A popup menu displays with the options listed. • Add new — Add anew event to Count Down. • Edit — Edit the event currently appearing in the display. • Erase — Erase the event currently appearing in the display.
Section 13: Changing Your Settings Topics Covered • Display Settings • Sounds Settings • Call Options • Network Settings • Clock Set • Language • Security Settings • Location Setting • Airplane Mode • Phone Info This section explains how to customize your phone to suit your needs and preferences.
Display Settings Using the Display menu, you can set the menu style, set the standby mode animation, customize the backlight settings, and more. 1. In standby mode, press the MENU (left) soft key ( ), then press (for Settings) and for Display. The following options appear in the display: • Menu Style — Lets you choose the main menu style. • Animation — Lets you choose the media that displays on your phone when you turn it on, turn it off, and while in standby mode.
Display Settings Animation Animation lets you choose the multi-media or pictures that appear in your phone’s display when you turn it on, turn it off, and while in standby mode (wallpaper). 1. In standby mode, press the MENU (left) soft key ( ), then press (for Settings) and (for Display), and for Animation. The following options appear in the display. • Wallpaper — Choose the graphic or animation that appears in your display when the phone is in standby mode.
1. In standby mode, press the MENU (left) soft key ( (for Settings) and Note: Press and hold @ (for Display), and def ), then press for Banner. wxyz to erase an existing banner, if necessary. BACK 2. Enter a word or short phrase to appear in your phone’s display while in standby mode (Up to 12 characters). 3. Press the OK key to save the new banner.
Display Settings 2. Use the Left and Right navigation keys to adjust the contrast for the front display (0 – 50), then press the OK key to save your setting.
Auto Hyphen Auto Hyphen automatically hyphenates phone numbers as they are entered. Example: If you enter “5804370000”, “580-437-0000” appears in the display. 1. In standby mode, press the MENU (left) soft key ( ), then press (for Settings) and (for Display), and for Auto-Hyphen. The following options appear in the display: • Off • On 2. Use the navigation keys to highlight the desired setting. wxyz mno @ 3. Press the OK key to save the setting.
Sounds Settings Theme Color Theme Color lets you select the color your phone uses to highlight menu items and scroll bar positions. 1. In standby mode, press the MENU (left) soft key ( ), then press (for Settings) and (for Display), and for Theme Color. The following options appear in the display: • Pattern 1 • Pattern 2 • Pattern 3 2. Use the navigation keys to highlight the desired setting, then press the OK key to save the setting.
Ringer Type You can assign ringer types and melody tones for calls, alarms, and other alerts, in the Ringer Type sub-menu. Note: In analog mode, the phone plays the Bell 2 ringtone in place of any assigned MP3 or QCP type ringtones; including the Preloaded ringtone, Bell 1. Assigning Calls and Alarm Ringer Types 1. In standby mode, press the MENU (left) soft key ( ), then press (for Settings), (for Sounds), and for Ringer Type.
Sounds Settings Assigning Messages, Data, and Calendar Ringer Types Note: In analog mode, the phone plays the Bell 2 ringtone in place of any assigned MP3 or QCP type ringtones; including the Preloaded ringtone, Bell 1. 1. In standby mode, press the MENU (left) soft key ( ), then press (for Settings), (for Sounds), and for Ringer Type.
3. Use the volume keys or the navigation keys to set the volume level for keypad tones. A tone sounds as you increase or decrease the volume setting. 4. Press the OK key when the desired key beep volume setting is reached. You’re returned to the Key Beep sub-menu. Key Beep Tone Length 1. While in the Key Beep menu, use the navigation keys to highlight Tone Length, then press the OK key. 2. Use the navigation keys to highlight Long or Normal. 3. Press the OK key to save your settings.
Call Options 1. In standby mode, press the MENU (left) soft key ( (for Settings), abc (for Sounds), and pqrs ), then press for Power On/Off. 2. Use the navigation keys to highlight Off or On, then press OK wxyz . Roam Ringer Set your phone to sound a unique tone when a call is received outside your home service area. This feature is set to Off by default. 1. In standby mode, press the MENU (left) soft key ( (for Settings), abc (for Sounds), and tuv ), then press for Roam Ringer. 2.
Auto Answer Auto Answer enables your phone to automatically answer calls after a period of time that you specify. 1. In standby mode, press the MENU (left) soft key ( ), then press (for Settings), (for Call Options), and for Auto Answer. The Auto Answer sub-menu with the following options appears in the display: • Off • After 5 sec • After 3 sec • After 1 sec 2. Use the navigation keys to highlight the desired setting, then press OK .
Call Options 2. Use the navigation keys to highlight Auto Detect, then press the OK key. The following options appear in the display: • Data off — No incoming data calls accepted. • Data for next call — Wait for data call for the next 10 minutes. • Data until powered off — Data calls only, no voice calls accepted, until you power the phone off and on again. 3. Use the navigation keys to highlight the Auto Detect option you want, then press the OK key. The Data menu appears in the display.
• No — Returns you to the Call Options menu. The No option is highlighted. 2. To change the TTY mode setting, use the navigation keys to highlight the Yes option, then press the OK key. The following options appear in the display: • TTY Full — Enables TTY mode and disables microphone and earpiece. • TTY + TALK — Enables TTY mode and microphone. • TTY + HEAR — Enables TTY mode and earpiece. • TTY OFF — Disables TTY mode. The current TTY Mode setting is highlighted. 3.
Language 3. Use the up/down navigation keys to highlight the Time setting. 4. Enter the time using the keypad and navigation keys. 5. Use the up/down navigation keys to highlight the Date setting. 6. Enter the date using the keypad and navigation keys. 7. Press OK to save your settings. Note: In digital service mode, the Clock Set feature is disabled. The network adjusts time and date automatically.
• On power up — The phone locks automatically the next time your phone is powered ON and stays locked until you enter the lock code. • Now — The phone locks immediately and stays locked until you enter the locked code. 3. Use the navigation keys to highlight the Lock Phone option of your choice. 4. Press the OK key to perform the function for the highlighted option. Change Lock The default lock code for your phone is generally the last four digits of your phone number.
Security Settings Important!: DO NOT depend on this phone as a primary method of calling 911 or for any other essential or emergency communications. Remember to always turn your phone on and check for adequate signal strength before placing a call. Store Emergency Numbers 1. In standby mode, press the MENU (left) soft key ( (for Settings) and code. pqrs ), then press for Security. You’re prompted to enter the lock wxyz Tip: The default lock code is the last four digits of your telephone number. 2.
Restriction Restriction lets you restrict the use of your phone for outgoing and incoming calls. You can allow all calls, allow no calls, or allow only calls to or from your Contacts. 1. In standby mode, press the MENU (left) soft key ( (for Settings) and code. pqrs ), then press for Security. You’re prompted to enter the lock wxyz Note: The default lock code is the last four digits of your telephone number. 2. Enter the lock code, then press jkl for Restriction. 3.
Location Setting 2. Enter the lock code, the press for Reset Phone. A prompt appears in the display asking if you wish to restore default settings (except for the Contacts and Voice Dial). pqrs 3. Use the navigation keys to highlight Yes or No, then press OK . Location Setting This function identifies your location to the network via the Global Positioning System (GPS). You can set this function for continuous operation or to operate only in the event that you dial 911.
Version You can view both the software and hardware version of your phone using this feature. This feature is helpful if you need to contact Customer Service. 1. In standby mode, press the MENU (left) soft key ( (for Settings), (for Phone Info), and @ ), then press for Version. wxyz Your phone’s hardware and software information appears in the display. 2. Press OK to return to the Phone Info menu. Phone Number My Phone# displays the ten-digit number assigned to your phone by your Wireless Provider.
Section 14: Health and Safety Information Topics Covered • Health and Safety Information Health and Safety Information 139
Health and Safety Information Exposure to Radio Frequency (RF) Signals Certification Information (SAR) Your wireless phone is a radio transmitter and receiver. It is designed and manufactured not to exceed the exposure limits for radio frequency (RF) energy set by the Federal Communications Commission (FCC) of the U.S. government.
UL Certified Travel Adaptor The FCC has granted an Equipment Authorization for this mobile phone with all reported SAR levels evaluated as in compliance with the FCC RF exposure guidelines. The maximum SAR values for this model phone as reported to the FCC are: • Head: 1.39 W/kg • Body-worn: 0.522 W/kg SAR information on this and other model phones can be viewed on-line at www.fcc.gov/oet/ea/.
the short distance between the phone and the user's head. These RF exposures are limited by Federal Communications Commission safety guidelines that were developed with the advice of FDA and other federal health and safety agencies. When the phone is located at greater distances from the user, the exposure to RF is drastically lower because a person's RF exposure decreases rapidly with increasing distance from the source.
Consumer Information on Wireless Phones • “Cooperate in providing users of wireless phones with the best possible information on possible effects of wireless phone use on human health. FDA belongs to an interagency working group of the federal agencies that have responsibility for different aspects of RF safety to ensure coordinated efforts at the federal level.
Three large epidemiology studies have been published since December 2000. Between them, the studies investigated any possible association between the use of wireless phones and primary brain cancer, glioma, meningioma, or acoustic neuroma, tumors of the brain or salivary gland, leukemia, or other cancers. None of the studies demonstrated the existence of any harmful health effects from wireless phones RF exposures.
Consumer Information on Wireless Phones wireless phone safety. FDA provides the scientific oversight, obtaining input from experts in government, industry, and academic organizations. CTIA-funded research is conducted through contracts to independent investigators. The initial research will include both laboratory studies and studies of wireless phone users. The CRADA will also include a broad assessment of additional research needs in the context of the latest research developments around the world.
Do hands-free kits for wireless phones reduce risks from exposure to RF emissions? Since there are no known risks from exposure to RF emissions from wireless phones, there is no reason to believe that hands-free kits reduce risks. Hands-free kits can be used with wireless phones for convenience and comfort. These systems reduce the absorption of RF energy in the head because the phone, which is the source of the RF emissions, will not be placed against the head.
Road Safety wireless phone EMI. FDA has tested wireless phones and helped develop a voluntary standard sponsored by the Institute of Electrical and Electronic Engineers (IEEE). This standard specifies test methods and performance requirements for hearing aids and wireless phones so that no interference occurs when a person uses a compatible phone and a compatible hearing aid at the same time. This standard was approved by the IEEE in 2000.
redial. If available, these features help you to place your call without taking your attention off the road. 2. When available, use a hands-free device. If possible, add an additional layer of convenience and safety to your wireless phone with one of the many hands free accessories available today. 3. Position your wireless phone within easy reach. Be able to access your wireless phone without removing your eyes from the road.
Operating Environment For more information, please call 1-888-901-SAFE, or visit our web-site http:// www.ctia.org/ Provided by the Cellular Telecommunications & Internet Association Operating Environment Remember to follow any special regulations in force in any area and always switch your phone off whenever it is forbidden to use it, or when it may cause interference or danger. When connecting the phone or any accessory to another device, read its user's guide for detailed safety instructions.
Hearing Aid Compatibility with Mobile Phones When some mobile phones are used near some hearing devices (hearing aids and cochlear implants), users may detect a buzzing, humming, or whining noise. Some hearing devices are more immune than others to this interference noise, and phones also vary in the amount of interference they generate.
Potentially Explosive Environments regarding your vehicle. You should also consult the manufacturer of any equipment that has been added to your vehicle. Posted Facilities Switch your phone off in any facility where posted notices require you to do so. Potentially Explosive Environments Switch your phone off when in any area with a potentially explosive atmosphere and obey all signs and instructions. Sparks in such areas could cause an explosion or fire resulting in bodily injury or even death.
first need to deactivate those features before you can make an emergency call. Consult this document and your local Wireless Provider. When making an emergency call, remember to give all the necessary information as accurately as possible. Remember that your phone may be the only means of communication at the scene of an accident; do not cut off the call until given permission to do so. Restricting Children's access to your Phone Your phone is not a toy.
Product Performance • Do not store or carry flammable liquids, gases or explosive materials in the same compartment as the phone, its parts or accessories. • For vehicles equipped with an air bag, remember that an air bag inflates with great force. Do not place objects, including both installed or portable wireless equipment in the area over the air bag or in the air bag deployment area. If wireless equipment is improperly installed and the air bag inflates, serious injury could result.
• Hold the phone with the antenna raised, fully-extended and over your shoulder. • Try not to hold, bend or twist the phone's antenna. • Don't use the phone if the antenna is damaged. • Speak directly into the phone's receiver. • Avoid exposing your phone and accessories to rain or liquid spills. If your phone does get wet, immediately turn the power off and remove the battery. If it is inoperable, call Customer Care for service.
Samsung Mobile Products and Recycling • Do not leave the battery in hot or cold places, such as in a car in summer or winter conditions, as you will reduce the capacity and lifetime of the battery. Always try to keep the battery at room temperature. A phone with a hot or cold battery may temporarily not work, even when the battery is fully charged. Li-ion batteries are particularly affected by temperatures below 0 °C (32 °F). • Do not short-circuit the battery.
• Do not store the phone in cold areas. When the phone warms up to its normal operating temperature, moisture can form inside the phone, which may damage the phone's electronic circuit boards. • Do not drop, knock or shake the phone. Rough handling can break internal circuit boards. • Do not use harsh chemicals, cleaning solvents or strong detergents to clean the phone. Wipe it with a soft cloth slightly dampened in a mild soap-and-water solution. • Do not paint the phone.
Section 15: Warranty Information Topics Covered • Standard Limited Warranty Warranty Information 157
Standard Limited Warranty What is Covered and For How Long? SAMSUNG TELECOMMUNICATIONS AMERICA, LLC (“SAMSUNG”) warrants to the original purchaser (“Purchaser”) that SAMSUNG's Phones and accessories (“Products”) are free from defects in material and workmanship under normal use and service for the period commencing upon the date of purchase and continuing for the following specified period of time after that date: Phone Batteries Leather Case/ Pouch Holster Other Phone Accessories 1 Year 1 Year 90 Days 90
Standard Limited Warranty receipt or comparable substitute proof of sale showing the date of purchase, the serial number of Product and the sellers' name and address. To obtain assistance on where to deliver the Product, call Samsung Customer Care at 1-888-987-4357. Upon receipt, SAMSUNG will promptly repair or replace the defective Product.
KIND RESULTING FROM THE PURCHASE, USE, OR MISUSE OF, OR INABILITY TO USE THE PRODUCT OR ARISING DIRECTLY OR INDIRECTLY FROM THE USE OR LOSS OF USE OF THE PRODUCT OR FROM THE BREACH OF THE EXPRESS WARRANTY, INCLUDING INCIDENTAL, SPECIAL, CONSEQUENTIAL OR SIMILAR DAMAGES, OR LOSS OF ANTICIPATED PROFITS OR BENEFITS, OR FOR DAMAGES ARISING FROM ANY TORT (INCLUDING NEGLIGENCE OR GROSS NEGLIGENCE) OR FAULT COMMITTED BY SAMSUNG, ITS AGENTS OR EMPLOYEES, OR FOR ANY BREACH OF CONTRACT OR FOR ANY CLAIM BROUGHT AGAINS
Standard Limited Warranty whether oral or written, do not constitute warranties by SAMSUNG and should not be relied upon. Samsung Telecommunications America, LLC 1000 Klein Street Plano, Texas 75074 Phone: 1-800-SAMSUNG Phone: 1-888-987-HELP (4357) ©2007 Samsung Telecommunications America, L.L.C. Samsung is a registered trademark of Samsung Electronics Co., Ltd. and its related entities. No reproduction in whole or in part allowed without prior written approval.
Index A Adjust ringer setting 22 Apps Buying New 78 Demo Apps 79 Disabled Apps 80 Expired Apps 80 Removing Apps 79 Restoring Apps 80 Axcess Shop 76 Help 78 Options 77 Settings 77 Axcess Web Exit 93 Launch Axcess Web 93 Navigate 93 Operations 93 Soft Keys 94 Using Links 94 B Battery 8 charging 10 Low battery indicator 11 removal 10 Travel adapter 10 C Call Answer mode 20 Call Functions 23 Adjusting the Call Volume 29 Answering a Call 28 Call Log 29 162 Making a Call — Number Entry Dialing 24 Making a Call
Banner 121 Contrast 122 Dial Digits 124 Dial Screen 124 Menu Style 120 E Emergency Calls 24 End key 16 Entering Text 46 Alpha (Abc) Mode 48 Entering Numbers 50 Entering Symbols 49 Entering Upper and Lower Case Letters 49 Text Entry Modes 47 Erase memos 105 G Gallery 96 Image 97 Melody 99 Gallery, Photo 90 Getting Started 7 Activating Your Phone 8 Understanding this User Manual 8 Voicemail 11 H Health and Safety Information 139 I In Use Menu Outline 39 Input mode 21 International Calls 24 L Language 133
Notes, description 8 Number Entry Dialing 24 O OK key 16 Open View of Your Phone 14 P Personal Organizer Alarm Clock 113 Calculator 116 Calendar 111 Count Down 117 Memo Pad 114 Today 110 To-Do List 112 Voice Memo 104 World Time 115 Phone Info 137 Phone Number 138 Version 138 Phone Modes 33 Phone Number 138 Photo Gallery 90 Pictures sending 82 zooming in 84 R Record memos 104 Resolution, notes about 84 86 Retrieving New Messages 69 Right soft key 16 Roaming 36 , S Safe Use of your phone 141 Security Set
Voicemail 70 VoiceSignal About VoiceSignal 110 Voice Memos 104 T Take pictures with flip open 82 Taking pictures 82 Talk mode 22 Timer, camera 86 Tip, description 8 Tools 101 Tools Menu 102 W Warranty Information 157 Web 92 Z Zooming, pictures 84 U Understanding Your Contacts 51 Adding a New Contact Entry 52 Deleting a Contact Entry 63 Editing an Existing Contact Entry 59 Finding a Contact Entry 56 Memory 63 Pauses 53 Understanding Your Phone 12 Closed View of Your Phone 13 Command Keys 14 15 Display S