
Instruction manual


COLOR CCD CAMERACOLOR CCD CAMERA User’s ManualUser’s Manual
1716
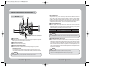
Connection
3. Remove the cover from the iris lens plug supplied, and solder the lens
cable to the plug as shown below.
4. Remove the protective cap, and attach the lens to the
camera by turning clockwise.
5. Connect the lens plug to the auto iris
connector on the right side of the
camera.
6. Set the DC/VIDEO selection switch to DC or VIDEO
according to the type of the lens.
• Video type :
No. 1 Pin --- Red (Power source)
No. 2 Pin --- N.C
No. 3 Pin --- White (Video signal)
No. 4 Pin --- Black (GND)
•DC type :
No. 1 Pin --- Damping -
No. 2 Pin --- Damping +
No. 3 Pin --- Drive +
No. 4 Pin --- Drive -
No. 3 Pin
No. 1 Pin
connector
Lens cable
No. 4 Pin
No. 2 Pin
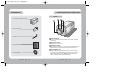
After removing the protecting cap, attach the lens into the
camera by turning clockwise.
1. Remove the protecting cap and C- mount adaptor.
2. Attach the lens into the camera by turning clockwise.
Installing C-Mount Lens
Installing CS-Mount Lens
• Use the lens under the specification as shown. Otherwise the lens can damage the camera
or abnormal fixing may result.
Notes
• A heavy lens may disturb the balance with the camera and
possibly result in damage. Don't use a lens heavier than
450g.
• It is recommended to set the lens ALC mode to Av mode
(Average). Pk mode can be occurred hunting.
C-mount lens : 10mm or less
CS-mount lens : 5 mm or less
C-mount lens adaptor
C-mount lens adaptor
CS-mount lens adaptor
Protecting cap
SDC-313,243(영) 2003.6.26 5:1 PM 페이지16