SGH-i907 Series S M A R T P H O N E User Manual Please read this manual before operating your phone, and keep it for future reference.
Intellectual Property All Intellectual Property, as defined below, owned by or which is otherwise the property of Samsung or its respective suppliers relating to the SAMSUNG Phone, including but not limited to, accessories, parts, or software relating there to (the “Phone System”), is proprietary to Samsung and protected under federal laws, state laws, and international treaty provisions.
The Bluetooth® word mark, figure mark (stylized “B Design”), and combination mark (Bluetooth word mark and “B Design”) are registered trademarks and are wholly owned by the Bluetooth SIG. microSD™ and the microSD logo are Trademarks of the SD Card Association.
Table of Contents Section 1: Getting Started ..............................................4 Understanding this User Manual . . . . . . . . . . . . . . . . . . . . . . . . 4 Preparing Your Phone . . . . . . . . . . . . . . . . . . . . . . . . . . . . . . . . 4 Activating Your Phone . . . . . . . . . . . . . . . . . . . . . . . . . . . . . . . 10 Resetting your Phone to Factory Defaults . . . . . . . . . . . . . . . . 30 Performing a Manual Hard Reset . . . . . . . . . . . . . . . . . . . . . .
Speed Dial Contacts . . . . . . . . . . . . . . . . . . . . . . . . . . . . . . . . 55 Section 8: Messaging ................................................... 57 Types of Messages . . . . . . . . . . . . . . . . . . . . . . . . . . . . . . . . Retrieving a Message . . . . . . . . . . . . . . . . . . . . . . . . . . . . . . . Accessing Message Folders . . . . . . . . . . . . . . . . . . . . . . . . . . Configuring Message Parameters . . . . . . . . . . . . . . . . . . . . . . Sending Messages . . . . . . .
Section 15: Multimedia .............................................. 139 Accessories . . . . . . . . . . . . . . . . . . . . . . . . . . . . . . . . . . . . . 139 Storage Card Slot (microSD) . . . . . . . . . . . . . . . . . . . . . . . . . 139 Games . . . . . . . . . . . . . . . . . . . . . . . . . . . . . . . . . . . . . . . . . 140 Section 16: Health and Safety Information ............... 145 Health and Safety Information . . . . . . . . . . . . . . . . . . . . . . . .
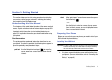
Section 1: Getting Started This section allows you to start using your phone by activating your service, setting up your voicemail, inserting your battery, and navigating from the Today screen. select – or – Understanding this User Manual Use the Stylus to select on a menu item or screen item, to launch, access, or save a highlighted menu item or screen field of interest. The chapters of this guide follow the order of the menus and sub menus. A quick reference index of features begins on page 169.
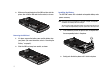
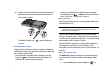
2. Make sure the gold contacts of the SIM card face into the phone, then slide the SIM card into the socket, as shown. Installing the Battery The SGH-i907 comes with a standard rechargeable battery and a power accessory. Note: This phone comes packaged with a partially-charged, rechargeable standard Li-Ion battery and travel charger. You must fully charge the battery before using your phone for the first time. A fully discharged battery requires up to 4 hours of charge time. 1.
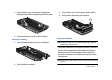
3. 4. Place the battery cover onto the back of the phone by 3. Lift the battery cover off of the phone, bottom end first. aligning the tabs with the corresponding slots in the phone. 4. Lift the battery up and away from the phone. Slide the battery cover up until it clicks into place. Removing the Battery 1. Push and hold the battery cover release latch down. Charging the Battery Note: The SGH-i907 comes with a rechargeable battery. Fully charge this battery before using your phone.
䊳 Plug the terminal end of the wall charger into the phone’s power/accessory interface connector and the other end • To display a more detailed view of the battery’s remaining power, select the battery icon ( ) ➔ Battery tab. (For more information, refer to “Battery tab - Charge state” on page 7.) into an electrical outlet. Battery Capacity When the battery becomes low, a warning window displays and the backlight turns off.
Advanced tab - Power parameters activate the Start menu. 2. Select Settings ( ) ➔ System tab ➔ Power ( ) Battery tab. The Power screen displays with the Battery tab active. The Advanced Tab allows you to set the following battery power and external power parameters for your device: 1. From the Today screen, press the Start key ( ) to activate the Start menu. 2. Select Settings ( ) ➔ System tab ➔ Power ( )➔ Advanced tab. The Power screen displays with the Advanced tab active. 3.
4. Select . If you are not finished, continue to step 5. 5. To stop the phone from turning itself off when on external has been connected for option. The check mark disappears power, within the On external power section, select the from the associated check box and the time delay setting Turn off device if not used for box. The check mark becomes inactive. 3.
Activating Your Phone If you purchased your phone at an AT&T Store, it is probably activated and ready to use. If you upgraded your phone or received a new phone by mail, it probably requires activation before you can use it. To activate your phone, follow these steps: 1. Powering On the Phone 1. key ( 2.
The Today Screen 2. 䊳 To access the Today screen from anywhere, press 3. Press and hold 2. When the voicemail system connects, enter your password and press . to dial the voicemail system. Note: Use of the key is reserved for speed dialing voicemail. To dial voicemail without using speed dial, simply dial your own phone number and when the system answers, enter your password and press . 11 1. 3.
Section 2: Customization and Navigation This section explains the menu navigation for your phone. Navigating Your PDA Your SGH-i907 provides the power of a personal computer with exceptional portability and integration of a mobile device. Unlocking its power begins with customizing the SGH-i907 so that it becomes an extension of your desktop or laptop computer. The SGH-i907 is powered by Windows Mobile 6.1 Professional, providing the power and familiarity of Microsoft Windows.
Customizing Your Today Screen Theme 1. From the Today screen, press the Start key ( 4. highlighted. activate the Start menu. ) ➔ Personal tab ➔ Today ( 2. Select Settings ( 3. Select your new theme from the list. 4. • The default theme is At&t black. Press or select to save your new settings and ). Press or select 6. From the Today screen, press the Start key ( Select Settings ( ) ➔ Personal tab ➔ Today ( 1.
3. From the Theme drop down menu, select a theme (color). 4. From the Today Text drop down menu, select a color for the Today text. 5. For Background you have two options: 6. Select a Background image. the following: 1. to “Today Plus Option Lists” on page 36. 2. Select the Use default image check box (the Select a Picture screen displays).
Showing/Hiding the Today Plus Options Lists • Tab Options: Launches the Today Plus Option screen showing the options currently assigned to the selected options list. 5. Select new options The Today Plus options lists display in the Today screen. To hide or display the options lists, do the following: 1. Activate the Today Plus menu. For more information, refer to “Today Plus Option Lists” on page 36. 2. From the Today screen, press the Start key ( ) to activate the Start menu. as desired. 3.
You can change the actions of these keys to suit your personal preferences. You can even assign these keys to act as other keys, such as the Soft keys. Example: Reassigning the Messaging key This procedure reassigns the Messaging key as a second Left soft key. 1. From the Today screen, press the Start key ( ) to activate the Start menu. 2. Select Settings ) ➔ Personal ( tab ➔ Buttons ( 3. ). Scroll and select a Special Function key from the Select a button: list. 4.
Section 3: Understanding Your Phone This section outlines many key features of your phone. It also describes the display icons, frequently used command keys, your display, and how to install your battery. Features of Your Phone Congratulations on your purchase of the Samsung SGH-i907. The SGH-i907 Microsoft software upgrade, supports thousands of applications. Using ActiveSync® 4.5 or later, you can keep your PC and device synchronized at all times.
Front View of Your Phone Key Functions 24 1. Power ON/OFF Button: Press and hold to turn the device on or off. When the device is on, a short press lights or 1 darkens the display. 23 22 2. Display: Shows all the information needed to operate your phone. Display is touch sensitive, which lets you access 2 your phone’s functions using the Stylus. 3.
6. Start key: Short press to drop down or close up the Start menu. 7. page. Press and hold to launch Microsoft Voice Send key: Short press to open the dialing screen. Press to 13. Calendar key: Short press to launch your calendar. once to access the Call History. If you press and hold the 14. Silent mode: Press and hold to place your device in silent Call History. During a call, press and hold will launch the speakerphone option. During a call, a short press will place the call on hold or unhold.
19. Right Soft key (RSK): allows you to select soft key actions Rear View of Your Phone or menu items corresponding to the bottom right line on 4 the display screen. When you receive an incoming call, instead of answering the call, press the Right Soft key If you press the Right Soft key 1 3 to Ignore the call. during a call, you access the Menu options. 20. Back/OK key: Press to close the current menu and return to the previous menu or screen. Saves any changes you’ve 2. made to the current menu.
Mirror: Displays your reflection when taking pictures and 3. access to the device settings, and a way to find files and videos. get help. Stylus: Used to select options or functions on the tough- 4. 2. sensitive display. Title Bar: The Title bar at the top of the screen displays the active program, wireless status, and current time, and Today Screen allows you to close screens. Click on the status icons to access abbreviated Connectivity, Phone, Volume, and 1 Battery settings menus. 2 3 3.
9. Left Soft Key Command: Left soft key function. 2. disable Silent Mode, activate the camera/camcorder, and 10. Right Soft Key Command: Right soft key function. more. Command Keys 3. Power On/Off Key 1. Press and hold the Power On/Off key ( To turn your LCD off/on, press the Power On/Off key Start Key ) once until the backlight turns off/on. Launches or closes the Start Menu. Navigation Pad Press and release the up or down Volume keys to adjust audio volume for any screen.
Send Key 2. End Key Lock ( 3. Ends a call or exits a program. Press and hold this key for two seconds to lock the keypad. While in the main menu, it returns the phone to standby mode and cancels your input. When you lock your phone, it requires a password to return to normal operation. When a password is set up, the phone can be locked immediately or configured to lock after a specified period of inactivity, or when the screen blanks out.
8. Press or select to save your new password. You are prompted to confirm your changes. 9. Unlocking the Phone After a Time-out To unlock your phone after the timer has expired: 1. Select Yes to confirm. Setting Up a Password Hint Press to activate the password screen. One way to make sure you don’t accidentally forget your password is to use the Hint feature. 2. Enter your password. From the Today screen, press the Start key ( 3. Press the Unlock soft 1. ) to activate the Start menu. 2.
The Lock icon changes as shown. Display Icons Various icons appear in your phone’s display or Title Bar during operation. The following table lists these icons as well as their descriptions. Indicates signal strength. More bars mean better signal. Indicates GPS is on for location. • Unlock is then displayed as a left soft key function at the lower left corner of the screen. Unlocking the Manual Phone Lock 1. From the Today screen, press the Unlock soft key. The Unlock screen displays. 2.
Indicates the ringer for the selected profile is set to Vibrate. Indicates you received a new text message. If you select this icon, a window displays that allows you to access the Inbox. Indicates your phone is charging. Indicates you received a new multimedia message. If you select this icon, a window displays that allows you to access the Inbox. Indicates the 3G high speed data transfer protocol is supported, which is required for video streaming and downloads. Indicates a programming error.
Using a microSD Storage Card Indicates the Voice Command feature is active and awaiting a verbal command. Indicates the current battery charge strength. (Icon shown fully charged.) Indicates the current battery charge strength. (Icon shown fully discharged.) Indicates the current battery charge strength. (Icon shown fully discharged and will power down.
4. With the card now securely installed, replace the plastic cover over the microSD slot on the phone. Programs - Installation and Removal You can install any program created for your phone, as long as the phone has enough memory. The most popular place to find software for your phone is on the Microsoft web site (http:/ www.windowslive.com/Explore/Mobile).
3. Managing Certificates Select Shop Games or Shop Application. 4. On your phone you can add and delete public key certificates. You can store the following two types of certificates on your phone. Select a game or an application and 1. follow the on-screen procedures to 2. upload the software to your phone. 3. To remove a program perform the following: From the Today screen, press the Start key ( ) to activate the Start menu. 2. Select Settings ( ( 3.
3. Select the appropriate type of certificate tab: Personal, Resetting your Phone to Factory Defaults Intermediate, or Root. 4. Position the cursor over the certificate you want to delete. 5. Press and hold 6. Press the Yes soft key to confirm the deletion. . Select the Delete option. Rebooting your Phone after Lockup The Power button ( ) lets you quickly turn off the phone in the event of a program or application error. In this case your phone would appear to “freeze” and become unresponsive. 1.
2. Select Settings ( ) ➔ System tab ➔ Hard Reset ( ). 7. The Hard Reset screen displays. 3. Select the Hard Reset button. A confirmation screen in the align screen. 8. displays. 4. Select Device, enter Using your Stylus, select within the crosshairs that appear Follow the on screen tutorials and complete the setup process. Performing a Manual Hard Reset the displayed password, then Important!: Caution, when performing a manual Hard Reset, the storage and settings initialize.
Section 4: Call Functions This section describes how to make or answer calls. It also includes the features and functionality associated with using your phone, as well as explaining the voice command feature built into your Samsung SGH-i907. 3. Select Settings ( ) ➔ Connection tab ➔ Wireless Manager. 4. From the Wireless Manager menu, select Phone Off. The Wireless Manager screen displays.
6. Press the Done soft key to exit and return to the Settings menu. You are now able to make and receive phone calls. Using the Contacts shortcut list lets you make a call while using just one hand. To make a call: 1. From the Today screen, select the Contacts tab. 2. Select a contact button. Recent call information for this Contact displays, with the Contact’s phone number highlighted. 3. Making a Call There are several ways to make calls on your new phone.
Method 2 — Using the Keypad 1. From the Today Method 4 — Using the Stylus 1. screen, enter the number using the menu. 2. keypad. 2. Press to dial To use Method 3 - the Contacts soft key, you must first enter contact information. (For more information, refer to “Contacts” on page 43) Using the Contacts soft key lets you make a call while using just one hand. To make a call: 1. From the Today screen, press the Contacts soft key. 2. Find and select the Contact entry you want to dial. 3.
Method 5 — Using the Voice Command 1. Press and hold the MEdia Net key ( Command. A microphone icon ( ) to activate Voice ) displays in the Title 䊳 Press the Answer soft key or press 䊳 Press the Ignore soft key or press to answer the call. to send the call to voicemail. bar. Note: Voice Command must be enabled by selecting Start Settings Personal tab Voice Command Enable OK. (For more information, refer to “Voice Command” on page 31.) 2.
3. the Own Number options, and then select Get settings... to 5. 2. ( display your Voice Line number(s), Data number, and/or The Phone screen displays the All Calls log. 3. To show only selected types of calls, press the Menu soft key, then select Filter desired number, press the Edit soft key, and enter the new Incoming. The selected calls log displays in the Phone number using the keypad. screen. Select from the upper right of the screen to exit.
3. – or – To display only the calls, press the Menu soft key, then select View All Calls. From the Today Plus menu, select Connection tab Placing a Call Using Call History 1. ( Do one of the following: Phone ). The Phone screen displays the All Calls log. From the Today menu, select the Phone soft key. – or – From the Today Plus menu, select Connection tab ( Phone ). The Phone screen displays the All Calls log.
the Filter used for calls log display (All Calls, Missed, Outgoing, or Incoming). Deleting Individual Call History Entries 1. Do one of the following: From the Today menu, select the Phone soft key. displayed. This option allows you to set to the initialization of the list saved to the call history.
Sending a Text Message Using Call History Text messages can be sent to other users that support SMS capabilities. Note: Contact your service provider for more information on SMS messaging services. 1. Do one of the following: From the Today menu, select the Phone soft key. Use the keypad to enter the message text. (For more information, refer to “Entering Text” on page 38.) Note: Each text message can contain a maximum of 160 characters.
make phone calls, get calendar information, play and control your music, as well as start programs. See http://www.microsoft.com/windowsmobile/voicecommand/ default.mspx for a Voice Command demo. Voice Command Settings 1. From the Today screen, press the Start key ( ) to activate the Start menu. 2. Select Settings ( ( 3. ) Personal tab Voice Command ) to display the Voice Command screen. Select the Enable box to enable/disable the Voice Command feature. A checkmark displays in the box.
Video Share Using the Voice Command 1. Press and hold the MEdia Net key ( Command. A microphone icon ( ) to activate Voice ) displays in the Title bar. 2. After the phone beeps, say the name of the command you want to perform. The Voice Commands are: • Call: Lets you dial a Contacts entry by saying a name saved in your contact list. • Dial: Lets you dial a phone number by saying the digits in the telephone number. • Lookup: Lets you retrieve contact information for any entry in your contacts list.
Initiating and Receiving a Video Share Session To initiate and receive a Video Share session use the following steps: . 8. Press the Yes soft key to accept the connection or the No soft key to decline it. 9. When the recipient accepts the video share, “Establishing 1. Dial the number and press 2. Once the call is answered, if you're both capable of Video recipient. Share, a “Video Share Ready” icon displays on the A Recording Started pop-up displays showing the memory screen.
Section 5: Menu Navigation This section explains the menu navigation for your phone. Menus and sub-menus are accessed by using the Finger Mouse or Stylus. 2. Select Settings ( ( ) System tab Finger Mouse ) to open the Finger Mouse screen. Finger Mouse Finger Mouse lets you select the navigation functioning of the Navigation Pad. You can choose the 4-way navigation mode or the mouse mode. The mouse mode option allows you to set mouse speed, timeout and cursor shape. 1.
– Mouse timeout: Sets the “Mouse timeout” time limit. When the mouse is inactive for this period of time, the mouse deactivates on screen. – Mouse cursor shape: Allows you to select a cursor icon (shape) from a selectable list. 3. Select the new value(s) for the Mouse speed, Mouse timeout, and Mouse cursor shape. 4. Press or select to save your new settings and return to the previous screen.
2. Select Settings ( ) Personal tab Today ( ) Items tab. The Today items screen displays. 3. Select the Today Plus box to enable/disable the Today Plus option lists. A checkmark displays in the box. Note: An unmarked box indicates the Today Plus feature is disabled. 2. Select the desired option. The associated option screen appears. Navigating Using the Title Bar Icons The status icons that display in the title bar are also shortcuts to related features and functions of your handset.
Section 6: Entering Text This section outlines how to select the desired text input mode when entering characters into your Samsung SGH-i907. Built-in QWERTY Keypad Your SGH-i907 has a built-in standard typing keypad, commonly called QWERTY, below the display. Using this keypad, you can type letters, punctuation, numbers, and other special characters into text entry fields or other applications available on your handset. To access the Input Method settings: 1.
Changing the Input Method To change the text input method from within a text entry field: 1. Select the keyboard icon ( ). A keyboard displays. Select the Up arrow Keyboard beside the keyboard icon ( ). The following options display in a pop-up: • Options: Displays the Settings Input screen. (For more information, refer to “Keyboard” on page 39.) • Block Recognizer ( ) • Keyboard ( ) • Letter Recognizer ( ) • Transcriber ( ) 3. Select the desired input method.
To select larger or smaller keys, simply select the button next to the desired option. The gestures feature allows you to replace keys used on the keyboard for space, backspace, shift+key, and enter by drawing a gesture or motion. The large key option must be selected for this option to display. Letter Recognizer This option allows you to enter text using the stylus and your own handwriting (natural character strokes). The screen is divided into three different areas.
1. From the Today screen, press the Start key ( ) to 5. activate the Start menu. 2. Select Settings ( ) numbers of words the device will suggest once the word Personal tab Input ( 6. To enter an empty space after each recognized word, select Add a space after word. To enable this feature, select the 7. To enable the auto correction feature which dynamically Suggest words when corrects for spelling errors and other mistakes, select entering text box. A Enable Auto Correct.
2. Select Settings ( ) tab Personal Input ( ) Options tab. The following input options are available: • Voice recording format • Default zoom level for writing • Default zoom level for typing • Capitalize first letter of sentence • Scroll upon reaching the last line 3. Select each option's associated box or field and make your desired changes. Note: Selecting the box adjacent to each item can either enable (check) or disable (uncheck) the items. 4. 42 Press or select to save your settings.
Section 7: Contacts This section describes how to manage your daily contacts by storing someone’s name and number in your phonebook. Understanding Your Contacts This feature is used to save important information about your friends, colleagues, or business acquaintances.
Add a New Contact 1. Find a Contact From the Today screen, press the Start key ( ) to activate the Start menu. 2. Select Contacts ( To locate a specific contact, you can use the find feature. Find allows you to enter the first few letters of the contact entry and then display the results on the screen. To find a contact: 1. ) to display the Contacts screen displays. Contacts screen. 3. 2. Press the New soft each consecutive character, the list of matching contacts Outlook Contact.
Delete a Contact 1. 3. device displays Done. “Find a Contact” on page 44.) 2. 3. 4. Press the Menu soft key and select Delete Contact. Find the desired contact. (For more information, refer to From the Today screen, press the Start key ( ) to activate the Start menu. 2. Select the contact to display its information. 3. Press the Call soft key to place a call to the selected 2. Select Settings ( contact.
4. Press or select to save your new settings and return to the previous screen. Adding a Note 1. Adding Notes to Contacts Notes allow you to attach either a recorded audio file or attach a written note to a saved contact entry. When you view the summary screen on the contact, you can view or listen to any notes that are associated with the contact. Find the desired contact. (For more information, refer to “Find a Contact” on page 44.) 2. Select the contact to display its information. 3.
Speed Dial Contacts 3. Press the Menu soft key and select Add to Speed dial can be used to dial contacts that you talk to the most. Speed dial allows you to press up to two numeric keys to dial to the contact. Memory locations 2-99 are available for speed dialing. Speed Dial... The Speed Dial screen displays with the Note: Location 1 is pre-configured to dial your voicemail and can not be altered. next available Speed Shortcut Method Location field. To assign a speed dial location: 1. 2.
4. Press the Menu soft key and select New. The Contacts list 5. Find the desired contact. (For more information, refer to displays. “Find a Contact” on page 44.) 6. Select the contact. The Speed Dial screen appears in the display. 7. Select the Location field's up or down arrows to assign this contact to an available speed dial location (2 – 99). 8. Press or select to save the Speed Dial assignment and return to the previous screen.
Section 8: Messaging This section discusses the types of messages you can send and receive, how to set up your phone to work with E-mail, and how to send and receive Email messages using different types of connections. 1. 2. . To re-open and display the message in the preview pane, press the Notification soft key. Types of Messages Text and Multimedia Messages 3. Your SGH-i907 is capable of sending Text (SMS) messages and Multimedia [picture or video (MMS)] messages.
• Close: Returns you to the Inbox folder contents screen. • Message Options: Inactive. • Copy to SIM: Lets you save a copy of the message to your SIM card. Read Multimedia Message Options Several message features are available when reading a Multimedia message. While reading a received Multimedia message, press the Menu • Attached Files...: View and/or save attached picture file and/or sound file, or video file. • Multimedia Msg. Options...
3. Select folder name 4. at the top, left of the Messages screen. A drop-down menu displays showing a menu tree that lists To display the contents of a folder, select it in the dropdown menu. Received Text Message Options Several message features are available for received text messages. 1. From the Messages Inbox folder screen, highlight a text Messaging account message and press the Menu soft key.
• Tools – Sort By: Lets you sort messages by one of the following criteria: Message Type, From, Received, or Subject. – Manage Folders...: Lets you create or modify a message folder. – Empty Deleted Items: Allows you to permanently delete all items in the Deleted Items folder. – Clear “Messages”: Deletes all items in the Inbox and Sent Items folder. – New Account...: Allows you set-up a new e-mail account. – Options...: Allows you to change the options for the Messaging.
• Select Messages: Select All messages, All Below this message, or Several messages to which other functions will be applied. • Send/Receive: Select to send or receive new e-mail messages. • Multimedia Msg. Options...: For more information, refer to “Configuring Multimedia Message Parameters” on page 54. Configuring Message Parameters 1. From the Today screen, press the Start key ( ) to activate the Start menu. 2. Select Messaging ( ) Messages ( ).
Configuring Multimedia Message Parameters 1. From the Today screen, press the Start key ( 2. Select Messaging ( ) to • Receiving: Lets you specify how your phone reacts to incoming Multimedia messages. activate the Start menu. ) Messages ( ). The Messages screen displays showing the contents of a Messages folder. 3. Press the Menu soft key, then select Multimedia Msg. Options...
• Compose: Lets you select Message Class and Creation Mode settings for composing Multimedia messages. Sending Messages Creating and Sending Text Messages 1. From the Today screen, press the Start key ( ) to activate the Start menu. 2. Select Messaging ( ) Messages ( ). The Messages screen displays showing the contents of a Messages folder (in this case, the Inbox folder). 3. Press the Menu soft key, then select New Text Message.
5. Select the message text input field and use the keypad to enter the text content of your message. (For more Spell Checking a Text Message 1. information, refer to “Entering Text” on page 38.) Text Messages” on page 55), press the Menu soft key and select Spell Check. Note: There is a 160-character limit for text messages.
Checking Names Within a Text Message 3. Press the Menu While creating a Text message (see “Creating and Sending soft key, then Text Messages” on page 55), press the Menu soft key and select New select Check Names. Multimedia Recipient names currently used within the To filed are Message. The verified against the current Contacts list and e-mail Multimedia addresses are reviewed to verify they conform with the Message standard E-mail formats. composition screen displays.
7. To add existing photos, music files, or video clips to your message or to launch the Camera or Sound Recorder to take or record new files and add them to your message, select the appropriate icon(s) on the bottom line of the Multimedia Message composition screen. 8. To access additional Multimedia message options, press the Menu soft key. The following options are available: • Preview: Allows you to preview the new MMS message prior to delivery.
Inserting My Text in a Message 1. 5. Select to save your changes and return to the message. Create a new message. (For more information, refer to “Sending Messages” on page 55.) Accessing E-mail 2. Press the Menu soft key and select My Text. E-mail Account Setup 3. Select a desired message from the list. The selected message is then inserted into the body of the message. 4. Complete your message.
2. Select Messaging ( ) Setup Note: For private E-mail servers, you will be prompted for specific information about the server. E-mail. 3. - Server URL or IP address - Server access authentication (nearly always required and usually the same as your account ID and password) - Whether the server requires SSL (Secure Sockets Layer) - Type of connection used to access the server Enter your E-mail address and password into the Contact the server operators or your ISP for this information.
4. To create an send E-mail, press the Menu soft key, and 7. select New. The E-mail composition screen displays. 5. Enter the E-mail address in the To field. 6. Select the Subject field and enter a subject. 7. Select the message text field and enter the content of your When you’re finished, press the Send soft key.
• Drafts: contains all messages that were not completed and saved to send at a later date. • Inbox: all incoming messages arrive and are stored in the Inbox until deleted. If memory is full, new messages are rejected. Delete older messages to free up space for incoming messages. • Outbox: the Outbox stores unsent messages until they send. • Sent Items: keeps a record of all sent messages from your device. Configuring E-mail Parameters 1.
Section 9: Changing Your Settings This section explains how to either set or change many of the settings available on your Samsung SGH-i907. Device Settings Menus The Settings menus for your SGH-i907 phone allow you to configure or change how many of your phone’s features or functions appear or work. Some of the settings on these menus are associated with shortcuts or hot keys on your phone and can be quickly accessed for your convenience.
6. Highlight the program you wish to launch with the selected letter key, then press the Select soft key. The Edit screen displays. 7. Press or select to save your new setting. Input Setting Phone Settings This series of screens lets you specify settings for the Phone functions of your SGH-i907. 1. For more information, refer to “Entering Text” on page 38. screen, press the Lock Start key ( This settings screen lets you select which links appear in the Start menu.
Phone Tab — Phone Ringer Options You can select several different phone ringer sounds for the SGHi907. You can also change the ring type and its tone. To access these settings: 1. From the Settings – Phone screen, select the Phone tab. 2. Select the Ring type drop down arrow, then select the ring Services Tab The Services tab lets you configure the phonerelated network services. type you want. 3. Select the Ring tone drop down arrow, then select the ringer sound you want.
• Call Forwarding: Lets you choose to forward incoming calls to your Voicemail or other number that you enter, and lets you set conditions under which incoming calls will be forwarded (No answer, Unavailable, Busy). • Call Waiting: Lets you choose whether or not to be alerted when you have a waiting incoming call. • Voicemail and Text Messages: Lets you change the access numbers for your Carrier’s Text message service center and Voicemail server. Network Tab 1.
1. To access the phone settings: From the Settings – Phone screen, select 2. 1. Phone screen, select Phone screen the More tab. The changes to show Phone screen your phone’s current changes to show a automatic lock list of phone-service status. related settings. To lock/unlock your 2. following options: box. A check mark in the box indicates your phone is • Fixed Dialing: Lets you Enable/Disable FDN (Fixed Dialing Number) service. Also shows Contact entries stored as FDNs.
Note: Auto Answer only functions when your phone is in handsfree mode. • SDN: Lists the Service Dialing Numbers (SDNs) — such as, emergency numbers, customer service numbers, and directory inquiries — assigned by your Wireless Provider. System Settings About 1. 2. then select the Get settings... button. 4. 5. Press or select to save your new settings and The Today screens let you set an appearance Theme for the Today screen, and let you determine the Items to be displayed on the Today screen.
• External Power tab: Allows you to set the backlight power save parameters that function when an external power source (such as a wall or car charger) is connected to your phone. • Keyboard tab: Allows you to set the keyboard backlight parameters. • Brightness tab: Allows you to adjust the backlight brightness settings. 3. Press or select to save your changes and return to the previous screen. Certificates 1. From the Today screen, press the Start key ( ) to activate the Start menu. 2.
Encryption 4. 1. From the Today screen, press the Start key ( 2. Select Settings ( Press or select to save your changes and return to the previous screen. ) to activate the Start menu. ) System tab Encryption ( ) External GPS to open the Encryption screen. 3. Note: Enabling this option may incur data usage charges. To enable encryption of information stored on microSD 1. 4. Press or select 2. System tab operation information and, in the event of an error, pass it along to Microsoft.
Finger Mouse 5. 1. From the Today screen, press the Start key ( Select Settings ( ) to 2. From the Today screen, press the Start key ( ) to ) Select Settings ( ) System tab Power ( ). For more information, refer to “Checking Battery Charge” on System tab Memory ( ) page 7. to open the Memory screen and select from one of the following information tabs: • Main: Displays the Total, In use, and Free memory available on the phone for Storage and Programs.
• Time tab: Allows you to adjust the time format. • Date tab: Allows you to adjust the date format. 3. Press or select to save your new settings and return to the previous screen. Remove Programs 1. From the Today screen, press the Start key ( ) to activate the Start menu. 2. Select Settings ( ( 3. ) System tab Remove Programs ) to open the Remove Programs screen. Highlight the programs you want to remove and then select the Remove button.
Connections Settings Bluetooth About Bluetooth Bluetooth is a short-range wireless communications technology capable of exchanging information over a distance of about 30 feet without requiring a physical connection. Unlike infrared, you don't need to line up the devices to beam information with Bluetooth. If the devices are within a range of one another, you can exchange information between them, even if they are located in different rooms.
3. Press the Menu soft key to display the following options: • • • • 4. 3. 4. Bluetooth devices that were detected within its communication range. Press the Done soft key to return to the Today Plus menu. 5. The Bluetooth wireless technology settings menu provides the ability to view and change the device name, show the visibility, and set the security for the device. For more information, refer to “Bluetooth Settings” on page 108. Adding a Bluetooth Device 6.
4. To enable and select dialing rules for accessing networks and reduce the number of live connections, select the Dialing Rules... button. 5. To specify any addressing exceptions used in intranets USB to PC USB to PC allows you to change the type of USB connection your devices uses when having problems connecting to ActiveSync. 1. 6. Press or select to save your new settings and 2. 3.
3. From the Wireless tab, filter the list of available networks search parameter: provided by your Network administrator to complete this select Add New, or to edit the parameters, select an available connection. section and press the Next soft key to continue. 7. • Select one of the following security connection presets from the Connects to drop down: – Select The Internet if the network connects to the Internet (does not use proxy settings).
Sound Settings Sounds and Notifications PDA/Phone Ringer Volume You can set the volume for both PDA notifications and phone volume. To adjust these volumes, follow these steps: 1. Select the icon located at the top of The Sounds and Notifications settings allows you to select the actions for which you hear sounds and how to notify you when different events occur. To view the sounds and notifications screen, follow these steps: 1. 2. to adjust both the PDA and phone ringer volumes. 2.
4. Select the Notifications tab to assign specific audio files (or 2. vibrate) to play for specific applications or actions. Sounds can be set for each of the following events: • • • • • • • • • • • • Notifications ( 3. Phone: Incoming Call ActiveSync: Begin sync ActiveSync: End sync Beam: Auto receive Connection disconnected Connection established Messaging: New e-mail message Messaging: New text message Phone: Missed call Phone: Voicemail Reminders Wireless network detected Select 4.
4. Select the Ring type field and select the type of desired ringer/vibration combination from the drop down menu. • The available notification options for this type of event are: Ring, Increasing ring, Ring once, Vibrate, Vibrate and ring, Vibrate then ring, or None. 5. Select the Ring tone field and select an available ringtone. 6.
• Strong alphanumeric: This password must be at least seven characters in length and contain at least three of the following: uppercase/lowercase letters, numerals, and punctuation. When a password is configured, there is a “Prompt if device unused for” option that allows a length of time range from 0 minutes - 24 hours. When this option is set, you can continue to use the SGH-i907 until the screen turns off due to inactivity.
Section 10: Microsoft Mobile Applications This section introduces applications included with your phone. You can view different document formats with the document viewing tool, access word processing and spreadsheets documents, and even instant message others using the preloaded applications on your Samsung SGH-i907. Launch Internet Explorer 1. From the Today screen, press the Start key ( ) to activate the Start menu. 2. Select Internet Explorer ( ).
6. 7. Select the Create in field and choose a bookmark storage 2. location (Mobile Favorites). • If there are no workbooks on this device, a new workbook automatically displays. • If there are existing workbooks on this device, the file access screen displays. To create a new workbook, press the New soft key. 3. Construct your spreadsheet(s). (For more information, refer Select Add to store the bookmark and return to the web page.
Beaming a Workbook 1. From the Today screen, press the Start key ( 2. Select Office Mobile ( ) to activate the Start menu. ) Excel Mobile ( ). The • If there are no notes on this device, a new note automatically displays. • If there are existing notes on this device, the file access screen displays. To create a new note, press the New soft key. 3. Construct your note(s). (For more information, refer to file access screen displays. 3.
2. Select Office Mobile ( ) PowerPoint Mobile ( ). The file access screen displays. 3. If needed, select the folder where the presentation you Select the desired presentation to begin showing it. • To advance to the next slide, press • To end the slide show, press and hold . , then select End Show. Delete a Presentation 1. From the Today screen, press the Start key ( ) to Select Office Mobile ( ) PowerPoint Mobile ( 6. Select the Yes button to confirm the deletion.
4. When finished, press or select to save and 3. exit. – or – Press the Menu soft key, then select File Save As... to save your document with a specific name, folder, type, and location. You can open one document at a time. If you try to open a second document, you are asked to save the first document. You can save a document in any one of the following formats: • Word Document (*.docx) • Word Template (*.dotx) • Rich Text Format (*.
6. Launch Media Player Select the Yes button to confirm the deletion. Beaming a Document 1. To beam a document to another Windows Mobile device user: 1. From the Today screen, press the Start key ( ) to 2. activate the Start menu. Select Office Mobile ( 3. Select the folder where the document resides 4. Move the cursor over the document you want to beam, ) Word Mobile ( ). . A pop-up menu displays. 5. Select Beam File.... 6.
5. Select the desired file from the list and press the Play soft key. The Widows Media screen displays and the selected file plays. Media Player Controls The following settings are available in the media player: • Select Play ( ) to listen to a file. The Play icon turns into the Pause icon ( ) once the file begins playing. • Select Rewind ( ) and Fast Forward ( ) during playback or while paused to skip back to the beginning of the current file and to skip ahead to the end.
The camera viewfinder screen displays. 2. Press the Menu soft key to choose the specific camera options and settings. 3. Select an option or setting, then select a value. • Options – Mode: Camera, Camcorder. – Shooting mode: Single Shot, Multi Shot, Mosaic Shot, Night Shot, Panorama Shot. – Size: 1600x1200, 1280x960, 1024x768, 640x480, and 320x240. – Timer: Off, 2 seconds, 5 seconds, 10 seconds. – White balance: Automatic, Daylight, Cloudy, Tungsten, Fluorescent.
– Recording sound: The sound you hear when you press or or select to start/stop video recording. Select musical one, musical two, or woman one. – Version: Shows the version of the Samsung Camera software. 4. Default Storage: Indicates whether photos are to be saved to phone memory (as shown) or to an optional Storage Card. Available Memory: Displays the amount of memory available to store photos.
3. – Brightness sound: The sound you hear when you increase or decrease video brightness. Select bright one or Off. – Zoom sound: zoom one or Off. – Recording sound: The sound you hear when you press or or select to start/stop video recording. Select musical one, musical two, or woman one. – Version: Displays Samsung Camera software version. Press the Menu soft key to choose the specific camcorder settings. 4. Select an option or setting, then select a value. • Options – Mode: Camera, Camcorder.
Default Storage: Indicates whether videos are to be saved to phone memory (as shown) or to an optional Storage Card. Available Memory: Displays the amount of memory available to store videos. 6. Press 7. Select the Cancel button to delete the current video and or or select to record a video. take another, or select the Save button to store the video to the gallery. Pictures My Pictures stores images taken with your phone. 1.
Application Management Videos Video stores video taken with your phone. 1. From the Today screen, press the Start key ( ) to activate the Start menu. 2. Select Programs ( ) My Stuff ( ) My Documents My Videos. 3. Highlight a video from the Videos screen. 4. Press the Menu soft key to display the following options for that video: • Send: Lets you send the image in a Multimedia Msg. or over a Bluetooth connection. • Set as: Sets the video as Today Background, Caller ID, or Ringtone.
3. Select the program from the list and select the Remove 3. button. For more information, refer to “Remove Programs” on page 72. 4. 4. Select Yes to confirm. 5. Select Switch To: switches to and displays the selected application. End All Tasks: ends all the tasks that are running. View: Allows you to view Applications or Processes. Sort By: Allows you to sort how applications are viewed, by Memory, CPU, or Name. • Refresh: Refreshes the screen display. • Exit: Exits the Task Manager screen.
3. Select Contents. 4. Touch a subject in the Table of Contents to launch the The Table of Contents displays. associated Help content. – or – 5. Touch Search and select the Search for drop-down menu to select a subject in which to search. Select the Type dropdown and select a type of information in which to search. 6. Touch Search. The result of the search displays in the Results field.
Section 11: Personal Organizer The topics in this section allow you to schedule appointments, view the calendar, create task lists, set an alarm, perform simple math calculations, and setup up your phone so you can synchronize your files and folders with your desktop. 1. Start Menu 2. Title Bar 3. Digital Clock 4. Day and Date 5. Get Xpress Mail shortcut 6. Instant Messaging shortcut 1 7. Messaging icon (Messaging shortcut) 2 8. Appointments shortcut 3 9.
Date and Time Settings Clock settings can be accessed from the Today screen by selecting the on-screen clock. Clock settings allow you to set the current time, time zone, date for either your home or visiting location. 1. From the Today screen, select the clock. The Clock & Alarms screen displays. 2. Note: The time on the SGH-i907 handset does not automatically change when you travel to another time zone.
5. Select the time to display the time settings. Select the up The Wireless Manager screen displays. or down arrows provided for each part of the time (Hour, Minute, AM/PM) to select the desired time. Note: Select the AM or PM to cycle between them. 6. Press or select to store the new time. 7. Press or select again to save the alarm and exit. Wireless Manager The Wireless Manager displays the status of the Phone, Wi-Fi, and Bluetooth.
Owner Information Appointments and Events Owner Information is where you can store information on the owner or user of the device. Name, Company, Address, Telephone, E-mail, and Notes information fields are available. 1. From the Today screen, press the Start key ( ) to activate the Start menu. 2. Select Settings ( ( 3. ) Personal tab Owner Information ). The Owner Information screen displays. Select each field to activate it, then enter your information into the respective fields. 4.
2. Select Calendar ( 3. Press the Menu soft key, then select New Appointment. 4. ). Enter the Subject of the appointment or press the drop down arrow to display a list of selectable preset subject from which to choose. 5. Select the Location field and enter the location information, if necessary. 6. Select the Starts and Ends fields for date and select a respective date from the on screen calendar. 7.
Change the Calendar View 1. From the Today screen, press the Start key ( Calendar Options ) to activate the Start menu. 2. Select Calendar ( ). The Calendar defaults to the Agenda view. 3. Calendar options allow you to select what day of the week your calendar starts upon, whether you view a 5-day, 6-day, or 7-day week, options for reminders, and more. 1. • Agenda - Displays a list of the current day’s appointments. • Day - Displays the current day with the times of any appointments blocked out.
7. To display more details regarding the length of time for each event by viewing half hour slots, select the check box adjacent to the Show half hour slots option. 8. To show the number of the week in your calendar, select the check box adjacent to the Show week numbers option. 9. To set the reminder parameters for new calendar items, select the Appointments tab, then select the check box adjacent to the Set reminders for new items option.
7. Select the Starts box and from the on screen calendar, select the starting date. 8. Select the Due box and from the on screen calendar, select When a task is completed, a checkmark is used to indicate the item has been completed. 1. the ending date. 9. Mark a Task Complete 2. • You will also need to select the corresponding date and time field to setup a a date for the early reminder to begin its notification. 11. Select Categories and select either Business, Holiday, 3.
• Show Tasks entry bar - If this option is selected, a bar is placed at the top of the screen to allow you to create a new task without navigating through the menu. For more information, refer to “The Task Entry Bar” on page 89. The Task Entry Bar Editing a Task The task entry bar option automatically places a bar at the top of the screen to allow you to create a new task without navigating through the menu. You simply select the bar and enter a name to create a new task.
6. When finished adding the note, press or select 3. to save and exit. Beam Task. - or - Deleting a Task 1. From the Today screen, press the Start key ( Select Programs ( ( 3. ) 4. Organizer ( ) 5. ). 6. Select Yes to confirm the deletion of the selected task. Beaming a Task From the Today screen, press the Start key ( ) to ( to exit. ) Quickly capture thoughts, reminders, ideas, drawings, and phone numbers with Notes.
3. Press the New soft key. 4. Press the Menu soft key, and select View Recording Toolbar. 7. The recording toolbar then displays at the bottom of the Notes screen. 5. Select list. Write a Note 1. to start recording, and then select From the Today screen, press the Start key ( 2. Record Yourself During a Call Select Programs ( ( During a call you can record yourself speaking to another caller, so you can save directions or a phone number. 1. Make a call to the desired person. 2.
4. Calculator Select Yes to confirm the deletion. Note Options 1. From the Today screen, press the Start key ( ) to activate the Start menu. 2. Select Programs ( ( 3. ) Organizer ( ) Notes ). Press the Menu soft key and select Options... to access the The calculator allows you to perform general mathematical functions, such as addition, subtraction, multiplication, and division.
Section 12: Synchronization This section describes Using Microsoft® ActiveSync®, you can synchronize data on your desktop computer with the data on your phone. Synchronization compares the data on your phone with your desktop computer and updates both your phone and computer with the latest data. Note: Access the Microsoft web site (http://www.microsoft.com/ windowsmobile/activesync/activesync45.mspx) to download Active Sync 4.5 or later.
3. Click the Install button to begin installation. Setting Up and Configuring ActiveSync 1. Tip: You can also download the latest version of ActiveSync from the Microsoft web site, http://www.microsoft.com/windowsmobile/en-us/help/ synchronize/device-synch.mspx. After you’ve installed ActiveSync, connect one end of the USB data cable to the jack on the upper right side of your phone and the other end to a USB port on your computer.
3. Enter a unique name for your device and click Next. 4. Select or deselect the desired applications that you wish to synchronize, then click Next.
5. Click the square to allow wireless data connections on your device while connected to your computer. If selected a checkmark will display in the box. 96 6. Click Finish.
Customizing Connection Settings 7. The SGH-i907 and the PC should perform the first ActiveSync. This may take some time, depending on the amount of information that needs to be synchronized. To establish a connection between your computer and the phone, you must enable the connections you want to use in the ActiveSync® program. By default, all connections are enabled. 1. From the ActiveSync® window on your computer, select File 2. Connection Settings... Change the connection settings.
If your phone is not connected to the computer, click this button to establish a connection. You can open the phone’s file directory from your PC by clicking Explore in the Microsoft ActiveSync window. You can then copy files quickly and easily from the phone to the computer, or from the computer to the phone. Note: To synchronize Bluetooth devices with a compatible computer, the computer must have the Bluetooth stack for Windows XP Service Pack 2.
6. To set how to handle a data conflict between the phone 6. and computer and to set an event logging type, make your selections in the If there is a conflict and Event logging Domain. 7. fields. 7. Select You can synchronize information automatically as items arrive only if your company is running Microsoft Exchange Server with Exchange ActiveSync®. Configuring an Exchange Server connection From the Today screen, select Start Programs ActiveSync. 2.
3. Set each option: • To synchronize periodically during peak times, select a frequency of synchronization in the Peak times field. • Select frequency of synchronization in the Off-peak times field to synchronize periodically during off-peak times. 4. Select one of the available options. • To use the peak time and off-peak time setting while roaming, select Use above settings when roaming. • To synchronize each time you send an e-mail, select Send/ receive when I click Send. 5.
PC Configuration 1. Add a COM port in the Bluetooth application you use on your PC. 2. In ActiveSync, select File Connection Settings. The Connection Settings window pops-up. 3. Check Allow connections to one of the following:, then choose the COM port added in Step 1. PDA Configuration 1. Establish a Bluetooth connection between your device and your PC. 2. Select Yes in the Bluetooth ActiveSync dialog box that displays, “(Your PC) supports synchronizing using Bluetooth.
System Requirements Windows Mobile Device Center is currently only available for the following versions of Microsoft Windows Vista™.
Section 13: Network Services Call Barring This section details how you can set up the network services supported by your carrier. Some of these services may not be available due to coverage area or service plans. If you have any questions, please contact your service provider. If your Wireless Carrier supports this service, it lets you permit or block incoming or outgoing calls. To access Network Services: 1. Note: For more information, contact your Wireless Carrier.
• All calls • International • International except to home country • Off 4. Press or select to save your new settings and return to the previous screen. Caller ID This service lets you choose whether and to whom your service provider's network will send your caller ID information (your phone number). 1. highlight Caller ID, then select the Get Settings... button.
3. To forward your incoming calls only under particular conditions: • If enabled, select the Forward all incoming phone calls option. The check mark disappears from the associated check box and the option becomes disabled. • Select any or all of the Forward phone calls only if: options (No answer, Unavailable, and/or Busy). A check mark appears in the associated check box for each of the selected options. • For each option, enter a Contacts entry name or a phone number, or select Voicemail.
Voicemail and Text Messages This service lets you change the access numbers for your Carrier’s Text message service center and Voicemail server. Note: These numbers are automatically setup when you receive your phone. You will probably not need to change them unless otherwise instructed by your carrier. 1. In the network services menu, highlight Voicemail and Text 2. To change the access numbers, select one of the following Messages, then select the Get Settings... button.
Section 14: Bluetooth and Wi-Fi Services This section explains the Bluetooth wireless technology and Wireless Fidelity (Wi-Fi) features available with your Samsung SGH-i907, as well as certain connection related details necessary for configuring your phone to work with these services. About Bluetooth Wireless Technology Bluetooth wireless technology provides short range wireless communication exchange over a distance of about 30 feet without requiring a physical connection.
Bluetooth Settings The Bluetooth wireless technology settings menu provides the ability to view and change the device name, show the visibility, and set the security for the device. 1. From the Today screen, press the Start key ( ) to activate the Start menu. 2. Select Settings ( ( ) Connections tab Bluetooth ) to review the various settings tabs: • Devices: Select Add new device to search for nearby Bluetooth devices. Select on a device to modify it’s settings.
• COM Ports: After pairing with a device, use this filed to setup a COM port by selecting a New Outgoing Port. For additional options, select and hold an existing port. where radio use is prohibited, such as airline traveling, you can turn off Bluetooth wireless technology in your device. Turning Bluetooth On/Off 1. From the Today screen, press the Start key ( ) to activate the Start menu. 2. Select Settings ( ( 3. ) ) Connections tab Bluetooth Mode tab.
information with other compatible Bluetooth wireless technology enabled devices. Making your SGH-i907 Discoverable To set your phone to be discoverable by other devices, follow these steps: 1. From the Today screen, press the Start key ( ) to activate the Start menu. 2. Select Settings ( ( 3. ) ) Connections tab Bluetooth Mode tab. Place a checkmark in the “Turn on Bluetooth” check box by selecting the screen. 4. Place a checkmark in the “Make this device visible to other devices” check box.
1. Make sure that the two devices are within range of one another and that Bluetooth discoverable mode is enabled Accepting a Bond 1. on both devices. 2. discoverable. From the Today screen, press the Start key ( ) to 2. activate the Start menu. 3. Select Settings ( ( ) ) Connections tab Bluetooth 3. Devices tab and select Add new device from the discovered Bluetooth devices that were detected within its communication range.
6. Select the Save soft key to save your changes and return to the previous screen. Bluetooth Hands-Free Device 1. Pair the SGH-i907 and the Bluetooth Hands-free device. For more information, refer to “Pairing a Bluetooth Device” on page 110. 2. Bluetooth Virtual Serial Port There are many Bluetooth wireless technology devices that support the Bluetooth serial profile, such as GPS. You can use the SGH-i907 Bluetooth virtual serial port to make Bluetooth serial connection with such devices.
5. Select the device and then select the Next soft key. 6. Select the port, and then press or select Note: The SGH-i907 may not be operable with all wireless access points. . Connecting a Virtual Serial Port Device The port you selected above can now be used in other applications available on your SGH-i907. For example, you can choose the port for communication when using a Bluetooth GPS application.
3. Select the Wi-Fi (Off) button. The button changes to Wi-Fi (On). Automatically Connecting to a Network If one or more networks are present, the Wi-Fi icon ( ) displays on the Title Bar of the Today screen and a list of the available networks pops-up at the bottom of the screen. 1. Select the SSID (Service Set Indentifier) for the network you want. 2. Select The Internet if the network connects to the Internet (does not use proxy settings) or Work (uses proxy settings). 3. 4.
4. From the Wireless tab, filter the list of available networks 7. by selecting within the Networks to access field and the SSID (name) of the Wi-Fi network you want, then select selecting a search parameter: • All Available • Only access points • Only computer-to-computer 5. To manually add a Network to the list, press Menu, then select the Add New... option at the top of the list. The Configure Wireless Network screen displays.
Changing Connection Information 5. Using either the Wireless or Network Adapters tabs under “Network Card,” you can change your connection information. If your Wi-Fi network encrypts data with a security key (WEP) or you need WPA authentication to connect to your Wi-Fi network, you can set the configurations under Wireless tab. The Network Adapters tab allows you to choose whether you use a fixed IP or the DHCP (Dynamic Host Control Protocol).
Section 15: Multimedia This section outlines the available gaming options and accessories for your phone. 2. Data Cable and synchronize the device with your PC via Accessories Your SGH-i907 supports many accessories that make your phone truly unique. You can add an optional Hands Free Kit to allow you to operate your phone while you drive, and your phone has Bluetooth technology that allows you to transmit files, contacts, or download information from other compatible devices.
Use the microSD card Once you’ve transferred files from your computer to the microSD card using ActiveSync, you can access applications that were transferred to your microSD card. Brain Challenge Vol.2 Demo 1. From the Today screen, press the Start key ( ) to activate the Start menu. 2. For example, if you’ve transferred any multimedia files onto your microSD card that are compatible with Windows Media Player, simply open Windows Media Player and select the media file that you wish to play.
5. Press or select to exit the current game and return to the previous screen. Bubble Breaker 1. to return to the game. From the Today screen, press the Start key ( ) to 7. activate the Start menu. 2. Select Programs ( ( • Choose from: Play Sounds, Confirm End Game, Display Bursts, Guest Mode, Game Style, and Breaker Set. 6. Update your selected options then press or select ) Press or select to exit the current game and return to the previous screen. Games ( ) Bubble Breaker ). Ms.
3. You are prompted to allow the game to use the network to 2. Select Programs ( ) Games ( ) Sims 2 ( ). 3. You are prompted to allow the game to use the network to validate that you have purchased the game. To play the demo version of the game, select “Don’t allow for this session”, then press the OK soft key. 4. You are prompted to retry purchase verification. To run the demonstration version of the game, press the Demo soft key. 5. You are prompted to activate sound for this game.
6. Update your selected options, then select New game to 4. start play. 7. Press the options screen for the current game. or select • Choose from: Draw, Scoring, Time game, Display status, and Keep cumulative score. 5. Update your selected options then press or select to exit the current game and return to the previous screen. Solitaire 1. to return to the game. From the Today screen, press the Start key ( ) to 6. activate the Start menu. 2.
2. Select Programs ( ) Challenge Poker ( ). Games ( ) WSOP Pro 6. Update your selected options, then select VERSUS to start play. 7. Press or select to exit the current game and return to the previous screen. 3. You are prompted to allow the game to use the network to validate that you have purchased the game. To play the demo version of the game, select “Don’t allow for this session”, then press the OK soft key. 4. You are prompted to activate sound for this game.
Section 16: Health and Safety Information This section outlines the safety precautions associated with using your phone. These safety precautions should be followed to safely use your phone. Health and Safety Information Exposure to Radio Frequency (RF) Signals Certification Information (SAR) Your wireless phone is a radio transmitter and receiver. It is designed and manufactured not to exceed the exposure limits for radio frequency (RF) energy set by the Federal Communications Commission (FCC) of the U.
For body worn operation, this phone has been tested and meets FCC RF exposure guidelines when used with an accessory that contains no metal and that positions the handset a minimum of 1.5 cm from the body. Use of other accessories may not ensure compliance with FCC RF exposure guidelines. The FCC has granted an Equipment Authorization for this mobile phone with all reported SAR levels evaluated as in compliance with the FCC RF exposure guidelines.
FAILURE TO FOLLOW THE INSTRUCTIONS OUTLINED MAY LEAD TO SERIOUS PERSONAL INJURY AND POSSIBLE PROPERTY DAMAGE. exposures are limited by Federal Communications Commission safety guidelines that were developed with the advice of FDA and other federal health and safety agencies. IMPORTANT SAFETY INSTRUCTIONS - SAVE THESE INSTRUCTIONS.
reproducing those studies, or in determining the reasons for inconsistent results. What is FDA's role concerning the safety of wireless phones? Under the law, FDA does not review the safety of radiationemitting consumer products such as wireless phones before they can be sold, as it does with new drugs or medical devices. However, the agency has authority to take action if wireless phones are shown to emit radio frequency energy (RF) at a level that is hazardous to the user.
What are the results of the research done already? The research done thus far has produced conflicting results, and many studies have suffered from flaws in their research methods. Animal experiments investigating the effects of radio frequency energy (RF) exposures characteristic of wireless phones have yielded conflicting results that often cannot be repeated in other laboratories.
What is FDA doing to find out more about the possible health effects of wireless phone RF? FDA is working with the U.S. National Toxicology Program and with groups of investigators around the world to ensure that high priority animal studies are conducted to address important questions about the effects of exposure to radio frequency energy (RF). FDA has been a leading participant in the World Health Organization international Electromagnetic Fields (EMF) Project since its inception in 1996.
What about children using wireless phones? The scientific evidence does not show a danger to users of wireless phones, including children and teenagers. If you want to take steps to lower exposure to radio frequency energy (RF), the measures described above would apply to children and teenagers using wireless phones. Reducing the time of wireless phone use and increasing the distance between the user and the RF source will reduce RF exposure.
claimed to protect wireless phone users from radiation with making false and unsubstantiated claims. According to FTC, these defendants lacked a reasonable basis to substantiate their claim. What about wireless phone interference with medical equipment? Radio frequency energy (RF) from wireless phones can interact with some electronic devices.
Road Safety 4. When driving a car, driving is your first responsibility. When using your wireless phone behind the wheel of a car, practice good common sense and remember the following tips: 1. 2. weather conditions. Rain, sleet, snow, ice and even heavy traffic can be hazardous. 5. book takes attention away from your primary responsibility, driving safely. 6. Dial sensibly and assess the traffic; if possible, place calls to place your call without taking your attention off the road.
9. Use your wireless phone to help others in emergencies. If Responsible Listening you see an auto accident, crime in progress or other serious emergency where lives are in danger, call 9-1-1 or other local emergency number, as you would want others to do for you. 10. Call roadside assistance or a special non-emergency wireless assistance number when necessary.
• Set the volume in a quiet environment and select the lowest volume at which you can hear adequately. • When using headphones, turn the volume down if you cannot hear the people speaking near you or if the person sitting next to you can hear what you are listening to. • Do not turn the volume up to block out noisy surroundings. If you choose to listen to your portable device in a noisy environment, you noise-cancelling headphones to block out background environmental noise.
National Institute for Occupational Safety and Health Hubert H. Humphrey Bldg. 200 Independence Ave., SW Washington, DC 20201 Voice: 1-800-35-NIOSH (1-800-356-4647) Internet: http://www.cdc.gov/niosh/topics/noise/default.html Operating Environment Remember to follow any special regulations in force in any area and always switch your phone off whenever it is forbidden to use it, or when it may cause interference or danger.
http://www.fcc.gov/oet/rfsafety/rf-faqs.html FCC Hearing-Aid Compatibility (HAC) Regulations for Wireless Devices happens to be vulnerable to interference, you may not be able to use a rated phone successfully. Trying out the phone with your hearing device is the best way to evaluate it for your personal needs. On July 10, 2003, the U.S.
Hearing Aid Compliance (HAC) and Wi-Fi Functionality M3 + M2 = 5 T3 + T2 = 5 In the above example, if a hearing aid meets the M2 level rating and the wireless phone meets the M3 level rating, the sum of the two values equal M5. This is synonymous for T ratings. This should provide the hearing aid user with "normal usage" while using their hearing aid with the particular wireless phone. "Normal usage" in this context is defined as a signal quality that is acceptable for normal operation.
Posted Facilities Switch your phone off in any facility where posted notices require you to do so. Potentially Explosive Environments Switch your phone off when in any area with a potentially explosive atmosphere and obey all signs and instructions. Sparks in such areas could cause an explosion or fire resulting in bodily injury or even death. Users are advised to switch the phone off while at a refueling point (service station).
scene of an accident; do not cut off the call until given permission to do so. Restricting Children's access to your Phone Your phone is not a toy. Children should not be allowed to play with it because they could hurt themselves and others, damage the phone or make calls that increase your phone bill. FCC Notice and Cautions FCC Notice The phone may cause TV or radio interference if used in close proximity to receiving equipment.
Product Performance Getting the Most Out of Your Signal Reception The quality of each call you make or receive depends on the signal strength in your area. Your phone informs you of the current signal strength by displaying a number of bars next to the signal strength icon. The more bars displayed, the stronger the signal. If you're inside a building, being near a window may give you better reception.
features are available for purchase or use in all areas. Downloadable Ring Tones may be available at an additional cost. Other conditions and restrictions may apply. See your service provider for additional information. Battery Standby and Talk Time Standby and talk times will vary depending on phone usage patterns and conditions.
• Misuse or use of incompatible phones, batteries, and charging devices could result in damage to the equipment and a possible risk of fire, explosion, leakage, or other serious hazard. • Extreme temperatures will affect the charging capacity of your battery: it may require cooling or warming first. • Do not leave the battery in hot or cold places, such as in a car in summer or winter conditions, as you will reduce the capacity and lifetime of the battery.
• Do not store the phone in cold areas. When the phone warms up to its normal operating temperature, moisture can form inside the phone, which may damage the phone's electronic circuit boards. • Do not drop, knock or shake the phone. Rough handling can break internal circuit boards. • Do not use harsh chemicals, cleaning solvents or strong detergents to clean the phone. Wipe it with a soft cloth slightly dampened in a mild soap-and-water solution. • Do not paint the phone.
Section 17: Warranty Information Standard Limited Warranty What is Covered and For How Long? SAMSUNG TELECOMMUNICATIONS AMERICA, LLC (“SAMSUNG”) warrants to the original purchaser (“Purchaser”) that SAMSUNG's Phones and accessories (“Products”) are free from defects in material and workmanship under normal use and service for the period commencing upon the date of purchase and continuing for the following specified period of time after that date: Phone 1 Year Batteries 1 Year Leather Case 90 Days Hols
facility in an adequate container for shipping, accompanied by Purchaser's sales receipt or comparable substitute proof of sale showing the date of purchase, the serial number of Product and the sellers' name and address. To obtain assistance on where to deliver the Product, call Samsung Customer Care at 1-888-9874357. Upon receipt, SAMSUNG will promptly repair or replace the defective Product.
OR LOSS OF USE OF THE PRODUCT OR FROM THE BREACH OF THE EXPRESS WARRANTY, INCLUDING INCIDENTAL, SPECIAL, CONSEQUENTIAL OR SIMILAR DAMAGES, OR LOSS OF ANTICIPATED PROFITS OR BENEFITS, OR FOR DAMAGES ARISING FROM ANY TORT (INCLUDING NEGLIGENCE OR GROSS NEGLIGENCE) OR FAULT COMMITTED BY SAMSUNG, ITS AGENTS OR EMPLOYEES, OR FOR ANY BREACH OF CONTRACT OR FOR ANY CLAIM BROUGHT AGAINST PURCHASER BY ANY OTHER PARTY.
Precautions for Transfer and Disposal If data stored on this device is deleted or reformatted using the standard methods, the data only appears to be removed on a superficial level, and it may be possible for someone to retrieve and reuse the data by means of special software.
Index A Accessing a Menu Function 44 Advanced Tab 8 Align Screen 80 Application Task Manager 101 Applications Deleting 100 Excel Mobile 90 Installing 100 Internet Explorer 89 Media Player 94 PowerPoint Mobile 91 Word Mobile 92 B Battery capacity 7 charging 6 Checking Charge 7 install 5 remove 6 169 Battery Tab 7 Bluetooth 81 About 81 129 Adding 82 Pairing 132 Service Profiles 81 129 Settings 82 130 Toggling On/Off 81 Bluetooth and Wi-Fi 129 Bluetooth Bonds Accepting Bonds 133 Renaming Bonds 133 , , ,
finding contact 52 Making calls 53 Send via Bluetooth 53 Speed Dialing 55 Create a New Workbook 90 Customization 12 D Delete Presentation 92 Deleting a Document 93 E E-mail Account Setup 67 Encryption 78 Entering Text 46 Error Reporting 78 Event Notification 86 Excel Mobile Beam a Workbook 91 create a workbook 90 Delete a Workbook 90 Expansion SD card removal 28 SD card transfer data 139 SD card use 140 SD slot 139 External GPS 78 F Finger Mouse 79 Folders (Text Message) Accessing 58 G Games Brain Chal
L LCD Off tab 9 M Making Calls one-handed dialing 34 Media Player controls 95 launching 94 load files 94 Message Folders Accessing 58 Overview 69 Message Menu Add Recipient 64 66 Cancel Message 64 Check Names 64 Message Options 64 Read Multimedia Options 58 Read Text Options 57 Received MMS Options 60 Received Text Options 59 Save to Drafts 64 Spell Check 64 Messaging 57 my text messages 66 , 171 Using Outlook 68 microSD 27 28 Installation 27 Removal 28 M-Ratings 157 My Text Messages Editing 67 Insertin
R Reboot 30 Rebooting Your Phone 30 Regional Settings 79 Resetting Your Phone 30 Factory Default 30 Ringtone Incoming 86 Roaming Definition 39 S SAR values 145 Security changing password 87 locking the phone 23 unlocking device 24 Settings 71 Device Settings Menus 71 Sound Settings 85 SIM card removing 5 Sounds and Notifications 85 Incoming Call 86 Speakerphone, use in call 35 Standard Limited Warranty 165 Start Menu Customization 12 Synchronization 115 Active Sync 115 Vista Windows Mobile Device Center 6
W Warranty Information 165 Wi-Fi 83 Windows Mobile Internet Explorer 89 Media Player 94 Task Manager 101 Wireless Manager 84 105 Bluetooth Status 105 Wi-Fi Status 105 Word Completion 48 Word Mobile Beam Documents 94 Delete Documents 93 new document 92 , 173