
User Manual

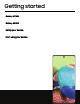
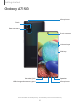
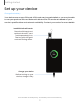

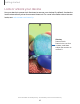
Table Of Contents
- Samsung Galaxy A51|A71 5G User Manual
- Contents
- Getting started
- Galaxy A71 5G
- Galaxy A51 5G
- Set up your device
- Start using your device
- Turn on your device
- Use the Setup Wizard
- Bring data from an old device
- Lock or unlock your device
- Side key settings
- Accounts
- Set up voicemail
- Navigation
- Navigation bar
- Customize your home screen
- Samsung Free
- Bixby
- Digital wellbeing and parental controls
- Always On Display
- Biometric security
- Mobile continuity
- Multi window
- Edge panels
- Enter text
- Emergency mode
- Camera and Gallery
- Apps
- Settings
- Access Settings
- Connections
- Sounds and vibration
- Notifications
- Display
- Dark mode
- Screen brightness
- Eye comfort shield
- Screen mode
- Font size and style
- Screen zoom
- Full screen apps
- Screen timeout
- Accidental touch protection
- Touch sensitivity
- Show charging information
- Screen saver
- Lift to wake
- Double tap to turn on screen
- Double tap to turn off screen
- Keep screen on while viewing
- One‑handed mode
- Lock screen and security
- Screen lock types
- Google Play Protect
- Security update
- Find My Mobile
- Find My Device
- Samsung Pass
- Secure Folder
- Private Share
- Samsung Blockchain Keystore
- Install unknown apps
- Encrypt or decrypt SD card
- Password for factory data reset
- Set up SIM card lock
- View passwords
- Device administration
- Credential storage
- Advanced security settings
- Permission manager
- Controls and alerts
- Samsung Privacy
- Google Privacy
- Location
- Accounts
- Device maintenance
- Accessibility
- Other settings
- Learn more
- Legal information

'
Getting started
Set up your device
Charge the battery
Your device uses a nano-SIM card. A SIM card may be preinstalled, or you may be able
to use your previous SIM card. Network indicators for 5G service are based on your
carrier’s specifications and network availability. Contact your carrier for more details.
SIM
microSD
Charge your device
Before turning on your
device, charge it fully.
Install SIM/microSD cards
Place the SIM card and
optional microSD
™
card
(sold separately) into
the tray with the gold
contacts facing down.
100%
Devices and software are constantly evolving — the illustrations you see here are for reference only.
7