
User Manual
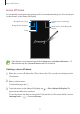

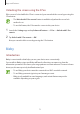

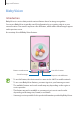

Table Of Contents
- Basics
- Read me first
- Device overheating situations and solutions
- Device layout and functions
- Battery
- SIM or USIM card (nano-SIM card)
- Memory card (microSD card) (Galaxy Note10+ 5G, Note10+)
- Turning the device on and off
- Initial setup
- Samsung account
- Transferring data from your previous device (Smart Switch)
- Understanding the screen
- Notification panel
- Screen capture and screen record
- Entering text
- Apps and features
- Installing or uninstalling apps
- Finder
- S Pen features
- Bixby
- Bixby Vision
- Bixby Home
- Bixby Routines
- Reminder
- Phone
- Contacts
- Messages
- Internet
- Camera
- Gallery
- AR Emoji
- AR Doodle
- Always On Display
- Edge screen
- Multi window
- Samsung Pay
- Samsung Health
- Samsung Members
- Samsung Notes
- PENUP
- Galaxy Wearable
- Calendar
- Voice Recorder
- My Files
- Clock
- Calculator
- Game Launcher
- Game Booster
- Kids Home
- SmartThings
- Sharing content
- Samsung DeX
- Samsung Global Goals
- Google apps
- Settings
- Appendix

Apps and features
74
Starting Bixby
When you launch Bixby for the first time, the Bixby intro page will appear. You must select
the language to use with Bixby, sign in to your Samsung account according to the on-screen
instructions, and then agree to the terms and conditions.
1
Press and hold the Side key. Alternatively, launch the
Bixby
app.
Sign in to your
Samsung
account.
Select a
language.
Side key
2
Select the language to use with Bixby.
3
Tap
Sign in to Samsung account
and follow the on-screen instructions to sign in to your
Samsung account.
If you are already signed in, your account information will appear on the screen.
4
Follow the on-screen instructions to complete the setup.
The Bixby screen will appear.