SM-R350 User Manual www.samsung.
About this manual You can use this Gear Fit as a companion device to some Samsung Android™ mobile devices. This user manual is specially designed to explain applications and features that are available when the Gear Fit is connected to a mobile device. • Please read this manual before using the Gear Fit to ensure safe and proper use. • Descriptions are based on the Gear Fit’s default settings. • Images and screenshots may differ in appearance from the actual product.
About this manual Instructional icons Warning: situations that could cause injury to yourself or others Caution: situations that could cause damage to your device or other equipment Note: notes, usage tips, or additional information Copyright Copyright © 2015 Samsung Electronics This guide is protected under international copyright laws.
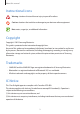
Table of Contents Getting started Applications 6 6 7 8 10 11 14 14 15 30 30 31 34 36 38 42 44 44 18 19 19 About Gear Fit Package contents Device layout Button Mounting the device on the strap Charging the battery Turning the Gear Fit on and off Notices for using Bluetooth Connecting the Gear Fit to a mobile device Wearing the Gear Fit Locking and unlocking the Gear Fit Adjusting the brightness of the display Settings 45 45 45 46 46 46 47 47 47 Basics 20 20 22 25 25 26 26 28 Timer Stopwatch Health Ma
Table of Contents Gear Fit Manager 48 48 48 49 49 50 Launching Gear Fit Manager Configuring the Gear Fit settings Home screen styler S Health Notifications Settings Troubleshooting Safety Information 57 58 59 Acknowledging Special Precautions and Industry Canada Notice Correct disposal of batteries in this product Disclaimer 5
Getting started About Gear Fit When you connect the Gear Fit to your mobile device, you can use the Gear Fit to view call logs or set alarms. You can use mobile devices more conveniently by connecting to various applications with the Gear Fit. Set your exercise program and manage your health by connecting the Gear Fit to a mobile device. To connect your Gear Fit to a mobile device, install Gear Fit Manager on the mobile device. Search for Gear Fit Manager from Samsung Apps or visit apps.samsung.
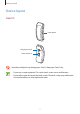
Getting started Device layout Gear Fit Power button Charging terminals Heart rate sensor Humidity and liquids may damage your Gear Fit. Keep your Gear Fit dry. • Do not use a screen protector. This causes touch screen sensor malfunctions. • Do not allow water to contact the touch screen. The touch screen may malfunction in humid conditions or when exposed to water.
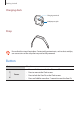
Getting started Charging dock Charging terminals Multipurpose jack Strap Ensure that the strap is kept clean. Contact with contaminants, such as dust and dye, can cause stains on the strap that may not be fully removed. Button Button Function • Press and hold to turn the Gear Fit on or off. Power • Press to move to the Clock screen. • Press to lock the Gear Fit on the Clock screen. • Press and hold for more than 7 seconds to reset the Gear Fit.
Getting started Maintaining water and dust resistance The device may be damaged if water or dust enters the device. Follow these tips carefully to prevent damage to the device and to maintain the water- and dust-resistant performance of the device. • Do not immerse the device in water deeper than 1 m and keep it submerged for more than 30 minutes. • Do not expose the device to water moving with force, such as water running from a tap, ocean waves, or waterfalls.
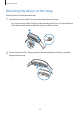
Getting started Mounting the device on the strap Mount the Gear Fit on the provided strap. 1 Insert both ends of the Gear Fit into the mounting hole on the strap. • First, insert one end of the Gear Fit into the mounting hole. Then, insert the other end of the device into the hole and pull the strap up at the same time. 2 1 2 Ensure that the Gear Fit is sitting securely in the mounting hole and that it is properly aligned with the strap.
Getting started Disconnecting the strap To disconnect the strap from the Gear Fit, lift the strap upwards. Charging the battery Charge the battery before using the Gear Fit for the first time. A computer can be also used to charge the Gear Fit by connecting them via the USB cable. Use only Samsung-approved chargers, batteries, and cables. Unapproved chargers or cables can cause the battery to explode or damage the Gear Fit. • When the battery power is low, the battery icon appears empty.
Getting started 1 Place the Gear Fit on the charging dock with the charging terminals facing each other. Charging dock Charging terminals 2 Plug the small end of the charger cable into the multipurpose jack of the charging dock. Connecting the charger improperly may cause serious damage to the Gear Fit. Any damage caused by misuse is not covered by the warranty.
Getting started • If the Gear Fit receives an unstable power supply while charging, the touch screen may not function. If this happens, unplug the charger from the Gear Fit. • While charging, the Gear Fit may heat up. This is normal and should not affect the Gear Fit’s lifespan or performance. If the battery gets hotter than usual, the charger may stop charging. • If the Gear Fit is not charging properly, take the Gear Fit and the charger to a Samsung Service Centre.
Getting started Turning the Gear Fit on and off When you turn on the Gear for the first time, follow the on-screen instructions. The instructions describe how to connect the Gear to a mobile device and to set up the Gear. Press and hold the Power button for a few seconds to turn on the Gear Fit. A pop-up window appears providing on-screen instructions that prompt you to download and install Gear Fit Manager. You can use the Gear Fit only after Gear Fit Manager is installed on the mobile device.
Getting started • Samsung is not responsible for the loss, interception, or misuse of data sent or received via the Bluetooth feature. • Always ensure that you share and receive data with devices that are trusted and properly secured. If there are obstacles between the devices, the operating distance may be reduced. • Some devices, especially those that are not tested or approved by the Bluetooth SIG, may be incompatible with your Gear Fit.
Getting started 5 6 Mobile device Select the Gear Fit model name (e.g. Gear Fit (0000)) that appeared in Step 2. Mobile device When the Bluetooth pairing request window appears, tap OK. Gear Fit When the connection window appears, tap 16 .
Getting started 7 Mobile device The Install window opens. The Install window may not appear depending on the software version. 8 Mobile device Read and agree to the terms and conditions, and follow the on-screen instructions. • Gear Fit Manager launches on the mobile device. • Gear Fit Manager application guide opens. • You can adjust the Gear Fit’s configuration in Gear Fit Manager. 9 Gear Fit Select the dominant hand and tap .
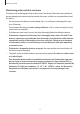
Getting started Wearing the Gear Fit Open the clasp and fit the strap to your wrist with the pin. When measuring your heart rate, wear the device firmly around your lower arm just above the wrist. Refer to ‘Wearing the Gear Fit’ for details. Do not bend the strap excessively. Doing so may damage the device. Power button Configure the Gear Fit for the wrist that you will wear it on.
Getting started Locking and unlocking the Gear Fit When not in use, lock the Gear Fit to prevent unwanted operation. Pressing the Power button on the Clock screen turns off the screen and puts the Gear Fit into lock mode. The Gear Fit automatically gets locked if it is not used for a specified period. Press the Power button to unlock the Gear Fit. Adjusting the brightness of the display You can adjust the display brightness on the Gear Fit to suit the environment.
Basics Viewing mobile device connection status and battery status Scroll left or right on the Home screen and tap Settings. The following icons provide information about the status of the Gear Fit. These icons appear at the left side of the screen. Icon Meaning Mobile device connected Mobile device disconnected Battery power level Using the touch screen Use only fingers to use the touch screen. • Do not allow the touch screen to come into contact with other electrical devices.
Basics Finger gestures Tapping To open an application, to select a menu item, or to press an on-screen button, tap it with a finger. Double-tapping While using the Gear Fit, double-tap anywhere on the screen with two fingers to access the brightness and volume control panel. You can also view indicator icons and the remaining battery power.
Basics Flicking Flick left or right on the Home screen or the Apps screen to see another panel. Viewing the Home screen View the Gear Fit’s Home screen when you connect it to the mobile device. It displays the clock, widgets, shortcuts to applications, and more. The Home screen can have multiple panels. To view other panels, scroll left or right. • Connect the Gear Fit to the mobile device after purchasing to accurately set the time.
Basics Home screen panels 1 2 3 4 Available applications and the arrangement of applications may vary depending on the software version.
Basics Number Application or feature Timer Use the Gear Fit as a countdown timer. 1 Stopwatch Measure and record the amount of elapsed time. Sleep Monitor your sleep patterns and record how much sleep you get. Pedometer Set a goal and measure your step count. 2 Exercise Set exercise goals and measure the exercise you do and calories you burn. Heart Rate 3 Measure and record your heart rate. Clock View the current date and time.
Basics Using the Clock screen While using the Gear Fit, press the Power button to return to the Clock screen. Using applications The Gear Fit can run a range of applications. On the Home screen or the Apps screen, tap a shortcut or an application icon to open it. On the Apps screen, scroll left or right to view all the applications installed on the Gear Fit. Returning to the previous page To return to the previous page, tap while using applications.
Basics Screening incoming calls When the connected mobile device receives an incoming call, you can screen it on the Gear Fit. Screen the call to reject it and send a reject message. To reject a call, tap when a call comes in and drag it to the left. To reject a call and send a reject message, tap when a call comes in and drag it to the right. You cannot use the Gear Fit for phone conversations or to make calls.
Basics Checking notifications at a later time 1 Scroll left or right on the Home screen and tap Notifications. 2 Select a notification type. 3 Select a notification to view the details. Notification details screen 4 In the notification’s detailed view, scroll down to use additional features. You can clear notifications, display the message on the mobile device, or reply to messages. View the message on the connected mobile device. Reply to the message using message templates. Delete the message.
Basics 5 Scroll left to view previous messages. • You can receive notifications on the Gear Fit for selected items. In Gear Fit Manager, tap Notifications → GEAR NOTIFICATIONS or GENERAL NOTIFICATIONS, and then tick items to select them. • If you set Notifications → Limit notifications on Gear Fit Manager, you will not be able to view specific notifications on the Gear. When Limit notifications is set, you can still view notifications for incoming calls and alarms on the Gear.
Basics 1 Click Update in the dialogue box to start the upgrade process. 2 Follow the on-screen instructions to complete the upgrade process. If a dialogue box does not appear automatically, click the Gear Fit name in the Connected devices list, and then click Firmware upgrade. When the upgrade is completed, a completion message appears on the screen and the Gear Fit resets automatically. • Check the Gear Fit’s battery status before upgrading the software.
Applications Timer Use this application to use the Gear Fit as a countdown timer. 1 2 On the Home screen, tap Timer. Set the duration, and then tap . Drag outside the large circle when the timer goes off. Stopwatch Use this application to measure the amount of elapsed time. 1 2 On the Home screen, tap Stopwatch. Tap to time an event. • : Record lap times. • : End timing. : Clear lap time records.
Applications Health Management Applications Use the pedometer, exercise, and heart rate applications to monitor and manage your health and physical condition. When the Gear Fit is synced with a compatible S Health application, you can use additional features. The additional features include, checking your physical condition and exercise records, and more. Pedometer, Exercise, and Heart Rate are intended for leisure, well-being and fitness purposes only and are not intended for medical use.
Applications The American College of Sports Medicine recommends that you see your doctor before engaging in vigorous exercise if two or more of the following apply: • You are a man older than age 45 or a woman older than age 55. • You have a family history of heart disease before age 55. • You smoke or quit smoking in the past six months. • You have not exercise for three months or more. • You are overweight or obese. • You have high blood pressure or high cholesterol.
Applications • Remove the protective plastic from the heart rate measurement sensor before taking measurements. • Heart rate measuring is intended for human use only. The heart rate may not be recognized due to surrounding conditions. In this case, the measured heart rate may not be valid. • Take heart rate measurements when you are seated and relaxed. • If heart rate measurements are taken at low temperatures, the result may be inaccurate. • Do not move your body while taking heart rate measurements.
Applications Sleep Use this application to monitor your sleep patterns and record how much sleep you get by detecting body movements while you sleep. You can transfer the records to the connected mobile device. Before using this application • If you have just purchased or have reset the Gear Fit, read the on-screen information about the application. • The Sleep application monitors your sleep duration and body movements while you are sleeping.
Applications Using additional features To use additional features, scroll left on the Sleep screen. Sleep screen View previous records. Return to the previous screen. Turn on/off the alarm blocking mode during sleep.
Applications Pedometer On the step count screen, start the pedometer to count your steps and view the distance walked and burned calories. Counting steps 1 2 On the Home screen, tap Pedometer. Tap Start to start counting. You can view information, such as step count and burnt calories, on the screen. Number of steps Return to the previous screen. Pause the step count. Distance 3 Burnt calories Tap Pause to stop counting.
Applications Using additional features Tap and hold the pedometer screen to use additional features. Scroll left on the pedometer screen to use additional features. Pedometer screen Reset the number of steps. View previous records. Return to the previous screen. Change the goal. • You may experience a brief delay while the pedometer monitors your steps and then displays your step count. • If you use the pedometer while travelling by car or train, vibration may affect your step count.
Applications Exercise Use this application to set diet and calorie goals and plan your exercise program. View the exercise you have completed in the day and compare it with your exercise goal. You can also record your exercise achievements in a log. Scroll left or right on the Home screen and tap Exercise. The connected mobile device’s GPS feature is used to check information, such as altitude and speed, when you are cycling or hiking.
Applications 3 Tap Start to start monitoring. You can view information, such as exercise time and distance, on the screen. Exercise duration Stop recording. Return to the previous screen. Distance 4 Tap the screen, and then tap Stop → 5 Scroll up or down to view the records. Pace to stop monitoring your exercise information. Your exercise records appear on the screen.
Applications Using additional features Scroll left on the exercise screen to use additional features. Exercise screen Turn on/off the heart rate display or coaching message. View previous records. Return to the previous screen. Change the goal. • To view more additional features, scroll left on the additional features screen. • Only records from the past thirty days are saved. You can view previous data on the mobile device where the S Health application is installed.
Applications and provide more personalized guidance. A typical workout may start at a lower intensity and sharply increase in intensity towards the end. Visit www.firstbeat.fi/te for more information. The Gear Fit measures your heart rate with the heart rate measurement sensor. This feature may not work properly if the heart rate sensor is exposed to excessive sweat or its position is changed during exercise. For the best coaching results, use the coaching feature while you exercise indoors.
Applications Heart Rate Use this application to measure and record your current heart rate. You can plan and adjust your exercise based on the recorded heart rate. • The device’s heart rate measurement feature cannot be used for clinical or medical diagnosis. • For more accurate heart rate measurement, measure your heart rate when your body is not moving. To measure your heart rate during exercise, use the exercise feature.
Applications 2 Tap Start to begin measuring your heart rate. The icon appears and blinks on the screen when heart rate measurement starts. The measurement will be taken by the device. Then, after a brief delay your current heart rate is displayed on the screen. Current heart rate Return to the previous screen. Date Viewing previous records 1 Scroll left on the heart rate measurement screen. Heart rate measurement screen 2 3 Tap History. Scroll left or right to view your previous heart rate records.
Applications You can save up to thirty records. You can view previous data on the mobile device where the S Health application is installed. Media Controller Use this application to play and control media files. You can launch the music player on the connected mobile device and control playback with the Gear Fit. For other media files, start playback on the mobile device first. You can control playback of the currently-playing file from the Gear Fit. 1 2 On the Home screen, tap Media Controller.
Settings Clock Change the clock types that appear on the Clock screen. On the Home screen, tap Settings → Clock. Scroll left or right and select the desired clock type. Wallpaper Change the colour of the Home screen or set an image as wallpaper for the Home screen. On the Home screen, tap Settings → Wallpaper. Display Change the settings for the display. On the Home screen, tap Settings → Display. • Brightness: Adjust the brightness for the display.
Settings • Font size: Change the font type and size for display text of notifications. • Wake-up gesture: Set the Gear to turn on and show a specified screen by using a gesture. Raise the hand that is wearing the Gear and look at the Gear’s screen for a few seconds. The screen turns on and a preset screen is displayed. Bluetooth Configure settings for the Bluetooth feature. On the Home screen, tap Settings → Bluetooth. • Bluetooth: Turn the Bluetooth feature on or off.
Settings Privacy lock On the Home screen, tap Settings → Privacy lock. • PIN: Activate or deactivate the privacy lock feature by setting a PIN of at least four numbers. You can unlock the Gear Fit’s screen by entering the PIN when the mobile device and the Gear Fit are disconnected. • None: Deactivate the privacy lock feature. • Help: Access help information about using the privacy lock feature. Reset Gear Fit Reset settings to the factory default values and delete all data.
Gear Fit Manager Launching Gear Fit Manager This application allows you to connect to a mobile device and customize your Gear Fit’s settings and applications. Also, you can use it to access the connected mobile device’s features. On the connected mobile device’s Apps screen, tap Gear Fit Manager. Some features may not be available depending on the type of connected mobile device. Configuring the Gear Fit settings Access Gear Fit information and update Gear Fit software.
Gear Fit Manager You can change the clock types to be displayed on the clock screen. Tap Clock on the Gear Fit Manager screen. Select the desired clock type. To configure detailed information on the watch screen, tap select an item. next to the watch list and Layout Change the order of the applications that appear on the Home screen. Tap Layout on the Gear Fit Manager screen. Tap and hold an application, and then drag it to another location.
Gear Fit Manager • GENERAL NOTIFICATIONS: Set applications to be notified on the Gear Fit. Settings Use this application to configure Gear Fit Manager and set various options. On the Gear Fit Manager screen, tap Settings. Setting the Power button Set actions to be performed when you press the Gear Fit’s Power button twice. On the Settings screen, tap Double pressing power key, and then select an option.
Gear Fit Manager Setting up emergency messages In an emergency, you can send a message that includes your current location to designated recipients. On the Settings screen, tap Send help messages and drag the Send help messages switch to the right. Then, read and agree to the terms and conditions. You can send emergency messages by pressing the Power button three times. Setting up emergency contacts Set the contacts to send messages to in an emergency.
Troubleshooting Before contacting a Samsung Service Centre, please attempt the following solutions. Some situations may not apply to your Gear Fit. Your Gear Fit does not turn on When the battery is completely discharged, your Gear Fit will not turn on. Charge the battery completely before turning on the Gear Fit. The touch screen responds slowly or improperly • If you attach a protective cover or optional accessories to the touch screen, the touch screen may not function properly.
Troubleshooting Another Bluetooth device cannot locate your Gear Fit • Ensure that the Bluetooth wireless feature is activated on your Gear Fit. • Reset your Gear Fit and try again. • Ensure that your Gear Fit and the other Bluetooth device are within the Bluetooth connection range (10 m). The distance may vary depending on the environment the devices are used in. If the tips above do not solve the problem, contact a Samsung Service Centre.
Troubleshooting The battery icon is empty Your battery is low. Recharge the battery. The battery does not charge properly (For Samsung-approved chargers) • Ensure that you place the Gear Fit on the charging dock and connect the dock to the charger properly. • If the charging terminals are dirty, the battery may not charge properly or the Gear Fit may turn off. Wipe both gold-coloured contacts and try charging the battery again. • The batteries in some devices are not user-replaceable.
Troubleshooting A small gap appears around the outside of the Gear Fit case • This gap is a necessary manufacturing feature and some minor rocking or vibration of parts may occur. • Over time, friction between parts may cause this gap to expand slightly.
Safety Information To prevent injury, fire, or explosion, read and adhere to all safety information before using the device. Warning • Use manufacturer-approved batteries, chargers, accessories, and supplies. • Do not expose the device to physical impact or damage. • Prevent the multipurpose jack and battery terminals from contacting conductive elements, such as metal or liquids. • Do not store your device in very hot or very cold areas.
Safety Information Caution • Do not disassemble, modify, or repair your device – – Any changes or modifications to your device can void your manufacturer’s warranty. If your device needs servicing, take it to a Samsung Service Centre. – – Do not disassemble or puncture the battery, as this can cause explosion or fire. • If you experience skin problems after wearing this device, remove the device and consult a medical professional.
Safety Information Information to User This equipment has been tested and found to comply with the limits of a Class B digital device. These limits are designed to provide reasonable protection against harmful interference in a residential installation. This equipment generates, uses, and can radiate radio frequency energy and, if not installed and used in accordance with the instructions, may cause harmful interference to radio communications.
Safety Information Disclaimer Some content and services accessible through this device belong to third parties and are protected by copyright, patent, trademark and/or other intellectual property laws. Such content and services are provided solely for your personal non-commercial use. You may not use any content or services in a manner that has not been authorized by the content owner or service provider.
Some content may differ from your Gear Fit depending on the region, service provider, or software version, and is subject to change without prior notice. www.samsung.com English (CA). 01/2015. Rev.1.