SM-T113NU User Manual English (SEA). 02/2015. Rev.1.0 www.samsung.
Table of Contents Read me first Network connectivity 30 Getting started 6 7 9 11 12 13 Motions & usability features Package contents Device layout Charging the battery Using a memory card Turning the device on and off Locking and unlocking the screen 31 Multi window Personalising 34 36 37 38 39 Basics 14 17 21 24 24 26 28 28 29 29 Wi-Fi Using the touch screen Home screen layout Notifications and quick setting panels Opening apps Installing or uninstalling apps Entering text Screen capture My Files
Table of Contents Camera Device & data manager 45 46 47 63 64 Basic shooting Shooting modes Camera settings 65 66 Upgrading the device Transferring files between the device and a computer Backing up and restoring data Performing a data reset Gallery 49 Viewing content on the device Settings 67 67 69 71 73 Useful apps and features 50 51 52 54 54 55 55 S Planner Video Clock Calculator Memo Hancom Office Viewer Google apps Troubleshooting Connecting with other devices 58 60 62 About Settings CON
Read me first Please read this manual before using the device to ensure safe and proper use. • Descriptions are based on the device’s default settings. • Some content may differ from your device depending on the region, service provider, or device’s software. • Content (high quality content) that requires high CPU and RAM usage will affect the overall performance of the device. Apps related to the content may not work properly depending on the device’s specifications and the environment that it is used in.
Read me first Instructional icons Warning: situations that could cause injury to yourself or others Caution: situations that could cause damage to your device or other equipment Note: notes, usage tips, or additional information 5
Getting started Package contents Check the product box for the following items: • Device • Quick start guide • The items supplied with the device and any available accessories may vary depending on the region or service provider. • The supplied items are designed only for this device and may not be compatible with other devices. • Appearances and specifications are subject to change without prior notice. • You can purchase additional accessories from your local Samsung retailer.
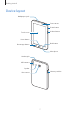
Getting started Device layout Multipurpose jack Front camera Power button Volume button Touch screen Home button Back button Recent apps button Microphone Headset jack GPS antenna Speaker Memory card slot Rear camera 7
Getting started • Do not cover the antenna area with your hands or other objects. This may cause connectivity problems or drain the battery. • Using a Samsung-approved screen protector is recommended. Unapproved screen protectors may cause the sensors to malfunction. Buttons Button Function Power • Press and hold to turn the device on or off. • Press to turn on or lock the screen. • Tap to open the list of recent apps. Recent apps • Tap and hold to access additional options for the current screen.
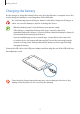
Getting started Charging the battery Use the charger to charge the battery before using it for the first time. A computer can be also used to charge the battery by connecting them via the USB cable. Use only Samsung-approved chargers, batteries, and cables. Unapproved chargers or cables can cause the battery to explode or damage the device. • When the battery power is low, the battery icon appears empty.
Getting started • The device can be used while it is charging, but it may take longer to fully charge the battery. • If the device receives an unstable power supply while charging, the touch screen may not function. If this happens, unplug the charger from the device. • While charging, the device may heat up. This is normal and should not affect the device’s lifespan or performance. If the battery gets hotter than usual, the charger may stop charging.
Getting started Using a memory card Installing a memory card Your device accepts memory cards with maximum capacities of 32 GB. Depending on the memory card manufacturer and type, some memory cards may not be compatible with your device. • Some memory cards may not be fully compatible with the device. Using an incompatible card may damage the device or the memory card, or corrupt the data stored in it. • Use caution to insert the memory card right-side up.
Getting started Removing the memory card Before removing the memory card, first unmount it for safe removal. On the Home screen, tap → Settings → Storage → Unmount SD card. 1 2 3 Open the cover of the memory card slot. Push the memory card until it disengages from the device, and then pull it out. Close the cover of the memory card slot. Do not remove the memory card while the device is transferring or accessing information.
Getting started Locking and unlocking the screen Pressing the Power button turns off the screen and locks it. Also, the screen turns off and automatically locks if the device is not used for a specified period. To unlock the screen, press the Power button or the Home button and flick your finger in any direction within the unlock screen area. You can change the unlock code to unlock the screen. Refer to Changing the screen lock method for more information.
Basics Using the touch screen • Do not allow the touch screen to come into contact with other electrical devices. Electrostatic discharges can cause the touch screen to malfunction. • To avoid damaging the touch screen, do not tap it with anything sharp or apply excessive pressure to it with your fingertips. • The device may not recognise touch inputs close to the edges of the screen, which are outside of the touch input area.
Basics Tapping and holding Tap and hold an item or the screen for more than 2 seconds to access available options. Dragging To move an item, tap and hold it and drag it to the target position. Double-tapping Double-tap on a webpage or image to zoom in. Double-tap again to return.
Basics Flicking Flick left or right on the Home screen or the Apps screen to see another panel. Flick up or down to scroll through a webpage or a list of items, such as contacts. Spreading and pinching Spread two fingers apart on a webpage, map, or image to zoom in a part. Pinch to zoom out.
Basics Home screen layout Home screen The Home screen is the starting point for accessing all of the device’s features. It displays widgets, shortcuts to apps, and more. Widgets are small apps that launch specific app functions to provide information and convenient access on your Home screen. To view other panels, scroll left or right, or tap one of the screen indicators at the bottom of the screen. To customise the Home screen, refer to Managing the Home screen.
Basics Home screen options On the Home screen, tap and hold an empty area, or pinch your fingers together to access the available options.
Basics Apps screen The Apps screen displays icons for all apps, including newly installed apps. On the Home screen, tap to open the Apps screen. To view other panels, scroll left or right, or select a screen indicator at the bottom of the screen. To customise the Apps screen, refer to Managing the Apps screen. Access additional options.
Basics Indicator icons Indicator icons appear on the status bar at the top of the screen. The icons listed in the table below are most common. The status bar may not appear at the top of the screen in some apps. To display the status bar, drag down from the top of the screen.
Basics Notifications and quick setting panels Using the notifications panel When you receive new notifications, such as messages, indicator icons appear on the status bar. To see more information about the icons, open the notifications panel and view the details. To open the notifications panel, drag the status bar downwards. To close the notifications panel, drag the bar from the bottom of the screen upwards.
Basics You can use the following functions on the notifications panel. Launch Settings. Activate or deactivate options. Tap and hold a button to view more detailed settings. View all quick setting buttons. Tap a notification and perform various actions. Clear all notifications. Adjust the volume. Adjust the brightness. Rearranging quick setting buttons To rearrange quick setting buttons on the notifications panel, tap item, and then drag the item to another location.
Basics Using the quick setting panel You can activate or deactivate some features on the notifications panel. To activate or deactivate more features, open the quick setting panel. To open the quick setting panel, drag the status bar downwards with two fingers. Alternatively, tap on the notifications panel. To close the quick setting panel, drag the bar from the bottom of the screen upwards. Tap the following options to activate or deactivate them.
Basics Opening apps On the Home screen or the Apps screen, select an app icon to open it. To open the list of recently-used apps, tap and select an app icon to open. Closing an app Tap and drag an app icon to the top or bottom to close it. To close all running apps, tap Close all. Installing or uninstalling apps Samsung GALAXY Apps Use this app to purchase and download apps. Tap GALAXY Apps on the Apps screen. This app may not be available depending on the region or service provider.
Basics Play Store Use this app to purchase and download apps. Tap Play Store on the Apps screen. Installing apps Browse apps by category or tap to search for a keyword. Select an app to view information about it. To download free apps, tap INSTALL. To purchase and download apps where charges apply, tap the price and follow the on-screen instructions. To change the auto update settings, tap then select an option.
Basics Entering text Keyboard layout A keyboard appears automatically when you enter text to send messages, create memos, and more. Text entry is not supported in some languages. To enter text, you must change the input language to one of the supported languages. Delete a preceding character. Enter punctuation marks. Break to the next line. Enter uppercase. For all caps, tap it twice. Move the cursor. Change the keyboard settings. Enter a space.
Basics Using additional keyboard functions Tap and hold to use various functions. Other icons may appear instead of the last function that was used. • depending on : Enter text by voice. Change the language. Open the keyboard. Start or pause entering text by voice. • : Change the keyboard settings. • : Enter emoticons. • : Change the keyboard type. You can move the keyboard to another location by . dragging Switch to the standard keyboard. Copying and pasting 1 2 3 4 Tap and hold over text.
Basics Screen capture Capture a screenshot while using the device. Press and hold the Home button and the Power button simultaneously. The image is saved in the Gallery → → Album → Screenshots folder. After capturing a screenshot, you can edit the image and share it with others. It is not possible to capture a screenshot while using some apps. My Files Use this app to access various files stored in the device. Tap My Files on the Apps screen. Alternatively, tap on the Home screen.
Basics Power saving feature Ultra power saving mode Use this mode to extend the device’s battery power. In ultra power saving mode, the device performs the following: • Restricts the available apps to essential and selected apps only. • Deactivates the Bluetooth feature. On the Apps screen, tap Settings → Ultra power saving mode, and tap the Ultra power saving mode switch to activate it. Alternatively, open the quick setting panel and tap U. power saving to activate it.
Network connectivity Wi-Fi Connect the device to a Wi-Fi network to use the Internet or share media files with other devices. Refer to Wi-Fi for additional options. Turn off Wi-Fi to save the battery when not in use. 1 2 On the Apps screen, tap Settings → Wi-Fi, and then tap the Wi-Fi switch to activate it. 3 Tap Connect. Select a network from the Wi-Fi networks list. Networks that require a password appear with a lock icon.
Motions & usability features Multi window About Multi window Use this feature to run two apps on the screen at the same time. You can use this feature to view emails or use the Internet while you play a video simultaneously. Launching Multi window 1 On the Apps screen, tap Settings → Multi window, and then tap the Multi window switch to activate it. Alternatively, open the quick setting panel and tap Multi window to activate it.
Motions & usability features 3 Tap and hold an app icon to launch from the Multi window tray, and then drag it to the screen. Release the app icon when the screen turns blue. 4 Tap and hold another app icon on the Multi window tray, and then drag it to a new location. Adjusting the window size Drag the circle between the app windows up or down to adjust the size of the windows.
Motions & usability features Using Multi window options When you use Multi window apps, select the app window and a blue frame will appear around it. Tap the circle between the app windows to access the following options: • : Switch locations between Multi window apps. • : Maximise the window. • : Close the app.
Personalising Managing the Home and Apps screens Managing the Home screen Adding items Tap and hold an app from the Apps screen, and then drag it to the Home screen. To add widgets, open the Home screen, tap and hold an empty area, tap Widgets, tap and hold a widget, and then drag it to the Home screen. Moving and removing an item Tap and hold an item on the Home screen, and then drag it to a new location. To move the item to another panel, drag it to the side of the screen.
Personalising Managing panels On the Home screen, tap and hold an empty area to add, move, or remove a panel. To add a panel, scroll left to the last panel, and then tap . To move a panel, tap and hold a panel preview, and then drag it to a new location. To remove a panel, tap and hold a panel preview, and then drag it to Remove at the top of the screen. To set a panel as the main Home screen, tap .
Personalising Setting wallpaper and ringtones Setting wallpaper Set an image or photo stored in the device as wallpaper for the Home screen or the locked screen. 1 On the Home screen, tap and hold an empty area, and then tap Wallpapers. Alternatively, on the Apps screen, tap Settings → Display → Wallpaper. 2 3 Select a screen to change or apply wallpaper to. Scroll left or right and select from images displayed at the bottom of the screen.
Personalising Changing the screen lock method You can change the way that you lock the screen to prevent others from accessing your personal information. On the Apps screen, tap Settings → Lock screen → Screen lock, and then select a screen lock method. The device requires an unlock code whenever unlocking it. If the unlock code is forgotten, take the device to a Samsung Service Centre to reset it. Pattern Draw a pattern by connecting four dots or more, and then draw the pattern again to verify it.
Personalising Multiple users Set up additional user accounts for other users to use the device with personalised settings, such as email accounts, wallpaper preferences, and more. Following types of user accounts are available. • Owner: The owner account is created only when setting up the device for the first time, and cannot be created more than one. This account has full control of the device including user account management.
Personalising Managing users When using the owner account, you can delete accounts or change the account settings. On the Apps screen, tap Settings → Users and select an account under USERS & PROFILES. Then, select or deselect apps and content to allow or restrict the account’s access to them. To delete the account, tap . Transferring data from your previous device Using backup accounts You can transfer backup data from your previous device to your new device using your Google account.
Personalising Using Smart Switch with computers Use this feature to import a backup of your data (from selected manufacturer’s mobile devices) from a computer to your device. You can download the app from www.samsung.com/smartswitch. 1 Back up data from a previous device to the computer. For more information, contact the device’s manufacturer. 2 3 4 On the computer, launch Smart Switch. Connect your current device to the computer using the USB cable.
Contacts Adding contacts Moving contacts from other devices You can move contacts from other devices to your device. Refer to Transferring data from your previous device for more information. Creating contacts manually 1 2 3 On the Apps screen, tap Contacts → Contacts. Tap and enter contact information. • : Add an image. • / : Add or delete a contact field. Tap Save.
Contacts Importing and exporting contacts Import contacts from storage services to your device or export contacts from the device to storage services. On the Apps screen, tap Contacts → Contacts. Tap → Settings → Import/Export, and then select an import or export option. Searching for contacts On the Apps screen, tap Contacts → Contacts. Use one of the following search methods: • Scroll up or down the contacts list. • Tap the search field at the top of the contacts list and enter search criteria.
Email Email Setting up email accounts Tap Email on the Apps screen. Set up an email account when opening Email for the first time. Enter the email address and password. Tap Next for a private email account or tap Manual setup for a company email account. After that, follow the on-screen instructions to complete the setup. To set up another email account, tap → Settings → Add account. If you have more than one email account, you can set one as the default account.
Email Reading emails Tap Email on the Apps screen. Select an email account to use, and new messages are retrieved. To manually retrieve new messages, tap . Tap a message to read. Reply to all recipients. Reply to the message. Forward the message. Compose a message. Delete the message. Access additional options. Add this email address to the contacts list or view other options. Mark the message as a reminder. Open attachments. Go to the previous or next message.
Camera Basic shooting Taking photos or recording videos 1 2 Tap Camera on the Apps screen. Tap to take a photo or tap → to record a video. • Spread two fingers apart on the screen to zoom in, and pinch to zoom out. Display current mode. Switch between still and video mode. Switch between the front and rear cameras. Take a photo. Use this for delayed-time shots. Change the shooting mode. Change camera settings. View photos and videos you have captured.
Camera Camera etiquette • Do not take photos or record videos of other people without their permission. • Do not take photos or record videos where legally prohibited. • Do not take photos or record videos in places where you may violate other people’s privacy. Shooting modes Auto Use this mode to allow the camera to evaluate the surroundings and determine the ideal mode for the photo. On the Apps screen, tap Camera → → Auto.
Camera Best photo Use this mode to take a series of photos and save the best one. To view other photos in the series, scroll left or right. The device recommends the best photo and identifies it with . On the Apps screen, tap Camera → → Best photo. Continuous shot Use this mode to take a series of photos of moving subjects. On the Apps screen, tap Camera → Tap and hold → Continuous shot. to take several photos continuously.
Camera To use more options, tap . • White balance: Select an appropriate white balance, so images have a true-to-life colour range. The settings are designed for specific lighting situations. These settings are similar to the heat range for white-balance exposure in professional cameras. • Metering modes: Select a metering method. This determines how light values are calculated. Centre-weighted measures background light in the centre of the scene. Spot measures the light value at a specific location.
Gallery Viewing content on the device On the Apps screen, tap Gallery and select an image or a video. Video files show the icon on the preview thumbnail. To hide or show the menu bar and the preview thumbnails, tap the screen. Send the image to others. Modify the image. Move to the previous screen. Access additional options. Delete the image.
Useful apps and features S Planner Creating events or tasks 1 2 Tap S Planner on the Apps screen. Tap . Alternatively, select a date with no events or tasks in it and tap the date again. If the date already has saved events or tasks in it, tap the date and tap 3 . Select either event or task and enter details. • Event: Set a start and end date for an event. You can set an optional repeat setting. • Task: Add a task to do on a specific date. You can set an optional priority setting. Select an item.
Useful apps and features Syncing events and tasks with your accounts Tap S Planner on the Apps screen. To sync events and tasks with your accounts, tap → Sync. To add accounts to sync with, tap → Calendars → Add account. Then, select an account to sync with and sign in. When an account is added, a green circle is displayed next to the account name. To change an account’s syncing option, open the Apps screen, tap Settings → Accounts, and then select an account service.
Useful apps and features Clock Alarm On the Apps screen, tap Clock → Alarm. Setting alarms Tap in the alarms list, set an alarm time, select the days on which the alarm will repeat, set other various alarm options, and then tap Save. To activate or deactivate alarms, tap next to the alarm in the alarms list. • Snooze: Set an interval and the number of times for the alarm to repeat after the preset time. • Smart alarm: Set a time and tone for the smart alarm.
Useful apps and features World clock On the Apps screen, tap Clock → World clock. Creating clocks Tap and enter a city name or select a city from the cities list. To apply summer time, tap and hold a clock, and then tap Deleting clocks Tap → Select, select clocks, and then tap . Stopwatch On the Apps screen, tap Clock → Stopwatch. Tap Start to time an event. Tap Lap to record lap times. Tap Stop to stop timing. To clear lap times, tap Reset. Timer On the Apps screen, tap Clock → Timer.
Useful apps and features Calculator Use this app for simple or complex calculations. Tap Calculator on the Apps screen. Rotate the device to landscape orientation to display the scientific calculator. If Screen rotation is disabled, tap → Scientific calculator. To see the calculation history, tap To clear the history, tap to hide the keypad. → → Clear history. Memo Use this app to create memos and organise them by category. Tap Memo on the Apps screen.
Useful apps and features Hancom Office Viewer Use this app to view documents in various formats, including spreadsheets and presentations. Tap Hancom Office Viewer on the Apps screen. Tap Recent Documents, Open, All Documents, or Cloud, and then select a file to open. This app may not be available depending on the region or service provider. Google apps Google provides entertainment, social network, and business apps. You may require a Google account to access some apps.
Useful apps and features Maps Find your location on the map, search for locations, and view location information for various places. Play Music Discover, listen to, and share music on your device. Play Movies & TV Watch videos stored on your device and download various content to watch from Play Store. Play Books Download various books from Play Store and read them. Play Newsstand Read news and magazines that interest you in one convenient location.
Useful apps and features Hangouts Chat with your friends individually or in groups and use images, emoticons, and video calls while you are chatting. Google Search quickly for items on the Internet or your device. Voice Search Search quickly for items by saying a keyword or phrase. Google Settings Configure settings for some features provided by Google.
Connecting with other devices Bluetooth About Bluetooth Bluetooth creates a direct wireless connection between two devices over short distances. Use Bluetooth to exchange data or media files with other devices. • Samsung is not responsible for the loss, interception, or misuse of data sent or received via Bluetooth. • Always ensure that you share and receive data with devices that are trusted and properly secured. If there are obstacles between the devices, the operating distance may be reduced.
Connecting with other devices Pairing with other Bluetooth devices 1 On the Apps screen, tap Settings → Bluetooth, tap the Bluetooth switch to activate it, and then tap Scan. The detected devices are listed. To set the device as visible to other devices, tap the device name. 2 Select a device to pair with. If your device has paired with the device before, tap the device name without confirming the auto-generated passkey.
Connecting with other devices Receiving an image When another device sends you an image, accept the Bluetooth authorisation request. The received image is saved in the Gallery → Download folder. Unpairing Bluetooth devices 1 On the Apps screen, tap Settings → Bluetooth. The device displays the paired devices in the list. 2 3 Tap next to the device’s name to unpair. Tap Unpair.
Connecting with other devices Sending and receiving data You can share data, such as contacts or media files, with other devices. The following actions are an example of sending an image to another device. Sending an image 1 2 3 4 On the Apps screen, tap Gallery. Select an image. Tap → Wi-Fi Direct, select a device to transfer the image to, and then tap Done. Accept the Wi-Fi Direct authorisation request on the other device.
Connecting with other devices Mobile printing Connect the device to a printer via Wi-Fi or Wi-Fi Direct, and print images or documents. Some printers may not be compatible with the device. Adding printer plug-ins Add printer plug-ins for printers you want to connect the device to. On the Apps screen, tap Settings → Printing → Add printer, and search for a printer plug-in in Play Store. Select a printer plug-in and install it.
Device & data manager Upgrading the device The device can be upgraded to the latest software. Upgrading over the air The device can be directly upgraded to the latest software by the firmware over-the-air (FOTA) service. On the Apps screen, tap Settings → About device → Software update → Update. Upgrading with Samsung Kies Download the latest version of Samsung Kies from the Samsung website. Launch Samsung Kies and connect the device to the computer.
Device & data manager Transferring files between the device and a computer Move audio, video, image, or other types of files from the device to the computer, or vice versa. Do not disconnect the USB cable from the device when you are transferring files. Doing so may cause data loss or device damage. • Do not disconnect the device from the computer when you play files saved in the device on the connected computer. After you finish playing the file, disconnect the device from the computer.
Device & data manager Connecting with Samsung Kies Samsung Kies is a computer app that manages media contents and personal information with Samsung devices. Download the latest Samsung Kies from the Samsung website. 1 Connect the device to the computer using the USB cable. Samsung Kies launches on the computer automatically. If Samsung Kies does not launch, double-click the Samsung Kies icon on the computer. 2 Transfer files between your device and the computer.
Device & data manager Performing a data reset Delete all settings and data on the device. Before performing a factory data reset, ensure you back up all important data stored on the device. Refer to Backing up and restoring data for more information. On the Apps screen, tap Settings → Backup and reset → Factory data reset → Reset device → Erase everything. The device automatically restarts.
Settings About Settings Use this app to configure the device, set app options, and add accounts. Tap Settings on the Apps screen. CONNECTIONS Wi-Fi Activate the Wi-Fi feature to connect to a Wi-Fi network and access the Internet or other network devices. On the Settings screen, tap Wi-Fi, and then tap the Wi-Fi switch to activate it. To use options, tap . • Advanced: Customise Wi-Fi settings. • WPS push button: Connect to a secured Wi-Fi network with a WPS button.
Settings Bluetooth Activate the Bluetooth feature to exchange information over short distances. On the Settings screen, tap Bluetooth, and then tap the Bluetooth switch to activate it. To use more options, tap . • Visibility timeout: Set duration that the device is visible. • Received files: View received files via Bluetooth. Flight mode This disables all wireless functions on your device. You can use only non-network services. On the Settings screen, tap Flight mode.
Settings Printing Configure settings for printer plug-ins installed on the device. You can search for available printers or add one manually to print files. On the Settings screen, tap Printing. More networks Customise settings to control networks. On the Settings screen, tap More networks. VPN Set up and connect to virtual private networks (VPNs). DEVICE Sound Change settings for various sounds on the device. On the Settings screen, tap Sound.
Settings Display Change the display settings. On the Settings screen, tap Display. • Wallpaper: – – Home screen: Select a background image for the Home screen. – – Lock screen: Select a background image for the locked screen. – – Home and lock screen: Select a background image for the Home screen and the locked screen. • Notification panel: Customise the items that appear on the notifications panel. • Brightness: Set the brightness of the display.
Settings Lock screen Change the settings for the locked screen. On the Settings screen, tap Lock screen. • Screen lock: Change the screen lock method. The following options may vary depending on the screen lock feature selected. • Dual clock: Set the device to show the dual clock. • Show date: Set the device to show the date with the clock. • Shortcuts: Set the device to show and edit app shortcuts on the locked screen. This feature may not be available depending on the region or service provider.
Settings Backup and reset Change the settings for managing settings and data. On the Settings screen, tap Backup and reset. • Back up my data: Set the device to back up settings and app data to the Google server. • Backup account: Set up or edit your Google backup account. • Automatic restore: Set the device to restore settings and app data when the apps are reinstalled on the device. • Factory data reset: Reset settings to the factory default values and delete all data.
Settings • Magnification gestures: Set the device to magnify the screen and to zoom in on a specific area. • Accessibility shortcut: Set the device to activate TalkBack when you press and hold the Power button, and then tap and hold the screen with two fingers. • Text-to-speech options: Change settings for the text-to-speech feature. • Turn off all sounds: Set the device to mute all device sounds, such as media sounds.
Settings Samsung keyboard To change the Samsung keyboard settings, tap . The available options may vary depending on the region or service provider. • English(UK): Select a default keyboard layout. • Select input languages: Select languages for text input. • Predictive text: Activate predictive text mode to predict words based on your input and show word suggestions. You can also customise the word prediction settings.
Settings Voice search • Language: Select a language for voice recognition. • Speech output: Set the device to provide voice feedback to alert you to the current action. • “Ok Google” Detection: Set the device to begin voice recognition when you say the wake-up command while using the search app. This feature may not be available depending on the region or service provider. • Offline speech recognition: Download and install language data for offline voice input.
Settings Date and time Access and alter the following settings to control how the device displays the time and date. On the Settings screen, tap Date and time. If the battery remains fully discharged or removed from the device, the time and date is reset. • Set date: Set the current date manually. • Set time: Set the current time manually. • Select time zone: Set the home time zone. • Use 24-hour format: Display time in 24-hour format. • Select date format: Select a date format.
Settings Battery View the amount of battery power consumed by your device. On the Settings screen, tap Battery. • Display battery percentage: Set the device to display the remaining battery life. Storage View memory information for your device and memory card, or format a memory card. On the Settings screen, tap Storage. Formatting a memory card permanently deletes all data from it.
Settings • Encrypt external SD card: Set the device to encrypt files on a memory card. If you reset your device to the factory defaults with this setting enabled, the device will not be able to read your encrypted files. Disable this setting before resetting the device. • Remote controls: Set the device to allow control of your lost or stolen device remotely via the Internet. To use this feature, you must sign in to your Samsung account. • Go to website: Access the Find My Mobile website (findmymobile.
Troubleshooting Before contacting a Samsung Service Centre, please attempt the following solutions. Some situations may not apply to your device. When you turn on your device or while you are using the device, it prompts you to enter one of the following codes: • Password: When the device lock feature is enabled, you must enter the password you set for the device.
Troubleshooting The touch screen responds slowly or improperly • If you attach a protective cover or optional accessories to the touch screen, the touch screen may not function properly. • If you are wearing gloves, if your hands are not clean while touching the touch screen, or if you tap the screen with sharp objects or your fingertips, the touch screen may malfunction. • The touch screen may malfunction in humid conditions or when exposed to water.
Troubleshooting The battery icon is empty Your battery is low. Charge the battery. The battery does not charge properly (For Samsung-approved chargers) • Ensure that the charger is connected properly. • Visit a Samsung Service Centre and have the battery replaced. The battery depletes faster than when first purchased • When you expose the device or the battery to very cold or very hot temperatures, the useful charge may be reduced.
Troubleshooting Photo quality is poorer than the preview • The quality of your photos may vary, depending on the surroundings and the photography techniques you use. • If you take photos in dark areas, at night, or indoors, image noise may occur or images may be out of focus.
Troubleshooting A connection is not established when you connect the device to a computer • Ensure that the USB cable you are using is compatible with your device. • Ensure that you have the proper driver installed and updated on your computer. • If you are a Windows XP user, ensure that you have Windows XP Service Pack 3 or higher installed on your computer. • Ensure that you have Samsung Kies or Windows Media Player 10 or higher installed on your computer.
Copyright Copyright © 2015 Samsung Electronics This manual is protected under international copyright laws. No part of this manual may be reproduced, distributed, translated, or transmitted in any form or by any means, electronic or mechanical, including photocopying, recording, or storing in any information storage and retrieval system, without the prior written permission of Samsung Electronics. Trademarks • SAMSUNG and the SAMSUNG logo are registered trademarks of Samsung Electronics.