TA B L E T User Manual Please read this manual before operating your device and keep it for future reference.
Legal Notices Disclaimer of Warranties; Exclusion of Liability Warning: This product contains chemicals known to the State of California to cause cancer and reproductive toxicity.
SAFE™ (Samsung For Enterprise) For complete statement of limited warranty, please refer to www.samsung.com/us/safe, available on the web and where Samsung smartphones and mobile devices are sold. [091714] SAFE™: “SAFE™” (Samsung for Enterprise) is a mark for a Samsung device which has been tested against Samsung’s own internal criteria for interoperability with certain third party securityrelated solutions for MDM and VPN.
Google, the Google logo, Android, the Android logo, Google Play, Gmail, Google Mail, Google Maps, Google Music, Google Hangouts, Picasa, Play Newsstand, YouTube and other Google marks are trademarks of Google Inc. Ascender is a trademark of Ascender Corporation which is registered in the U.S. Patent and Trademark Office and certain other jurisdictions. Georgia is a trademark of Microsoft Corporation which is registered in the U.S. Patent and Trademark Office and certain other jurisdictions.
Table of Contents Getting Started .................................................................1 Calculator ..........................................................................51 Calendar ............................................................................52 Camera and Video ......................................................53 Contacts.............................................................................55 Email ..................................................................
Accessibility.....................................................................92 Blocking Mode ..............................................................94 Language and Input Settings ...............................95 Palm Motion ....................................................................97 Smart Screen..................................................................98 Accounts............................................................................99 Cloud .............................
Welcome Welcome to the best of both worlds. The Samsung Galaxy Tab® 4 NOOK® 10.1 integrates NOOK’s awardwinning reading experience and Barnes & Noble’s enormous selection of content with Samsung’s leading edge technology, allowing you to connect to the world when you need and escape from it when you want. And with the fully integrated NOOK® experience, browsing, purchasing, and enjoying your content has never been easier.
Getting Started Learn about your mobile device hardware, assembly procedures, and how to get started using your new device.
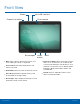
Front View Volume microSD card slot Front camera Power/Lock button Recent apps Home button • Back: Tap to return to the previous screen, or to Back • Power/Lock button: Press and hold to turn the close a dialog box, menu, or keyboard. device on or off. Press to lock or wake up the screen. Press and hold to turn the device off or restart it, or for quick access to Airplane Mode, Emergency Mode, and to Mute, Vibrate, and Sound modes. • Front camera: Take self-portraits and record videos of yourself.
Back View Infrared transmitter Rear camera Headset jack Speaker Speaker Microphone USB charger/Accessory port • Headset jack: Connect an optional headset • Microphone: Records audio and detects voice • Rear camera: Take pictures and record videos. • Infrared transmitter: Controls external devices • Speaker: Plays music, and other sounds. • USB charger/Accessory port: Connect the (not included). commands. using infrared light.
Assemble Your Device Prior to use, install an optional memory card (not included), and charge the battery. To charge the battery: 1. Insert the USB cable into the port. 2. Connect the USB cable to the charging head, and then plug the charging head into a standard outlet. Install an Optional Memory Card You can install an optional microSD or microSDHC memory card (not included) to expand available memory space.
Setting Up Your NOOK® 6. Read the End User License Agreement (EULA) for Software. If you agree to the EULA, touch the check box I understand and agree to the terms and conditions above. (If you do not agree to the EULA, you will not be able to use your NOOK.) The set-up process for your Samsung Galaxy Tab 4 NOOK guides you through setting up four types of accounts: • A Google/Gmail account for accessing Google Play and the Google App Store. • A Samsung account for using buying and using 7.
.Next your device displays a full-screen welcome page for NOOK. (Until you have set up a NOOK account, your NOOK will display this same welcome page whenever you launch any NOOK app such as the NOOK Library.) 4. Add credit card information for your account. Enter: Follow the steps below to set up your NOOK account. 5. Touch the pop-up menu to select the card type. Choose from: • • • • • • • • Registering an Existing NOOK Account If you already have a Barnes & Noble or NOOK account, touch Sign In. 1.
Set Up Accounts on Your Device NOOK Account Samsung Account Use your existing NOOK account or create a new one to make the best use of the NOOK features on your device. See NOOK for more information about the NOOK features. Create a Samsung account, for access to Samsung content and apps on your device. Google Account – or – Your new device uses your Google Account to fully utilize its Android features, including Gmail, Google Hangouts, and the Google Play Store.
Know Your Device Learn some of the key features of your mobile device, including the screens and icons, as well as how to navigate the device and enter text using the keyboard. Warning: Please note that a touch screen responds best to a light touch from the pad of your finger or a non-metallic stylus. Using excessive force or a metallic object when pressing on the touch screen may damage the tempered glass surface and void the warranty.
Home Screen NOOK Widgets Notification Icons Recent Reading Status Bar Home Screen Indicator • Apps Screen: Provides quick access to all of your App Shortcuts Apps Screen • Notification Icons: Display new email messages, applications. notifications, available software updates, and so on. • App Shortcuts: Shortcuts to your favorite • Recent Reading: Shortcut to the NOOK reader, applications. • Status Icons which opens to the last material you were reading.
App Shortcuts The Home screen is the starting point for using your device. You can use app shortcuts to launch an app from any Home screen. Customize your Home screen by adding application shortcuts, widgets, folders, and using wallpapers. Add a Shortcut to a Home Screen 1. From a Home screen, tap 2. Touch and hold an app shortcut, drag it to a Home screen and release it. Remove a Shortcut Manage Home Screens 1. Touch and hold a shortcut to release it.
Folders Change the Wallpaper Place folders on the Home screen to organize items. Change the look of the Home and Lock screens with wallpaper. You can display a favorite picture, or choose from preloaded wallpapers. Adding Folders 1. From a Home screen, pinch the screen. 1. From a Home screen, touch and hold an app shortcut. 2. Drag the shortcut onto release. • • • – or – Create folder and Touch and hold an empty space on the screen. Enter a folder name. 2.
Status Bar The Status Bar at the top of the Home screen provides device information (such as network status, battery charge, and time) on the right side and notification alerts on the left. Notification Icons New email has arrived New Gmail has arrived. Download of a file or app is in progress. File is being uploaded or sent. Status Icons Battery is fully charged. Location service (GPS) is active. Battery is low. App updates are available from the Google Play Store. Battery is charging.
Navigation, Motions, and Gestures Touchscreen Navigation Drag Tap To drag, touch and hold on an item, and then move it to a new location. • Drag an app shortcut to add it to a Home screen. • Drag a widget to a place it in a new location on a Lightly tap items to select or launch them. • Tap the on screen keyboard to enter characters or text. Home screen. • Tap an item to select it. • Tap an app icon to launch the application.
Notification Panel Settings View additional Quick settings Quick settings Adjust screen brightness Volume Clear all notifications Tap a notification to launch its app or view it Quick Settings Notification icons display on the Status Bar displaying calendar events, device status, and more. For details about these notifications, open the Notification Panel.
Multi Window Multi Window Tray Window Controls Using Multi Window Multitask by using multiple applications at the same time. After enabling Multi Window, you can use it to run multiple apps at the same time. Note: Multi Window view is not available for all apps. NOOK apps do not currently support Multi Window. Activate Multi Window 1. From a Home screen, tap Apps > > Device tab > Multi window. Settings The apps display together on a split screen.
Window Controls Change the Order of Apps in the Multi Window Tray Select an application window and tap Border button in the middle of the window border. 1. Swipe the right edge of the screen toward the center to display the Multi window tray. Control Buttons 2. Tap an hold an app, drag it to a new position in the tray and then drop it. Switch locations between Multi window applications. Choose Apps to Display in the Multi Window Tray Share items between the application windows.
Entering Text Using the Samsung Keyboard Predictive Text Type your text input using a QWERTY keyboard. Predictive text suggest words matching your text entries, and, optionally, completes common words automatically. Predictive text can learn your personal writing style from your contacts, messages, email, and social networking sites — improving its accuracy of predicting your text entries. Predictive Text Configure the Samsung Keyboard To customize the Samsung Keyboard, see Samsung Keyboard Settings.
NOOK The Samsung Galaxy Tab® 4 NOOK® 10.1 integrates NOOK’s award-winning reading experience and Barnes & Noble’s enormous selection of content with Samsung’s leading edge technology, allowing you to connect to the world when you need and escape from it when you want. And with the fully integrated NOOK® experience, browsing, purchasing, and enjoying your content has never been easier.
NOOK Features on the Home Screen NOOK Library Widget NOOK Discovery Widget NOOK App Shortcuts The Home screen features widgets and apps shortcuts that provide quick and easy access to your NOOK Library and to new NOOK Content. To open a book or periodical, tap its cover. To see a broader selection of content, tap the More button. Swipe left or right to scroll through a carousel of recently purchased or accessed items.
App Shortcuts The Home screen features shortcuts to these apps: NOOK Shop: Opens the NOOK Store where you can shop for books, periodicals, and apps. NOOK Search: Lets you search the NOOK Store and your Library for keywords. NOOK Today: Presents new recommendations and promotions from the NOOK Store. NOOK Library: Opens your Library, giving you access to your NOOK Books and any other content you have purchased through the NOOK Store or sideloaded onto your NOOK.
Your NOOK The Your NOOK app presents recommendations and special offers from the NOOK Store. Tap the app to open it. By default, the Your NOOK app appears in the row of app shortcuts on the Home Screen.
NOOK Reader Opening a Book or Periodical Changing Type Size, Font, Margins, and Other Page Elements To open a book or periodical in the Library or the Library widget, tap its cover. 1. Tap the center of the page. Turning Pages 2. Tap To turn to the next page, tap the right side of the screen. Or swipe from the right side of the screen. to open the Text Options window. 3. Select the type size, font, margins, line spacing, and color theme you want.
Configuring Reader Settings 3. Tap View Details. If the book can be lent, it will display a LendMe button. 1. Tap the center of the page. 2. Tap 4. Tap LendMe. to open the options menu. 5. Select the contact to whom you would like to lend the book. 3. Tap Settings. 4. On the Settings screen, configure the Reader: • Tap the radio button for the Page Turn Effect you want: Curl, Slide or None. • Tap the check box to enable or disable 2-page layouts of PDFs.
Displaying Two-page Spreads in PDFs in Landscape Format To skip from one part of the book to another, do this: 1. Tap the white arrow at the bottom of the screen. A scrollable panel with thumbnail images of pages appears at the bottom of the screen. By default, your NOOK displays PDFs as a two-page spreads when you hold your NOOK in landscape mode. A two-page spread means you see two pages at a time as though you were holding a book. 2.
Enlarging Text and Images in a NOOK Kids Book Recording Yourself Reading a Book You can record yourself reading a NOOK Kids book, save the recording, and play it back. If text on the page of a NOOK Kids book is too small to read, double-tap on the text area to enlarge it. To record yourself reading a NOOK Kids book, do this: In books with audio tracks, enlarged text will also display a Play button (an orange triangle) at the top left corner.
3. Tap the Edit button on the picture of the recording you want to edit. A pop-up menu opens, offering you these choices: 6. Tap the picture you want to use as a label. 7. Tap the text field for the recording’s name. Type the name for the recording. • • • • 8. Tap Save. Your NOOK returns you to the front cover of the NOOK Kids book. You recordings appear in the lower left corner of the screen. Note: Your NOOK stores your recordings as audio files in the My Files area.
Reading Newspapers and Magazines Additional Features in Article View In Article View, tap the center of the page to open Reading Tools at the top of the Screen. Newspapers and magazines use many of the same reading features as books. • Tap to open controls for formatting the page. • Tap the grid icon (9 small squares) to display all Your NOOK displays magazines published in a variety of digital formats. The format determines a magazine’s interactive features, including its navigation.
NOOK Shop and the NOOK Store® Buying or Renting a Movie To reach the NOOK Store, launch the NOOK Shop app or tap the shopping bag icon at the top of the screen in any other NOOK app. Renting give you 30 days to start watching. Once you begin watching, you have 24 hours to finish. 1. Tap the cover of the movie. 2. Tap Buy or Rent. If the movie is available in SD and HD formats, select the format you want. A dialog box opens.
Managing Credit Cards 5. Tap the Card or Certificate Number field and enter the number for the gift card. You can also manage your credit card on NOOK.com. 6. Tap the PIN field and enter the 4-digit PIN for the card. 1. In the Shop tap . 7. Tap Submit. 2. Tap Shop Settings. 3. Tap Manage credit card. Redeeming Access Codes 4. Tap Change. An access code is a 13-digit code that is available on a receipt or a card you received in a store or in the body of an email confirmation message. 5.
NOOK Apps The NOOK Apps application displays the NOOK apps you have purchased that are supported on the Samsung Galaxy Tab 4 NOOK. If you have not purchased any NOOK apps yet, the NOOK Apps application displays a shortcut button that takes you directly to the Apps section of the NOOK Store.
NOOK Library Adding a Shortcut to an Item the Home Screen Tap the NOOK Library app to open your NOOK Library. In the Library, you can see all your books, periodicals, TV shows and movies, and catalogs. You can also see all the NOOK apps you have purchased that are supported on the Samsung Galaxy Tab 4 NOOK. 1. Press and hold on the cover of item. 2. Tap Add to Home. Organizing Library Items in Shelves You can create shelves to organize Library content as you wish.
Refreshing the Content in Your Library Renaming a Shelf 1. Open the shelf. 2. Tap . 1. Tap . 3. Tap Rename shelf. A dialog box opens. 2. Tap Refresh. 4. Type a new name for the shelf. 5. Tap Rename. Removing an Item from Your Device Removing a Shelf Removing a shelf does not delete any of the items on the shelf. They remain available in the Library. You can remove an item such as a book from your device.
NOOK VideoTM NOOK Video™ is a streaming and download service that allows you to rent movies and purchase movies and TV shows for viewing on your NOOK. NOOK Video offers a wide variety of popular movies and TV shows. To configure your NOOK to download video content to an SD card, rather than to internal storage, do this: NOOK Video supports both streaming and downloading content. When you purchase or rent a movie, you need to select how you will access it: streaming or downloading.
Closed Captioning Managing NOOK Video on Your Devices Your NOOK supports closed captioning on select NOOK Video titles. NOOK Video allows you to access NOOK Video content on up to five devices at a time. To select which of your NOOK devices has access to NOOK Video, do this: Note that not all titles include Closed Captioning data. 1. Open the NOOK Settings app. UltraViolet™ 2. Tap Manage NOOK Video on Your Devices.
NOOK Profiles • Adult Profile: An adult profile can purchase A NOOK Profile™ tailors content and shopping experiences on your NOOK for an individual user. any type of content. An adult profile can also control which content is visible to itself and which content is visible to any child profile. It can also set parental controls for child profiles. It cannot control which content is visible to the primary profile.
Note: During the new profile setup, you will have the option to skip, sign-in, or create several types of accounts for the new profile: a Google account, a Samsung account, and a Dropbox account. You will also be able to name the profile, which will be specific for your NOOK profile. When prompted to enter a NOOK account, enter the account name and password for the primary profile, and tap Sign In. Once signed in, you will be prompted to assign a name to the device.
Deleting a NOOK Profile For example, if the Primary Profile owns a particular NOOK Book and grants another profile access to it, the book will appear in the other profile’s Library with a download icon, indicating that the book is available for download. To read the book, the other profile simply has to tap its cover to download it to the profile’s storage area on your NOOK. Note: Deleting a user’s NOOK profile does NOT remove the user account from the device.
To Manage Access to Many Items or Content Categories Using parental controls, you can control whether or not a specific child profile can: To manage access to many items or item categories, do this: • Browse the NOOK Shop • Purchase from NOOK Shop only when using your 1. In the Library or Shop, tap the profiles icon to display a list of profiles, and then select an option: • To manage your own profile’s content, tap Manage your own content.
NOOK Settings NOOK Settings provides access to the configuration settings for NOOK Library, NOOK Shop (e.g., credit cards and gift cards), and other NOOK features. By default, the widget displays just one issue or episode of any given magazine, TV show, newspaper, or catalog. To change this setting, do this: View NOOK Account Information 1. On the NOOK Settings screen for the NOOK Library widget, tap Hide selected content item. 1. Tap the slider bar icon next to the type of content you want to control.
Linking to Social Media Accounts To add a gift card to your account, do this: 1. In NOOK Settings, tap Manage credit cards, gift cards & shop controls. You can link your NOOK to your Facebook and Twitter accounts. 2. Tap Manage gift card. 3. Tap Add Gift Card. 1. In NOOK Settings, tap Link to social networking. 4. Enter the Card or Certificate Number and the PIN. 5. Tap Submit. 2. Tap the Link Your Account button for the network to which you want to link.
NOOK Search The NOOK Search app lets you quickly search your Library and the NOOK Shop. The NOOK Search app appears by default on your Home screen. To perform a search with NOOK Search: 1. Tap the app to open it. 2. Type in the search field at the top of the screen. As you type, your NOOK displays suggestions for matching words and phrases in a pop-up window. 3. When you see the word or phrase you are searching for, tap it.
Sideloading Files Sideloading means transferring files from your personal computer to your NOOK over the USB cable. The NOOK folder includes these subfolders: Books, Magazines, Newspapers, Videos, and My Files. The My Files folder is for personal files you have not purchased through the NOOK Store. For example, if you have created PDFs on your computer and want to view them on your NOOK, drag them to the My Files folder.
Dictionaries Your NOOK includes Merriam Webster’s Collegiate® Dictionary, Eleventh Edition. You can download and install free foreignlanguage dictionaries as well. Only one dictionary can be active at a time. To download a foreign language, make sure your NOOK is connected to a Wi-Fi network. Open NOOK Settings and tap either Books or Newspapers. In the list of dictionaries, tap the cloud icon or the Download link for the dictionary you want.
NOOK Legal Information To read the NOOK Device Terms of Service, the NOOK Store Terms of Service, and the NOOK Privacy Policy, open the NOOK Settings app and tap Legal Information. Your NOOK displays links to popup windows with each of these documents.
Applications The Apps screen displays all applications installed on your device, both preloaded apps and apps you download and install yourself. Learn how to change the way apps appear, organize apps into folders, and uninstall or disable apps.
Apps Screen Uninstall or Disable Apps The Apps screen shows all preloaded apps and apps that you downloaded. You can uninstall, disable, or hide apps from view. You can uninstall or disable apps you download and install. • Preloaded apps cannot be uninstalled. • Apps that are disabled are turned off and hidden from view. Shortcuts to app can be placed on any of the Home screens. For more information, see Add a Shortcut to a Home Screen. 1. From a Home screen, tap 2.
Use Folders to Organize Apps 1. From a Home screen, tap 2. Tap Apps. More options > Create folder. 3. Enter a folder name. 4. Tap Add, select apps to include in the folder, and then tap Done. • Touch a folder to view its apps. Touch an app to launch it. • Touch More options to select a background color for the folder. Apps Screen Options 1. From a Home screen, tap 2. Tap Apps.
Google Applications Enjoy these applications from Google. Google Now Google Now works in the background to collect information you regularly look up and organize it into convenient cards that appear when you need them. Note: Certain applications require a Google account. Visit google.com to learn more. Visit google.com/landing/now to learn more. Chrome ► Press and hold the Home key.
Maps Play Music Use Google Maps to find your current location, get directions, and other location-based information. With Google Play Music, you can play music and audio files on your device. Visit google.com/maps to learn more. Visit play.google.com/about/music to learn more. Note: You must enable location services to use Maps. Please see Location Services. Play Newsstand Subscribe to your favorite magazines to read on your device at your leisure. Photos Visit play.google.
Other Applications Dropbox Use this application to save and share files with others via the Dropbox cloud storage. When you save files to Dropbox, your device automatically syncs with the web server and any other computers that have Dropbox installed. Visit dropbox.com to learn more. Hancom Office Viewer Opens and manages Hancom Office Hanword (*.hwp) and Hanshow (*.show) documents. Help View information on using your device’s basic features and settings.
Calculator Additional Functions The Calculator provides basic and advanced arithmetic functions. To clear the results: ► Tap Clear. To clear the calculator history: ► Tap Basic Operation 1. From a Home screen, tap Calculator. Apps > Clear history. To copy all or part of the calculation to the clipboard: ► Touch and hold an entry in the display field. 2. Enter the first number using the numeric keys. 3. Tap the appropriate arithmetic function key. 4. Enter the next number. 5.
Calendar Sharing Events Manage your events and tasks. 1. From a Home screen, tap Calendar. Create an Event or Task 1. From a Home screen, tap Calendar. Apps > 2. Tap to view an event or task. Tap More options > Share via, select a sharing method, and follow the prompts. Apps > 2. Tap Add and use one of the following methods: Calendar Settings • Event: Enter an event with an optional repeat setting. These settings allow you to modify settings associated with using the Calendar.
Camera and Video Quick settings Switch between the front and back cameras Current shooting mode Switch between camera and video Take a picture Change shooting mode Gallery Current shooting mode Taking Pictures Shooting Mode Take pictures with your device’s front or back cameras. Several visual effects are available. Some modes are not available when taking self-portraits. 1. From a Home screen, tap Apps > Camera. 1.
• Beauty face: Take a picture with lightened faces for gentler images. • Volume key: Use the Volume key as the camera key, the record key, or as a zoom key. • Sound & shot: Enrich pictures by adding background sounds. • • Timer: Take time-delayed pictures or videos. • Voice control: Set the camera to take pictures with voice commands. • White balance: Select an appropriate white balance, so images have a true-to-life color range. The settings are designed for specific lighting situations.
Contacts Store and manage your contacts with the Contacts app, which can be synchronized with a variety of your existing personal accounts, including Google, Email, Facebook, and your Samsung account. Add a Contact Use the following procedure to add a new contact. 1. From a Home screen, tap Contacts. 2. Tap Add, and then tap contact fields to enter information. For more information on connecting with and managing your accounts through your device, see Accounts.
Share a Name Card Unlink Contacts When you share a name card, the contact’s information is sent as a vCard file (.vcf). You can share a vCard via Bluetooth or Wi-Fi Direct, attach it to a message, or save it to a storage location. 1. From a Home screen, tap Contacts. 1. From a Home screen, tap Contacts. Apps > 2. Tap the contact to display it, and then tap Link. Apps > 3. Tap Remove beside contacts to unlink them from the main contact. 2.
Create a Shortcut to a Favorite Rename a Group You can create a shortcut to a favorite on the home screen, to access their information directly from the home screen. 1. From a Home screen, tap Contacts. 1. From a Home screen, tap Contacts. 2. Tap the Groups tab, and then tap a group. Apps > 3. Tap More options > Edit group and enter a new name. 2. Tap the Favorites tab, and then touch and hold on a contact to select it. 4. Tap Save. 3. Tap More options > Add shortcut to home.
Contact Settings These settings allow you to modify settings associated with using the Contacts app. 1. From a Home screen, tap Contacts. 2. Tap Apps > More options > Settings. 3. Tap an option and follow the onscreen instructions.
Email Use the Email app to view and manage all your email accounts in one application. Managing Your Email Accounts To access Email: 1. From a Home screen, tap ► From a Home screen, tap Apps > You can view email you receive for all accounts on the Combined view screen or you can view email accounts individually. Email. Apps > Email. 2. Tap Menu at the top left of the screen to select: Configuring Email Accounts • Combined view: View all email in a combined inbox.
GALAXY Apps Galaxy Essentials is a collection of specially chosen applications available through Samsung Apps. From Galaxy Essentials, you can access and download a collection of premium content, free of charge Note: A Samsung account is required to download apps. ► From a Home screen, tap GALAXY Apps.
Gallery View, edit, and manage pictures and videos. Trimming Segments of a Video 1. Select a video, and then tap 2. Using the sliders at the bottom of the screen to trim the video. Move the left bracket to the desired starting point, move the right bracket to the desired ending point, and then tap Done to save the video. View Images and Videos Launching Gallery displays available folders.
Deleting Images 1. From a Home screen, tap Gallery Settings Apps > Gallery. These settings allow you to modify settings associated with using your Gallery. 2. Tap a folder to open it. 1. From a Home screen, tap 3. In a folder, tap More Options > Delete, select images, and then tap Done. 2. Tap – or – When viewing an single image, tap Apps > Gallery. More options > Settings. 3. Tap an option and follow the onscreen instructions. Delete. 4.
Internet Access the Internet with a fully featured web browser. Browser Tabs Access the Internet To open a new tab: ► From a Home screen, tap Apps > Use tabs to view multiple web pages at the same time. ► Tap Internet. To close a tab: ► Tap Command Keys The following command keys are available: • • • • Back or previous page. More options > New tab. Close. Bookmarks Back key to return to the To bookmark the current web page: 1. Tap Forward to go forward to a recent page. Bookmark > Add.
Sharing Pages Internet Settings To share a web page address with others: These settings allow you to modify settings associated with using the Internet app. ► Tap More options > Share via and follow the prompts. 1. From a Home screen, tap 2. Tap Incognito Tabs Internet. More options > Settings. 3. Tap an option and follow the onscreen instructions. Pages viewed with incognito tabs do not appear within your browser history or search history, and leave no traces (such as cookies) on your device.
Memo Browsing Memos Use the Memo app to write and save notes on your device. 1. Tap Apps > Memo. 2. Browse memo thumbnails by scrolling up or down. Viewing a Memo 1. Tap Apps > 3. To edit a memo, tap a memo thumbnail, and then tap the content of the memo. Memo. 4. To search for a memo, tap 2. Tap a memo thumbnail to open it. Search. 3. To edit the memo, tap the content of the memo. 4. To delete the memo, tap Memo Options Delete. 5.
Music Player Stream the song to another device Menu Volume Mark as favorite Playback position Adjust the sound quality with SoundAlive Elapsed playing time Length of song View playlist Rewind song or go to previous song Playback mode Shuffle on/off Pause/Play Scan forward or go to next song Listen to Music Listen to your favorite songs with the Music player. Navigate through your music library, play songs, and create customized playlists. Applications 1. From a Home screen, tap Apps > Music.
My Files Access files stored on your device, including images, videos, songs, and sound clips. File Options ► Tap Menu > Select, select a file or folder, and then use one of these functions: Share via: Send files to others or share them. Delete: Delete files or folders. View Files Files stored in the device are sorted into groups: Move: Move files or folders to another folder. • Timeline: View files that are grouped by date.
S Voice Speak commands to perform operations on your device, and to speak criteria for searches and other operations. 1. From a Home screen, tap Apps > S Voice. 2. Speak a command. 3. Tap the microphone icon, if the device does not hear you, or to give it another command. Tip: Tap More options for example commands and to view a tutorial. Use S Voice to find everything from directions to trivia answers to the current weather forecast.
Video Player Pop up play AMOLED cinema Change player More options Video file name Volume Playback position Adjust the sound quality with SoundAlive Video list Rewind video or go to previous video Change screen ratio Pause/Play Scan forward or go to next video Play and manage videos stored on your device. Use Pop-Up Play Multi task with Pop-Up Play — transform your video player into a pop-up window.
WatchON Configure Your Device as a Remote WatchON turns your tablet into a remote control. Not only can you control your TV, set-top box, DVR and other devices from your tablet, but it will recommend great shows and movies based on your preferences and past viewing behavior. 1. From the WatchON tool bar, tap Control. Remote 2. Tap Setup at the prompt. 3. Follow the instructions to find your TV or other devices and configure your device to control their operation.
World Clock The World Clock app offers features for keeping track of time around the world. 1. From a Home screen, tap World Clock. 2. Tap Apps > Add city to add a city. 3. To delete a city, touch and hold it until a check mark appears on the city. Then tap Delete.
Settings Configure your device’s connections and settings, add accounts, and customize the home screen, apps, and features. • Some options use an ON/OFF button to turn the option on ( ) or off ( ). • For some options, you must tap a field, such as Email address, to display and set options. • Some options are enabled or disabled by tapping a check box. When enabled, a check mark displays. Tap the check mark to remove it and disable the option.
How to Use Settings Accessing Settings ► From a Home screen, tap Settings. Customize the Quick Settings Menu Apps > Quick settings are the settings that you are most likely to frequently use. When you first access the Settings menu, the Quick settings are set to a default list of settings. – or – From a Home screen, drag down from the Status bar to display the Notification panel, and then tap Settings.
Wi-Fi and Wi-Fi Direct Wi-Fi is a term used for certain types of Wireless Local Area Networks (WLAN). Wi-Fi communication requires access to a Wireless Access Point (WAP). 3. Tap the network you want to connect to. • To manually scan for networks, tap More options > Scan. 1. From a Home screen, tap Settings. Apps > 2. Tap Connections tab > Wi-Fi, and then tap ON/OFF to turn Wi-Fi on. Turn Wi-Fi On or Off 3. Tap Add Wi-Fi network.
Wi-Fi Status Indicators These Status bar icons show your current Wi-Fi connection status: Displays when Wi-Fi is connected, active, and communicating with a Wireless Access Point (WAP). A Wi-Fi access point is available, but your device is not connected to it. It may also display if there is a communication issue with the target Wireless Access Point (WAP). Settings WPS PIN entry: View the PIN used by your device to set up a PIN-secured connection to a Wi-Fi router or other equipment (not configurable).
Bluetooth Making Your Device Visible to Other Bluetooth Devices Bluetooth is a short-range communications technology that allows you to connect wirelessly to a number of Bluetooth devices, such as headsets and hands-free car Bluetooth systems, and Bluetooth-enabled computers, printers, and wireless devices. When you make your device visible, other Bluetooth can find it in a scan and initiate pairing. You can choose the length of time your device remains visible. 1. From a Home screen, tap Settings. 2.
Pair Bluetooth Devices Delete a Paired Device (Unpairing) The Bluetooth pairing process allows you to establish trusted connections between your device and another Bluetooth device. When you unpair from a Bluetooth device, the two devices no longer recognize each other. To connect again, you must pair the devices. Pairing between two Bluetooth devices is a one time process.
Airplane Mode Airplane mode disconnects your device from all networks and turns off connectivity features, such as Wi-Fi. 1. From a Home screen, tap Settings. 2. Tap Connections tab > Airplane mode, and then tap ON/OFF to enable or disable the option. Note: You can also control Airplane mode from the Device options menu. Press and hold the Power/Lock key, and then tap Airplane mode. While in airplane mode, you can use other features, such as playing music, watching videos, and other online applications.
Data Usage Monitor your mobile data usage. Note: Your service provider may account for data usage differently. 1. From a Home screen, tap Apps > Settings > Connections tab > Data usage for options: • Data usage cycle: Tap the menu, and then choose a time period for data usage. Data usage for the period displays on the graph, along with usage by application below. 2. Tap Settings More options: • Auto sync data: Set your accounts to automatically sync.
Location Services Location Reporting Some apps, such as Google maps, may require one or more location services be turned on for full functionality. Google uses Location Reporting to store and use your device’s most recent location data. Google apps, such as Google Maps, can use this data to improve your search results based on places that you have visited. 1. From a Home screen, tap Apps > > Connections tab > Location. Locating Method 1. From a Home screen, tap Apps > > Connections tab > Location. 2.
More Networks Configure miscellaneous connection types for your device. 1. From a Home screen, tap Settings. Connect to a VPN 1. From a Home screen, tap > VPN. Edit or Delete a VPN 2. Tap Connections tab > More networks for options: Printing: Send images and documents to compatible printers (not included). • VPN: Set up and manage your Virtual Private Networks (VPNs). • Ethernet: Manage Ethernet connections. Settings 2. Tap the VPN, enter your log in information, and tap Connect.
Nearby Devices Share your media files with nearby devices via Wi-Fi or Wi-Fi Direct. Warning! If file sharing is enabled, other devices can access your data. Use this option with care. 1. From a Home screen, tap Apps > > Connections tab > Nearby devices. Settings 2. Tap ON/OFF to enable Nearby devices. 3. Set the following options: Settings • Content to share: Select the content to share. Choices are: Videos, Photos, and Music. • Allowed devices: Indicate the devices accessible to your device.
Screen Mirroring Share Your Device’s Screen with Another Device. 1. From a Home screen, tap Apps > Settings > Connections tab > Screen Mirroring. 2. Tap ON/OFF to enable Screen Mirroring. • • Available devices are listed. Tap Scan to find more devices. 3. Tap a device and follow the prompts to connect.
Sound Settings Play Tones When Touching or Tapping the Screen Configure the sounds and vibrations used to indicate notifications, screen touches, and other activities. Play tones when you touch or tap the screen to make selections. 1. From a Home screen, tap Settings. Adjust the Volume 2. Tap Device tab > Sound > Touch sounds to turn the feature on. Set the system volume level, and set default volume for notifications and other audio.
Play a Sound When Using the Samsung Keyboard Adapt Sound Play a sound when typing on the Samsung Keyboard. 1. From a Home screen, tap Settings. 1. From a Home screen, tap Settings. Find the best sound for you when playing music. 2. Tap Device tab > Sound > Adapt sound. Apps > 3. Follow the instructions and tap Start when you are ready to begin. 2. Tap Sound for options: • Settings Apps > Sound when tapped: Play a tone when you tap an onscreen key.
Display Settings Adjust the Screen Brightness • Desk home screen: Select items to display while the device is docked. Adjust the screen brightness to suit your surroundings or personal preference. You may also want to adjust screen brightness to conserve battery power. • Google Photos: Display pictures from your Google Photos account. Tap Settings for options. • Photo frame: Display pictures in a photo frame. Tap Settings for options. • Photo table: Display pictures in a photo table.
Multi Window Settings Turn on the Multi window feature. For more information, see Using Multi Window. 1. From a Home screen, tap Apps > > Device tab > Multi window. Settings 2. Tap ON/OFF to enable. The following options are available: • Tap Open in multi window view to automatically view content in a multi window when you open files from My Files or Video, or attachments from email. Note: Multi Window view is not available for all apps. NOOK apps do not currently support Multi Window.
Lock Screen Choose a method for unlocking your screen. Different Screen Locks have different levels of security and options. Screen Lock Options All Screen Locks • Set a Screen Lock 1. From a Home screen, tap Settings. Apps > 2. Tap Device tab > Lock screen 3. Tap Screen lock to select a screen lock and level of security: Settings Clock widget options: Configure options for the clock that appears on the Lock screen: - Clock size: Select the size of the clock that will appear on your Lock screen.
Wallpaper Settings Change the look of the home and lock screens with wallpaper. You can display a favorite picture or choose from preloaded wallpapers. 1. From a Home screen, tap Settings. Apps > 2. Tap Device tab > Wallpapers. 3. Select any of the following to assign an image as its wallpaper: • Home screen: Set a wallpaper for the Home screen. • Lock screen: Set a wallpaper for the Lock screen. • Home and lock screens: Set a wallpaper for both the Home and Lock screens. 4.
Font Font Size Adjust the font style and size throughout the device. To change the font size: 1. From a Home screen, tap Settings. Font Style 2. Tap Device tab > Font > Font size. To change the font style: 1. From a Home screen, tap Settings. Apps > 3. Tap a font size to set it as the default on your device. Apps > 2. Tap Device tab > Font > Font style. 3. Tap a font style to set it as the default on your device.
Notification Panel Recommended Applications Customize which Quick setting buttons appear on the Notification Panel. When you perform certain actions, such as plugging in earphones, the Notification panel can display shortcut to your favorite related apps, such as Music Player or Google Play Music. You can also customize which apps appear on the Recommended applications menu on the Notification panel when you perform certain actions, such as plugging in earphones.
Accessibility Accessibility services are special features to make using the device easier for those with certain physical disabilities. Vision • • Font size: Set the font size. Note: You can download additional accessibility applications from the Google Play Store. • Negative colors: Reverse the display of onscreen colors from White text on a Black background to Black text on a White background. • Notification reminder: Play a beep when a notification has been missed. 1.
Dexterity • Assistant menu: Improve the device accessibility for users with reduced dexterity. • Press and hold delay: Select a time interval for this tap gesture. Recognition • Settings Interaction control: Turn on this feature to control interactions with certain applications and settings on your device. To configure controls for specific applications or settings, open the app or setting, and then press the down Volume and Home keys at the same time.
Blocking Mode Turn off notifications for selected features. 1. From a Home screen, tap Settings. Apps > 2. Tap Device tab > Blocking mode. 3. Tap ON/OFF to turn the feature on. 4. Configure options: • Tap Turn off notifications to block all notifications. • Tap Turn off alarm and timer to block all alarms. • The SET TIME option allows you to set Blocking mode for a specific time range or to always keep it on. - Tap the Always field to disable it and configure the From and To time fields.
Language and Input Settings Configure your device’s language and input settings. • Predictive text: Allow Predictive text to suggest words matching your text entries, and, optionally, complete common words automatically. Predictive text can learn your personal writing style from your contacts, messages, Gmail, and social networking sites — improving its accuracy of predicting your text entries. • Additional keyboard settings provide assistance with capitalization, punctuation, and much more.
Voice Recognizer Text-To-Speech Options Select the voice recognition service. Configure your Text-To-Speech (TTS) options. TTS is used for various accessibility features, such as TalkBack. For more information, see Accessibility. Settings. 1. 2. Tap Controls tab > Language and input > Voice recognizer for options. 1. From a Home screen, tap Settings. 3. Tap the voice recognition service to use. 2.
Palm Motion Control certain device actions by touching the screen with the palm of your hand. 1. From a Home screen, tap Settings. Apps > 2. Tap Controls tab > Palm motion. 3. Tap ON/OFF to enable each of the following: Settings • Capture screen: Capture an image of the screen when you sweep your hand left or right across the screen. • Mute/pause: Mute or pause sounds and video by covering the screen or turning over the device.
Smart Screen Using the front camera to detect your face, the screen will not time out as long as you are facing the screen. 1. From a Home screen, tap Settings. Apps > 2. Tap Controls tab > Smart screen > Smart stay to turn on the Smart stay feature.
Accounts Account Settings Set up and manage accounts, including your Google Account, Samsung account, email, and social networking accounts. Each account has its own set of settings. In addition, you can configure common settings for all accounts of the same type. Note: Account settings and available features vary between account types and service providers. Contact your service provider for more information on your account’s settings.
Cloud Using Your Dropbox Account Back up your personal data using your Samsung Account or Dropbox. For more information about Dropbox, visit dropbox.com. 1. From a Home screen, tap Settings. Using Your Samsung Account 1. From a Home screen, tap Settings. Apps > 2. Tap General tab > Cloud. Apps > 3. Tap your Dropbox account to manage your sync settings and backup options. 2. Tap General tab > Cloud. • 3. Tap your Samsung account to manage your sync settings and backup options.
Backup and Reset Factory Data Reset Back up your data to Google servers. You can also reset your device to its factory defaults. Return your device to its factory defaults. Warning! This action permanently erases ALL data from the device, including Google or other account settings, system and application data and settings, downloaded applications, as well as your music, photos, videos, and other files. Backup and Restore Enable backup of your information to Google servers. 1.
Date and Time Settings By default, your device receives date and time information from the wireless network. 1. From a Home screen, tap Settings. 2. Tap General tab > Date and time. 3. Set the date, time, time zone, time format, and date format. When you are outside network coverage, you may want to set date and time information manually using the date and time settings.
Accessories Configure options when using HDMI audio devices (not included) or using a book cover (not included). 1. From a Home screen, tap Settings. Apps > 2. Tap General tab > Accessories for options: Settings • Dock sound: Play sounds when inserting and removing device from a dock. • Audio output: Select a sound output format to use when connecting your device to HDMI devices (not included). Some devices may not support the surround sound setting.
Application Manager Downloaded You can download and install new applications on your device. Use Application manager settings to manage your downloaded and preloaded applications. Displays apps you have downloaded onto your device. 1. From a Home screen, tap Apps > Settings > General tab > Application manager. 2. Tap DOWNLOADED to view a list of all the downloaded applications on your device.
SD Card Running Services Displays apps you have downloaded onto your memory card (not included). View and control services running on your device. 1. From a Home screen, tap Apps > Settings > General tab > Application manager. 1. From a Home screen, tap Apps > Settings > General tab > Application manager. 2. Tap RUNNING to view a list of running services. 2. Tap SD CARD to view a list of all the downloaded applications on your SD card.
Default Applications If you have multiple applications of the same type, such as email apps, you can select one app to be the default. You can also use a simpler Home screen which provides an easier user experience for first-time tablet users. 1. From a Home screen, tap Apps > Settings > General tab > Default Applications. 2. Tap Home and select a Home screen mode: • TouchWiz home: The Home screen that originally displays on your device. 3. To clear defaults you have set up, tap Clear.
Users Use User Profiles Share this tablet with multiple people by creating User accounts. To access the device with a user profile, select a profile on the locked screen. Users have their own space, which they can customize with their own apps, wallpaper, and so on. Users can also adjust settings like Wi-Fi which affect everyone. Owner New user 2 New user 3 You can also switch between users by sliding down the Notification Panel and tapping the current User.
Battery View how battery power is used for device activities. 1. From a Home screen, tap Settings. Apps > 2. Tap General tab > Battery for options: • Show battery percentage: Display the battery charge percentage next to the battery icon on the Status bar. • Battery Chart: The battery level displays as a percentage. The amount of time the battery has been used also displays. • Apps and OS Usage: Battery usage displays in percentages per application. 3.
Power Saving Mode Conserve battery power by automatically adjusting the screen brightness, limiting the performance of the CPU, and other power reduction activities. 1. From a Home screen, tap Settings. 2. Tap General tab > Power saving for options: Ultra power saving mode saves even more battery power by using a gray scale theme on the Home screen and limiting the number of usable apps. Settings Apps > • Tap ON/OFF to turn the feature on. Tap Power saving mode to select options.
Storage Memory Card (SD Card) View the device memory and usage, or mount, unmount, or format an optional memory card (not included). Once an optional memory card (not included) has been installed in your device, the card memory displays as Total space and Available space. Install a Memory Card You can use an optional microSD or microSDHC card (not included) to add additional memory space to your device. Device Memory View and manage the memory used by the device. 1. From a Home screen, tap Settings.
Mount a Memory Card Remove a Memory Card When you install an optional memory card, it is automatically mounted (connected to the device) and prepared for use. However, should you unmount the card without removing it from the device, you will need to mount it before it can be accessed. Warning! To prevent damage to information stored on the memory card, unmount the card before removing it from the device. 1. From a Home screen, tap Settings. 1. From a Home screen, tap Settings. Apps > Apps > 2.
Security Secure your device and protect your data with Security settings. Receive an Alert When Your SIM Card Is Changed Prevent unauthorized changes to your SIM card by being alerted whenever an app or service attempts to change data on your SIM card. Encrypt Your Data 1. From a Home screen, tap Settings. Require a numeric PIN or password to decrypt your device each time you power it on or encrypt the data on a memory card (not included) each time it is connected. 1. From a Home screen, tap Settings.
Device Administration Credential Storage Manage your device administrators and application installation privileges. Manage your security certificates. If a certificate authority (CA) certificate gets compromised or for some other reason you do not trust it, you can disable or remove it. 1. From a Home screen, tap Settings. Apps > 1. From a Home screen, tap Settings. 2. Tap General tab > Security for options: • Device administrators: Add or remove device administrators.
About Your Device Software Update View information about your device, including status, legal information, hardware and software versions, and a tutorial. 1. From a Home screen, tap Settings. Use Software update to update your device’s software. 1. From a Home screen, tap Settings. Apps > 2. Tap General tab > About device > Software update. 2.