A N D R O I D TA B L E T User Manual Please read this manual before operating your device and keep it for future reference.
Legal Notices Disclaimer of Warranties; Exclusion of Liability Warning: This product contains chemicals known to the State of California to cause cancer and reproductive toxicity.
IF YOUR CARRIER PROHIBITS THIS, IF YOU ATTEMPT TO DOWNLOAD SOFTWARE ONTO THE DEVICE WITHOUT AUTHORIZATION, YOU WILL BE NOTIFIED ON THE SCREEN THAT UNAUTHORIZED SOFTWARE HAS BEEN DETECTED. YOU SHOULD THEN POWER DOWN THE DEVICE AND CONTACT YOUR CARRIER TO RESTORE THE DEVICE TO THE CARRIER AUTHORIZED SETTINGS. DEVICES AND APPLICATIONS TESTED WITH SAFE™ DEVICES.
The actual available capacity of the internal memory is less than the specified capacity because the operating system and default applications occupy part of the memory. The available capacity may change when you upgrade the device. Your tablet is designed to make it easy for you to access a wide variety of content. For your protection, AT&T wants you to be aware that some applications that you enable may involve the location of your tablet being shared.
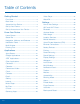
Table of Contents Getting Started ............................................................. 1 Video Player .................................................................... 47 WatchON ........................................................................... 48 Front View ........................................................................... 2 Back View ........................................................................... 3 Assemble Your Device ....................................
Language and Input Settings ............................... 83 Date and Time Settings ........................................... 86 Accessories ..................................................................... 87 Battery................................................................................. 88 Power Saving .................................................................. 89 Storage ............................................................................... 90 Security..............
Getting Started Learn about your mobile device hardware, assembly procedures, and how to get started using your new device.
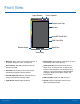
Front View Light Sensor Front Camera Power/Lock Key Volume microSD Card Slot SIM Card Slot Back Key Recent Apps Home Key • Back Key: Tap to return to the previous screen, or • Recent Apps: Tap to display recent apps, or touch • Front Camera: Take self-portraits and record • Power/Lock Key: Press and hold to turn the to close a dialog box, menu, or keyboard. and hold for home screen options. videos of yourself. device on or off. Press to lock or wake up the screen.
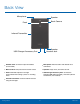
Back View Microphone Speaker Back Camera Flash Infrared Transmitter Speaker Headset Jack USB Charger/Accessory Port • Headset Jack: Connect an optional headset • Microphone: Records audio and detects voice • Back Camera: Take pictures and record videos. • Flash: Illuminate subjects in low-light • Speaker: Plays music, and other sounds. • USB Charger/Accessory Port: Connect the (not included). commands. environments when taking a photo or recording video.
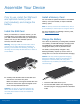
Assemble Your Device Prior to use, install the SIM card and optional memory card (not included), and charge the battery. Install a Memory Card Install the SIM Card For more information on installing a memory card, see Install a Memory Card. You can install an optional microSD or microSDHC memory card (not included) to expand available memory space. Note: A memory card can be installed at any time; it is not necessary to install it prior to using the device.
When to Charge the Battery When the battery is weak and only a few minutes of operation remain, the battery icon ( ) blinks and the device sounds a warning tone at regular intervals. In this condition, your device conserves its remaining battery power by dimming the screen. 3. When charging is complete, unplug the charging head from the outlet and remove the USB cable from the device. When the battery level becomes too low, the device automatically turns off.
Set Up Your Device Turn Your Device On and Off Secure Your Device Turning the Device On Use your device’s screen lock features to secure your device. ► Press and hold the Power/Lock key until the device vibrates and starts up. Lock the Device Turning the Device Off By default, the device locks automatically when the screen times out. 1. Press and hold the Power/Lock key until the device vibrates and the Device options menu displays. To lock the device: ► Press the Power/Lock key. 2.
Set Up Accounts on Your Device Google Account Samsung Account Your new device uses your Google Account to fully utilize its Android features, including Gmail, Google Hangouts, and the Google Play Store. Create a Samsung account, for access to Samsung content and apps on your device. When you turn on your device for the first time, set up your existing Samsung account, or create a new Samsung account.
Know Your Device Learn some of the key features of your mobile device, including the screens and icons, as well as how to navigate the device and enter text using the keyboard. Warning: Please note that a touch screen responds best to a light touch from the pad of your finger or a non-metallic stylus. Using excessive force or a metallic object when pressing on the touch screen may damage the tempered glass surface and void the warranty.
Home Screen Status Bar Notification Icons Status Icons Widgets App Shortcuts App Folders Apps Screen My Files Home Screen Indicator • App Folders: For your convenience, there are • Notification Icons: Display new messages and • Apps Screen: Allows quick access to all of your • Status Bar: Displays device status icons (right) • App Shortcuts: Shortcuts to your favorite • Status Icons: Display information about the • My Files: Launch the My Files app. See My Files.
App Shortcuts The Home screen is the starting point for using your device. You can use app shortcuts to launch an app from any Home screen. Customize your Home screen by adding application shortcuts, widgets, folders, and using wallpapers. Add a Shortcut to a Home Screen 1. From a Home screen, tap Apps. 2. Touch and hold an app shortcut, drag it to a Home screen and release it. Remove a Shortcut Manage Home Screens 1. Touch and hold a shortcut to release it.
Folders Change the Wallpaper Place folders on the Home screen to organize items. Change the look of the Home and Lock screens with wallpaper. You can display a favorite picture, or choose from preloaded wallpapers. Adding Folders 1. From a Home screen, pinch the screen. 1. From a Home screen, touch and hold on an app shortcut. 2. Drag the shortcut onto release. • • • – or – Create folder and Touch and hold an empty space on the screen. Enter a folder name. 2.
Status Bar The Status Bar at the top of the Home screen provides device information (such as network status, battery charge, and time) on the right side and notification alerts on the left. Notification Icons No SIM card is installed or the installed SIM card is not working. Download of a file or app is in progress. File is being uploaded or sent. Location services (GPS) are active. Status Icons Battery is fully charged. App updates are available from the Google Play Store. Battery is low.
Notification Icons A screenshot has been captured. This is a notification for one or more events. Private mode is enabled. For more information, see Private Mode. Error occurred or caution required.
Navigation, Motions, and Gestures Touchscreen Navigation Pinch and Spread Tap Pinch the screen using your thumb and forefinger or spread by moving your fingers apart. • Zoom in or out while viewing a picture or a Lightly tap items to select or launch them. web page. • Tap the on screen keyboard to enter characters • Zoom in or out while taking a picture. or text. • Tap an item to select it. • Tap an app icon to launch the application.
Notification Panel Settings View additional Quick settings Quick settings Volume Adjust screen brightness Clear all notifications Tap a notification to launch its app or view it Quick Settings Notification icons display on the Status Bar displaying calendar events, device status, and more. For details about these notifications, open the Notification Panel.
Multi Window Multi Window Tray Window Controls Tray Controls Using Multi Window Multitask by using multiple applications at the same time. After enabling Multi Window, you can use it to run multiple apps at the same time. Note: Only apps located on the Multi Window tray can be used together. Additional Multi Window apps are available from the Google Play Store. Activate Multi Window 1. From a Home screen, tap Apps > > Device tab > Multi window. Settings The apps display together on a split screen.
Window Controls Select an application window and tap middle of the windows. Change the Order of Apps in the Multi Window Tray in the 1. Tap the Multi window tab to display the tray. 2. Tap an hold an app, drag it to a new position in the tray and then drop it. Window Controls Open a recently-used application in the selected window. Choose Apps to Display in the Multi Window Tray Switch locations between Multi window applications. You can choose the apps you want to display in the Multi window tray.
Entering Text Using the Samsung Keyboard Using Google Voice Typing Type your text input using a QWERTY keyboard. Instead of typing, speak your text input. 1. On the Samsung Keyboard, tap Typing. Google Voice 2. Speak your text. Special Keys Configure Google Voice Typing Touch and hold this key for quick access to cut (x), copy (c), paste (v), undo (z), redo (y), and select all (a). To customize Google Voice Typing, see Google Voice Typing Settings. Tap to insert common symbols.
Using Swype Swype is a text input method that makes it possible to enter a word by sliding your finger or stylus from letter to letter, lifting your finger between words. For example, to enter the word “this”, simply slide your finger or stylus across t-h-i-s. Enabling and Configuring Swype To enable the Swype keyboard while entering text: 1. Touch the top of the screen and swipe downward to display the Notification Panel. 2. Touch Select input method. 3. Touch Swype.
Applications The Apps screen displays all applications installed on your device, both preloaded apps and apps you download and install yourself. Learn how to change the way apps appear, organize apps into folders, and uninstall or disable apps.
Apps Screen Uninstall or Disable Apps The Apps screen shows all preloaded apps and apps that you downloaded. You can uninstall, disable, or hide apps from view. You can uninstall or disable apps you download and install. • Preloaded apps cannot be uninstalled. • Apps that are disabled are turned off and hidden from view. Shortcuts to app can be placed on any of the Home screens. For more information, see Add a Shortcut to a Home Screen. 1. From a Home screen, tap 2.
Apps Screen Options Use Folders to Organize Apps 1. From a Home screen, tap 2. Tap Apps. 1. From a Home screen, tap More options > Create folder. 2. Tap 3. Enter a folder name. 4. Tap Add, select apps to include in the folder, and then tap Done. • Touch a folder to view its apps. Touch an app to launch it. • Touch More options to select a background color for the folder. Hide Apps from View You can hide (rather than uninstall or disable) any apps you do not want to see on the App screen. 1.
Google Applications Chrome Google Settings Use Google Chrome to browse the Internet and bring your open tabs, bookmarks and address bar data from your computer to your mobile device. Quickly and easily change Google app settings to suit your preferences. Visit google.com/chrome/browser to learn more. Note: You must be signed in to the application you want to configure. For example, sign in to Google+ to configure Google+ settings.
Play Books Play Newsstand With Google Play Books, you can find millions of free e-books and hundreds of thousands more to buy in the eBookstore. Subscribe to your favorite magazines to read on your device at your leisure. Visit play.google.com/store/newsstand to learn more. Visit play.google.com/store/books to learn more. Play Store Play Games Find new apps, movies and TV shows, music, books, magazines, and games in Google Play Store.
AT&T Applications AT&T AllAccess AT&T Ready2Go AT&T AllAccess is the easy-to-use, all-in one tool that helps you view and manage your data plan. AT&T Ready2Go allows you to quickly and easily setup your device by using the web browser on your PC. You can set-up email accounts, import contacts, set wallpaper, configure Wi-Fi and many more features. Your Data plan and Data Usage is displayed. You can manage your account, view your bill, and contact customer support.
Other Applications Flipboard Paper Garden Use this application to access your personalized magazines. Paper Garden is an interactive digital magazine service the offers a seamless user experience with a wide variety of premium global magazines. Paper Garden delivers highly interactive, high resolution magazine content that fits perfectly on Samsung Tablet screens. Visit flipboard.com to learn more.
Calculator Additional Functions The Calculator provides basic and advanced arithmetic functions. To clear the results: • Tap Clear. To clear the calculator history: • To clear the calculator history, tap Basic Operation 1. From a Home screen, tap Calculator. Clear history. Apps > 2. Enter the first number using the numeric keys. To copy all or part of the calculation to the clipboard: 3. Tap the appropriate arithmetic function key. • Touch and hold an entry in the display field. 4.
Calendar Sharing Events Manage your events and tasks. 1. From a Home screen, tap Calendar. Create an Event or Task 1. From a Home screen, tap Calendar. Apps > 2. Tap to view an event or task. Tap More options > Share via, select a sharing method, and follow the prompts. Apps > 2. Tap Add and use one of the following methods: Calendar Settings • Event: Enter an event with an optional repeat setting. These settings allow you to modify settings associated with using the Calendar.
Camera and Video Current Flash mode Current shooting mode Switch between the front and back cameras Record video Quick settings (flash shown) Take a picture Change shooting mode Camera settings View pictures and videos in the Gallery Taking Photos Shooting Mode Take photos with your device’s front or back camera, or combine shots with Dual mode. Several photo effects are available. Some modes are not available when taking self-portraits. 1.
• HDR (Rich tone): Take photos without losing details in bright and dark areas. • Dual camera: Take photos and record videos using the front and rear cameras at the same time. A variety of picture-in-picture styles are available. • Manage modes: Select which shooting modes to display when you tap MODE. • Download: Download additional shooting modes from the Samsung Apps store. Camera Settings 1. From a Home screen, tap Apps > Camera. 2. Tap Settings to configure settings for Camera.
Clock The Clock app offers features for keeping track of time and setting alarms. 1. From a Home screen, tap Apps > 2. Tap Clock. 2. Tap a tab to use a feature: • Alarm: This feature allows you to set an alarm to ring at a specific time. • World clock: View the time of day or night in other parts of the world. World Clock displays time in hundreds of different cities, within all 24 time zones around the world. • • • Time: Choose a time for the alarm.
Contacts Store and manage your contacts with the Contacts app, which can be synchronized with a variety of your existing personal accounts, including Google, Email, Facebook, and your Samsung account. Adding a Contact Use the following procedure to add a new contact. 1. From a Home screen, tap Contacts. 2. Tap Add, and then tap contact fields to enter information. For more information on connecting with and managing your accounts through your device, see Accounts.
Share a Name Card Unlink Contacts When you share a name card, the contact’s information is sent as a vCard file (.vcf). You can share a vCard via Bluetooth or Wi-Fi Direct, attach it to a message, or save it to a storage location. 1. From a Home screen, tap Contacts. 1. From a Home screen, tap Contacts. Apps > 2. Tap the contact to display it, and then tap Link. Apps > 3. Tap Remove beside contacts to unlink them from the main contact. 2.
Create a Shortcut to a Favorite Rename a Group You can create a shortcut to a favorite on the home screen, to access their information directly from the home screen. 1. From a Home screen, tap Contacts. 1. From a Home screen, tap Contacts. 2. Tap the Groups tab, and then tap a group. Apps > 3. Tap More options > Edit group and enter a new name. 2. Tap the Favorites tab, and then touch and hold on a contact to select it. 4. Tap Save. 3. Tap More options > Add shortcut to home.
Delete a Group Contact Settings Preset groups, such as Family, cannot be deleted. These settings allow you to modify settings associated with using the Contacts app. 1. From a Home screen, tap Contacts. Apps > Apps > 2. Tap the Groups tab. 1. From a Home screen, tap Contacts. 3. Tap More options > Delete groups. 2. Tap More options > Settings. 4. Select groups to delete and tap Done. 3. Tap an option and follow the onscreen instructions.
Email Use the Email app to view and manage all your email accounts in one application. Managing Your Email Accounts To access Email: 1. From a Home screen, tap ► From a Home screen, tap Apps > You can view email you receive for all accounts on the Combined view screen or you can view email accounts individually. Email. Apps > Email. 2. Tap the drop-down menu at the top left of the screen to select: Configuring Email Accounts • Combined view: View all email in a combined inbox.
Email Settings Use the Email Settings to configure your Email preferences. Note: Available settings depend on the email provider. 1. From a Home screen, tap Apps > Email. 2. Tap More options > Settings, then tap General settings. 3. Tap an option and follow the onscreen instructions. 4. Tap an account to configure specific settings. Available options depend on the account.
Gallery View, edit, and manage pictures and videos. Trimming Segments of a Video 1. Select a video, and then tap 2. Using the sliders at the bottom of the screen to trim the video. Move the start bracket to the desired starting point, move the end bracket to the desired ending point, and then tap Done to save the video. View Images and Videos Launching Gallery displays available folders.
Deleting Images 1. From a Home screen, tap Gallery Settings Apps > Gallery. These settings allow you to modify settings associated with using your Gallery. 2. Tap a folder to open it. 1. From a Home screen, tap 3. In a folder, tap More Options > Delete, select images, and then tap Done. 2. Tap – or – When viewing an single image, tap Apps > Gallery. More options > Settings. 3. Tap an option and follow the onscreen instructions. Delete. 4.
Internet Browser Tabs Access to the Internet with a fully featured web browser. Use tabs to view multiple web pages at the same time. To open a new tab: Access the Internet ► From a Home screen, tap Apps > ► Tap Internet. Tap a different tab to view it. To close a tab: Command Keys ► Tap The following command keys are available: • • • Back or previous page. Back key to return to the To bookmark the current web page: ► Tap Home to display your Internet Home screen.
Sharing Pages Internet Settings To share a web page address with others: These settings allow you to modify settings associated with using the Internet app. ► Tap More options > Share via and follow the prompts. 1. From a Home screen, tap 2. Tap Incognito Tabs Apps > Internet. More options > Settings. 3. Tap an option and follow the onscreen instructions.
Music Player Stream the song to another device Menu Mark as favorite Volume Playback position Shuffle songs Adjust the sound quality with SoundAlive Elapsed playing time View playlist Repeat the song or playlist Rewind song or go to previous song Length of song Add to playlist Pause/Play Scan forward or go to next song Listen to Music Listen to your favorite songs with the Music player. Navigate through your music library, play songs, and create customized playlists.
My Files Access files stored on your device, including images, videos, songs, and sound clips. Group Options ► After selecting a group, tap options: View Files Files stored in the device are sorted into groups: • Timeline: View files that are grouped by date. • FAVORITE FOLDERS: View shortcuts to folders or FTP servers. • FOLDERS: View files stored in the internal More options for • • • Select: Select files or folders.
Additional Functions Add Shortcuts to Folders The following functions are available: Add a shortcut to frequently-used folders in Favorite folders. • • • • Create folder: Create a new folder. ► Select a folder and tap More options > Add to Favorite folders. View: Change the view mode. Storage usage: View memory information for your device and memory card (not included). Search: Search for a file or folder.
S Voice S Voice Settings Speak commands to perform operations on your device, and to speak criteria for searches and other operations. These settings allow you to modify settings associated with using S Voice. 1. From a Home screen, tap 2. Tap Use S Voice to find everything from directions and trivia answers to the current weather forecast. 1. From a Home screen, tap Apps > Apps > S Voice. More options > Settings. 3. Tap an option and follow the onscreen instructions. S Voice. 2.
Samsung Apps With Samsung Apps, you can download hundreds of applications from a variety of categories. Note: To use this feature to download applications, you must have a Samsung account. 1. From a Home screen, tap Samsung Apps. Apps > The Disclaimer screen displays. 2. Read the Terms and conditions and the Privacy policy and tap Accept. 3. Tap an application that you would like, then follow the onscreen instructions to download. 4. Tap More options > Help for additional information.
Video Player Pop-up play Change player AMOLED cinema More options Video file name Volume Playback position Adjust the sound quality with SoundAlive Video list Move controls to the left Move controls to the right Rewind video or go to previous video Change screen ratio Pause/Play Scan forward or go to next video Play and manage videos stored on your device. Use Pop-Up Play Multi task with Pop-Up Play — transform your video player into a pop-up window.
WatchON Configure Your Device as a Remote WatchON turns your tablet into a remote control. Not only can you control your TV, set-top box, DVR and other devices from your tablet, but it will recommend great shows and movies based on your preferences and past viewing behavior. 1. From the WatchON tool bar, tap Control. Remote 2. Tap Setup at the prompt. 3. Follow the instructions to find your TV or other devices and configure your device to control their operation.
Settings Configure your device’s connections and settings, add accounts, and customize the home screen, apps, and features. • Some options use an ON/OFF button to turn the option on ( ON ) or off ( OFF ). • For some options, you must tap a field, such as Email address, to display and set options. • Some options are enabled or disabled by tapping a check box. When enabled, a check mark displays. Tap the check mark to remove it and disable the option.
How to Use Settings Accessing Settings ► From a Home screen, tap Settings. Search for Settings Apps > If you are not sure exactly where to find a certain setting, you can use the Setting search feature. – or – 1. From a Home screen, tap Settings. From a Home screen, drag down from the Status bar to display the Notification panel, and then tap Settings. 2. Tap Categories of Settings • Connections: Control your device’s wireless Apps > Search. • Enter a word or words in the Search box.
Wi-Fi and Wi-Fi Direct Manually Connect to a Wi-Fi Network Wi-Fi is a term used for certain types of Wireless Local Area Networks (WLAN). Wi-Fi communication requires access to a Wireless Access Point (WAP). 1. From a Home screen, tap > Connections tab. 3. Tap Add Wi-Fi network. 4. Enter information about the Wi-Fi network: Turn Wi-Fi On or Off Turning Wi-Fi on makes your device able to discover and connect to compatible in-range WAPs. Apps > Tap Network SSID to enter the name of the Wi-Fi network.
Wi-Fi Settings Wi-Fi Direct The Wi-Fi settings menu allows you to set up many of your device’s advanced Wi-Fi services. Wi-Fi Direct allows direct device-to-device connections via Wi-Fi, without having to connect to a Wi-Fi network. 1. From a Home screen, tap > Connections tab. Apps > Settings 1. From a Home screen, tap > Connections tab. 2. Tap Wi-Fi, and then tap ON/OFF to turn Wi-Fi on. • Settings 3. Tap Wi-Fi Direct.
Bluetooth Making Your Device Visible to Other Bluetooth Devices Bluetooth is a short-range communications technology that allows you to connect wirelessly to a number of Bluetooth devices, such as headsets and hands-free car Bluetooth systems, and Bluetooth-enabled computers, printers, and wireless devices. When you make your device visible, other Bluetooth can find it in a scan and initiate pairing. You can choose the length of time your device remains visible. 1.
Pair Bluetooth Devices Disconnect a Paired Device The Bluetooth pairing process allows you to establish trusted connections between your device and another Bluetooth device. Disconnecting a paired device breaks the connection between the device and your device, but retains the knowledge of the pairing. At a later point when you wish to reconnect the device, there is no need to setup the connection information again. Pairing between two Bluetooth devices is a one time process.
Airplane Mode Airplane mode disconnects your device from all networks and turns off connectivity features, such as Wi-Fi and Bluetooth. 1. From a Home screen, tap > Connections tab. Settings 2. Tap Airplane mode, and then tap ON/OFF to enable or disable the option. Note: You can also control Airplane mode from the Device options menu. Press and hold the Power/Lock Key, and then tap Airplane mode.
Data Usage Monitor your mobile data usage. 2. Tap Note: Your service provider may account for data usage differently. 1. From a Home screen, tap Apps > Settings > Connections tab > Data usage for options: • Data roaming: Enable data roaming on your device. • Restrict background data: Restrict some apps and services from working unless you are connected to a Wi-Fi network. • Mobile data: Enable mobile data. You can also control Mobile Data at the Notification panel.
Location Services Location Reporting Some apps, such as Google maps, may require one or more location services be turned on for full functionality. Google uses Location Reporting to store and use your device’s most recent location data. Google apps, such as Google Maps, can use this data to improve your search results based on places that you have visited. 1. From a Home screen, tap Apps > > Connections tab > Location. Locating Method 1. From a Home screen, tap Apps > > Connections tab > Location. 2.
Mobile Networks Control your device’s access to networks and mobile data service. 1. From a Home screen, tap > Connections tab. Apps > Default Setup Options Your device default is set to Automatic, which causes your tablet to automatically search for an available network. To select a network each time you connect, set this option to Manual: Settings 2. Tap More networks > Mobile networks for options: • Mobile data: Allow your device to connect to a mobile data network.
Virtual Private Networks (VPN) Connect to a VPN Set up and manage your Virtual Private Networks (VPNs). 1. From a Home screen, tap Apps > Settings > Connections tab > More networks > VPN. Note: You must set a screen lock PIN or password before setting up a VPN. For more information, see Lock Screen. 2. Tap the VPN, enter your log in information, and tap Connect. Edit or Delete a VPN Adding a VPN 1. From a Home screen, tap Apps > Settings > Connections tab > More networks > VPN. 1.
Ethernet Connections Manage your Ethernet connections. 1. From a Home screen, tap Apps > Settings > Connections tab > More networks. 2. Tap Ethernet and follow the prompts to connect to an Ethernet network.
Nearby Devices Share your media files with nearby devices via Wi-Fi, Wi-Fi Direct, or Mobile Hotspot. 3. Set the following options: Warning! If file sharing is enabled, other devices can access your data. Use this option with care. 1. From a Home screen, tap Apps > Settings > Connections tab > Nearby devices. • Content to share: Select the content to share. Choices are: Videos, Photos, and Music. • Allowed devices: Indicate the devices accessible to your device.
Printing Print images and documents to Samsung printers and other compatible printers (not included). 1. From a Home screen, tap Apps > > Connections tab > Printing. Settings 2. Tap a print service and follow the prompts. Note: Tap Download plug-in to install additional print service drivers.
Screen Mirroring Share your device’s screen with another device. To enable Screen Mirroring: 1. From a Home screen, tap Apps > Settings > Connections tab > Screen Mirroring. 2. Tap ON/OFF to enable Screen Mirroring. Available devices are listed. To find more devices: ► Tap Scan. To connect: ► Tap a device and follow the prompts.
Sound Settings Adjust the Volume Configure the sounds and vibrations used to indicate notifications, screen touches, and other activities. Set the system volume level, and set default volume for notifications and other media. Tip: You can also set System volume from the home screen by pressing the Volume key. 1. From a Home screen, tap > Device tab. Change the Sound Mode • • • Tip: Sound modes are also available from the Device options menu.
Play Tones When Touching or Tapping the Screen Set Notification Sounds for Samsung Applications Play tones when you touch or tap the screen to make selections. Choose notification alerts for new email and calendar events. 1. From a Home screen, tap > Device tab. Apps > Settings 1. From a Home screen, tap > Device tab. 2. Tap Sound > Touch sounds to turn the feature on. Apps > Settings 2. Tap Sounds for options: Set the Screen Lock Sound • Email: Configure your email account notifications.
Display Settings Change the Font Style and Size Automatically Rotate the Screen You can set the font style and size for all text that displays on the screen. Use the front camera to rotate the screen based on the orientation of your face. 1. From a Home screen, tap > Device tab. Apps > Settings 1. From a Home screen, tap > Device tab. 2. Tap Display > Font for options. Settings 2.
Select a Screen Mode Auto Adjust the Screen Tone Choose a screen mode to match your type of viewing. You can choose to have the device automatically adapt the display depending on the type of image being displayed, and other criteria such as battery level. Your device will analyze the images displayed on the screen and automatically adjusts the brightness to conserve battery power. 1. From a Home screen, tap > Device tab. Apps > 1. From a Home screen, tap > Device tab.
Set the Touch Key Light Duration Increase the Touch Sensitivity of the Screen Set the length of time the Recent apps key and Back key remain lit after you touch them. 1. From a Home screen, tap > Device tab. Apps > Increase the sensitivity of the touch screen to improve results when wearing gloves. Settings 1. From a Home screen, tap > Device tab. 2. Tap Display > Touch key light duration to choose a timeout period.
Wallpaper Change the look of the home and lock screens with wallpaper. You can display a favorite picture or choose from preloaded wallpapers. 1. From a Home screen, tap > Device tab. Apps > Settings 2. Tap Wallpaper. 3. Tap Home screen, Lock screen, or Home and lock screens. 4. Tap an image to preview it, and then tap Set wallpaper. • Tap More images for additional wallpapers. For more information, see Change the Wallpaper.
Lock Screen Choose a method for unlocking your screen. Different Screen Locks have different levels of security and options. Screen Lock Options Swipe Only Set a Screen Lock 1. From a Home screen, tap > Device tab. Apps > Settings Unlock effect: Set the visual effect used when unlocking the screen. • Shortcuts: Set shortcuts to appear at the bottom of the Lock screen. Touch the ON/OFF button to turn it on. • Help text: Show help information on unlocking the screen on the Lock screen.
Multi Window Turn on the Multi window feature. To activate Multi window: 1. From a Home screen, tap > Device tab. Apps > Settings 2. Tap Multi window. 3. Tap ON/OFF. For more information, see Using Multi Window.
Notification Panel Recommended Applications Customize which Quick setting buttons appear on the Notification Panel. When you perform certain actions, such as plugging in earphones, the Notification panel can display shortcut to your favorite related apps, such as Music Player or Google Play Music. You can also customize which apps appear on the Recommended applications menu on the Notification Panel when you perform certain actions, such as plugging in earphones.
Toolbox The Toolbox is a floating shortcut menu that displays on every screen, giving you quick access to your favorite apps. To activate the Toolbox: 1. From a Home screen, tap > Device tab. Apps > Settings 2. Tap Toolbox. 3. Tap ON/OFF to enable Toolbox. 4. Tap Edit to choose up to five apps to display in Toolbox.
Motions Control certain device actions by touching the screen with the palm of your hand. 1. From a Home screen, tap > Device tab. Apps > Settings 2. Tap Motions. 3. Tap ON/OFF to enable each of the following: Settings • Mute/pause: Mute or pause sounds and video by covering the screen or turning over the device. • Palm swipe to capture: Capture an image of the screen when you sweep your hand left or right across the screen.
Accessibility Accessibility services are special features that make using the device easier for those with certain physical disabilities. • Negative colors: Reverse the display of onscreen colors from White text on a Black background to Black text on a White background. • Color adjustment: Adjust the color of the screen if you are color blind or have difficulty reading the display because of the screen color. Tap Color adjustment for options.
Dexterity and Interaction • Assistant menu: Improve the device accessibility for users with reduced dexterity. • Press and hold delay: Select a time interval for this tap gesture. • Interaction control: Enable motions and screen timeout. You can also block areas of the screen from tap interaction. More Settings • Direct Access: Open your accessibility settings by pressing the Home Key three times in quick succession. • Single tap mode: Tap to stop/snooze alarms and calendar events.
Blocking Mode Turn off notifications for selected features. 1. From a Home screen, tap > Device tab. Apps > Settings 2. Tap Blocking mode and tap ON/OFF to turn the feature on. Configure options: • Tap Turn off notifications to block all notifications. • • Tap Turn off alarm to block all alarms. The Set time option allows you to set Blocking mode for a specific time range or always. - Tap the Always field to disable it and configure the From and To time fields.
Users Use User Profiles Share this tablet with multiple people by creating User accounts. To access the device with a user profile, select a profile at the top right of the locked screen. Users have their own space, which they can customize with their own apps, wallpaper, and so on. Users can also adjust tablet settings like Wi-Fi which affect everyone.
Private Mode Hide personal content from being accessed by anyone else using your device. Private mode is only available for certain applications. Note: A secure screen lock (Pattern, PIN, Fingerprint, or Password) is required to use Private Mode. Set Up Private Mode 1. From a Home screen, tap > Device tab. Apps > Settings 2. Tap ON/OFF to turn Private mode on. 3. Tap Private mode. 4. Follow the prompts to learn about and set up Private mode.
Finger Scanner Change Your Alternative Password Use fingerprint recognition as an alternative to entering passwords in certain apps. 1. From a Home screen, tap > Device tab. You can also use your fingerprint to verify your identity when logging in to your Samsung account. Apps > Settings 2. Tap Finger Scanner > Change alternative password. 3. Enter your fingerprint or password. Additional Settings Apps > Register a Fingerprint 1. From a Home screen, tap > Device tab.
Accounts Account Settings Set up and manage accounts, including your Google Account, Samsung account, email, and social networking accounts. Each account has its own set of settings. In addition, you can configure common settings for all accounts of the same type. Note: Account settings and available features vary between account types and service providers. Contact your service provider for more information on your account’s settings.
Backup and Reset Factory Data Reset Back up your data to Google servers. You can also reset your device to its factory defaults. Return your device to its factory defaults. Warning! This action permanently erases ALL data from the device, including Google or other account settings, system and application data and settings, downloaded applications, as well as your music, photos, videos, and other files. Backup and Restore Enable backup of your information to Google servers. 1.
Language and Input Settings Samsung Keyboard Settings Configure your device’s language and input settings. Configure options for using the Samsung keyboard. 1. From a Home screen, tap > General tab. Set Your Default Language 1. From a Home screen, tap > General tab. Apps > 3. Tap Settings next to Samsung keyboard for options: 3. Select a language from the list. Select Your Default Keyboard or Input Method Apps > • Select input languages: Choose which languages are available on the keyboard.
Swype Keyboard Settings Keeper FastFill Configure options for using the Swype keyboard. Use Keeper FastFill to securely and quickly auto-fill your login credentials on websites and mobile apps. 1. From a Home screen, tap > General tab. Apps > Settings Voice Search 2. Tap Language and input. 3. Tap Settings next to Swype for options: • • • Settings: Configure basic options. • Languages: Set the current language. Additional languages can be downloaded.
Mouse/Trackpad Settings Configure settings for using an optional mouse or trackpad (not included). 1. From a Home screen, tap > General tab. Apps > Settings 2. Tap Language and input for options: • Mouseover: Show more information when you move the pointer over items on the screen. - Preview and icon labels: Show previews, progress information, speed dial information and icon labels. - List scrolling: Scroll down or up lists by holding the mouse pointer over the edge of the screen.
Date and Time Settings By default, your device receives date and time information from the wireless network. 1. From a Home screen, tap > General tab. Settings 2. Tap Date and time. 3. Set the date, time, time zone, time format, and date format. When you are outside network coverage, you may want to set date and time information manually using the date and time settings.
Accessories Configure options when docking (dock not included) or using a book cover (not included). 1. From a Home screen, tap > General tab. Apps > Settings 2. Tap Accessories for options: Settings • Audio output: Select a sound output format to use when connecting your device to optional HDMI devices (not included). Some devices may not support the surround sound setting. • Automatic unlock: Flip the cover open to unlock the screen when secure lock is turned off.
Battery View how battery power is used for device activities. 1. From a Home screen, tap > General tab. Apps > Settings 2. Tap Battery for options: • Show battery percentage: Display the battery charge percentage next to the battery icon on the Status bar. • Battery Chart: The battery level displays as a percentage. The amount of time the battery has been used also displays. • Apps and OS Usage: Battery usage displays in percentages per application.
Power Saving Conserve battery power by automatically adjusting the screen brightness, limiting the performance of the CPU, and other power reduction activities. 1. From a Home screen, tap > General tab. Settings 2. Tap Power saving for options: Ultra power saving mode saves even more battery power by using a gray scale theme on the Home screen and limiting the number of usable apps. Settings Apps > • Power saving mode: Tap ON/OFF to turn the feature on. Tap Power saving mode to select options.
Storage Memory Card (SD Card) View the device memory and usage, or mount, unmount, or format an optional memory card (not included). Once an optional memory card (not included) has been installed in your device, the card memory displays as Total space and Available space. Install a Memory Card You can use an optional microSD or microSDHC card (not included) to add additional memory space to your device. Device Memory View and manage the memory used by the device. 1.
Mount a Memory Card Remove a Memory Card When you install an optional memory card, it is automatically mounted (connected to the device) and prepared for use. However, should you unmount the card without removing it from the device, you will need to mount it before it can be accessed. Warning! To prevent damage to information stored on the memory card, unmount the card before removing it from the device. 1. From a Home screen, tap > General tab. Apps > 1. From a Home screen, tap > General tab.
Security Secure your device and protect your data with Security settings. Locate a Lost Device Encrypt Your Data Note: You must sign up for a Samsung account and enable Google location service to use Remote controls. Protect your device from loss or theft allowing your device to be locked, tracked, and for your data to be deleted remotely. Require a numeric PIN or password to decrypt your tablet each time you power it on or encrypt the data on a memory card (not included) each time it is connected. 1.
Set Up SIM Card Lock Device Administration To prevent another person from using your SIM card to make unauthorized calls or from accessing information stored on your SIM card, you can protect the information by using a PIN code. Manage your device administrators and application installation privileges. 1. From a Home screen, tap > General tab. When enabled, your tablet asks for a PIN number each time you use the tablet. Using this option you can also change your SIM PIN number. 1.
Credential Storage Manage your security certificates. If a certificate authority (CA) certificate gets compromised or for some other reason you do not trust it, you can disable or remove it. 1. From a Home screen, tap > General tab. Apps > Settings 2. Tap Security for options: Settings • Storage type: Select a storage location for credential contents. • Trusted credentials: Display certificates in your device’s ROM and other certificates you have installed.
About Your Device Software Update View information about your device, including status, legal information, hardware and software versions, and a tutorial. 1. From a Home screen, tap > General tab. Apps > Use Software update to update your device’s software. 1. From a Home screen, tap > General tab. Settings Settings Software update: Update your tablet software, if available. • Status: View the status of the battery, network, and other information about your device.
Application Manager Downloaded You can download and install applications from Google Play Store or create applications using the Android SDK and install them on your device. Use Application manager settings to manage applications. Displays apps you have downloaded onto your device. 1. From a Home screen, tap Apps > Settings > Applications tab > Application manager. 2. Tap DOWNLOADED to view a list of all the downloaded applications on your device.
SD Card Running Services Displays apps you have downloaded onto your memory card (not included). View and control services running on your device. 1. From a Home screen, tap Apps > Settings > Applications tab > Application manager. 1. From a Home screen, tap Apps > Settings > Applications tab > Application manager. 2. Tap RUNNING. 2. Tap SD CARD to view a list of all the downloaded applications on your device. All the applications that are currently running on the device display. 3.
Default Applications If you have multiple applications of the same type, such as email apps, you can select one app to be the default. You can also use a simpler Home screen which provides an easier user experience for firsttime tablet users. 1. From a Home screen, tap Apps > Settings > Applications tab > Default Applications. 2. Tap an app to set it as the default application. – or – Tap an app to remove it as the default application. 3. To clear defaults that you have set up, tap Clear.
Applications Settings Shortcuts Shortcuts to the settings for various apps are available in one convenient location. To quickly access the settings for Contacts, Email, Gallery, Internet, Calendar, or S Voice: 1. From a Home screen, tap > Applications tab. Apps > Settings 2. Tap one of the following to display the settings for the selected app: Settings • Contacts: For more information, see Contact Settings. • Email: For more information, see Email Settings.