
Installation Guide (Installation manual) (ver.1.0)


6
General information
7
General information
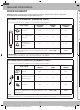
# 1 and #2 Phillips
screwdriver
Pencil Ruler or tape measure and
straight edge
Carpenter square (optional)
Tin snips (for cutting
damper, if required)
Scissors (to cut
template, if necessary)
Electric drill with
3
/
16
˝, ½˝ and
⅝˝ drill bits
Filler blocks or scrap wood
pieces, if needed for top
cabinet spacing (used on
recessed bottom cabinet
installations only)
Gloves Saw (saber, hole or
keyhole)
Stud finder or Hammer
(optional)
Safety goggles
Level Duct and masking tape
• Thespacebetweenthecabinetsmustbe30˝wideand
free of obstructions.
• Thismicrowaveovenisforinstallationoverrangesup
to 36˝ wide.
• Ifyouaregoingtoventyourmicrowaveoventothe
outside, see the Hood Exhaust Section for exhaust
duct preparation.
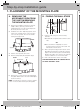
• If installing the microwave oven beneath smooth
flat cabinets, be careful to follow the instructions
on the top cabinet template for power cord
clearance.
•
unit is 12˝.
• The dimensions provided are the minimum
codes and the practical use of the range will
shown between the range and the bottom of the
microwave.
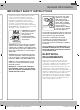
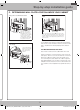
• If the unit is damaged in shipment, return the unit to the store in which it was bought for repair or
replacement.
• If the unit is damaged by the customer, repair or replacement is the responsibility of the customer.
• If the unit is damaged by the installer (if other than the customer), repair or replacement must be made by
arrangement between the customer and installer.
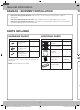
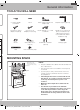
PART qUANTITY
Template
INSTALLATION
INSTRUCTIONS
Wood Screws
(¼˝ x 2˝)
1
Template
INSTALLATION
INSTRUCTIONS
Toggle Bolts
(and wing nuts)
(
3
/
16
˝ x 3˝)
2
Template
INSTALLATION
INSTRUCTIONS
Self-aligning
Machine Screws
(¼˝ - 28 x 3 ¼˝)
2
You will find the installation hardware contained in a
packet with the unit. Check to make sure you have all
these parts.
NOTE: Some extra parts are included.
PART qUANTITY
TOP CABINET TEMPLATE
REAR WALL TEMPLATE
Top Cabinet
Template
1
TOP CABINET TEMPLATE
REAR WALL TEMPLATE
Rear Wall Template 1
Installation
Instructions
1
One Touch Easy
Grease Filter
1
(Installed)
Template
INSTALLATION
INSTRUCTIONS
Exhaust adaptor 1
SMH1927_XAA_DE68-04108A-01_EN_120725.indd 6 2012-07-25 �� 7:54:29