| Power Related | Installation Related | Cleaning and Use Related | To avoid injuries or damage to property, please read the following precautions carefully and use the product accordingly. Failure to follow the instructions marked with this symbol may cause personal injury or even fatality. Failure to follow the instructions marked with this symbol, may cause personal injury or damage to the product or property. Be sure to plug the plug in tightly as failing to do so may cause fire.
Always unplug the unit by holding the power plug and not the power cable. z There is a danger of fire. Unplug the power plug before cleaning the product. z There is a danger of electric shock or fire. Do not let water or any liquid come into contact with the adapter. z This may cause fire or electric shock. z Avoid using the product near liquids or outdoors (i.e. rain, snow). z Ensure that the adapter is not exposed to wetness when cleaning the floor with water.
When installing the product in a cabinet or on a shelf, do not let the front part of the product project out of the cabinet or shelf. z A falling product may damage the product or cause injury. Keep the power cord away from heaters. z The coating of the power cord may melt and cause electric shock or fire. Do not install the product in locations exposed to oil, smoke, moisture or water (rainwater), or in a vehicle. z There is a danger of electric shock or fire.
Do not drop the product while moving it. z Failing to do so may cause damage or injury. Keep the product out of children’s reach. z A falling product may cause harm to children. Since the front part of the product is heavier than the back part, install the product on a flat and stable location.
If the product emits smoke, unusual noise, or there is a burning smell, turn the system off immediately, disconnect the power plug from the wall outlet, and contact a Service Center. z There is a danger of electric shock or fire. If the power plug pin or jack is exposed to dust, water or alien substances, clean it. z There is a danger of electric shock or fire. Ask a Customer Center or Service Center to internally clean the product at least once a year.
Correct Disposal of This Product (Waste Electrical & Electronic Equipment) - Europe only (Applicable in the European Union and other European countries with separate collection systems) This marking shown on the product or its literature, indicates that it should not be disposed with other household wastes at the end of its working life.
| Product Features | Product Views | Battery (sold separately) | Product Specifications | A custom made new projector designed for important marketing activities and presentations of the active business man! The Portable Projector SP-P300ME provides high mobility and ease of use at a reasonable price. The New Concept Projector for High Mobility - Small Size. - Lightweight.
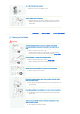
1. Power Button[ ] 7. POWER LED To turn it on If you turn the projector on, the Power LED Press the Power button. The Power LED will light lights up and if you turn it off, the Power LED up and the power is turned on. turns off accordingly. To turn it off Press the Power button until the Power LED is turned off. 8. TEMP LED This lights up when the product is out of order. Refer to the Status of the Operating LEDs. 2. Menu Button[ ] Press to display the OSD menu. 9.
Quick Installation Guide Warranty User Manual CD Adapter Power Cord PC/Composite cable Lens Cap Stand (View Stand Installation) Carrying Case Use only the adapter supplied with the product. For purchasing an additional adapter, contact your dealer or nearby service center. Optional Module Battery Video Cable Status of Operating LEDs : On, : Off POWER TEMP (BLUE) (RED) Description The set is power off. The set is normally operating.
Your Battery 1. Locking hole A part for installing the battery into the projector. 2. Power Terminal A part for connecting the power to charge only the battery. 3. Battery Latch A part to fix the battery onto the projector. 4. Battery Charge Indicator Shows the remaining battery charge. While charging the battery (by connecting the AC adapter), the LED lights up red.
the bottom left of the battery. The green LEDs show the remaining battery charge and are automatically turned off after a while. When the AC power is connected through the adapter and the battery is being charged, the green LED lights up. Battery Installation and Precautions. 1. Installing the Battery Place the projector over the battery and push it down pushing the back of the projector forward. When the projector is connected to the battery, the screen is displayed automatically.
4. Charging the Battery Charging the battery when the battery is separated from the projector. z Adapter Standard : DC 14 V, 3.5 A Charging the battery when the battery is installed in the projector. 5. Battery Use Instructions Please follow the instructions below when using the battery. Use only an authorized battery. Using an unauthorized battery may damage the projector and the battery may explode during use. Avoid heat or impact to the battery.
at the lamp light or the light is projected onto your eyes, it may cause damage to your eyesight. Avoid touching the battery charging terminals with metal objects such as necklaces, coins, keys, etc. There is a danger of fire or explosion. Avoid keeping the battery in air-tight locations exposed to high temperatures such as within a vehicle exposed to the sun. Keep the battery around room temperature (between 0°C and +40°C). There is a danger of external deformation or explosion.
than class A. Supported Display Mode Horizontal Resolution Frequency (kHz) Vertical Frequency Clock Frequency (Hz) (MHz) Polarity (Horizontal /Vertical) VGA, 640 x 350 31.469 70.086 25.175 +/- VGA, 640 x 350 37.861 85.080 31.500 +/- VGA, 640 X 400 37.861 85.080 31.500 -/+ VGA, 640 x 480 31.469 59.940 25.175 -/- VGA, 640 x 480 31.469 59.940 25.175 -/- VGA, 640 x 480 37.500 75.000 31.500 -/- VGA, 640 x 480 43.269 85.008 36.000 -/- VGA, 640 x 480 35.000 66.667 30.
| Basic Settings | Connecting the Power | Connecting with a PC | Connecting with an AV device | Installing a Projector Install the projector so that the beam from the projector is perpendicular to the screen. Place the projector so that the lens is at the center of the screen. If the screen is not vertically installed, the picture on the screen may not be a rectangle. Do not install the screen in a bright surrounding. If the screen is too bright, the picture on the screen is not displayed clearly.
Screen Size and Projection Distance Distance Picture size(mm x mm) Diagonal inch 0.5 m 25.5 * 19.1 12.5" 1.0 m 50.8 * 38.1 25.0" 1.64 m 83.3 * 62.5 41.0" 2.0 m 101.6 * 76.2 50.0" 2.8 m 127.0 * 95.3 63.0" The screen is designed to be optimal at 41". | Basic Settings | Connect the adapter to a wall outlet( Connecting the Power | Connecting with a PC | Connecting with an AV device | ). Connect the power cord to the adapter and connect it to a wall outlet.
Use only an authorized adapter. | Basic Settings | Connecting the Power | Connecting with a PC | Connecting with an AV device | Connect the [PC/COMPOSITE] port on the side of the projector and the Monitor OUT port [D-Sub] of the PC using a PC/Composite cable. When all the connections above have been connected, turn the projector and the PC on. Using the Projector Selecting the external input source. Select PC IN by using the Menu and Adjust buttons.
Connect the [Composite Input (Yellow)] port on the side of the projector and the Video Out (Yellow) port of the AV device with a video cable. When all the connections above have been connected, turn the projector and the video devices on. How to Use Selecting the external input source. Press the SOURCE button and select the PC input ( SOURCE ) Select PC input using the Adjust buttons. ( Menu > Input > Source List > Composite ) Turn the connected AV device.
| The Checklist before reporting a problem | Installation and Connection Symptom Cannot turn the power on. Solution When using the adaptor : Check the connectivity of the power to the projector. When using the battery : Check the connection status of the battery and the projector, and the remaining battery charge. The screen is distorted or Install the projector so that the beam from the projector is perpendicular to the displayed in a trapezoid shape. screen.
| Custody and Management | Contact SAMSUNG WORLD-WIDE | Other | Authority | To clean the exterior and lens of the projector Clean the projector using a soft dry cloth. Do not clean the projector with inflammable substances such as benzene, paint thinners or a wet cloth, as these may cause problems. Do not touch the projector with a nail or any other sharp objects, as this may scratch the surface.
Latin America ARGENTINE 0800-333-3733 http://www.samsung.com/ar BRAZIL 0800-124-421 http://www.samsung.com/br CHILE 800-726-7864 (SAMSUNG) http://www.samsung.com/cl COSTA RICA 0-800-507-7267 http://www.samsung.com/latin ECUADOR 1-800-10-7267 http://www.samsung.com/latin EL SALVADOR 800-6225 http://www.samsung.com/latin GUATEMALA 1-800-299-0013 http://www.samsung.com/latin JAMAICA 1-800-234-7267 http://www.samsung.com/latin PANAMA 800-7267 http://www.samsung.
Asia Pacific AUSTRALIA 1300 362 603 http://www.samsung.com/au CHINA 800-810-5858, 010- 6475 1880 http://www.samsung.com.cn HONG KONG 2862 6001 http://www.samsung.com/hk INDIA 3030 8282, 1600 1100 11 http://www.samsung.com/in INDONESIA 0800-112-8888 http://www.samsung.com/id JAPAN 0120-327-527 http://www.samsung.com/jp MALAYSIA 1800-88-9999 http://www.samsung.com/my PHILIPPINES 1800-10-SAMSUNG (7267864) http://www.samsung.com/ph SINGAPORE 1800-SAMSUNG (7267864) http://www.samsung.
- Description of standard on file transmission and white board. - Shared application submitted to ITU for approval as a part of the T.120 standard. H.320 H.320 is the ITU standard for public circuit-switched networks. - A comprehensive standard for audio and video. It can be shared between systems that sell ISDN. - Including the H.261 Video Standard, G.711, G.722 and G.728 audio standards, and data for the T.120 standard. Backwards Compatible Backwards compatibility for previous computer models.
player, etc. as a video source. English Caption (= Caption Settings) A function that shows English captions or text information included in the broadcasting signal or video tape. You can use this function for studying English by watching AFKN or CC marked video tapes. Resolution Pixels are a number of small dots making up the TV screen. The resolution represents the number of pixels on a screen.
EXPORTADO POR: Samsung Electronics CO.,LTD.