| Safety Symbols | Power | Installation | Using and Cleaning | Safety Symbols Make sure to follow the directions below to prevent accidents and damage to the product. Failure to follow the accompanying directions may lead to serious injury or death. Failure to follow the accompanying directions may lead to minor personal injury or property damage.
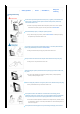
Do not connect more than one appliance to a single outlet, as an overheated outlet may cause fire. Do not use force to pull the power cord. Don't place anything heavy on the power cord, as this may cause electric shock or fire. Make sure to turn the power off and disconnect the power plug from the outlet before moving the product. Make sure to disconnect the connection cables from other devices as well.
| Safety Symbols | Power | Installation | Using and Cleaning Installation When installing the product on a cabinet or shelf, do not let the front end of the product project beyond its front edge. z Failing to do so, may cause the product to fall, resulting in a product malfunction or personal injury. Do not place the power cord near a heater, as the power cord may melt, causing electric shock or fire.
| Safety Symbols | Power | Installation | Using and Cleaning | Using and Cleaning Do not insert any metal objects such as forks, wire, or gimlets, or flammable items such as paper or matches into the ports at the back of the product, as this may cause electric shock or fire. z If water or any foreign substance enters the product, make sure to turn the product off disconnect the power plug from the outlet, and contact a service center. Never disassemble, repair, or modify the product yourself.
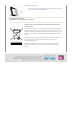
disconnect the power plug. z Using the product without verifying that it has not been damaged may cause electric shock or fire. Please contact a service center. Correct Disposal of This Product (Waste Electrical & Electronic Equipment) - Europe only (Applicable in the European Union and other European countries with separate collection systems) This marking shown on the product or its literature, indicates that it should not be disposed with other household waste at the end of its working life.
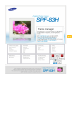
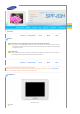
| Features | Components | Front | Back | Side | Features Expand the memory capacity with a memory card. Enjoy stored images immediately. By connecting a CF or SD/MMC/MS/xD memory card of your digital camera to your Digital Photo Frame, you can enjoy the images on your Digital Photo Frame quickly and easily. This also provides a way to expand the memory capacity of your Digital Photo Frame.
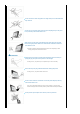
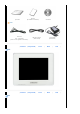
Quick Start Warranty User Manual (Not available in all locations) Cables Power cord U.S.A. : 3903-000192 (Part No. are not applicable in all countries.
The Kensington lock is a device used to physically secure the system when using it in a public place. (The locking device has to be purchased separately.) Kensington lock For using a locking device, please contact where you purchased it. Connect the power adapter to this jack. Power terminal Connect the power cord to the power terminal of the power adapter. Connect a PC or an external device using a USB cable.
[ ] Power Button Power Indicator Turns the product on or off. Connect the power cord to the power terminal of the power adapter. Shows the power status. When the product is powered on, the power light turns on. [MENU] Menu Button Displays the menu window at the bottom left corner of the screen. [ ] Up Button Used for moving up. [ ] Left Button Used for moving left. [ ] Right Button Used for moving right. [ Used for moving down.
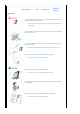
Allows you to insert an optional memory card. (Only applicable for CF/SD/MMC/MS/XD card) Connect a PC or an external device using a USB cable. Down stream terminal Connect your Digital Photo Frame to a USB-supported.
| Power | USB | Memory Card | | USB | Memory Card | Power Connect the power adapter to the terminal at the back of the product. Connect the power cord to the power adapter. Plug the power cord for the product into a nearby outlet. Press the button at the right of the product to turn the product on.
Up Stream Terminal Used to connect your digital photo frame to a PC. When connecting your digital photo frame to a PC through the up stream terminal, make sure to use the USB cable provided with the product. Down Stream Used to connect an external USB-supporting device to your digital photo frame. Terminal If you connect your USB memory stick product to a USB hub or USB extension, it may not be recognized. Therefore, make sure that the USB memory stick is inserted directly into the USB port.
CF/SD/MMC/MS/xD CARD Slide the card in the direction marked on the top of the card. When the power is turned on, the Photo menu screen appears automatically and a slide show starts with the photos in the Frame Memory. If external memory, such as a memory card or USB memory, is installed, it is selected first and a slide show starts with the photos in its root directory. If there are no photo files, a list of folders is displayed.
When turning on the power, a slide show starts with the photo files in the root directory of the installed external memory device. If there are no photo files or no external memory device is installed, the Photo menu screen is displayed. If there are no key operations for five (5) minutes, the current mode changes to Clock mode to protect the screen. But Slide Show mode has no change. If you press the MENU button in Clock mode, a sub menu is displayed. Press the BACK button to return to the main screen.
OSD Description Open Open the folder. Copy Copy the folder. Delete Delete the folder. When Thumbnail list is selected When pressing the MENU, on-screen menu is displayed on the screen. OSD Description Start Slide Show Start slideshow. Copy / Copy All files Delete / Delete All files Copy the file. Delete the file. Slide Show When pressing the MENU, on-screen menu is displayed on the screen.
On, Off Auto Rotation If a photo is to be displayed in portrait mode while your Digital Album is placed horizontally, it is automatically displayed rotated and fit to the width. Original, 90°, 180°, 270° Rotate Select one among Original, 90°, 180°, and 270°. Original, x1, x2, x4 Zoom Select this if you want to zoom into a photo. You can magnify it to the x2 or x4 size. The x1 size is when the photo is set to Fit to Width.
| Buttons | Photo | Clock | Settings Settings Detail OSD Upper OSD Description English, Deutsch, Español, Français, Italiano, Nederlands, Polski, Português, Русский, Svenska, Language Türkçe, 简体体体, 繁繁体体, 日日日, 한한한 Select a language to use for your product. Auto Slide Show Off, On If On is selected, a slide show starts automatically when your monitor is turned on. Brightness 0~100 Adjust brightness from 0 to 100 levels.
To use your digital photo frame as a Mini-Monitor (the secondary monitor) using a USB cable. Installing Frame Manager guide Frame Manager User's Manual Using your digital photo frame as a Mini-Monitor. Using your digital photo frame as Mass Storage. Changing the current mode to another mode Adjusting the brightness Updating the firmware System Requirements z OS : Windows XP SP2 z USB : Extended Host Controller (EHCT) for USB 2.0 z RAM : 256 MB or above Caution 1.
| Specifications | Supported Files Specifications Items Model Name Specifications SPF-83H Type 8" (20 cm) TFT Resolution 800 x 600 Brightness 200 cd/m2 Contrast Ratio 500 : 1 Interface RGB 6bit TTL Panel Supported Formats JPEG (Baseline, RGB) Windows 2000(SP2), Windows XP, Operating System MAC OS X(10.x), Linx OS (2.6.x) Built-in Memory 128 MB(FAT32) USB One upstream (device 2.0) and one downstream (host 1.
Class B Equipment (Information Communication equipment for residential use) This product complies with the Electromagnetic Compatibility Directives for residential Use and can be used in all areas including common residential areas. (Class B equipment radiates less electromagnetic influences than class A equipment.
| Troubleshooting | Terminology | Service Centers | Troubleshooting This section lists various problems and solutions encountered by users while using the digital photo frame. When encountering a problem, first check the list below and follow the suggested action if one matches your problem. If the problem still persists, contact or visit the nearest service center. Symptoms My Digital Photo Frame does not turn on. On Timer and Off Timer does not work.
I have connected a memory card, but it does not work. Check the file system on the memory card. I have connected a USB memory Check the type of the USB memory device. This product may not support the device, but it does not work. compound USB device. | Troubleshooting | Terminology | Service Centers | Service Centers | Terminology Terms Description JPEG is an image compression technology. It provides the smallest loss of all image compression technologies.
North America U.S.A 1-800-SAMSUNG (726-7864) http://www.samsung.com/us CANADA 1-800-SAMSUNG (726-7864) http://www.samsung.com/ca MEXICO 01-800-SAMSUNG (726-7864) http://www.samsung.com/mx Latin America ARGENTINE BRAZIL 0800-333-3733 http://www.samsung.com/ar 0800-124-421 http://www.samsung.com/br 4004-0000 CHILE 800-SAMSUNG (726-7864) http://www.samsung.com/cl COLOMBIA 01-8000112112 http://www.samsung.com.co COSTA RICA 0-800-507-7267 http://www.samsung.
PORTUGAL 80 8 200 128 http://www.samsung.com/pt REPUBLIC OF IRELAND 0818 717 100 http://www.samsung.com/ie SLOVAKIA 0800-SAMSUNG(726-7864) http://www.samsung.com/sk SPAIN 902 10 11 30 http://www.samsung.com/es SWEDEN 0771-400 200 http://www.samsung.com/se SWITZERLAND 0800-SAMSUNG(726-7864) http://www.samsung.com/ch U.K 0870-SAMSUNG(726-7864) http://www.samsung.com/uk CIS ESTONIA 800-7267 http://www.samsung.ee LATVIA 800-7267 http://www.samsung.