Digital Cordless Answering Telephone SP-R6150 User’s Manual ELECTRONICS Your battery is guaranteed for six months. When you purchase the unit, you should fully charge the battery before initial operation. Printed in Korea Code No. : GG68-00265A U.K. 1/2001. Rev.1.0 This equipment is not designed for making emergency telephone calls when the power fails. Alternative arrangements should be made for access to emergency services.
Safety Precautions When using your telephone, these basic safety precautions should always be followed to reduce risk of fire, electric shock, and injury. 1. Never push objects of any kind into your telephone through case or cabinet openings. They may touch dangerous voltage points resulting in risk of fire or shock. 2. To reduce the risk of electric shock, do not disassemble your telephone. Take it to a qualified service technician when repair work is required.
Table of Contents Getting Started Checking Parts .................................................................................................................... 6 Control Locations ................................................................................................................ 7 Connecting Lines ................................................................................................................. 9 Installing Handset Battery ..................................................
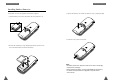
G ETTING S TA R T E D Getting Started Control Locations Checking Parts Once you have unpacked your phone, check to make sure that you have all the parts shown below. If any piece is missing or broken, please call your dealer. Handset Ear piece LCD window Handset Base soft keys Each of the two soft keys performs the function indicated by the text above it (the bottom line in the display).
G ETTING S TA R T E D G ETTING S TA R T E D Connecting Lines Base - Front LCD window Speaker 4 GHI 7 PQRS MENU/OK 2 ABC 5 JKL 8 TUV 3 DEF 6 MNO 9 WXYZ 0 R/P lamp Lights steadily while the base is connected to the power supply. key Activates intercom communications and pages the handset. Also registers a new handset with the base. key Enters the base menu mode. Also, confirms the settings. 2.
G ETTING S TA R T E D G ETTING S TA R T E D Installing Handset Batteries The handset uses the rechargeable Ni-MH battery supplied. 3. Replace the battery cover. Make sure that the cover is properly aligned. 1. Slide the battery cover in the direction of the arrow, then lift it off. 4. Slide the cover up until it snaps shut. 2. Remove the old battery (if any), then plug the battery connector into the socket shown below, and insert the battery.
G ETTING S TA R T E D G ETTING S TA R T E D Charging the Handset Turning the Handset On/Off Before initial operation, you should fully charge the handset for more than 10 hours. When you place the handset in the base unit to charge it, the handset automatically turns on. To turn the handset on or off in the Standby mode, follow these steps: To charge the handset, simply place it in the base unit. The handset must be charged facing up.
G ETTING S TA R T E D G ETTING S TA R T E D LCD Window Icon Descriptions On the Handset Choosing Dial Mode In order to provide compatibility with most telephone systems, your phone can be set to either pulse-dialling (same as rotary), or tone dialling (DTMF). Your phone is preset to tone mode. HS( 1 ) BS ( 1 ) SAMSUNG 1. In the Standby mode, press the Menu soft key to access the menu mode. 2. Press the soft key repeatedly until Settings appears, then press the Select soft key.
G E N E R A L FU N C T I O N S General Functions Making a Call On the Base On the Handset 1. Open the flip cover, and press 1. Press key. INT key. You hear a dial tone. MENU/OK 1 4 GHI Note: If you turn the Active Flip feature on, you do not need to press key. For details, see page 51. 7 PQRS 2 ABC 5 JKL 8 TUV 3 DEF 6 MNO 9 WXYZ 0 R/P key turns the speakerphone on. 2. Dial the desired phone number by using the number keypad.
G E N E R A L FU N C T I O N S Camp On Busy (Available only when you have more than one handset) This feature allows your handset to wait for connection to the telephone line currently engaged by another handset. Your handset rings when the telephone line becomes free. Note: This feature does not apply to communications between the base and the handset. It applies only to communications between two handsets. 1.
G E N E R A L FU N C T I O N S G E N E R A L FU N C T I O N S Speed Dial To Erase All Numbers In Redial Memory 1. Press the Redials soft key in the Standby mode. 2. Press the All Erase soft key. The display prompts you to confirm the setting. 3. Press the Yes soft key. You hear a beep and the phone returns to the Standby mode after clearing the redial memory. To Dial the Last Number 1. Press key in the Standby mode. The last number you dialled is displayed. key to dial the last number.
G E N E R A L FU N C T I O N S G E N E R A L FU N C T I O N S Dialling a Speed Dial Number On the Handset One-Touch Dial (both on the base and on the handset) 1. If the handset is on the base, pick up the handset and speak. Or Memory addresses 01 through 09 (0 through 9 on the base) are special onetouch addresses. You can dial the phone numbers stored in the Phonebook memory from 01 through 09 simply by pressing one key.
G E N E R A L FU N C T I O N S G E N E R A L FU N C T I O N S Caller ID Display Call Select Caller ID displays the caller’s name and number, as well as the date and time that the call was received. This feature is available on your phone if the caller’s network transmits the necessary information. Turning this feature on allows you to answer calls selectively. To use this feature, you have to assign a call select number to one of the memory locations on your base.
G E N E R A L FU N C T I O N S G E N E R A L FU N C T I O N S Battery Level Indicator Deleting a Call Select Number 1. In the Call Select menu, select Delete CLI. A icon is continuously displayed in the upper line of the LCD window. The icon shows the level of your battery. The more bars you see, the more power you have left. Note: If there is a number stored in the first location, the number is displayed. HS(1) 2. Press or key to select a desired number. BS(1) SAMSUNG 3.
G E N E R A L FU N C T I O N S G E N E R A L FU N C T I O N S Adjusting Voice Volume Quick Switching to Vibration Mode On the Handset You can quickly switch your phone to vibration mode with a touch of key or on the left side of the phone. This feature provides a convenient way to mute your phone’s ringer quickly. During calls, pressing ear piece volume. or key on the side of the phone affects the You can adjust the volume from level 1 to 5, and it is preset to level 3.
U SING THE M ENUS Using the Menus A two-level menu structure is available to set the various options available on your phone. You can set the menu options in two different ways, via the soft keys or by using the index system. 3. Press the Select soft key to access the Ring menu. 4. Press the soft key repeatedly until Ring Delay appears. Using the Soft Keys Ring Delay Off Select The two soft keys are used in the following ways. Key Purpose Left soft key Enters the menu structure.
U SING THE M U SING ENUS THE M ENUS Menu Map 5. Settings The following illustration shows the menu structure available and indicates the: • Number assigned to each option • Brief description and the page on which you can find details of each feature. 5-1 Tone/Pulse 5-2 Call Time 5-3 Base Number Handset Menu 5-4 Active Flip 1. Phone Book 5-5 Language 1-1 Find Name 1-2 Find Address 1-3 New Entry 1-4 All Erase 2. Received Calls (Search for a number by name. See page 38.
B ASIC O P E R ATION B ASIC O P E R ATION Base Menu You can change the answering machine settings using the base menu. There are 14 listings in the base menu. You can access the base menu by pressing MENU/OK , or or key while in the Standby mode. 8. Remote Cont. 8-1 Change Code 8-2 Reset Code 1. Speed Dial 2. Memo Record (Store the speed dial numbers. See page 21.) 3-1 Bell Settings 3-2 Bell Records 9. Message Time (Select caller message time. See page 75.) 10. Language (Select a language.
P H O N EB O O K PhoneBook The PhoneBook allows you to store frequently used phone numbers and their associated names in your personal directory so that you can easily make a call without having to remember or enter the phone number. You can store up to 70 phone numbers. Storing a Phone Number in Phonebook (MENU 1-3) Note: If you want to store a number in the phonebook of the base, see page 21. 1. In the Standby mode, enter the desired number (up to 24 digits). 2. Press the Save soft key.
P H O N EB O O K P H O N EB O O K Recalling a Number from PhoneBook If you do not remember which telephone numbers have been stored in the various memory addresses, you can scan through the memory until you find the one you are looking for. By Address Number (MENU 1-2) 1. In the Standby mode, press the Menu soft key. PhoneBook appears. Note: If you try to recall a number without storing the numbers in the phonebook, the message Phone Book Empty is displayed. 2.
P H O N EB O O K Received Calls (Caller ID) Phonebook Options When you are viewing a number in the Phonebook, Options appears above the left soft key to allow you to access the phonebook options, which are described in the following paragraphs. Accessing the Options 1. Press the Options soft key when it appears. The options are displayed. 2. Press the soft key until a desired option is selected. The option in bold type will be selected. 3. Press the Select soft key.
R ECEIVED C A L L S Greeting Message Received Calls Options When you are viewing received numbers, Options appears above the left soft key to allow you to access the received call options, which are described in the following paragraphs. This option allows you to enter a greeting message that will be displayed when your phone is in the Standby mode. You can change the greeting message according to your own preference. To write your greeting message, follow this procedure; Accessing the Options 1.
RING Ring You can use the Ring menu to customize various sound settings such as ring volume, type and tone. Also you can delay the ring for a specified time via the menu. 6. Press or key to select a location. Each time you press a key, the base sounds the selected bell, if any. Choosing Ring Tone On the Handset (MENU 4-1) You can define your own ring sound. Ten ring tones are available.The factory default setting is ‘Tone 1’. 1. In the Standby mode, press the Menu soft key. 2.
R ING R ING Adjusting Ring Volume On the Handset Choosing Alert Type (on the handset) (MENU 4-2) (MENU 4-3) This option allows you to indicate how you wish to be informed of any incoming calls. The following options are available. 1. In the Standby mode, press the Menu soft key. 2. Press the soft key repeatedly until Ring appears, then press the Select soft key. 3. Press the soft key repeatedly until Ring Volume appears, then press the Select soft key. The current Ring Volume setting appears. 4.
R ING R ING Unique Ring Tone (MENU 4-4) This new feature allows you to distinguish between different callers by assigning unique ring tones to specific numbers stored in your handset When a call is received from a specified number, you will hear a unique ring sound that can only be heard when that specific number calls. You can selectively deactivate a number’s unique ring by erasing that number.
S ETTINGS Settings Many different features of your phone can be customized to suit your preferences. All of these features are accessed via the Settings menu. Tone/Pulse (MENU 5-1) (MENU 5-2) If you turn this feature on, the handset automatically times the call duration. The handset displays the call duration both during a call and for a few seconds after the call is completed. The feature is preset to ‘On’. 1. In the Standby mode, press the Menu soft key. 2.
S ETTINGS System Language Selection (MENU 5-5) You can select a display language from 8 different available languages. These are: English, French, German, Italian, Dutch, Spanish, Swedish, and Norwegian. Up to five handsets can be registered and operated from your base unit. You can register and remove a handset through the System menu. You can also reset the handset to its default configuration. To access the System menu, the PIN is required. The PIN is preset to ‘0000’ at factory. 1.
SYSTEM SYSTEM Registering a New Handset 5. Press the Select soft key to access the Call Barring option. The first barring address containing a restricted number, if already registered, appears. 6. If you want to choose another barring address, select the desired address by using the soft key. 7. Press the Edit soft key. 8. Enter up to a 4-digit number by using the numeric keys that you want to restrict, and then press the OK soft key. 9. If you want to block another number, repeat steps 6 through 8.
SYSTEM SYSTEM Intercom From the Base to the Handset Between Handsets 1. Press INT key and enter the number of the handset that you wish to communicate with. (Available only when you have more than one handset) If you have multiple handsets registered with the base, two handsets can talk to each other on an internal intercom call, while a third handset can be on an external call. 1. Press key on your handset. INTERCOM -> is displayed and the cursor blinks. INT 3. The handsets ring.
SYSTEM SYSTEM Call Transfer From the Handset To the Base From One Handset to Another 1. During a telephone conversation, press (Available only when you have more than one handset) 1. During a telephone conversation, press key. Your caller will be put on hold and will hear music. INTERCOM -> is displayed and the cursor blinks. INT 2. Enter the number (1 through 5) of the handset to which you want to transfer the call. 3. The paged handset rings.
SYSTEM Changing PIN (Personal Identification Number) SYSTEM (MENU 6-4) The PIN is required when you access the System menus. The PIN is preset to ‘0000’ at factory. You can change the PIN code. 1. In the Standby mode, press the Menu soft key. 2. Press the soft key repeatedly until System appears, and then press the Select soft key. 3. Enter the PIN code, and then press the OK soft key. 4. Press the soft key repeatedly until Change PIN appears, and then press the Select soft key. 5.
Base Answering System The SP-R6150 handset may be used with up to four base units. To use the handset with more than one base unit, you must register the handset to each base unit. Refer to ‘Registering a New Handset’ on page 55. Selecting Base Manually (MENU 7-1) You can select a base unit through which you want your handset to operate. 1. In the Standby mode, press the Menu soft key. 2. Press the soft key repeatedly until Base appears, and then press the Select soft key. 3. Select Base is displayed.
A NSWERING SYSTEM A NSWERING SYSTEM Recording Your Greeting Message To Turn the Answering Mode On/Off To turn the answering mode on, press key on the base. The LED around the key lights up and an icon appears in the LCD window. The base plays back the greeting message currently selected. When a call comes in, your phone will answer with the greeting message and the caller can leave a message. To turn the answering mode off, press will disappear. key once again.
A NSWERING SYSTEM A NSWERING SYSTEM Checking and Selecting Greeting Message Listening To Messages You can select either the pre-recorded factory message or your personalized greeting message (if you have recorded one). After a new message has been recorded, the total number of new messages will be displayed in the LCD window on the base. 1. Press Press key on the base briefly. The currently selected greeting message is played through the speaker.
A NSWERING SYSTEM A NSWERING SYSTEM Deleting Messages Recording a Memo The number of messages that your phone can store is limited to the amount of available memory space. When you no longer need messages that you have already listened to, you can delete them to increase the space of memory for new messages. You can record a memo for yourself or anyone else who shares the phone with you. Your phone recognizes the recorded memo as one of the incoming messages.
A NSWERING SYSTEM A NSWERING SYSTEM Recording a Phone Conversation Setting the Current Day and Time You can record your phone conversation while on the phone. Your phone recognizes the recorded conversation as an incoming message. So, you can listen to the recorded conversation in the same way that you would listen to the caller messages on the base. See page 67.
A NSWERING SYSTEM A NSWERING SYSTEM Setting Morning Call On/Off You can set the phone to sound an alarm at a specified time everyday. The alarm will only sound on the base for 3 minutes unless you press any key on the base. The feature is preset to ‘OFF’ at the factory. To Deactivate the Morning Call 1. Press 2. Press To Set the Morning Call 1. Press MENU/OK 3. Press MENU/OK or MENU/OK or 3. Press 4. Press 5. Press or key to select OFF. MENU/OK key to save the setting. key to enter the menu.
A NSWERING SYSTEM A NSWERING SYSTEM Remote Control Code Changing the Message Time The RCC number prevents unauthorized persons from accessing your phone and listening to the messages recorded in it. The RCC number is preset to 0000 at the factory. You can change the maximum time allowed for a caller message. It is preset to 1 minute at factory. 1. Press To Change RCC (Remote Control Code) 1. Press MENU/OK 2. Press key to enter the menu mode. or MENU/OK 2. Press or MENU/OK K key until 8.
A NSWERING SYSTEM A NSWERING SYSTEM Changing Ring Count Using Answering Operation From a Handset You can specify the number of rings your phone sounds before answering an incoming call. It is preset to 6 at factory. You can operate the answering system from the handset. Before you operate answering features using the handset, you have to turn the answer mode on from the handset. 1. Press MENU/OK 2. Press 3. Press key to enter the menu mode. or MENU/OK 4. Press key until 12.
A NSWERING SYSTEM A NSWERING SYSTEM To Delete Messages 3. Press 2 key to play the messages. The phone announces the total number of new messages and plays the messages. You can delete messages selectively while the current messages are being played. 4. While you listen to the message: To ... Press... 1 The selected message will be deleted when the message playback has finished, and then the next message will begin to play.
A NSWERING SYSTEM A NSWERING SYSTEM Troubleshooting Setting the Answering Mode From Another Phone Line Symptom If your answering machine has been set to off, you can turn the system on from another telephone line. • Check that the power adapter is properly connected. 1. Call your phone from another touch tone phone. After 20 rings, the phone answers the call and announces “Please call back later. Thank you for your call.” 2. While your phone is playing the message, press correct RCC number.
TR O U B L E S H O O T I N G Specifications ELECTRONICS Frequency Range 1.88~1.
The equipment has been approved to [Commission Decision “CTR 21”] for panEuropean single terminal connection to the Public Switched Telephone Network (PSTN). However, due to differences between the individual PSTNs provided in different countries the approval does not, of itself, give an unconditional assurance of successful operation on every PSTN network termination point. In the event of problems, you should contact your equipment supplier in the first instance.