Refrigerator user manual English Free Standing Appliance imagine the possibilities Thank you for purchasing a Samsung product. To receive a more complete service, please register your product at www.samsung.
features of your new refrigerator KEY FEATURES OF YOUR NEW REFRIGERATOR Your Samsung Refrigerator comes equipped with various innovative storage and energy-efficient features. • Twin Cooling System The Refrigerator and Freezer have separate evaporators. Due to this independent cooling system, the Freezer and Refrigerator cool more efficiently. Additionally, this separate air flow system prevents food odor of one compartment from seeping into other compartments.
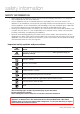
safety information SAFETY INFORMATION • Before operating the appliance, please read this manual thoroughly and retain it at a safe place near the appliance for your future reference. • Use this appliance only for its intended purpose as described in this instruction manual.
safety information WARNING SEVERE WARNING SIGNS FOR TRANSPORTATION AND SITE • When transporting and installing the appliance, care should be taken to ensure that no parts of the refrigerating circuit are damaged. - Refrigerant leaking from the pipe work could ignite or cause an eye injury. If a leak is detected, avoid any naked flames or potential sources of ignition and air the room in which the appliance is standing for several minutes.
safety information - You must ground the refrigerator to prevent any power leakages or electric shocks caused by current leakage from the refrigerator. • Never use gas pipes, telephone lines or other potential lightening rods as ground. - Improper use of the ground plug can result in electric shock. • If the power cord is damaged, have it replaced immediately by the manufacturer or its service agent. • The fuse on the refrigerator must be changed by a qualified technician or service company.
safety information - This may cause frostbite. • Do not use mechanical devices or any other means to accelerate the defrosting process, other than those recommended by the manufacturer. • Do not damage the refrigerant circuit. • This product is intended only for the storage of food in a domestic environment. • Bottles should be stored tightly together so that they do not fall out.
safety information CAUTION CAUTION SIGNS FOR USING • If the refrigerator is disconnected from the power supply, you should wait for at least five minutes before plugging it back in. • If you will be away for more than three weeks or the refrigerator will not be used for a long period of time, you must empty and clean the refrigerator and pull out the power plug. Wipe excess moisture from the inside and leave the doors open. - Otherwise, odor and mold may develop.
safety information • Do not spray cleaning products directly on the display. - Printed letters on the display may come off. • Remove any foreign matter or dust from the power plug pins. But do not use a wet or damp cloth when cleaning the plug, remove any foreign material or dust from the power plug pins. - Otherwise there is a risk of fire or electric shock. • Never put fingers or other objects into the dispenser hole and ice chute. - It may cause personal injury or material damage.
contents SETTING UP YOUR REFRIGERATOR 10 OPERATING YOUR SAMSUNG REFRIGERATOR 25 10 Getting ready to install the refrigerator 11 Installation of the water line (Auto Ice Maker Model) 14 Setting up the refrigerator 14 Removing the refrigerator doors 23 Adjusting the doors 24 making minor adjustments between doors 25 26 27 29 30 30 31 32 33 34 35 Parts and features Using the control panel Controlling the temperature Making Ice Storing food in the refrigerator Storing food in the freezer drawer Removing a
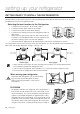
setting up your refrigerator GETTING READY TO INSTALL THE REFRIGERATOR Congratulations on your purchase of this Samsung Refrigerator. We hope you enjoy the state-of-art features and efficiencies that this new appliance offers. Selecting the best location for the Refrigerator • • • • A location with easy access to the water supply. 150mm 150mm A location without direct exposure to sunlight. A location with level (or nearly level) flooring.
setting up your refrigerator INSTALLATION OF THE WATER LINE (AUTO ICE MAKER MODEL) Before you install the water line Check the accessories listed below. Water line fixer and screws Pipe connector Water line Fastner - Refer to ‘MAKING MINOR ADJUSTMENTS BETWEEN DOORS’(on page 24) USING THE WATER FILTER (NOT PROVIDED) Connecting to water supply line • Shut off the main water supply line and turn the Ice maker to the off position. • Locate the nearest cold drinking water line.
Connect the water line to the fridge • Connect the plastic line on the back of your fridge to the cartridge holder outlet (fully insert the plastic line to the cartridge holder outlet). • Insert plastic clip to the cartridge holder inlet and outlet. • Turn water on and check for any leakage. Cartridge Holder Clip • You can purchase the necessary filter cartridge at the retailer where you purchased this refrigerator.
setting up your refrigerator Connecting the water line to the refrigerator Water Line from unit Remove cap Loosen a No gap Water Line from unit Only connect the water line to a drinkable water source. If you have to repair or disassemble the water line, cut off 6.5mm of the plastic tubing to make sure you get a snug, leak-free connection. After the water supply has been installed check all the joints to ensure there are no leaks. CAUTION • Samsung Warranty does not cover THE WATER LINE INSTALLATION.
SETTING UP THE REFRIGERATOR Now that you have your new Refrigerator installed in place, you are ready to set up and enjoy the features and functions of the appliance. By completing the following steps, your Refrigerator should be fully operational. 1. Place the Refrigerator in an appropriate location with reasonable clearance between the wall and the Refrigerator. Refer to installation instructions in this manual. (P8. Selecting the best location for the Refrigerator) 2.
setting up your refrigerator DISASSEMBLING THE FRIDGE DOOR Be careful not to drop and scratch the fridge door while removing the fridge door! WARNING Top Table 1. Remove the 3 screws holding down the top table and remove it. 2. Disconnect electric wire on the top of the refrigerator. 3. Remove the 3 hex bolts that hold the hinge on the top of the refrigerator with the 10mm socket wrench. 4. Remove the screw that holds the ground wire with a philips screwdriver(+). 5.
DISASSEMBLING THE FREEZER DOOR (DRAWER TYPE) Middle Hinge 1. Separate the cap on the middle hinge. 2. Remove the screw attached to the left and right middle hinges with a philips screwdriver(+). Remove the 2 hex head bolts attached to the left and right middle hinges with an allen wrench(Ø5mm). 3. After opening the Freezer door, lift the drawer box. 4. Remove 4 hex head bolts from both sides with a socket wrench(10mm) 16_ setting up 5. Lift up the freezer door from the rails.
DISASSEMBLING THE FREEZER DOOR (SWING TYPE) 2. Remove the screw attached to the left and right middle hinges with a philips screwdriver(+). Remove the 2 hex head bolts attached to the left and right middle hinges with an allen wrench(Ø5mm). Middle Hinge 3. Remove the Middle Hinge connected to the Freezer. 4. Lift up the freezer door from the hinge. Be careful not to drop and scratch the freezer door. setting up _17 01 setting up 1. Separate the Cap on the Middle Hinge.
setting up your refrigerator REASSEMBLING THE FRIDGE DOOR 1. Insert and tighten the screw into the left and right middle hinges with a philips screwdriver(+). 2. Insert and tighten the 2 hex head bolts into the left and right middle hinges with an allen wrench(Ø5mm). 3. Replace the middle hinge cap. 4. Place the hole in the bottom of the left door over the middle hinge. 5. Insert the left upper hinge shaft into the hole on the corner of the fridge door. 6.
REASSEMBLING THE FREEZER DOOR (DRAWER TYPE) Slot 2. Hang the freezer door front onto open slot on the sides. 3. With the 10mm wrench, reattach 4 bolts to connect the rail with the door. 4. Replace the drawer box. REASSEMBLING THE FREEZER DOOR (SWING TYPE) 1. Place the hole in the bottom of the freezer door over the right side low hinge. 2. Replace the middle hinge connected to the freezer. 3. Insert and tighten the screw into the left and right middle hinges with a philips screwdriver(+).
setting up your refrigerator HOW TO REVERSE THE DOOR (OPTION) Unplug the refrigerator or disconnect the power. 1. Remove 3 screws on the hinge cover. 2. Disassemble the hinge cover. 3. Disassemble 2 connectors. (a housing and a reed switch) 4. Disassemble ground wire by removing 1 screw on each side. 5. Disassemble the upper hinge by removing 3 bolts on each side with the 10mm wrench. 6. Remove each fridge doors by lifting it up. 7. Disassemble middle hinge cap. 1. Avoid the wire damage. 2.
12. Separate the Cap of the front leg Cover. (pull out inside of Cap) 13. Insert the Cap on the other side of the front leg Cover. 14. Remove 2 bolts of each hinge with the 10mm wrench. 15. Place them in front of each side. 16. Separate low hinge shaft by using 5/32” wrench and disassemble low hinge leg by turning it colockwise, and then assemble the low hinge by turning it over. 17. Reattach the former right hinge on the left side and the former left hinge on the right side by using 2bolts. 18.
setting up your refrigerator 22. Place the hole in the bottom of the freezer door over the low hinge. 23. Replace the middle hinge connected to the freezer. 24. Insert and tighten the screw into the left and right middle hinges with a philips screwdriver(+). Insert and tighten the 2 hex head bolts into the left and right middle hinges with an allen wrench(Ø5mm). 25. Replace the cap on the middle hinge. 26. Place the hole in the bottom of the left door over the middle hinge. 27.
setting up your refrigerator ADJUSTING THE DOORS For example, when the left side is lower than the right side, insert a flat-blade screwdriver into a notch on the left control lever, and turn it clockwise or counter clockwise to level the door. Turning it clockwise to raise the refrigerator and counterclockwise to lower it. For the left side is higher, do it with right lever.
setting up your refrigerator MAKING MINOR ADJUSTMENTS BETWEEN DOORS Remember, a level Refrigerator is necessary for getting the doors perfectly even. If you need help, review the previous section on leveling the Refrigerator. When the left door is lower than the right door. When the left door is higher than the right door. Adjustment part Adjustment part 1. Pull out the freezer drawer ( 1 ), then you can see the middle hinge ( 2 ) . 2.
operating your samsung refrigerator 02 operating PARTS AND FEATURES Use this page to become more familiar with the parts and features of the Refrigerator.
USING THE CONTROL PANEL 1. For auto ice maker model 1 2 3 4 5 6 4 5 6 2. For normal ice maker model 1 2 3 Temperature & Function select / control panel ( 1 ) Ice Off Button (Option) When the Ice Off button is pressed, ice will not be produced. Use this function only when it is needed. When the Alarm Off Button is pressed, alarm will not sound in case of ( 1 ) Alarm Off Button door open. (Option) Use this button only when it is needed.
operating your samsung refrigerator CONTROLLING THE TEMPERATURE 02 operating SETTING THE FREEZER TEMPERATURE If you want to control the freezer temperature, follow as below. Press the Freezer Button (Refer the picture) - The temperature can be set in 1ºC interval between -25ºC and -14ºC. When selecting the temperature, the set temperature is displayed initially for 5 seconds, then the actual temperature is displayed.
When selecting the fridge temperature, the set temperature is displayed initially for 5 seconds, then the actual temperature is displayed. (There may be slight difference between the set temperature and displayed actual temperature, but it will be corrected to the set temperature automatically.) - The Fridge temperature will change depending on the number of door openings, quantity of food, ambient temperature, etc. - Temperature of each shelve or container in the fridge may be different.
operating your samsung refrigerator MAKING ICE AUTO ICE MAKER MODEL TWIST ICE MAKER MODEL 1. Pull out the Ice-cube trays. 2. Fill trays up to the water level mark(arrow). 3. Put the Ice-cube trays back in position. And close the freezer door. 1 2 3 4 4. Once the water has become frozen, turn the dials on the Ice cube trays to empty Ice cubes into the storage bin. Saving Energy Tips • Install the appliance in a cool, dry room with adequate ventilation.
STORING FOOD IN THE REFRIGERATOR The Samsung Refrigerator has been designed to provide you with maximum space saving features and functions. Here are some of the customized compartments we have created to keep your food fresher longer. In order to further prevent odor from seeping into the ice compartment, stored food should be wrapped securely and as airtight as possible.
operating your samsung refrigerator REMOVING AND RELOCATING THE FRIDGE ACCESSORIES 02 operating 1. Door Bins To remove - Simply lift the bin up and pull straight out. To replace - S lide it in above the desired location and push down until it stops. CAUTION Injury may occur if the door bins are not firmly inserted. Do not allow children to play with bins. Sharp corners of the bins may cause injury. Empty the bin before adjusting it. Dust removal method -Remove the guard and wash in water. 2.
REMOVING THE FREEZER ACCESSORIES 1. Pull Out Drawer To remove - P ull the drawer out to full extension. Tilt up rear of drawer and lift straight out. (Refer to picture 1 & 2) 1 1 2 2 3 3 Open the freezer door fully and remove the drawer. To replace - P lace the drawer onto the rails by tilting it up. Lower the drawer into place until it is horizontal and slide the drawer in. (Refer to picture 3) 2. Freezer Drawer Bin 1 Swing-Type To remove - P ull the drawer out fully.
operating your samsung refrigerator USING THE WATER DISPENSER (OPTION) You can easily obtain chilled water with the water dispenser without opening the refrigerator door. In addition, you can save electricity by reducing the number of times the door is opened by more than 30%.
CLEANING THE REFRIGERATOR Caring for your Samsung Refrigerator prolongs the life of your appliance and helps keep it odor and germ free. Cleaning the Interior Clean the inside walls and accessories with a mild detergent and then wipe dry with a soft cloth. You can remove the drawers and shelves for a more thorough cleaning. Just make sure to dry drawers and shelves before putting them back into place. Cleaning the Exterior Wipe the display panel with damp, clean, soft cloth.
operating your samsung refrigerator REPLACING THE INTERIOR LIGHT 02 operating For LED lamp, please contact service eneineer to replace it.
troubleshooting PROBLEM SOLUTION The Refrigerator does not work at all or it does not chill sufficiently. • • • • The food in the Refrigerator is frozen. • • • You hear unusual noise or sounds. The front corners and horizontal hinged section of the appliance are hot and condensation is occurring. Ice Maker is not producing ice. Check that the power plug is properly connected. Is the temperature control on the display panel set to the correct temperature? Try setting it to a lower temperature.
CAUTION NO YES Clean the ice box if there are some small pieces of ice on the bottom. TIDAK NO YES Throw away the coherent ice if the ice maker is not used for long time. Set “Ice Off” for saving energy if the ice maker will not be used for long time. If you want to buy and use a tool of shoveling ice,put it into special place of ice box or take it out.
memo
memo
Ambient Room Temperature Limits This fridge/freezer is designed to operate in ambient temperatures specified by its temperature class marked on the rating plate. Class Symbol Ambient Temperature range(°C) Extended Temperate SN +10 to +32 Temperate N +16 to +32 Subtropical ST +16 to +38 Tropical T +16 to +43 NOTE: Internal temperatures may be affected by such factors as the location of the fridge/ freezer, ambient temperature and the frequency with which you open the door.