
User Manual


3
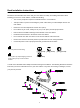
Use four M4 screws per side to secure the
server to the rails; then, remove the
rack-support wheels and the handles
and store them in a safe place. Also remove
the blue thumbscrew from the left side of
the server and store it in a safe place.
Note: The rack-support wheels and the
handles are required if you remove the server
from the rack cabinet. You must also install
the blue thumbscrew if you intend to remove
the server from the rack cabinet and move the
server to a new location.
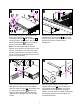
Insert the tab on the bottom edge of the cable
management arm hinge plate into the slot
at the rear-left side of the server; then, attach
the plate to the server with the M3.5
thumbscrew.
Press in on the slide-rail-locking latches and
slide the server fully into the rack cabinet.
Slide the cable-management-arm bracket over
the right-rear M6 screws . Ensure that
both rear slide-rail brackets are vertically
aligned; then, fully tighten the four rear M6
screws.
Slide the server halfway out of the rack
cabinet; then, loosen but do not remove the
four front M6 screws . While one person
supports the front of the server by lifting it
slightly, ensure that the front slide-rail brackets
are vertically aligned; then, fully tighten the
four front M6 screws.