SS7500 Series Vacuum Cleaner user manual ✻ Before operating this unit, please read the instructions carefully. ✻ For indoor use only. imagine the possibilities Thank you for purchasing a Samsung product. To receive a more complete service, please register your product at www.samsung.
safety information SAFETY INFORMATION WARNING •• Before operating the appliance, please read this manual thoroughly and retain it for your reference. •• Because these following operating instructions cover various models, the characteristics of your vacuum cleaner may differ slightly from those described in this WARNING manual. WARNING •• This vacuum cleaner is designed for household use only. Do not use this vacuum cleaner to clean building waste or debris.
safety information IMPORTANT SAFETY INSTRUCTIONS When using an electrical appliance, basic precautions should be observed, including the following: READ ALL INSTRUCTIONS BEFORE USING YOUR STICK VACUUM CLEANER. Unplug from outlet when not in use and before conducting maintenance. WARNING : to reduce the risk of fire, electric shock, or injury: GENERAL •• Use only as described in this manual. •• Do not operate the STICK vacuum cleaner or charger if it has been damaged in any way.
contents assembling the cleaner 05 operating the cleaner 10 maintain tools and filter 13 troubleshooting 16 04_ contents 05 Assembling the cleaner 07 Assembling the handle and the main body 07 Assembling the main body and the power brush 07 Assembling the main body and the handy cleaner 08 Charging 09 About the battery 10 10 10 11 11 Using the stick cleaner Using the power brush Using the handy cleaner Using the crevice / dusting Emptying the dust bin 13 Cleaning the filter 14 Countermeasure to r
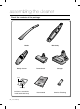
assembling the cleaner Check the contents of the package.
Assembling the handle and the main body Insert the guiding parts of the handle as far as possible into the hole of the main body, insert the guide key into the holes of the handle and then fasten the screw with the (+) screw driver. 2 Handle 3 Guiding parts Guiding key Main body Screw Holes on the main body Assembling the main body and the power brush Insert the connector of the power brush into the hole of the main body until it clicks into place.
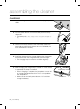
assembling the cleaner Charging 111 Install the charger on a flat surface and then plug the power cable. 222 Turn the power buttons of the main body and the handy cleaner off. •• The battery does not charge when the power button is on. 333 Connect the handy cleaner to the main body. (When the main body and the handy cleaner are not assembled, the stick cleaner does not work.) 444 Install the cleaner with the charger aligning the charge pins of the cleaner with the charge terminals of the charger.
note About the battery •• The powerful Li-Ion battery has been used. •• The warranty for the battery is 6 months from the time of purchase. •• To purchase a new battery, please contact the service center. •• Since this battery is only for this cleaner, do not use it for other appliances or purposes. •• Do not disassemble or modify the product. •• Charge the product in a well-ventilated location. •• Do not expose the battery to heat or fire. •• Do not connect metal objects to the (+) or (-) terminal.
operating the cleaner Using the stick cleaner Using the stick cleaner allows you to clean the floor without bending over. Stick Cleaner On / Off •• When the power button is pressed, the operation alternates between . caution Power button 111 Only when the handy cleaner is assembled, does the stick cleaner work. (For assemblying the handy cleaner: See page 7). 222 When you use the stick cleaner, turn the handy cleaner power off. Countermeasure when the stick cleaner is not turned off.
222 Handy Cleaner On / Off •• When the power button is pressed, the operation alternates between . Power button 02 operating caution 111 Connect the handy cleaner to the main body after using it. (See page 7). 222 When you connect the handy cleaner to the main body, make sure to turn the handy cleaner off. Using the crevice / dusting Insert crevice/dusting into the end of the air inlet on the handy cleaner to install it. To remove it, simply pull it out.
operating the cleaner 444 Empty the dust bin. 555 Close the dust bin cover. 666 Push the dust bin down until it “clicks” into place. ‘Click’ •• Using a plastic bag note This method is recommended for people with allergies or asthma. Cleaning the dustbin with cold water is also recommended.
maintain tools and filter Maintaining the filter caution •• Do not dry it near a microwave or fire. •• Do not clean it by putting it into a washer or using an unapproved detergent. (See page 5). •• After cleaning, dry it completely in the shade. -- If you use the filter when it is not completely dried -- Moisture or water may enter the motor and cause a problem. -- The dust and moisture in the inlet solidifies and this drastically decreases the sucking power. -- The filter may smell.
444 Remove any hairs and threads around the drum with a vaccuum cleaner. 03 maintain 555 Install the belt onto the drum and fix the drum using the fixing grooves. 666 After fixing the drum, insert the air inlet cover into the groove and assemble it by slightly sliding it down. note •• Since an oil-papered or wood-covered floor may be scratched by the cleaner, please check the type of wheels of the air inlet. •• If you cannot remove foreign objects from the cleaner, please contact a service center.
troubleshooting PROBLEM SOLUTION Motor downs and does not start. •• Check cable, plug and socket. •• Leave to cool. Suction force is gradually decreasing. •• Check for blockage and remove. Low or decreasing suction. •• Please check filters. If required clean it as illustrated in the instruction. This Vacuum cleaner is approved the following.
memo
( Code No. DJ68-00611B REV(0.