SmartViewer3.13 User Manual Before installing or while using this program, visit the Samsung website www.samsungsecurity.com and download and upgrade with the latest S/W version available.
overview Contents overview 2 2 Contents 5 Key Features of SmartViewer 4 5 Terminology installation 6 Installation SmartViewer 8 Log in/out 10 Name and function of each item in Live Viewer 13 Connecting to or Disconnecting from the Device 6 8 live viewer 10 7 9 12 14 15 16 18 19 20 22 25 search viewer 29 29 30 30 31 32 32 32 34 35 2_ overview What is SmartViewer? To check the Installation Status SmartViewer at a Glance Name and function of each item in the Video Window Camera
setup 37 37 Viewer Tab 43 User Tab 40 45 48 Update Tab System Administration Tab ● overview 46 Device Tab Log Information Tab English _3
overview What is SmartViewer? SmartViewer is an access control tool that enables you to connect to and control a remote Samsung product on your PC via the network. With this tool, you can access Samsung products anywhere around the world via the network, and check the video data from the connected cameras. You can also search for and play recording data in the product on a remote site, which will be an effective and convenient monitoring system.
Key Features of SmartViewer • Live Viewer -- Monitor a maximum of 36 videos from the connected cameras -- Save up to 2 hours of video as one monitoring file -- Support full screen mode -- Add video to a desired position with the drag & drop method ● overview -- Add video to the video screen by double-clicking -- Support Sequence (automatic screen transition) -- Favorite View & Sequence of Favorites • Search Viewer -- Play up to 16 videos simultaneously -- Support range backup (integrated viewer) --
installation Installation Install SmartViewer on a local PC and launch it. 1. Run the executable of SmartViewer (Setup Launcher) that is included in the installation CD or stored in your PC. 2. When you see the installation guide screen, click [ Next >]. 3. Specify the destination folder in which the installation files are copied. The default path is “C:\Program Files\Samsung\ SmartViewer3.0\”. -- To change the path, click [ Change...] and specify a desired path or select a folder. 4.
6. Installing SmartViewer will proceed. ● installation 7. When the installation is completed, click [ Finish] to exit the installation screen. Upgrade If you have SmartViewer installed on your PC, click the updater program to proceed with the upgrade. 1. Run the updater program, “Setup Launcher”. The confirmation dialog pops up. 2. Click [ Yes]. MM `` As there is possibility of a program error right after the upgrade, it is recommended to restart the system.
SmartViewer On your desktop, click the program icon that has been created automatically. SmartViewer gets started. Log in/out Login To access SmartViewer, you must log in with a registered account at first. 1. On your desktop, click the SmartViewer icon. The login dialog should appear. 2. Provide the user ID and password. Default ID : ADMIN Password : 4321 default password can be exposed to a hacking thread so JJ `` The it is recommended to change the password after installing the product.
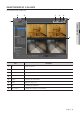
SmartViewer at a Glance SmartViewer Screen Configuration. b d c e f g a ● SmartViewer h Item Shows the user ID. Description a ID b S/W title bar Displays the name of the software. c Log Out Click to log out. d Live Launches the Live Viewer. e Search Launches the Search Viewer. f Setup Open the setup screen. g Exit Terminates the application. h Video Screen Displays the Live Viewer or Search Viewer.
live viewer From the top right corner of the SmartViewer main screen, click the [Live] tab. Name and function of each item in Live Viewer b a c s rqp o n ml Item k j i h gf e d Description a Device List Displays the list of registered devices. It will show you only the connected devices when you have logged in. b Connect/Disconnect Connects to or disconnects from the device. c Video Screen Displays the Live Viewer screen. d Contrast You can adjust the contrast for the current screen.
Item Description Full Screen Displays the current video in full screen. j Factory Default Returns the zoomed-in or –out screen to the default size (100%). k Zoom In/Out Enlarges or collapses the image. l Initialize DVR Event Removes the alarm indicator, which is displayed if an event occurs. m Talk You can use the microphone if the connected DVR supports the voice signal. Volume Control Use this to adjust the audio volume level. Speaker Turns on or mutes the speakers.
live viewer Name and function of each item in the Video Window a b c i hgfed Item Description a Camera Name Shows the name of the device. b Date & Time Displays the creation time and date of the video. c DVR Recording Displays the recording status of the connected DVR: recording /stop. d Record SmartViewer displays the recording status of the current PC: recording/stop. e Motion The motion indicator is displayed if an event occurs from the connected camera.
Connecting to or Disconnecting from the Device To connect to the device 1. Select a device to connect to. Only those devices or groups that are registered in the Setup menu will be listed. ● live viewer 2. Click the [Connect ( )] button to the right of the device selection checkbox. SmartViewer will try to connect to the selected device, and when connected, it will display a list of cameras that are connected to the device. add a device to the list, see “Setup > Device”.
live viewer Camera List When the device is connected successfully, you will see a list of cameras that are connected to the device. Camera icons & description In the camera list, the icon to the left of the each camera name will show you the information of the specific camera. 1. 2. 3. : General camera : PTZ compliant camera : Camera in recording 4. : Disconnected 6. : Camera where talking is in process 5.
To select a tile HowTo 1 : Select a tile and double-click a Desired camera. The video from the selected camera will be displayed in the highlighted screen. HowTo 2 : Select a camera and drag and drop it to a desired tile. HowTo 3 : Drag and drop the selected camera video tile to a desired tile. The screen will switch to display the video from the selected camera. ● live viewer Alarm Out List & Control When the device is connected successfully, you will see a list of Alarm Out events.
live viewer Event List You can check the events that occurred from the device. If an event occurs, the event video will be displayed automatically, of which you can change the settings in the menu. Event icons & description In the event list, the icon to the left of each event will show the event information. 1. : Displays the occurrence of the Motion event. 3. : Displays the occurrence of the alarm. 2. : Displays the occurrence of the video loss.
Name and function of each item in the Event window ● live viewer Pause Play from 30 Seconds before the Occurrence Play Previous Event Post Event Fast Play Move by the Frame To check the entire events 1. From the top of the event list, click [Clear Event ( )]. 2. Check all the events that are not confirmed. For the event that is confirmed, the Unconfirmed icon in the right side will disappear. To lock scrolling of the event list 1. From the top of the event list, click [Scroll Lock ( )].
live viewer To play the latest event video manually 1. From the tile, select a channel to search for. 2. Right-click the channel to display the context menu where you select [Instant Replay]. The Receive Events window will appear. List of Device Status Information You can check the status of the device. To check the status information 1. Select a device status list. 2. Check the status of the selected device. Information including device status, name and occurrence time will be shown.
Favorite List Favorite is to save the current split mode setting and the videos from the cameras on the current screen. The Favorite feature is available only if you access the group. To add a favorite item 1. From the favorite item, click [Add ( You can add up to 10 favorite items. )]. ● live viewer 2. Select a site in the tree and press the [Enter] key. The current split mode and the videos from the camera on the screen will be saved in the name you entered.
live viewer Digital Zoom Digital Zoom is to enlarge the screen image using the magnifier function. This is an enlarged image on the screen; however, it is different from the optical zooming. The maximum factor of the digital zooming is x100 (10000%). Name and function of each item in Digital Zoom For the zooming purpose, you can use the buttons in the Digital Zoom list window as well as those in the bottom of the video window.
To select a digital zoom area 1. Click the [Zoom In ( )] button on the bottom. The shape of the mouse pointer will switch to [ ]. 2. Click an image to zoom in or select an area to enlarge. The selected image will be enlarged 100% per click. For a selected area, it will fit the screen. ● live viewer 3. Click the Zoom In button again. The shape of the mouse pointer will switch to normal and the zoom mode will be released. Digital zoom out 1. Click the [Zoom Out ( )] button on the bottom.
live viewer PTZ Control If the connected device supports the PTZ functions, you can control the PTZ camera remotely. MM `` Some connected cameras may not support PTZ function. For more information, refer to camera's user manual.
To control the direction If you click a nearer position from the center, the focus moves in that direction slowly; if clicking a farther position, the focus does that fast. clicking on a left-side area to turn the lens clockwise; keep clicking on a right-side area will turn the lens MM `` Keep counter clockwise. ● live viewer To adjust the iris This is to adjust the level of the exposure to the light. • Close IRIS : As the iris exposure is greater with a lesser light intensity, the scene gets dark.
live viewer To control the group/scan Scan enables you to navigate through the preset list one item by one. You have only two options: activate/deactivate the [Scan] function. To control the swing/auto pan Auto Pan will repeat moving the focus between two different points. You can set to rotate or repeat moving a specific range. You have only two options: activate/deactivate the [Auto Pan] function. To control the trace/pattern Pattern will perform the predefined movement and zooming of the camera.
To control the video of the Live Viewer You can save, print or record the video on the video screen of the selected camera. Capture Record ● live viewer Print To capture the screen This is to capture the video on the video screen in the picture format. You can choose to display the camera title, recording date/time and description on the video and specify the saving path. 1. Click [Capture ( )] on the bottom of the video screen. 3. Click [Set Path ( )] to specify the saving path. 2.
live viewer Record This is to record the video on the selected video screen in a video format. The video will be saved in the proprietary format with the dedicated viewer included. 1. Click [Record ( )] on the bottom of the video screen. 2. When the recording starts on the selected video screen, the record icon will be active. 3. To stop recording, click the record button again.
Video Sequence This is to transit the camera video screen automatically. This is useful especially if the number of connected cameras is greater than the split screens, as many cameras as the split screens will be displayed in the first sequence and the remaining cameras in the next sequence, and so on. )] on the bottom of the video screen. 1. Click [Sequence ( Auto sequence will be performed to fit the current split mode. MM `` You can change the sequence interval in “Setup > Viewer > Sequence”.
live viewer Scroll View If the number of cameras that are currently connected is greater than the number of the selected tile pattern, use the scroll bar to move to the next or previous video. Ex) If two 4CH DVR sets are connected in a 2x2 tile, you will have a total of 8 videos. You can scroll up or down the list and monitor 4 videos at once. < 1 CH ~ 4 CH > < 5 CH ~ 8 CH > MM `` Move the scroll bar up or down to move to the next or previous video in the list.
search viewer From the top right corner of the SmartViewer main screen, click the [Search] tab. Name and function of each item in Search Viewer ● search viewer a b c d e k f j g Item h i Description a Device List Displays a list of devices available. b Date Search Displays the recording history. c POS Search Search for the POS use history using the time information and keyword. d Advanced Search Displays the search options available. e Digital Zoom Displays a digital-zoomed image.
search viewer Indications of the Video Input Status You can check the input status of the camera video signal as follows: 1. : No data 3. : Excessive concurrent users 2. : Disconnected Device List From the device list, you can select a device to search for. 1. Check the list of registered devices. 2. Select a group or device to search for and connect to it. you access the search mode, the first listed device will be MM `` Ifselected automatically.
POS Search You can search for the POS use history using the time information and keyword. To perform the search 1. Specify the time information including year, month, day and time. ● search viewer 2. Enter a keyword for your search. • Find whole words only: If this option is not selected, the space between characters will be considered as AND. Ex) If you enter “2500WON cash”, the search will find only data items including both “2500WON” and “cash”.
search viewer Advanced Search You can refine your search according to the record type. 1. Click the advanced search menu. The Advanced Search window appears. 2. Select a desired item to search for. • All : You can search for all camera videos from the selected device. • Manual, Alarm, Motion, Video Loss, Schedule : The search will be performed on the current screen, whose mode will switch to one-channel (full) screen. Digital Zoom Digital Zoom is to enlarge the screen image using the magnifier function.
To select a camera to play If you double-click a camera in the result pane, the video of the selected camera will be added. The default of the timeline is 4 channels, where you can expand the area or use the scroll bar to add up to 16 channels for your search. 2. From the first empty screen on, the video of the selected camera will be displayed. MM `` If you drag and drop a camera in the result pane, the camera video will be added to the selected video window.
search viewer To move the play timeline When a recording data item is found, the current time point will be marked as the play timeline. 1. Select a data item to search for. The current time point will be marked as the play timeline. 2. Click the play timeline and drag and drop it to a desired start time. When the play time table is expanded, use the [Move ( , )] buttons to move the play time earlier or later.
Name and function of each item in play bar a b c 1. Play & Pause 2. Fast forward/backward (inactive in pause mode) Each time you press the button, the play speed will switch to x2, x4, x8, x16, x32, x64 and back to x2 forward or backward. 3. Frame advance/reverse-frame advance The video will be played by the frame. The buttons will be inactive during the playback. 4. Skip/Skip backward Skips playing between events. Backup You can backup video data to the PC where the program is currently running.
search viewer To resume the backup If backup is stopped, you can resume the backup later, starting from the stopped point. 1. To exit the backup screen, simply click [Continuous Later]. The current backup will be stopped with the backup screen closed. 2. Click [Backup ( )]. The backup screen for your last operation will appear again. 3. Click [Start]. Your last backup operation will be resumed. To change the file path You can backup video data to the PC where the program is currently running. 1.
setup Click [Setup ( )] in the top right corner of the program screen. The Setup window consists of several different tabs according to the function. ● setup Viewer Tab You can configure the Live Viewer or Search Viewer settings. When you complete your settings, click [OK] or [Apply] to apply your settings. OSD Display You can display/hide the on-screen information. Date/Time If checked, the time and date information will be displayed in the upper area of the video screen.
setup Date/Time Specify the date/time format that will be displayed on the video screen. Date Format Select one from YYYY-MM-DD, MM-DD-YYYY and DD-MM-YYYY. Time Format Choose between hh:mm:ss and hh:mm. Capture Specify the picture format and saving location of the captured screen. Record Specify the file path and time of recording videos. You can specify the recording time from 1 minute to 2 hours (120 min).
Event Sound You can select an event sound to output if there is an incoming event. To change the sound, click [Set Path ( )]. The Open dialog appears when you can specify the path. Play Sound ● setup You can select to repeat the sound if an event is received. If set to Continuous, the event sound will not be stopped until you confirm the event. Event Discard Time This is a time of disregarding an event if the same event occurs.
setup Others Restore the default This will restore the default settings of the viewer. ok The Setup window will be closed with your settings applied to the viewer. Cancel The Setup window will be closed without applying your settings to the viewer. Apply Your changes are applied to the viewer. Device Tab You can add a device, check a list of registered devices, or change the device settings.
Device List Displays a list of devices that are registered by the user. To add a device automatically You can scan for a device in the local network before registering it. ● setup 1. Click [Add Automatically]. A list of all devices connected in the local network will be shown in the “Add Device Automatically” window. Any registered device will be displayed grey. 2. Select a device to register from the list. 3. Provide the user ID and password, and press the [Register] button.
setup Connection Error Type • Parameter Error: The parameter is wrong. Check the connection information again. • Device Connection Error: T he device is not connected. Check if the device is connected to the network properly. • Network Error: Not connected to the network. Check if the device is connected to the network properly. • Redundant Address Error: The same address already exists. (If the IP and the port number are the same) • Login ID Error: The login ID is not valid.
To delete a device group 1. Select a group to delete. 2. Click [Delete]. The selected group will be deleted. Device Setup ● setup 1. Select a device. 2. Click [Device Menu Setup]. The Device Setup window appears where you can configure the device settings in details. Setup window may differ depending on the connected device; for more information, see the user manual of the MM `` The appropriate device.
setup User List To add a user 1. Click [Add User]. 2. Provide a login ID for the user name. You can enter up to 31 characters for the ID including alphabets, numeric and ‘—’. 3. Enter the password. You can enter up to 31 characters for the password without a space including alphabets, numeric and special characters. 4. Provide additional information such as the telephone number or the address, according to the user. 5.
Update Tab You can update the software via the remote update server. ● setup Auto Update If Auto Update is checked, check if a new software file is available in the server. To specify the interval of checking the update server You can specify the interval of checking the update server. 1. Specify the interval and the date. Select one from once/everyday/every week/every month, and you can specify the date/time according to your selection. 2.
setup To update the device To update the software of the device, you should save the new software file to your PC in advance. 1. Select a device to update. 2. Select the new software for the update. 3. Specify the path of the update file. 4. Click [Update]. The program will start being updated with the update status displayed. can update multiple devices simultaneously, which will MM `` You be updated in the order of registration.
Manage SmartViewer Configuration You can export the SmartViewer configuration file. Export Smart Viewer configuration You can save the SmartViewer configuration as a file. 1. Check the checkbox and select configuration items. 3. Click [Export Configuration]. The configuration items will be saved as a file and the result will be displayed in a message popup. Import Smart Viewer configuration You can import and read the SmartViewer configuration items as a file. 1. Select a configuration item to import.
setup Log Information Tab You can search for system-related logs by the occurrence time and by the item. 1. Specify the start and end times for the log search. 2. Click the checkbox of a desired log item to select it. 3. Click [Start searching]. The log information will be displayed in the log list. 4. To delete the list of logs that you have searched for, click [Remove All].
SALES NETWORK SAMSUNG TECHWIN CO., LTD. Samsungtechwin R&D Center, 701, Sampyeong-dong, Bundang-gu, Seongnam-si, Gyeonggi-do, Korea, 463-400 TEL : +82-70-7147-8740~60 FAX : +82-31-8018-3745 SAMSUNG TECHWIN AMERICA Inc. 100 Challenger Rd. Suite 700 Ridgefield Park, NJ 07660 Toll Free : +1-877-213-1222 Direct : +1-201-325-6920 Fax : +1-201-373-0124 www.samsungcctvusa.com www.samsungtechwin.com www.samsungsecurity.com www.samsungipolis.com SAMSUNG TECHWIN EUROPE LTD.