
Quick Start Guide


QSG_SWT-F0803MG 08/12/19 PAGE 7
QUICK START GUIDE SWT-F0803MG SERIES
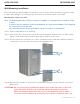
Wall Mounting Installation
Each switch has another installation method for users to fix the switch. A wall mount panel can be
found in the package. The following steps show how to mount the switch on the wall:
Mounting the switch on a wall
Note: For drywall applications where no studs are available, use drywall anchors rated for 50 lbs
or more.
In order to prevent switches from being damaged, use appropriate hardware (not supplied)
for securing the unit to the wall.
#6 screws with at least ½-inch penetration into wood surface recommended.
Step 1: Remove DIN-Rail kit if it is installed.
Step 2: Remove the two screws at the top of the unit’s back panel. Remove only one pair of back
panel screws at time (these hold the back panel in place on the unit).
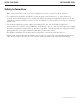
Step 3: Use the same two screws plus one of the included screws to attach the wall mount panel
to the top set of screw holes as shown in the diagram below.
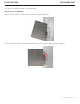
Step 4: Repeat Steps 2 and 3 to mount the second wall mount panel on the bottom of the unit’s
back panel.
ATTENTION: Do not remove the top and bottom panel screws at the same time, or the back
panel will detach from the unit. Install the wall mount panels one at a time.
When operating at temperatures above 51ºC, the equipment surfaces will be
hot to the touch. Installation in restricted access location is required for this case.