LCD MONITOR quick start guide 2043SW 2043SWX 2243SW 2243SWX ii
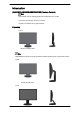
Introduction {2043SW/2043SWX/2243SW/2243SWX} Package Contents Note Please make sure the following items are included with your monitor. If any items are missing, contact your dealer. Contact a local dealer to buy optional items. Unpacking Type 1 Monitor & Simple stand Note MagicRotation program can not be provided as Simple Stand does not support Pivot function.
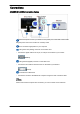
Introduction Monitor & Dual Hinge Stand Manuals Quick Setup Guide Warranty Card User's Guide (Not available in all locations) Cables D-Sub Cable Power Cord DVI Cable (option) Others Cleaning Cloth Note Cleaning Cloth is only provided for highly polished black products as a product feature. {2043SW/2043SWX/2243SW/2243SWX} Your Monitor Initial Settings Select the language using the up or down key. The displayed content will disappear after 40 seconds. Turn the Power button off and on.
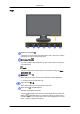
Introduction Front MENU button [MENU/ ] Opens the on-screen menu and exits from the menu. Also use to exit the OSD menu or return to the previous menu. Customized Key[ ] You can customize key assignment for the Custom button according to your preferences. Note You can configure the customized key for a required function via Setup > Customized Key. Brightness button [ ] When OSD is not on the screen, push the button to adjust brightness.
Introduction Note If you select the digital mode, you must connect your monitor to the graphic card's DVI port using the DVI cable. >> Click here to see an animation clip AUTO button Use this button for auto adjustment. >> Click here to see an animation clip Power button [ ] Use this button for turning the product on and off. Power Indicator This light is lit when operating normally, and blinks once when your adjustments are saved.
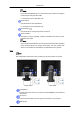
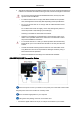
Introduction Connect the D-sub cable to the 15-pin, RGB IN port on the back of your monitor. Kensington Lock The Kensington lock is a device used to physically fix the system when using it in a public place. (The locking device has to be purchased separately.) For using a locking device, contact where you purchase it. Note The location of the Kensington Lock may be different depending on its model. Using the Anti-Theft Kensington Lock 1.
Connections Connections {2043SW/2043SWX} Connecting Cables Connect the power cord for your monitor to the power port on the back of the monitor. Plug the power cord for the monitor into a nearby outlet. Use a connection appropriate for your computer. Using the D-sub (Analog) connector on the video card. • Connect the signal cable to the 15-pin, D-sub port on the back of your monitor. [RGB IN] Using the DVI (Digital) connector on the video card.
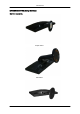
Connections {2043SW/2043SWX} Using the Stand Monitor Assembly Simple Stand HAS Stand
Connections Dual Hinge Stand Monitor and Bottom HAS Stand A. Stand Stopper Attaching a Base This monitor accepts a 75 mm x 75 mm VESA-compliant mounting interface pad. Simple Stand( Dual Hinge Stand ) HAS Stand . Monitor . Mounting interface pad (Sold separately) 1. Turn off your monitor and unplug its power cord. 2. Lay the LCD monitor face-down on a flat surface with a cushion beneath it to protect the screen. 3. Remove two screws and then remove the stand from the LCD monitor.
Connections 4. Align the mounting interface pad with the holes in the rear cover mounting pad and secure it with four screws that came with the arm-type base, wall mount hanger or other base. • Do not use screws longer than the standard dimension, as they may damage the inside of the Monitor. • For wall mounts that do not comply with VESA standard screw specifications, the length of the screws may differ depending on their specifications.
Connections [RGB IN] Using the DVI (Digital) connector on the video card. • Connect the DVI Cable to the DVI IN Port on the back of your Monitor. [DVI IN] Connected to a Macintosh. • Connect the monitor to the Macintosh computer using the D-sub connection cable. Note If the monitor and the computer are connected, you can turn them on and use them.
Connections HAS Stand Dual Hinge Stand Monitor and Bottom HAS Stand A. Stand Stopper Attaching a Base This monitor accepts a 100 mm x 100 mm VESA-compliant mounting interface pad.
Connections Simple Stand( Dual Hinge Stand ) HAS Stand . Monitor . Mounting interface pad (Sold separately) 1. Turn off your monitor and unplug its power cord. 2. Lay the LCD monitor face-down on a flat surface with a cushion beneath it to protect the screen. 3. Remove two screws and then remove the stand from the LCD monitor. 4.
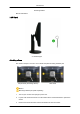
Troubleshooting {2043SW/2043SWX} Self-Test Feature Check Note Your monitor provides a self test feature that allows you to check whether your monitor is functioning properly. Self-Test Feature Check 1. Turn off both your computer and the monitor. 2. Unplug the video cable from the back of the computer. 3. Turn on the monitor. If the monitor is functioning properly, you will see a box in the illustration below.
Troubleshooting 900 60 Hz" message comes up, disconnect the cable from the computer while the monitor is still powered on. If there is a message coming up on the screen or if the screen goes white, this means the monitor is in working condition. In this case, check the computer for trouble. {2043SW/2043SWX} Check List Note Before calling for assistance, check the information in this section to see if you can remedy any problems yourself.
Troubleshooting A: The monitor is in PowerSaver mode. A: Press a key on the keyboard to activate the monitor and restore the image on the screen. A: If there is still no image, press the ' /SOURCE' button. Then press any key on the keyboard again to activate the monitor and restore the image on the screen.
Troubleshooting LED is blinking but no images on the screen. Q: Is the frequency properly adjusted when checking the Display Timing on the menu? A: Adjust the frequency properly by referring to the video card manual and the Preset Timing Modes. (The maximum frequency per resolution may differ from product to product.) There are only 16 colors shown on the screen. The screen colors have changed after changing the video card.
Troubleshooting A: Download the latest program. The program can be downloaded http://www.samsung.com/monitor/magictune Q: Did you install the program? A: Reboot the computer after installing the program for the first time. If a copy of the program is already installed, remove it, reboot the computer, and then install the program again. You need to reboot the computer for it to operate normally after installing or removing the program.
Troubleshooting A: Windows XP: Set the resolution in the Control Panel → Appearance and Themes → Display → Screen Saver. Set the function in the BIOS-SETUP of the computer. (Refer to the Windows / Computer Manual). A: Windows ME/2000: Set the resolution at the Control Panel → Display → Screen Saver. Set the function in the BIOS-SETUP of the computer. (Refer to the Windows / Computer Manual).
Troubleshooting Warning Messages If there is something wrong with the input signal, a message appears on the screen or the screen goes blank although the power indicator LED is still on. The message may indicate that the monitor is out of scan range or that you need to check the signal cable. Environment The location and the position of the monitor may influence the quality and other features of the monitor.
Troubleshooting (Connected using the DVI cable) If you still see an error message on the screen when the monitor is connected properly, check to see if the monitor status is set to analog. If you still see an (error) message on the screen when the monitor is connected properly, check to see if the monitor status is set to analog. Press ‘ /SOURCE’ button to have the monitor double-check the input signal source.
Troubleshooting The screen shows strange colors or just black and white. Q: Is the screen displaying only one color as if looking at the screen through a cellophane paper? A: Check the signal cable connection. A: Make sure the video card is fully inserted in its slot. Q: Have the screen colors become strange after running a program or due to a crash between applications? A: Reboot the computer.
Troubleshooting Set the resolution at the Control Panel → Display → Settings. Q: Has the video card been set properly? A: Set the video card by referring to the video card manual. There is a message that reads "Unrecognized monitor, Plug & Play (VESA DDC) monitor found". Q: Have you installed the monitor driver? A: Install the monitor driver according to the Monitor Driver. Q: See the video card manual to see if the Plug & Play (VESA DDC) function can be supported.
Troubleshooting If you installed a new video card or if you assembled the PC, check if the installed the adapter (video) driver and the monitor driver. Check if the scanning ratio of the video screen is set to between 56 Hz ~ 75 Hz. (Do not exceed 75 Hz when using the maximum resolution.
Troubleshooting Note Before calling for assistance, check the information in this section to see if you can remedy any problems yourself. If you do need assistance, please call the phone number on the Information section or contact your dealer.