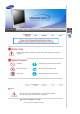
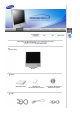
SyncMaster 930MP
Failure to follow directions noted by this symbol could result in bodily harm or damage to equipment. Prohibited Important to read and understand at all times Do not disassemble Disconnect the plug from the outlet Do not touch Grounding to prevent an electric shock Power When not used for extended period of time, set your computer to DPMS. If using a screen saver, set it to the active screen mode. Do not use a damaged or loose plug. z This may cause an electric shock or fire.
Do not pull the plug out by the wire nor touch the plug with wet hands. z This may cause an electric shock or fire. Use only a properly grounded plug and receptacle. z An improper ground may cause electric shock or equipment damage. Do not excessively bend the plug and wire nor place heavy objects upon them, which could cause damage. z This may cause an electric shock or fire. Do not connect too many extension cords or plugs to an outlet. z This may cause fire.
Set down the monitor carefully. z The monitor could be damaged or broken. Do not place the monitor face down. z The TFT-LCD surface may be damaged. Installing a wall bracket must be done by a qualified professional. z z Installation by unqualified personnel may result in injury. Always use the mounting device specified in the owner's manual. Leave a space for ventilation between the product and the wall. z Poor ventilation may cause the interior temperature to rise and lead to fire.
Use the recommended detergent with a smooth cloth. If the connector between the plug and the pin is dusty or dirty, clean it properly with a dry cloth. z A dirty connector may cause an electric shock or fire. Contact a Service Center or Customer Center for interior cleaning once a year. z Keep the product's interior clean. Dust which has accumulated in the interior over an extended period of time may cause malfunction or fire. Others Do not remove cover (or back). No user serviceable parts inside.
Do not try to move the monitor by pulling only the wire or the signal cable. z This may cause a breakdown, electric shock or fire due to damage to the cable. Do not move the monitor right or left by pulling only the wire or the signal cable. z This may cause a breakdown, electric shock or fire due to damage to the cable. Do not cover the vents on the monitor cabinet. z Bad ventilation may cause a breakdown or fire. Do not place water containers, chemical products or small metal objects on the monitor.
Be careful that adapter should not be in contact with water and therefore not be wet. z z z This may cause malfunction, an electric shock or fire. Do not use adapter by the waterside or outside particularly when it rains or snows. Be careful that adapter should not be wet while cleaning floor with water. Keep all power adapters apart. z Failure to do so may cause fire. Keep power adapter away from any other heat source. z Failure to do so may cause fire.
z Exposure to strong vibrations may be fire hazard and shorten the life of the monitor. When moving the monitor, turn the power switch off and unplug the power cord. Make sure that all cables, including the antenna cable and cables connecting to other devices, are disconnected before moving the monitor. z Failure to disconnect a cable may damage it and lead to fire or an electric shock. When you remove batteries from the remote, be careful that they are not swallowed by children.
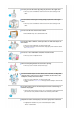
Please make sure the following items are included with your monitor. If any items are missing, contact your dealer. Contact a local dealer to buy optional items.
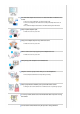
D-Sub Cable Power Cord Audio Cable DC Adapter Radio Antenna Sold separately DVI Cable(option) Others Remote Control Batteries (AAA X 2) Connecter Front 1. MENU 2. AUTO 3. ENTER/FM RADIO 4. SOURCE 5. PIP 6. 7. MagicBright™ CH 8. + VOL 9. Power button / Power indicator 10.
1. MENU Use this button for open the on-screen menu and exits from the menu screen or closes screen adjustment menu. 2. AUTO Use this button for auto adjustment. If you change resolution in the control panel, Auto function will be executed. >>Click here to see an animation clip 3. ENTER / FM RADIO ENTER : Activates a highlighted menu item. FM RADIO : In areas where signal is weak, noise may occur while FM radio is broadcast. >>Click here to see an animation clip 4.
adjusts the audio volume. >>Click here to see an animation clip 9. Power button / Power indicator Use this button to turn the monitor on and off./ Power Indicator shows PowerSaver mode by green blinking. 10. Remote Control Sensor Aim the remote control towards this spot on the Monitor. See PowerSaver described in the manual for further information regarding power saving functions. For energy conservation, turn your monitor OFF when it is not needed or when leaving it unattended for long periods.
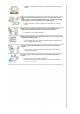
3. AUDIO terminal Audio connection terminal 4. COMPONENT terminal z DVD/DTV left / right audio connection terminal (R/L) DVD/DTV Component(PR, PB,Y) terminal z FM RADIO ANT connection terminal z TV connection terminal For more information > Connecting TV z 5. FM RADIO / TV connection terminal 6. EXT(RGB) connection terminal EXT(RGB) connection terminal - Scart is mainly used in Europe.
7. AV connection terminal z S-Video connection terminal (Input) z Video connection terminal (Input) z Left(L) / Right(R) audio connection terminal (Input) z Headphone connection terminal (Output) See Connecting the Monitor for further information regarding cable connections. Remote Control The performance of the remote control may be affected by a TV or other electronic devices operated near the monitor, causing malfuction due to interference with frequency. 1. POWER 2. CHANNEL 3. +100, -/-4.
13. EXIT 14. Up-Down Left-Right Buttons 15. AUTO 16. P.MODE, M/B (MagicBright™) 17. P.SIZE 18. STILL 19. PIP 20. S.MODE 21. DUAL/MTS 22. PRE-CH 23. SOURCE 24. SIZE 25. POSITION 26. MAGIC-CH 1. POWER Use this button to turn the monitor on and off. 2. CHANNEL Selects TV channels in the TV mode. You may use this button in PIP mode as well. 3. +100 Press to select channels over 100. For example, to select channel 121, press "+100", then press "2" and "1".
15. AUTO Adjusts the screen display automatically. 16. P.MODE, M/B (MagicBright™) When you press this button, current mode is displayed on the lower center of the screen. TV / AV / Ext. / S-Video /Component Mode : P.MODE( Picture Mode ) The Monitor has four automatic picture settings that are preset at the factory. Then push button again to circle through available preconfigured modes.
Connecting the monitor 1. Connecting to a Computer 1. Connect the power cord for your monitor to the power port on the back of the monitor. Plug the power cord for the monitor into a nearby outlet. 2-1. Using the D-sub (Analog) connector on the video card. Connect the signal cable to the 15-pin, D-sub connector on the back of your monitor. 2-2. Using the DVI (Digital) connector on the video card. Connect the DVI Cable to the DVI Port on the back of your Monitor. 3.
If you connect properly your monitor using the DVI connector but get a blank or fuzzy screen, check to see if the monitor status is set to analogue. Press Source button to have the monitor doublecheck the input signal source. 2. Connecting to a Macintosh 1. Connect the power cord to the DC adapter and then connect the adapter jack to the DC POWER port on the monitor. (Voltage is automatically adjusted by the power adapter.) 2. Using the D-sub (Analog) connector on the video card.
1. Input devices such as DVDs, VCRs or Camcorders are connected to the Video or S-Video terminal of the monitor using the RCA or S-Video cable. S-Video, RCA cable and SCRAT cable is optional. 2. Then, start the DVD, VCR or Camcorders with a DVD disc or tape inserted. 3. Select AV or S-Video using the SOURCE button on the monitor's front. 4. Connect the Audio (R) and Audio (L) terminals of a DVD, VCR or Camcorders to the monitor's R and L audio input terminals using audio cables. 1-2. Connecting EXT.
1. Connect the CATV or antenna coaxial cable to the Antenna terminal on the rear of the monitor. You need to use a coaxial antenna cable. When using an interior antenna terminal: Check the antenna terminal on the wall first and connect the antenna cable. When using an outdoor antenna: If you are using an outdoor antenna, use a professional for installation if possible. To connect the RF cable to the antenna input terminal: Keep the copper wire portion of the RF cable straight. 2. Turn on the monitor. 3.
3. Select Component using the SOURCE button on the monitor's front. 4. Connecting Headphone You may connect your Headphone to the monitor. 1. Connect your Headphone to the Headphone connection terminal. Using the Stand This monitor supports various types of VESA-standard bases. You need to either fold or remove the base in use in order to install a VESA base. Folding the base | Removing the base | Install a VESA base 1. Folding the base The monitor may be reclined from 0 to 90 degrees.
You may install a VESA base when the monitor base is fully folded. 2. Removing the base You can separate the base from the monitor. 3. Install a VESA base 1. 2. 3. 4. Lay the LCD monitor face-down on a flat surface with a cushion beneath it to protect the screen. Disconnect the monitor cables. Remove the four bolts that fasten the base to the monitor. Reconnect the monitor cables. You may install a VESA base when the monitor base is separated.
The monitor supports VESA mounting standard for use with various VESA mounting devices. This monitor accepts a 100mm x 100mm VESA-compliant mounting interface pad. You need to fold the monitor base before installing a VESA base. Align four bolt holes base with four bolts on the monitor base with the holes on the VESA base and then fasten the . Samsung Electronics will not be responsible for damages caused by using a base other than those specified.
4. Click the "Install" button in the "Warning" window. 5. Monitor driver installation is completed. Windows XP/2000 1. Insert CD into the CD-ROM drive. 2. Click "Windows XP/2000 Driver" 3. Choose your monitor model in the model list, then click the "OK" button. 4. If you can see following message window, then click the "Continue Anyway" button. Then click "OK" button. This monitor driver is under certified MS logo,and this installation doesn't damage your system.
Windows XP | Windows 2000 |Windows Me |Windows NT | Linux When prompted by the operating system for the monitor driver, insert the CD-ROM included with this monitor. Driver installation is slightly different from one operating system to another. Follow the directions appropriate for the operating system you have. Prepare a blank disk and download the driver program file at the Internet web site shown here. z Internet web site : http://www.samsung-monitor.com/ (Worldwide) http://www.samsungusa.
6. Select "Don't search ,I will.." then click "Next" and then click "Have disk". 7. Click the "Browse" button then choose A:(D:\Driver) and choose your monitor model in the model list and click the "Next" button. 8. If you can see following message window, then click the "Continue Anyway" button. Then click "OK" button. This monitor driver is under certified MS logo,and this installation doesn't damage your system.The certified driver will be posted on Samsung Monitor homepage. http://www.
10. Monitor driver installation is completed. Microsoft® Windows® 2000 Operating System When you can see "Digital Signature Not Found" on your monitor, follow these steps. 1. Choose "OK" button on the "Insert disk" window. 2. Click the "Browse" button on the "File Needed" window. 3. Choose A:(D:\Driver) then click the "Open" button and then click "OK" button. How to install 1. 2. 3. 4. 5. 6. 7. 8. 9. 10. Click "Start" , "Setting" , "Control Panel". Double click the "Display" Icon.
Microsoft® Windows® NT Operating System 1. Click Start, Settings, Control Panel, and then double-click Display icon. 2. In Display Registration Information window, click Settings Tab and then click All Display Modes. 3. Select a mode that you wish to use (Resolution, Number of colors and Vertical frequency) and then click OK. 4. Click Apply button if you see the screen working normally after clicking Test.
How to delete the Natural Color software program Select "Setting" / 'Control Panel" on the "Start" menu and then double-click "Add/Delete a program". Select Natural Color from the list and then click the [Add/Delete] button.
Input Available Mode OSD : PC / DVI : TV : AV : S-Video Description Source Use to select PC, TV or other external input source connected to the Monitor. Use to select the screen of your choice. - The direct button on the remote control is 'SOURCE' button. • PC • DVI: HDCP supported • TV • Ext.- Scart is mainly used in Europe.
1) PIP • ON/ Off : Turn the PIP Screen on or off. - The direct button on the remote control is 'PIP' button. 2) Source • PC / DVI : TV / Ext.(Scart is mainly used in Europe.) / AV / S-Video / Component Mode : Select the input source for the PIP. - The direct button on the remote control is 'SOURCE' button. 1) PIP 2) Source 3) Size 3) Size : Change the Size of the PIP window. If you select , in Size, Position and Transparency will not be activated.
OSD Description Play MagicBright™ MagicBright™ is a new feature providing the optimum viewing environment depending on the contents of the image you are watching. Currently four different modes are available: Entertain, Internet,Text and Custom. Each mode has its own pre-configured brightness value. You can easily select one of four settings by simply pressing the MagicBright™ control button. - The direct button on the remote control is 'M/B' button.
: Adjusts the Brightness of the PIP window on the screen. 3) Sharpness : Adjusts the difference between the lightest and darkest areas of the PIP window. 4) Color : Adjusts the Color of the PIP window on the screen. 5) Tint : Adds a natural tone to the PIP window. TV / Ext.
• Normal • Zoom 1 • Zoom 2 - ZOOM1, ZOOM2 are not available in 1080i(or over 720p) of DTV. Digital NR - Digital Noise Reduction. You can turn the Noise Elimination feature On/Off. The Digital Noise Elimination feature allows you to enjoy clearer and crisper images. • On /Off Film Mode You can turn Film Mode On/Off. The Film Mode feature offers you a theater-quality viewing experience.
preference. 1) Bass : Emphasize low frequency audio. 2) Treble : Emphasize high frequency audio. 3) Balance : Allows you to adjust the sound balance between the left and right speakers. Ballance allows you to adjust the sound balance between the left and right speakers and you can hear the sound even when the sound value is set to 0. Auto Volume Reduces the differences in volume level among broadcasters.
Available Mode : PC / DVI : TV : AV : S-Video : Component OSD Description Air/CATV The channel system can be set in several different ways. • Air • STD • HRC • IRC • AFN STD, HRC, IRC, AFN, and Air identify various types of cable TV systems. Contact your local cable company to identify the type of cable system that exists in your particular area. Auto Program The TV automatically cycles through all of the available channels and stores them in memory. This takes about one to two minutes.
Available Mode OSD : PC / DVI : TV : AV : S-Video : Component Description Play When you turn the power on of the product for the first time since it released Area Configuration from a factory, menu to select location will appear. Choose the region and country where you use the monitor. This is because broadcasting type varies according to region and country. You can select broadcasting type in OSD menu as well by selecting MENUSetup-Area Configuration.
Self-Test Feature Check Check the following items yourself before calling for service. Contact the service center for problems that you cannot solve by yourself. Self-Test Feature Check | Not Supported Mode | Not Optimum Mode | Display Adapter Driver Maintenance and Cleaning | Symptoms & Recommended Actions 1. Self-Test Feature Check Your monitor provides a self test feature that allows you to check whether your monitor is functioning properly. 1. Turn off both your computer and the monitor. 2.
Contact the computer dealer or manufacturer for information on Safe Mode Booting. Refer to Specifications > Preset Timing Modes for the resolutions or frequencies that are supported by the monitor. Sometimes the screen turns black without the "Not Supported Mode" message appearing on the screen. This indicates the monitor is set for a frequency out of range or the PowerSaver mode is on. 3.
6. Symptoms and Recommended Actions A monitor recreates visual signals received from the computer. Therefore, if there is trouble with the computer or the video card, this can cause the monitor to become blank, have poor coloring, noise, Video mode not supported, etc. In this case, first check the source of the problem, and then contact a service center or your dealer. 1. Check if the power cord and the video cables are properly connected to the computer. 2.
z video adapter. Compare these values with the data in the Preset Timing Modes Chart. Picture rolls vertically. z Check if the signal cable is securely connected. Connect it again securely. (Refer to Connecting to a Computer) Image is not clear. Picture is blurred. z Run Frequency Coarse and Fine tuning. Turn on again after removing all accessories (video extension cable, etc.) Set resolution and frequency to the recommended ranges. z z Picture image is unstable and vibrates.
z z Check if the power cord is securely connected. Check if a special fluorescent or neon lamp is on in the vicinity. Q&A Question How can I change the frequency? Answer Frequency can be changed by reconfiguring the video card. Note that video card support can vary, depending on the version of the driver used. (Refer to the computer or the video card manual for details.) How can I adjust the resolution? Windows ME/XP/2000 : Set the resolution at the Control Panel→Display→Settings.
General General Model Name SyncMaster 930MP LCD Panel Size 19" Diagonal Display area 376.32(H) x 301.056(V) Pixel Pitch 0.294(H) x 0.294(V) Type a-si TFT active matrix Synchronization Horizontal 31 ~ 81kHz Vertical 56 ~ 85Hz Display Color 16,777,216 Colors Resolution Maximum resolution SXGA 1280 x 1024 @75Hz Input Signal, Terminated RGB Analog , DVI Compliant Digital RGB. Composite H/V Sync, 0.
Power Consumption Less than 58W Power Saving Less than 2W Dimensions (WxDxH)/ Weight 433 x 58 x 419.5 mm (Without stand) 433 x 198 x 436 mm / 5.9 kg (With Stand) VESA Mounting Interface 100mm x 100mm (for use with Specialty(Arm) Mounting hardware.
If the signal transferred from the computer is the same as the following Preset Timing Modes, the screen will be adjusted automatically. However, if the signal differs, the screen may go blank while the power LED is on. Refer to the video card manual and adjust the screen as follows. Table 1. Preset Timing Modes Horizontal Frequency (kHz) Vertical Frequency (Hz) Pixel Clock (MHz) Sync Polarity (H/V) IBM, 640 x 350 31.469 70.086 25.175 +/- IBM, 720 x 400 31.469 70.087 28.
Countries Germany Norway Spain Israel Denmark Portugal Netherlands Austria Singapore Indonesia Australia China North Korea Rumania Ireland England South Africa Hongkong Ireland England South Africa Hongkong Brazil SECAM Broadcasting Systems SECAM-B Countries SECAM-D Iran Iraq Saudi arabia Syria Lebanon Egypt SECAM-K1 Russia Hungary Bulgaria Poland SECAM-L France Horizontal Frequency The time to scan one line connecting the right edge to the left edge of the screen horizontally is called Horizo
Service AUSTRALIA : Samsung Electronics Australia Pty Ltd. Customer Response Centre 7 Parkview Drive, Homebush Bay NSW 2127 Tel : 1300 362 603 http://www.samsung.com.au/ BRAZIL : Samsung Eletronica da Amazonia Ltda. R. Prof. Manoelito de Ornellas, 303, Terro B Chacara Sto. Antonio, CEP : 04719-040 Sao Paulo, SP SAC : 0800 124 421 http://www.samsung.com.br/ CANADA : Samsung Electronics Canada Inc.
http://samsung.es/ FRANCE : SAMSUNG ELECTRONICS FRANCE Service Paris Nord 2 66 rue des Vanesses BP 50116 Villepinte 95950 Roissy CDG Cedex Tel : 08 25 08 65 65 Fax : 01 48 63 06 38 http://www.samsungservices.com/ GERMANY : TELEPLAN Rhein-Main GmbH Feldstr. 16 64331 Weiterstadt T. 06151/957-1306 F. 06151/957-1732 * EURO 0.12/Min http://www.samsung.de/ HUNGARY : Samsung Electronics Magyar Rt. 1039, Budapest, Lehel u. 15-17. Tel: 36 1 453 1100 Fax: 36 1 453 1101 http://www.samsung.
Fax: 51-1-336-8551 http://www.samsungperu.com/ PORTUGAL : SAMSUNG ELECTRONICA PORTUGUESA S.A. Rua Mário Dioniso, No2 - 1º Drt. 2795-140 LINDA-A-VELHA Tel. 214 148 114/100 Fax. 214 148 133/128 Free Line 800 220 120 http://www.samsung.pt/ SOUTH AFRICA : Samsung Electronics,5 Libertas Road, Somerset Office Park, Bryanston Ext 16. Po Box 70006, Bryanston,2021, South Africa Tel : 0027-11-549-1621 Fax : 0027-11-549-1629 http://www.samsung.co.
Téminos Sync Signal Sync (Synchronized) Signals refer to the standard signals that are required to display desired colors on the monitor. They are divided into Vertical and Horizontal Sync Signals. These signals display normal color images by the set resolution and frequency. Types of Sync Signals Separate This is a scheme of transmitting individual vertical sync signals to the monitor.
Broadcasting service provided via satellite. Enables high picture quality and clear sound throughout the country regardless of the location of the viewer. Sound Balance Balances the levels of the sound coming from each speaker in televisions with two speakers. Cable TV Whereas the terrestrial broadcasting is delivered via frequency signals through the air, cable broadcasting is transmitted via a cable network. In order to view cable TV, one must purchase a cable receiver and hook it up to the cable network.
Authority Information in this document is subject to change without notice. © 2004 Samsung Electronics Co., Ltd. All rights reserved. Reproduction in any manner whatsoever without the written permission of Samsung Electronics Co., Ltd. is strictly forbidden. Samsung Electronics Co., Ltd. shall not be liable for errors contained herein or for incidental or consequential damages in connection with the furnishing, performance, or use of this material.
MPR II Compliance European Notice (Europe only) | PCT Notice | VCCI | TCO'95-Ecological requirements for personal computers (TCO'95 applied model only) TCO'99-Ecological requirements for personal computers (TCO'99 applied model only) TCO'03-Ecological requirements for personal computers (TCO'03 applied model only) TCO'03 Recycling Information (TCO'03 applied model only) Medical Requirement Mercury Statement (LCD Monitor, LCD TV, DLP Projection TV, Projector for USA only) MPR II Compliance This monitor comp
the equipment according to the instruction manual. TCO'95-Ecological requirements for personal computers (TCO'95 applied model on AB general requirements AB2 Written Eco-document acompanying the products Congratulations! You have just purchased a TCO'95 approved and labelled product! Your choice has provided you with a product developed for professional use. Your purchase ha contributed to reducing the burden on the environment and to the further development of environmentally-adapted electronic products.
Labelled products must meet strict environmental demands, for example in respect of the reduction of electric and magnetic fields, along with physical and visual ergonomics and g usability. TCO Development Unit 1996-11-29 On the page this folder you will find a brief summary of the environmental requirements m this product. The complere environmental criteria document may be ordered from: TCO Development Unit S-11494 Stockholm Sweden Fax: +46 8 782 92 07 E-mail (Internet): development@tco.
CFCs (freons) are sometimes used for washing printed circuit boards and in the manufac of expanded foam for packaging. CFCs break down ozone and thereby damage the ozon layer in the stratosphere, causing increased reception on Earth of ultraviolet light with consequent increased risks of skin cancer (malignant melanoma). The relevant TCO'95 requirement: Neither CFCs nor HCFCs may be used during the manufacturing of the product or its packaging.
presence and use of heavy metals, brominated and chlorinated flame retardants, CFCs(fr and chlorinated solvents, among other things. The product must be prepared for recycling the manufacturer is obliged to have an environmental policy which must be adhered to in country where the company implements its operational policy.
printed circuit boards. CFCs break down ozone and thereby damage the ozone layer in th stratosphere, causing increased reception on earth of ultraviolet light with e.g. increased of skin cancer (malignant melanoma) as a consequence. Lead** Lead can be found in picture tubes, display screens, solders and capacitors. Lead damag nervous system and in higher doses, causes lead poisoning. The relevant TCO'99 require permits the inclusion of lead since no replacement has yet been developed.
o heavy metals such as cadmium, mercury and lead. The requirements included in this label have been developed by TCO Development in cooperation with scientists, experts, users as well as manufacturers all over the world. Sin the end of the 1980s TCO has been involved in influencing the development of IT equipm a more user-friendly direction. Our labelling system started with displays in 1992 and is no requested by users and IT-manufacturers all over the world. For more information, Please visit www.
Classifications: In accordance with UL 2601-1/IEC 60601-1, the product is cssified as Continuous duty C equipment, which is not protected against ingress of liquids. The product is not suitable fo in the presence of a flammable anaesthetic mixture with air or with oxygen or nitrous oxid EMC This equipment has been tested and found to comply with the limits for medical devices to IEC 601-1-2:1994.
PRODUCT INFORMATION (Image Retention Free) LCD Monitors and TVs may have image retention when switching from one image to another especially after displaying a stationary image for a long time. This guide is to demonstrate correct usage of LCD products in order to protect them from Image retention. What is Image retention ? During normal operation of a LCD panel, pixel image retention doesn't occur.
The best way to protect your monitor from Image retention is to set your PC or System to operate a Screen Saver program when you are not using it. Image retention may not occur when a LCD panel is operated under normal conditions. Normal conditions are defined as continuously changing video patterns. When the LCD panel is operated for a long time with a fixed pattern (-over 12 hours-), there may be slight difference in voltage between electrodes that work the liquid crystal (LC) in a pixel.