SyncMaster P2050,P2250,P2350,P2050G,P2250G,P2350G LCD Monitor User Manual
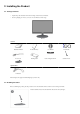
. Installing the Product 2-1. Package Contents • Unpack the product and check if all of the following contents have been included. • Store the packaging box in case you need to move the Product at a later stage. Monitor Contents Installation Manual Product Warranty User Manual D-Sub Cable Power Cord Cleaning Cloth Cable Arrangement Link Stand Connector Stand Optional Parts DVI Cable The cleaning cloth is supplied with black high-glossy models only. 2-2.
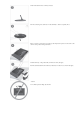
Check if the Stand Connector is firmly connected. Turn the connecting screw at the bottom of the stand fully so that it is completely fixed. Place a soft cloth over the table to protect the product and place the product onto the cloth so that the front of the product is facing downwards. Hold the main body of the product with your hand as shown by the figure. Push the assembled stand into the main body in the direction of the arrow as shown in the figure.
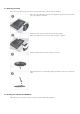
2-3. Removing the Stand Before removing the stand, place the product down on a flat and stable surface so that the screen faces downwards. Place a soft cloth over the table to protect the product and place the product onto the cloth so that the front of the product faces downwards. Hold the main body of the product with your hand as shown by the figure. Pull the stand in the direction of the arrow as shown in the figure to separate it. Turn the connecting screw at the bottom of the stand to separate it.
A. Stand Mount B. Stand (Optional) 1. Turn the product off and unplug the power cord from the wall outlet. 2. Place a soft cloth or cushion on a flat surface to protect the panel and place the product down on the cloth so that the front of the product faces downwards. 3. Separate the stand. 4. Align the groove of the part of the product that is to be connected to the stand with the groove in the stand (desk-top stand, wall mount stand or another stand) and firmly fix the stand by fastening the screw.
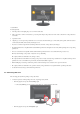
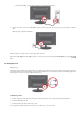
• 2. Connect the [DVI IN] port of the product to the DVI port of the PC with the DVI cable.. Connect one end of the power cord to the POWER port of the product and connect the other end of the power cord to the 220V or 110V wall outlet. (The input voltage is switched automatically.) When the product is connected to a PC, you can turn the product on and use it. When both the DVI (digital) and D-Sub (analog) cables are connected, you can select the input signal (analog/digital) by pressing the button.
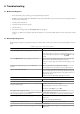
5. Troubleshooting 5-1. Monitor Self-Diagnosis • You can check if the product is working properly using the Self-Diagnosis function. • If a blank screen is displayed and the Power LED blinks even if the product and the PC are properly connected, perform the self-diagnosis function according to the procedures below. 1. Turn the product and the PC off. 2. Separate the D-Sub cable from the product . 3. Turn the product on. 4.
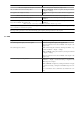
refer to the (Standard Signal Mode Table) The color is displayed in 16 bit (16 colors). The color has been changed after changing the graphics card. Did you install the device driver for the product? Windows ME/XP/2000 : Set the color again by selecting Control Panel → Display → Settings. Is the graphics card configured correctly? Configure the color again in accordance with the new graphics card driver.