TA750 TA950 LED TV MONITOR (MFM TV) user manual imagine the possibilities Thank you for purchasing this Samsung product. To receive more complete service, please register your product at www.samsung.
Figures and illustrations in this User Manual are provided for reference only and may differ from actual product appearance. Product design and specifications may be changed without notice. Digital TV notice Functionalities related to Digital TV (DVB) are only available in countries/areas where DVB-T (MPEG2 and MPEG4 AVC) digital terrestrial signals are broadcasted or where you are able to access to a compatible DVB-C (MPEG2 and MPEG4 AAC) cable-TV service.
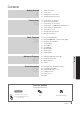
Contents 4 4 11 12 13 Safety Precautions Accessories Viewing the Control Panel Viewing the Remote Control Connections 14 14 14 15 17 18 19 21 22 Connecting to an Antenna Plug & Play (Initial Setup) Connecting to an AV Device Connecting to a COMMON INTERFACE slot Connecting to an Audio Device Connecting to a PC Changing the Input Source Network Connection Basic Features 24 24 24 24 27 29 35 37 41 45 How to Navigate Menus Using the INFO button (Now & Next guide) Using the Channel Menu Channel Menu
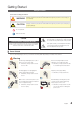
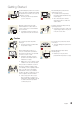
Getting Started Safety Precautions Icons used for safety precautions Warning Failing to follow the precautions marked with this sign may result in a serious injury or even a fatality. Caution Failing to follow the precautions marked with this sign may result in a personal injury or property damage. Do not perform. Must be followed. This symbol indicates that high voltage is present inside. It is dangerous to make any kind of contact with any internal part of this product.
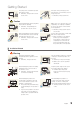
Getting Started Keep the power cord and the product away from a heater. yy Otherwise, it may result in electric shock or fire. If the pins of the power plug or the wall outlet are covered in dust, clean it using a dry cloth. yy Otherwise, it may result in fire. ! Caution Avoid unplugging the power plug while the product is operating. yy Otherwise, it may damage the product due to electric shock.
Getting Started ! Avoid installing the product in a location exposed to direct sunlight and installing the product near a heat source such as a fireplace or heater. yy This may shorten the product life cycle or cause fire. Avoid installing the product where children may reach it. yy If a child touches the product, the product may fall and this may result in injury. yy Since the front part is heavier, install the product on a flat and stable surface.
Getting Started ¦¦ Cleaning Related Warning Before cleaning the product, unplug the power cord. yy Otherwise, it may result in electric shock or fire. When cleaning the product, do not spray water directly over the product parts. yy Make sure that water does not enter the product. yy Otherwise, it may result in fire, electric shock or a problem with the product. ! Caution Avoid spraying cleansing agent directly onto the product.
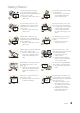
Getting Started ! ! If the product generates a strange noise, a burning smell, or smoke, unplug the power plug immediately and contact a service centre. yy Otherwise, it may result in electric shock or fire. Avoid letting children hang or climb onto the product. yy Otherwise, it may result in the product falling and this may result in injury or death. If you drop the product or the case is damaged, turn the power off and unplug the power cord. Contact a service centre.
Getting Started Avoid placing a liquid container such as a vase, flowerpot, beverage, cosmetics or drugs, or a metal object over the product. yy If water or substances enter the product, turn the power off, unplug the power cord and contact a service centre. yy Otherwise, it may result in a problem with the product, electric shock or fire. Do not press down hard on the product. The product may become deformed or damaged.
Getting Started Avoid using a humidifier or cooker near the product. yy Otherwise, it may result in electric shock or fire. ! Since the display panel is hot after using it for a long time, do not touch the product. It is important to give your eyes some rest (5 minutes every hour) when viewing the product screen for long periods of time. yy This will alleviate any eye strain. Keep the small accessories in a location out of the reach of children.
Getting Started Accessories ✎✎Please make sure the following items are included with your TV. If any items are missing, contact your dealer. ✎✎The items’ colours and shapes may vary depending on the models. ✎✎Cables not included in the package contents can be purchased separately. ✎✎Check if there is no accessory hidden behind packing materials when you open the box.
Getting Started Viewing the Control Panel ✎✎The product colour and shape may vary depending on the model. TA750 TA950 Power lndicator Power lndicator Remote control sensor Remote control sensor Speakers Speakers m (Menu) (Source) o (Volume) k (Channel) Displays an on-screen menu, the OSD (on screen display) of your TV’s features. Toggles between all the available input sources. In the on-screen menu, use this button as you would use the ENTERE button on the remote control. Adjusts the volume.
Getting Started Viewing the Remote Control ✎✎This is a special remote control for the visually impaired persons and has Braille points on the Power, Channel and Volume buttons. POWER Turns the TV on and off. ON/OFF Turns the remote control light on or off. When on, the buttons become illuminated for a moment when pressed. (Using the remote control with this button set to on will reduce the battery usage time.) SOURCE Displays and selects the available video sources. Have direct access to channels.
Connections Connecting to an Antenna When the TV is initially powered on, basic settings proceed automatically. ✎✎Preset: Connecting the mains and antenna. TA950 DC 14V ANT IN Cable TA750 ANT OUT Power Input Plug & Play (Initial Setup) When the TV is initially powered on, a sequence of on-screen prompts will assist in configuring basic settings. Press the POWERP button. Plug & Play is available only when the Input Source is set to TV.
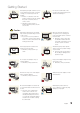
Connections Connecting to an AV Device Connection using an HDMI or HDMI/DVI cable Available devices: DVD, Blu-ray player, HD cable box, HD STB (Set-Top-Box) satellite receiver, VCR R W Red White HDMI IN 1(DVI) DVI AUDIO IN 2(ARC) TA950 TA750 W R Device AUDIO OUT DVI OUT Device HDMI OUT ✎✎HDMI IN 1 (DVI), 2 (ARC) / DVI AUDIO IN xx Connecting the product to a digital device using an HDMI cable will improve the picture and sound quality.
Connections Using a Component (up to 1080p) or an Audio/Video (480i only) and a Scart Cable Available devices: DVD, Blu-ray player, HD cable box, HD STB (Set-Top-Box) satellite receiver, VCR AV IN VIDEO Y PB PR AUDIO W Y White AUDIO COMPONENT IN Yellow R Red G Green B Blue EXT (RGB) TA950 TA750 EXT W R B G R W R W R B G R W Device AUDIO OUT COMPONENT OUT Y Y R VCR / DVD Device AUDIO OUT VIDEO OUT ✎✎In Ext. mode, DTV Out supports MPEG SD Video and Audio only.
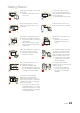
Connections Connecting to a COMMON INTERFACE slot Attaching the CI Card Adapter Attach the adapter as shown below. To connect the CI CARD Adapter, follow these steps. TV Rear ✎✎We recommend attaching the adapter before installing the wall mount, or inserting the “CI or CI+ CARD.” 1. Insert the CI CARD Adapter into the two holes on the product 1. ✎✎ Please find a two holes on the rear of the TV. A two holes is beside the COMMON INTERFACE port. 2.
Connections Connecting to an Audio Device Using an Optical (Digital) or a Headphone Connection Available devices: digital audio system, amplifier, DVD home theatre, PC TA750 TA950 DIGITAL AUDIO OUT (OPTICAL) Digital audio system OPTICAL ✎✎DIGITAL AUDIO OUT (OPTICAL) xx When a Digital Audio System is connected to the DIGITAL AUDIO OUT (OPTICAL) jack, decrease the volume of both the TV and the system. xx 5.1 CH (channel) audio is available when the TV is connected to an external device supporting 5.
Connections Connecting to a PC Connection using an HDMI or HDMI/DVI cable ✎✎Connecting through the HDMI cable may not be supported depending on the PC. DVI AUDIO IN HDMI IN ARC) 1(DVI) TA950 or TA750 AUDIO OUT DVI OUT HDMI OUT ✎✎A PC should be connected via the HDMI IN 1 (DVI) port. ✎✎If a non-standard video format is selected, the TV may not operate normally. ✎✎The interlaced scan mode is not supported.
Connections Compatible PC resolutions (when the PC is connected to the HDMI IN 1 (DVI) port) If a signal that belongs to one of the following standard signal modes is transmitted from the PC, the TV screen will automatically be adjusted. If a signal outside of the standard signal modes is transmitted from the PC, the TV screen may go blank and only the power indicator may turn on.
Connections Changing the Input Source OO SOURCE → TOOLS → Edit Favourites Source In the Source, press the TOOLS button to select Edit Favourites. You can set an external input source to Favourites. OO SOURCE → ENTERE Use to select TV or an external input sources such as a DVD / Blu-ray player / cable box / STB satellite receiver. Edit Favourites SOURCE ■■ TV / Ext. / HDMI1/DVI / HDMI2 / AV / Component / USB / AllShare ✎✎In the Source, connected inputs will be highlighted.
Connections Network Connection Connecting to a Wired Network You can attach your TV to your LAN using cable in three ways: yy You can attach your TV to your LAN by connecting the LAN port on the back of your TV to an external modem using a LAN cable. See the diagram below.
Connections Connecting to a Wireless Network To connect your TV to your network wireless, you need a wireless router or modem and a Samsung Wireless LAN adapter (WIS09ABGN, WIS09ABGN2, WIS10ABGN-sold separately) , which you connect to your TV’s back or side panel USB port. See the illustration below.
Basic Features TTX/MIX PRE-CH MUTE How to Navigate Menus Using the INFO button (Now & Next guide) Before using the TV, follow the steps below to learn how to navigate the menu and select and adjust different functions. CH LIST HUB MENU SMART GUIDE TOOLS INFO RETURN EXIT 3 1 2 A B C 4 The display identifies the current channel INFO and the status of certain audio-video settings. The Now & Next guide shows daily TV programme information for each channel according to the broadcasting time.
Basic Features Using Channel View Guide 2:10 Tue 1 Jun yy Repeat: Select Once, Manual, Sat~Sun, Mon~Fri or Everyday to set at your convenience. If you select Manual, you can set the day you want. DTV Air 800 five ✎✎ The c mark indicates the date is selected. Home and Away 18:00 - 18:30 yy Date: you can set desired date. It is available when you select Once in Repeat. Drama Dani is devastated when scott makes clear his views on marriage...
Basic Features How to use Timer Viewing in Channel List (digital channels only) When you set the Timer Viewing in Channel List, you can only set the programme in Programme View. 1. Press the CH LIST button, then select a desired digital channel. 2. Press the { (Programme View) button. 3. Press the u / d buttons to select the desired programme, then press the E (Information) button. 4. Select Timer Viewing, then press the ENTERE button when done.
Basic Features Using the TOOLS button with the Channel yy Upcoming Programme (digital channels only): View details on the programme being aired on a selected digital channel. yy Edit Favourites: Set channels you watch frequently as favourites. 1. Select the Edit Favourites, then press the ENTERE button. Press the ENTERE button to select Favourites 1 - 5, then press the OK button. 2 ✎✎ One favourite channel can be added in several of favourite channels among Favourites 1 - 5.
Basic Features Auto Tuning Manual Tuning (depending on the country) Scans for a channel automatically and stores in the TV. ✎✎If a channel is locked using the Channel Lock function, ✎✎Automatically allocated programme numbers may not correspond to actual or desired programme numbers. If a channel is locked using the Channel Lock function, the PIN input window appears. ■■ Auto Tuning –– Air / Cable: Select the antenna source to memorise.
Basic Features Transfer Channel List ¦¦ Adjusting Picture Settings The PIN input screen appears. Enter your 4 digit PIN number. Imports or exports the channel map. You should connect a USB storage to use this function. OO MENUm → Picture → ENTERE ■■ Import from USB: Import channel list from USB. Samsung MagicAngle ■■ Export to USB: Export channel list to USB. this function is available when USB is connected. This feature allows you to see optimal screen quality according to your viewing position.
Basic Features Screen Adjustment ■■ Picture Size: Your cable box / satellite receiver may have its own set of screen sizes as well. However, we highly recommend you use 16:9 mode most of the time. P.SIZE Auto Wide: Automatically adjusts the picture size to the 16:9 aspect ratio. 16:9: Sets the picture to 16:9 wide mode. Wide Zoom: Magnifies the picture size more than 4:3. Adjusts the Position by using u, d buttons. ✎✎ Zoom: Magnifies the 16:9 wide pictures vertically to fit the screen size.
Basic Features 3D How to watch the 3D images This feature allows you to view 3D content such as 3D broadcasts or movies. You can view 3D content using (SyncMasterdedicated) Samsung 3D glasses. W ✎✎You can purchase SyncMaster- dedicated 3D glasses (model name: SSG-M3750CR) separately. Contact the dealer you purchased the product from for details about purchasing the 3D glasses. ✎✎The product may not be compatible with 3D glasses other than the model specified above.
Basic Features Resolution compatible with PC input (connected via the HDMI IN 1 (DVI) port) PC input is optimized for video in 1920 x 1080 resolution. Videos with a resolution other than 1920 x 1080 will not be viewable in 3D or full screen mode. Playing a 3D Game on a PC First, install the SyncMaster 3D Game Launcher (TriDef 3D) software. ✎✎SyncMaster 3D Game Launcher(TriDef 3D) is a game driver that allows you to play PC games in 3D. 1. Set your monitor as the default monitor for the PC. 2.
Basic Features ¦¦ Changing the Picture Options ✎✎ To adjust Colour, Red, Green, Blue and Reset, Advanced Settings set Colour Space to Custom. OO MENUm → Picture → Advanced Settings → ENTERE (Advanced Settings are available in Standard / Movie mode) You can adjust the detailed setting for the screen including colour and contrast. ✎✎In HDMI1/DVI mode (when a PC is connected), only Gamma and White Balance are available.
Basic Features Picture Options OO MENUm → Picture → Picture Options → ENTERE ✎✎In HDMI1/DVI mode (when a PC is connected), only Colour Tone is available. Picture Options Colour Tone Standard Auto Digital Noise Filter MPEG Noise Filter Auto HDMI Black Level Normal Off Film Mode Motion Plus Standard ■■ Film Mode (Off / Auto1 / Auto2): Sets the TV to automatically sense and process film signals from all sources and adjust the picture for optimum quality.
Basic Features Maintaining the Correct Posture when Using this Product ¦¦ Adjusting Sound Settings OO MENUm → Sound → Sound Effect → ENTERE Sound Effect (standard sound mode only) ✎✎If Speaker Select is set to External Speaker, Sound Effect is disabled. ■■ SRS TruSurround HD (Off / On)t This function provides a virtual 5.1 channel surround sound experience through a pair of speakers using HRTF (Head Related Transfer Function) technology.
Basic Features Broadcast Audio Options ■■ Dolby Digital Comp (Line / RF): This function minimizes signal disparity between a dolby digital signal and a voice signal (i.e. MPEG Audio, HE-AAC, ATV Sound). (digital channels only) ✎✎ Select Line to obtain dynamic sound, and RF ■■ Audio Language t Change the default value for audio languages. The available language may differ depending on the broadcast.
Basic Features Network Menu How to set up automatically Network Settings Network Settings OO MENUm → Network→ Network Settings → ENTERE Network Select a network connection type. Wired Wireless (general) Connect to the network using a LAN cable. Please make sure that the LAN cable is connected. WPS(PBC) One Foot Connection Previous Next Cancel Network Settings Network Status AllShare Settings xx The displayed image may differ depending on the model. 1. Go to Network Settings screen.
Basic Features How to set up manually How to set up automatically To set up your TV’s cable network connection manually, follow these steps: Network Settings Select a network connection type. IP Settings IP Mode Wired Manual Wireless (general) IP Address 0.0.0.0 WPS(PBC) Subnet Mask 0.0.0.0 One Foot Connection Gateway 0.0.0.0 DNS Mode Manual DNS Server 0.0.0.0 OK 1. Follow Steps 1 through 2 in the “How to set up automatically” procedure. 2. Select the IP Settings on network test screen.
Basic Features □□ Network Settings (Manual) Use the Manual Network Setup when connecting your TV to a network that requires a Static IP address. Getting the Network Connection Values To get the Network connection values on most Windows computers, follow these steps: 1. Right click the Network icon on the bottom right of the screen. 2. In the pop-up menu that appears, click Status. 3. On the dialog that appears, click the Support tab. 4. On the Support Tab, click the Details button.
Basic Features 3. Place the wireless router in parallel with the Samsung Wireless LAN adapter giving a gap no larger than 25cm. ✎✎ If One Foot Connection does not connect your TV to your Router, a pop-up window appears on the screen notifying you of the failure. If you want to try using One Foot Connection again, reset the wireless router, disconnect the Samsung Wireless LAN adapter and then try again from Step 1. You can also choose one of the other connection setup methods. 4.
Basic Features System Menu If Your TV Fails to Connect to the Internet Your TV may not be able to connect to the Internet because your ISP has permanently registered the MAC address (a unique identifying number) of your PC or modem, which it then authenticates each time you connect to the Internet as a way of preventing unauthorized access. As your TV has a different MAC address, your ISP can not authenticate its MAC address, and your TV can not connect.
Basic Features xx It is recommended that you use a USB memory Setting the On / Off Timer stick and a multi card reader when using On Timer. The On Timer function may not work with USB devices with a built-in battery, MP3 players, or PMPs made by some manufacturers because these devices take a long time to be recognized. ■■ On Timer 1 / On Timer 2 / On Timer 3: Three different on timer settings can be made. You must set the clock first.
Basic Features ¦¦ Locking Programmes ¦¦ Other Features OO MENUm → System → Security → ENTERE OO MENUm → System → ENTERE Security Language ✎✎The PIN input screen appears before the setup screen. ■■ Menu Language: Set the menu language. ■■ Channel Lock (Off / On): Lock channels in Channel Manager, to prevent unauthorized users, such as children, from watching unsuitable programme. ■■ Teletext Language: Set a desired language for teletext. ✎✎ Available only when the input Source is set to TV.
Basic Features General DivX® Video On Demand ■■ Max. Power Saving (Off / On): Turns off the TV to reduce power consumption after the PC has been left idle for a specified period of time. Shows the registration code authorized for the TV. If you connect to the DivX web site and register, you can download the VOD registration file. If you play the VOD registration using Media contents, the registration is completed. ✎✎ Available only when the HDMI1/DVI port is connected to a PC.
Basic Features Support Menu ¦¦ Picture In Picture (PIP) OO MENUm → System → PIP → ENTERE OO MENUm → Support → ENTERE PIPt Self Diagnosis You can watch the TV tuner and one external video source simultaneously. PIP (Picture-in-Picture) does not function in the same mode. ✎✎NOTE xx For PIP sound, refer to the Sound Select instructions. xx If you turn the TV off while watching in PIP mode, the PIP window will disappear.
Basic Features Software Upgrade Software Upgrade can be performed via a broadcasting signal or by network connection or downloading the latest firmware from “www.samsung.com,” to a USB memory device. ✎✎ If the function is selected during the software transmission period, software will be automatically searched and downloaded. ✎✎ The time required to download the software is determined by the signal status.
Advanced Features Getting Started with Smart Hub Features Search All Easily search and access content from diverse sources (e.g. applications, Your Video, AllShare). Social TV Share your TV viewing experience with your friends via social networking service (SNS). Your Video Enjoy your movie watching with a customized video on demand (VOD) recommendation service.
Advanced Features ✎✎NOTE xx Configure the network setting before using Smart Hub. For more information, refer to Network Settings. xx Unsupported fonts within the provider’s content will not display normally. xx Slow responses and/or interruptions may occur, depending on your network conditions. xx Depending on the region, English may be the only language supported for application services. xx This feature is not available in some locations.
Advanced Features Method 2: Using the Keypad of T9 type. 4-1. For example, suppose that you want to input “105Chang”. 4-2. Press the TTX/MIX button on the remote 3 times to change the input mode from lower case to numbers. 4-3. Press the 1, 0 and 5 button in numerical order. 4-4. Press the TTX/MIX button on the remote 3 times to change the input mode from numbers to capitalized case. 4-5. ress numbers in sequence: 2, 4, 2, 6, 4.
Advanced Features Channel Bound Service (Off / On): Some channels support applications as an Internet data service, allowing you to access the Internet service while watching TV. Only available if supported by the broadcaster ✎✎ yy Reset: Resets Smart Hub settings to factory default settings. If you want reset Smart Hub, Enter password. yy Properties More: Display information about Smart Hub. Terms of Service Agreement: Display the Terms of Service Agreement.
Advanced Features ¦¦ Troubleshooting for SMART HUB Problem Some application contents only appear in English. How can I change the language? Possible Solution The Application content language may be different from the application user interface language. The ability to change the language depends on the service provider. Some application services do Check with the service provider. not work. Refer to the help website for application service provider information.
Advanced Features Using the Smart Hub Enjoy photos, music and/or movie files saved on a USB Mass Storage Class (MSC) device. 1. Press the SMART HUB button. HUB Search Your Video 2. Press the d or u button to select desired menu (Videos, Photos, Music), then press the ENTERE button.
Advanced Features Before using media contents functions... ✎✎It might not work properly with unlicenced multimedia files. ✎✎Need-to-Know List before using media contents xx MTP (Media Transfer Protocol) is not supported. xx The file system supports FAT16, FAT32 and NTFS. Note that the supported maximum file size is 2GB for FAT16 and 4GB for FAT32. xx Certain types of USB Digital camera and audio devices may not be compatible with this TV.
Advanced Features Screen Display Move to the file you desired using the u / d / l / r buttons and then press the ENTERE or � (Play) button. The file is played. Device name: Displays a connected device name. Home: Return to content home Music SUM Sweet Candy File List Section: You can confirm the files and groups that is sorted by each category.
Advanced Features Timeshift information You can see current information about Timeshift function. 1. Press the ENTERE button on your remote while Timeshift function is enabled. 2. Timeshift bar appears as below. yy Timeshift Screen Shows current playback point. Mode Display : Shows current states of Timeshift function. The past icon appears when current scene is the previous Shows recorded time by Timeshift function. Shows progress bar. Playback control button during Timeshift function is enabled.
Advanced Features ■■ Timer Recording (in Schedule Manager) OO SMART HUB → Schedule Manager → ENTERE Allows you to make a reservation to record a programme scheduled for broadcast. Set the current time first to use this function. Using the Timer Recording function (digital channels only) 1. Press the ENTERE button to select Schedule Manager. The Schedule Manager screen will be displayed. 2. Press the ENTERE button to add manual booking. A pop up screen will appear. 3.
Advanced Features Before using the Timeshift and a record function... [ Recorded videos are DRM (digital rights management) protected and cannot be played on a PC or other TVs. Note that files saved on the TV cannot be used after the main board is changed. ✎✎NOTE xx We recommend using a USB HDD with at least 5 400 rpm, but a USB HDD of RAID type is not supported.
Advanced Features ¦¦ Videos Playing Video 1. Press the l / r / u / d button to select the desired file in the file list. 1:02:15 / 2:04:10 3/15 1:02:15 / 2:04:10 2. Press the ENTERE button or � (Play) button. xx The selected file is displayed on the top with its playing time. xx If video time information is unknown, play time and progress bar are not displayed. xx During playing the video, you can search using the l and r button. xx You can use � (REW) and µ (FF) buttons during playback.
Advanced Features *.ts *.tp *.trp TS MPEG2 1920x1080 24 / 25 / 30 30 H.264 1920x1080 6 ~ 30 25 VC1 1920x1080 6 ~ 30 25 AC3 / AAC / MP3 / DD+ / HE-AAC Other Restrictions ✎✎ NOTE xx If there are problems with the contents of a codec, the codec will not be supported. xx If the information for a Container is incorrect and the file is in error, the Container will not be able to play correctly.
Advanced Features ¦¦ Music Playing Music 1. Press the l / r / u / d button to select the desired music file in the file list. Music 2. Press the ENTERE button or � (Play) button. Playlist I Love You Ming xx During playing the music, you can search using the � Love R&B ✎✎ 1.2MB (FF) and µ (REW) button. Only displays the files with MP3 and PCM file extension. Other file extensions are not displayed, even if they are saved on the same USB device.
Advanced Features ¦¦ Photos Viewing a Photo (or Slide Show) 1. Press the l / r / u / d button to select the desired photo in the file list. Normal Friends.jpg 1024 X 768 2011/01/03 2. Press the ENTERE button. xx When you press the � (Play) button in the file list, slide show will be started immediately. xx All files in the file list section will be displayed in the slide show. xx During the slide show, all files in the file list will be displayed in order.
Advanced Features Videos/Music/Photos Play Option menu The following functions are enabled during playback. Category Operations Recorded TV Videos Music Photos > > > > > > List Return to the file list. Resume / Play continuosly A movie file will begin to play from where it was stopped. Play / Pause You can start or pause a video or music file. Alternatively, the � (Play) or � (Pause) button on the remote can be used. Set Section Repeat You can set up the function to repeat some section.
Advanced Features About AllShare™ AllShare™ connects your TV and compatible Samsung mobile phones/ devices through a network. On your TV, you can view call arrivals, SMS messages and schedules set on your mobile phones. In addition, you can play media contents including videos, photos and music saved on your mobile phones or the other devices (such as your PC) by controlling them on the TV via the network. Additionally, you can use your TV for browsing web pages in your mobile phones.
Advanced Features Anynet+ What is Anynet+? t Anynet+ is a function that enables you to control all connected Samsung devices that support Anynet+ with your Samsung TV’s remote. The Anynet+ system can be used only with Samsung devices that have the Anynet+ feature. To be sure your Samsung device has this feature, check if there is an Anynet+ logo on it. yy You can only control Anynet+ devices using the TV remote control, not the buttons on the TV.
Advanced Features Anynet+ Menu The Anynet+ menu changes depending on the type and status of the Anynet+ devices connected to the TV. Anynet+ Menu View TV Device List (device_name) MENU (device_name) TOOLS Description Changes Anynet+ mode to TV broadcast mode. Shows the Anynet+ device list. Shows the connected device menus. E.g. If a DVD recorder is connected, the disc menu of the DVD recorder will appear. Shows the tools menu of the connected device. E.g.
Advanced Features ¦¦ Listening through a Receiver You can listen to sound through a receiver (i.e Home Theatre) instead of the TV Speaker. 1. Select Receiver and set to On. 2. Press the EXIT button to exit. ✎✎ If your receiver supports audio only, it may not appear in the device list. ✎✎ The receiver will work when you have properly connected the optical in jack of the receiver to the DIGITAL AUDIO OUT (OPTICAL) jack of the TV. ✎✎ When the receiver (i.
Advanced Features ¦¦ Troubleshooting for Anynet+ Problem Anynet+ does not work. Possible Solution • • • • • • • • • • I want to start Anynet+. • • Check if the device is an Anynet+ device. The Anynet+ system supports Anynet+ devices only. Only one receiver (home theatre) can be connected. Check if the Anynet+ device power cord is properly connected. Check the Anynet+ device’s Video/Audio/HDMI cable connections. Check whether Anynet+ (HDMI-CEC) is set to On in the Anynet+ setup menu.
Other Information Analogue Channel Teletext Feature The index page of the Teletext service gives you information on how to use the service. For Teletext information to be displayed correctly, channel reception must be stable. Otherwise, information may be missing or some pages may not be displayed. ✎✎You can change Teletext pages by pressing the numeric buttons on the remote control. 1 / (Teletext on/mix/off): Activates the Teletext mode for the current channel.
Other Information Assembling the Cables Use the Cable Holder to hide the cables behind the stand. TA750 TA950 ✎✎The colour and the appearance may differ depending on the product, and the specifications are subject to change without prior notice to improve the performance. Anti-theft Kensington Lock The Kensington Lock is not supplied by Samsung. It is a device used to physically fix the system when using it in a public place.
Other Information Troubleshooting If you have any questions about the TV, first refer to this list. If none of these troubleshooting tips apply, please visit “www. samsung.com,” then click on Support, or contact the call centre listed on the back-cover of this manual. Issues Solutions and Explanations PC Connection A Mode Not Supported message appears. • Set your PC’s output resolution and frequency so they match the resolutions supported by the TV (p. 20).
Other Information Issues Solutions and Explanations Sound Quality First of all, please perform the Sound Test to confirm that your TV audio is properly operating. (go to MENU - Support - Self Diagnosis - Sound Test) (p. 45) If the audio is OK, the sound problem may caused by the source or signal. There is no sound or the sound is too low at maximum volume. • Please check the volume the of external device connected to your TV. The picture is good but there is no sound.
Other Information Issues Solutions and Explanations A message prompts me to format a USB device that has been working well. • • If the USB device has a lock, ensure it is off. Recover the USB device using the recovery function in Checking Device. The recording function does not work. • • • • Check that a USB device is connected. Check that the channel is a recordable digital channel. If the signal is weak or does not exist, the recording function will automatically be closed.
Other Information Issues Solutions and Explanations You have intermittent loss of audio or video. • • Check the cable connections and reconnect them. Loss of audio or video can be caused by using overly rigid or thick cables. Make sure the cables are flexible enough for long term use. If mounting the TV to the wall, we recommend using cables with 90 degree connectors. You see small particles when you look closely at the edge of the frame of the TV.
Other Information ¦¦ Licence TheaterSound HD, SRS and symbol are trademarks of SRS Labs, Inc. TheaterSound HD technology is incorporated under license form SRS Lab, Inc. Manufactured under licence from Dolby Laboratories. Dolby and the double-D symbol are trademarks of Dolby Laboratories. Manufactured under licence under U.S. Patent #’s: 5,451,942; 5,956,674; 5,974,380; 5,978,762; 6,487,535 & other U.S. and worldwide patents issued & pending. DTS and the Symbol are registered trademarks. & DTS 2.
Other Information Specifications Environmental considerations Operating Temperature : 50°F ~ 104°F (10°C ~ 40°C) Humidity : 10 % ~ 80 %, non-condensing Storage Temperature : -4°F ~ 113°F (-20°C ~ 45°C) Humidity : 5 % ~ 95 %, non-condensing TV System Analogue: B/G, D/K, L, I (Depending on your country selection) Digital: DVB-T/DVB-C Colour/Video System Analogue: PAL, SECAM, NTSC-4.43, NTSC-3.58, PAL60 Digital: MPEG-2 MP@ML, MPEG-4, H.264/AVC MP@L3, MP@L4.0, HP@L4.0 Sound System BG. OK NICAM.
Other Information Index A Accessories Advanced Settings Amplify Antenna Anynet+ Audio Description Auto Volume F 11 33 35 27 64 36 36 Film Mode Fine Tune Flesh Tone 61 35 13 33 29 I B Background Music Balance L/R Batteries Black Tone Brightness C Cable Holder Change PIN Channel Channel List Channel Menu Cleaning Related Clock Colour Tone Component Connecting to an Antenna Connecting to an Audio Device Connecting to an AV Device Connecting to a PC 69 43 26 25 27 7 41 34 16 14 18 15 19 D DIGITAL AUDIO
Contact SAMSUNG WORLDWIDE If you have any questions or comments relating to Samsung products, please contact the SAMSUNG customer care centre. Country Customer Care Centre Web Site ALBANIA 42 27 5755 - AUSTRIA 0810 - SAMSUNG (7267864, € 0.07/min) www.samsung.com BELGIUM 02-201-24-18 www.samsung.com/be (Dutch) www.samsung.com/be_fr (French) BOSNIA 05 133 1999 - BULGARIA 07001 33 11 www.samsung.com CROATIA 062 SAMSUNG (062 726 7864) www.samsung.com CZECH 800 - SAMSUNG (800-726786) www.