TD390 TD391 TD590 T22D390EW T24D390EW T24D391EW T27D390EW T24D590EW T27D590EW T22D390EX T24D391EX T24D390EX T27D390EX T27D590EX T24D590EX LED TV MONITOR (MFM TV) user manual Thank you for purchasing this Samsung product. To receive more complete service, please register your product at www.samsung.com/register Model _____________ Serial No.
Figures and illustrations in this User Manual are provided for reference only and may differ from actual product appearances. Product design and specifications may be changed without notice. Digital TV notice 1. Functionalities related to Digital TV (DVB) are only available in countries/areas where DVB-T (MPEG2 and MPEG4 AVC) digital terrestrial signals are broadcasted or where you are able to access to a compatible DVB-C (MPEG2 and MPEG4 AAC) cable-TV service.
Contents Getting Started yy Using the INFO button (Now & Next guide).............. 40 yy Safety Precautions..................................................... 4 yy Using the Channel Menu.......................................... 40 yy Providing Proper Ventilation for Your Product........... 11 yy Other Features......................................................... 46 yy Accessories and Cables........................................... 12 yy Using the Control Panel.................................
Getting Started Safety Precautions Icons used for safety precautions WARNING Failing to follow the precautions marked with this sign may result in a serious injury or even a fatality. CAUTION Failing to follow the precautions marked with this sign may result in a personal injury or property damage. Do not perform. Must be followed. CAUTION This symbol indicates that high voltage is present inside. It is dangerous to make any kind of contact with any internal part of this product.
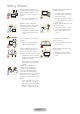
Getting Started Caution Avoid unplugging the power plug while the product is operating. Make sure to use only the power cord supplied by our company. In addition, do not use the power cord of another electric appliance. •• Otherwise, it may damage the product due to electric shock. ! When unplugging the power plug from the wall outlet, make sure to hold it by the plug and not by the cord. •• Otherwise, it may result in electric shock or fire. ! •• Otherwise, it may result in electric shock or fire.
Getting Started Avoid installing the product in a location exposed to direct sunlight and installing the product near a heat source such as a fireplace or heater. Avoid installing the product where children may reach it. •• If a child touches the product, the product may fall and this may result in injury. •• This may shorten the product life cycle or cause fire. •• Since the front part is heavier, install the product on a flat and stable surface. Install the aerial far away from any high voltage cables.
Getting Started Cleaning Related Warning Before cleaning the product, unplug the power cord. When cleaning the product, do not spray water directly over the product parts. •• Otherwise, it may result in electric shock or fire. •• Make sure that water does not enter the product. ! •• Otherwise, it may result in fire, electric shock or a problem with the product. Caution Avoid spraying cleansing agent directly onto the product.
Getting Started If the product generates a strange noise, a burning smell, or smoke, unplug the power plug immediately and contact a service centre. ! Avoid letting children hang or climb onto the product. •• Otherwise, it may result in the product falling and this may result in injury or death. •• Otherwise, it may result in electric shock or fire. If you drop the product or the case is damaged, turn the power off and unplug the power cord. Contact a service centre.
Getting Started Avoid placing a liquid container such as a vase, flowerpot, beverage, cosmetics or drugs, or a metal object over the product. Do not press down hard on the product. The product may become deformed or damaged. •• If water or substances enter the product, turn the power off, unplug the power cord and contact a service centre. •• Otherwise, it may result in a problem with the product, electric shock or fire.
Getting Started Avoid placing a heavy object over the product. When using headphones or earphones, do not turn the volume too high. •• Otherwise, it may result in a problem with the product or injury. Be careful that children do not place the batteries in their mouths when removed from the remote control. Place the battery in a location that children or infants cannot reach. •• Having the sound too loud may damage your hearing. When replacing the batteries, insert them with right polarity (+, -).
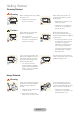
Getting Started Providing Proper Ventilation for Your Product When you install your product, maintain a distance of at least 10 cm between the product and other objects (walls, cabinet sides, etc.) to ensure proper ventilation. Failing to maintain proper ventilation may result in a fire or a problem with the product caused by an increase in its internal temperature. ✎✎Whether you install your product using a stand or a wall-mount, we strongly recommend you use parts provided by Samsung Electronics only.
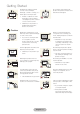
Getting Started Accessories and Cables ✎✎Please make sure the following items are included with your product. If any items are missing, contact your dealer. ✎✎The items’ colours and shapes may vary depending on the model. ✎✎Make sure that there are no accessories hidden behind or under packing materials after you open the box.
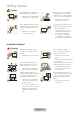
Getting Started Using the Control Panel ✎✎The product colour and shape may vary depending on the model. The product’s Controller, a small joy stick like button on the rear right side of the TV, lets you control the TV without the remote control. Selecting the Media Play Selecting the Menu m Selecting a Source R P Return Power off Function menu TV Controller Remote control sensor Power on Turn the TV on by pressing the Controller when the TV is in standby mode.
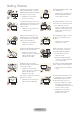
Getting Started The Standard Remote Control Buttons ✎✎This remote control has Braille points on the Power, Channel, and Volume buttons and can be used by visually impaired persons. Turn the product on and off. Display and selects the available video sources. (page 25) Give direct access to channels. Return to the previous channel. Alternately select Teletext ON, Double, Mix or OFF. Cut off the sound temporarily. Adjust the volume. Change channels. Display channel list on the screen.
Getting Started Installing batteries (Battery size: AAA) Match the polarity of the batteries to the symbols in the battery compartment. ✎✎NOTE •• Install the batteries so that the polarity of the batteries (+/-) matches the illustration in the battery compartment. •• Use the remote control within 7 m of the product. •• Bright light may affect the performance of the remote control. Avoid using it near fluorescent lights or neon signs. •• The colour and shape of the remote may vary depending on the model.
Getting Started How to Navigate Menus Your product’s Main and Tools menus contains functions that let you control the product’s features. For example, in the Main menu you can change the size and configuration of the picture, its brightness, its contrast and so on. There are also functions that let you control the product’s sound, channel configuration, energy use, and a host of other features. To access the main, on-screen menu, press the MENUm button on your remote.
Getting Started Connecting the Power Cord and the Aerial or Cable Connection VHF/UHF Aerial Cable Aerial Cable or ✎✎Plug the power cord into a wall outlet only after you have made all other connections. ✎✎If you are connecting your product to a cable or satellite box using HDMI, Component, or Composite connections, you do not need to connect the ANT IN jack to an aerial or a cable connection. ✎✎Use caution when you move or swivel the product if the aerial cable is tightly connected.
Connections Connecting to AV Devices (Blu-ray Players, DVD Players, etc.) Using an HDMI Cable for an HD connection (up to 1080p, HD digital signals) For the best quality HD picture, we recommend using an HDMI connection. Use with DVD players, Blu-ray players, HD cable boxes, and HD Set-Top-Box satellite receivers. HDMI Cable ✎✎HDMI IN 1 (DVI) / HDMI IN 2 (MHL) •• For the best picture and audio quality, connect digital devices to the product using HDMI cables.
Connections Sharing Mobile Device Screens On the Displayer This displayer is capable of displaying mobile device screens. You can use the following features to enjoy video, photo, and music files from mobile devices directly on your displayer. Use an MHL cable to display a mobile device's screen on the displayer. •• MHL This displayer supports MHL (Mobile High-definition Link) via an MHL cable. Connect an MHL cable to the mobile device and the displayer.
Connections Using a Component Cable (up to 1080p HD signals) or an Audio/Video Cable (480i analogue signals only) Use with DVD players, Blu-ray players, cable boxes, STB satellite receivers, VCRs.
Connections Connecting to Audio Devices Using a Headphone Cable Connection Headphone Cable ✎✎Headphones H: You can connect your headphones to the headphone output jack on your product. While the headphones are connected, the sound from the built-in speakers will be disabled. •• The sound function may be restricted when you connect headphones to the product. •• Headphone volume and product volume are adjusted separately. •• The earphone jack supports only the 3 conductor tip-ring-sleeve (TRS) type.
Connections Connecting to a PC Using an HDMI Cable or an HDMI to DVI Cable or a D-sub Cable Connection ✎✎Your PC may not support an HDMI connection. ✎✎Use your PC speakers for audio. D-sub Cable Stereo Cable HDMI Cable HDMI to DVI Cable Stereo Cable ✎✎NOTE •• For an HDMI to DVI cable connection, you must use the HDMI IN 1 (DVI) jack. •• For PC's with DVI video out jacks, use an HDMI to DVI cable to connect the DVI out on the PC to the HDMI IN 1 (DVI) jack on the product.
Connections Connecting to a COMMON INTERFACE slot (Your product viewing Card Slot) Using the “CI or CI+ CARD” To watch paid channels, the “CI or CI+ CARD” must be inserted. •• If you don’t insert the “CI or CI+ CARD”, some channels will display the message “Scrambled Signal”. •• The pairing information containing a telephone number, the “CI or CI+ CARD” ID the Host ID and other information will be displayed in about 2~3 minutes. If an error message is displayed, please contact your service provider.
Connections Display Modes (D-Sub and HDMI/DVI Input) The optimal PC display resolution for this product is 1920 x 1080 @ 60 Hz. We very strongly recommend you set the video output of your computer to the optimal resolution. You can also select one of the standard resolutions listed in the table below and the product will be automatically adjust to the resolution you choose.
Connections Changing the Input Source Source When you are watching product and you want to watch a movie on your DVD player or Blu-ray player or switch to your cable box or STB satellite receiver, you need to change the Source. TV / Ext. / PC / HDMI1/DVI / HDMI2 / AV / Component 1. Press the SOURCEs button on your remote. The Source screen appears. 2. Select a desired external input source.
Basic Features Correct posture to use the product Use the product in the correct posture as follows. •• Straighten your back. •• Allow a distance of 45 to 50cm between your eye and the screen, and look slightly downward at the screen. Keep your eyes directly in front of the screen. •• Adjust the angle so light does not reflect on the screen. •• Keep your forearms perpendicular to your upper arms and level with the back of your hands. •• Keep your elbows at about a right angle.
Basic Features Changing the Preset Picture Mode Picture Mode Menu → Picture → Picture Mode Picture modes apply preset adjustments to the picture. •• Dynamic Suitable for a bright room. •• Standard Suitable for a normal environment. •• Movie Suitable for watching movies in a dark room. •• Entertain Sharpens the picture. Suitable for games. ✎✎It is only available when connecting a PC.
Basic Features Adjusting Picture Settings Samsung MagicAngle (only for T22D390) This feature allows you to see optinal screen quality according to your viewing position. When viewing the screen at an angle from below or above by setting the appropriate mode for each position you can obtain a similar picture quality as viewing the screen directly from the front. •• Off: Select when viewing from the front position. •• Lean Back Mode: Select when viewing from a slightly lower position.
Basic Features ✎✎You can adjust and store Settings for each external device connected to the product. ✎✎Lowering picture brightness reduces power consumption. Response Time (Normal / Faster / Fastest) Accelerate the panel response rate to make video appear more vivid and nature. Changing the Picture Size Picture Size Menu → Picture → Picture Size Using this function, you can make change to various picture size and aspect ratio options.
Basic Features To use the Position function after selecting Wide Zoom, Zoom or Screen Fit, follow these steps: 1. Select the Position. 2. On the Position screen, select Position, and then move the picture to position you want using your remote. 3. When done, select Position again, and then select Close. 4. To reset the picture position, select Reset.
Basic Features Calibrating the Screen Display Auto Adjustment Menu → Picture → Auto Adjustment Automatically adjusts the picture's frequency, position, and fine tune settings in the PC mode. ✎✎Available only when you connect your PC to the product with a D-Sub cable. PC Screen Adjustment Menu → Picture → PC Screen Adjustment ✎✎Available in PC mode only. •• Coarse / Fine: Removes or reduces picture noise.
Basic Features Picture In Picture (PIP) PIP Menu → Picture → PIP View two sources on the TV at the same time. •• PIP Activate or deactivate the PIP function. •• Source Changes the source. •• Aerial Choose between Air or Cable. •• Channel Select the channel for the sub-picture screen. •• Size (õ / ä / ã) The sub-picture size can be set by three modes. •• Position (ã / – / — / œ) Select a position for the sub-picture screen.
Basic Features Changing the Picture Options Advanced Settings Menu → Picture → Advanced Settings Using this function, you can configure advanced picture settings to create your preferred picture. ✎✎Available when the Picture Mode is set to Standard or Movie. ✎✎When connecting a PC, you can make changes to the White Balance or Gamma.
Basic Features Picture Options Menu → Picture → Picture Options Using this function, you can configure additional picture settings to suit your preference. ✎✎When connecting a PC, you can only make changes to Colour Tone. Picture Options Colour Tone Standard Digital Clean View Auto MPEG Noise Filter Auto HDMI Black Level Low Film Mode Off LED Clear Motion Off •• Colour Tone (Cool / Standard / Warm1 / Warm2) ✎✎Warm1 or Warm2 will be deactivated when the picture mode is Dynamic.
Basic Features Picture Off Menu → Picture → Picture Off Turns off the screen and plays audio only. To turn the screen back on, press any button (except Power and Volume buttons) on your remote. Reset Picture Menu → Picture → Reset Picture Resets your current picture mode to its default settings. Changing the Preset Sound Mode Sound Mode Menu → Sound → Sound Mode Sound modes apply preset adjustments to the sound. •• Standard Selects the normal sound mode. •• Music Emphasizes music over voices.
Basic Features Adjusting Sound Settings Sound Effect Menu → Sound → Sound Effect ✎✎Available only when the Sound Mode is set to Standard. •• DTS TruSurround HD Produces sound that will make you feel like you are sitting in a movie theatre or concert hall. •• DTS TruDialog Increases the voice intensity to make dialog clearer. •• Equaliser The Equaliser displays a series of sliders. Use the arrow buttons to select a slider, and change the slider’s value. To Reset the Equaliser, select the Reset.
Basic Features Speaker Settings Menu → Sound → Speaker Settings •• Auto Volume Because each station has its own broadcasting conditions, the volume may fluctuate each time you change the channel. This feature automatically adjusts the volume of a channel by lowering the sound output when the modulation signal is high or by raising the sound output when the modulation signal is low. ✎✎To use the volume control of a connected source device, set Auto Volume to Off.
Basic Features Memorizing Channels Aerial Menu → Broadcasting → Aerial Before your product can memorize the available channels, you must select your Product signal source, Air (using an aerial) or Cable. Select Air or Cable. After you have selected the signal source, go on to the Auto Tuning function. ✎✎Selecting the signal source using the Aerial function also determines the signal source the product is tuned to.
Basic Features Manual Tuning Menu → Broadcasting → Channel Settings → Manual Tuning Scans for a channel manually and stores in the TV. ✎✎If a channel is locked using the Channel Lock function, the PIN input window appears. ✎✎This function may not be supported depending on the region. •• Digital Channel Tuning Scans for a digital channel. 1. Select the New. ✎✎When selecting Aerial → Air Channel, Frequency, Bandwidth ✎✎When selecting Aerial → Cable Frequency, Modulation, Symbol Rate 2. Select the Search.
Basic Features Using the INFO button (Now & Next guide) The display identifies the current channel and the status of certain audio-video settings. The Now & Next guide shows daily TV programme information for each channel according to the broadcasting time. •• Scroll l, r to view information for a desired programme while watching the current channel. •• Scroll u, d to view information for other channels. If you want to move to the currently selected channel, select E using your remote.
Basic Features Change the Broadcast Signal Press r button on the remote and select a broadcasting signal. This will change the signal source immediately. Change the Channel List Press r button on the remote and switch to the Favourites list. However, the Favourites list can only be selected if it contains at least one favourites channel. If no favourites channel was previously added, select Edit Favourites and add channels from the Edit Favourites screen. You can also change the antenna to Air or Cable.
Basic Features Schedule Manager Menu → Broadcasting → Schedule Manager Configure the TV to show a specific channel or programme at a specific time and date. Before scheduling TV watching, make sure that the date and time is set properly under the System > Time > Clock menu. The icon appears next to programmes that have been configured for a Schedule Viewing. You can view, modify or delete a channel you have reserved to watch.
Basic Features Digital Channel Schedule Viewing Schedule Viewing for programmes on digital channels can be set up through the following two options: •• Guide From Guide, select a programme you wish to view. •• Programme Info Press INFO` button and select a programme you wish to view. Analogue Channel Schedule Viewing The Schedule Viewing function for programmes on analogue channels can be set up by specifying the time and date. Run Schedule Manager and then select Schedule. A popup menu will appear.
Basic Features Edit Channel Menu → Broadcasting → Edit Channel You can add, Ÿ (Go To) edit or delete channels. •• a (Change Number): Edit the number by pressing the number buttons desired. ✎✎This function may not support depending on the region. •• b (Delete): You can delete a channel to display the channels you want. •• { (Lock/Unlock): Lock a channel so that the channel cannot be selected and viewed. Unlock a locked channel. Default PIN is: 0-0-0-0.
Basic Features Add Channels Add a channel to a favourites channels list. 1. Press a button to bring up the channel list containing the channels you wish to add and then select the channels. 2. Press b button to bring up a favourites channels list and then } button to add the selected channels. Remove Channels Remove channels from a favourites channels list. 1. Press b button to bring up a favourites channels list and then select the channels you wish to remove. 2.
Basic Features Other Features Fine Tune Menu → Broadcasting → Channel Settings → Fine Tune (analogue channels only) If the reception is clear, you do not have to fine tune the channel, as this is done automatically during the search and store operation. If the signal is weak or distorted, fine tune the channel manually. Scroll to the left or right until the image is clear. ✎✎Select the channel, and then select Fine Tune.
Basic Features Audio Options Menu → Broadcasting → Audio Options •• Audio Language (Digital channels only) Change the default value for audio languages. ✎✎The available language may differ depending on the broadcast. •• Audio Format (Digital channels only) When sound is emitted from both the main speaker and the audio receiver, a sound echo may occur due to the decoding speed difference between the main speaker and the audio receiver. In this case, use the product Speaker function.
Basic Features Common Interface Menu → Broadcasting → Common Interface •• CI Menu: This enables the user to select from the CAM-provided menu. Select the CI Menu based on the menu PC Card. •• CAM video transcoding: You can configure the setting to transcode the video codec from the CAM automatically. Turn it Off if you do not want to use it. ✎✎You must use a CAM that supports transcoding the video codec.
Preference Features Setting the Time Time Menu → System → Time ✎✎The time you set will appear when you press the INFO` button. •• Clock Set the clock to use the various timer features of the product. ✎✎If you disconnect the power cord, you have to set the clock again. Clock Mode: Set the current time manually or automatically. –– Auto: The product sets the current time automatically using the time from a digital channel.
Preference Features •• On Timer Set On Timer so that your product turns on automatically at a time and on a day of your choosing. You can set up three separate On Timer configurations. (On Timer 1, On Timer 2, On Timer 3) and select the source of the content the product plays when it turns on: an air or cable channel, a USB device, or a set-top box connected to one of the product's inputs (HDMI1, AV, etc.). ✎✎You must set the clock before you can use the On Timer function.
Preference Features Economical Solutions Eco Solution Menu → System → Eco Solution •• Energy Saving Lets you adjusts the brightness of the product in order to reduce power consumption. •• No Signal Power Off To avoid unnecessary energy consumption, you can set how long you want the product to remain on if it’s not receiving a signal. •• Auto Power Off The product will automatically turn off if you don’t press a button on your remote or product controller within 4 hours to prevent overheating.
Preference Features Blocking Programmes Programme Rating Lock Menu → Broadcasting → Programme Rating Lock (Depending on the country) When turned on, the Programme Rating Lock feature can automatically block programmes that you deem inappropriate for your children. You must enter a PIN (personal identification number) before you can set or change any of the Programme Rating Lock restrictions. ✎✎The items of Programme Rating Lock differs depending on the country.
Preference Features Other Features Menu Language Menu → System → Menu Language Set the menu language. General Menu → System → General •• Max. Power Saving When the product is attached to a PC, conserves power by turning the product off when the PC is not used for period of time you specify. ✎✎Available only when the Source is set to PC.
Preference Features Anynet+ (HDMI-CEC) Menu → System → Anynet+ (HDMI-CEC) Allows you to control all connected Samsung devices that support anynet+ with your Samsung product’s remote. For details on set up options, refer to the “Anynet+ (HDMI-CEC)” instructions. (page 65) DivX® Video On Demand Menu → System → DivX® Video On Demand Shows the registration code authorized for the product. If you connect to the DivX web site and register with 10-digit registration code, you can download the VOD activation file.
Preference Features Support Menu Self Diagnosis Menu → Support → Self Diagnosis •• Picture Test Use to check for picture problems. Picture Test displays a high definition picture that you can examine for flaws or faults. Yes: Select Yes if the test picture does not appear or there is noise or distortion in the test picture. There may be a problem with the product. Contact Samsung’s Call Centre for assistance. No: Select No if the test picture displays properly.
Preference Features •• Reset Reset all setting to factory defaults except for your network settings. To reset your product to default setting, follow these steps: 1. Go to the Reset menu. (Support → Self Diagnosis → Reset) 2. The PIN input screen appears. Enter the four digit security PIN using your remote. 3. When done, the PIN screen disappear automatically. The message "All the settings will return to factory defaults." appears. 4. Select Yes. All settings are reset.
Preference Features Use Mode Menu → Support → Use Mode Select the Use Mode suitable for your place. We strongly recommend you select Home Use. •• Home Use: Home Use is the default setting. •• Store Demo: Store Demo is for retail environments only. If you select Store Demo, some functions will not work, and the picture settings will be reset every 5 minutes.
Advanced Features Application Application Menu MENU → Applications Source List MENU → Applications → Source List ✎✎When you press the SOURCEs button, Source screen will be displayed at once. ✎✎You can only choose external devices that are connected to the TV. In Source, connected inputs are highlighted. ✎✎For the detailed information, refer to “Changing the Input Source” in User Manual. Connecting a USB Device 1. Turn on your TV. 2.
Advanced Features •• If a file deleted from the PC is still found when Media Contents is run, use the “Empty the Recycle Bin” function on the PC to permanently delete the file. •• If the number of files and folders saved on a USB storage device is approximately over 4000, the files and folders may not appear and some folders may not be opened. Disconnecting a USB Device 1. Press the SOURCEs button. 2. Select a desired USB device, and then press the TOOLST button. The Tools menu appears. 3.
Advanced Features Video Playback MEDIA.P → Videos You can play video files saved on USB device and/or your PC. ✎✎For more information about the subtitle formats and codec formats, refer to "Supported Subtitle and Media Play file formats" in the Other Information section. Video Playback Select the video file from the list or press ∂ to play video. Use the remote control or the on-screen buttons to control the video playback. Press E or TOOLST to bring up the on-screen buttons and RETURNR to hide them.
Advanced Features Additional Video Playback Settings •• Repeat Select the Repeat Mode on-screen button. This changes the repeat mode. Repeat One repeats the current file only, whereas Repeat All repeats all files contained in the folder. •• Picture Size Select the Picture Size button and then select the picture size. •• Picture Mode Select the Settings on-screen button and then select Picture Mode. Select a picture mode. •• Sound Mode Select the Settings on-screen button and then select Sound Mode.
Advanced Features Photo Playback MEDIA.P → Photos Select a photo from the list to display it on the screen. Press E or TOOLST to bring up the on-screen buttons and RETURNR to hide them. To stop playing the file, press ∫ or RETURNR. Slide Show •• From the Options list located at the top of the screen, select Slide Show. You can view all photos in the list as a slideshow. •• Press ∂ from the list. •• Press ∂ or select the Start Slide Show on-screen button to begin the slideshow.
Advanced Features Mini Player When viewing photos with background music, you can control the music. Select Background Music from among the onscreen control buttons and select Mini Player. You can pause playback or skip to the previous or next song. Additional Photo Playback Settings •• Zoom: Select the Zoom on-screen button. Zoom in by up to a factor of 4. •• Rotate: Select the Rotate on-screen button. This rotates the photo.
Advanced Features Music playback MEDIA.P → Music Select the music file from the list or press ∂ to play music. Use the remote control or the on-screen buttons to control the video playback. To stop playing the file, press ∫ or RETURNR. Playlist Creation From the Options list located at the top of the screen, select Play Selected, specify all the music files you want to play, and then select Play. This creates a playlist.
Advanced Features Anynet+ (HDMI-CEC) Menu → System → Anynet+ (HDMI-CEC) Anynet+ is a function that enables you to control all connected Samsung devices that support Anynet+ with your Samsung TV’s remote. The Anynet+ system can be used only with Samsung devices that have the Anynet+ feature. To be sure your Samsung device has this feature, check if there is an Anynet+ logo on it. ✎✎You can only control Anynet+ devices using the TV’s remote control, not the buttons on the product.
Advanced Features Anynet+ (HDMI-CEC) Menu The Anynet+ menu changes depending on the type and status of the Anynet+ devices connected to the product. •• View TV Change from Anynet+ mode to product broadcast mode. •• (device_name) Menu Shows the menu of the connected device. E.g. if a DVD player is connected, the disc menu of the DVD player will appear. •• (device_name) Tools Shows the Tools menu of the connected device. E.g. if a DVD player is connected, the Tools menu of the DVD player will appear.
Advanced Features Switching between Anynet+ Devices 1. Open the Tools menu using your remote, and then select Anynet+ (HDMI-CEC). 2. Select a device, and then wait until the switch to the selected device is completed. ✎✎The menu appears only when you set Anynet+ (HDMI-CEC) to On in the System menu. ✎✎Switching to the selected device may take up to 2 minutes. You cannot cancel the switching operation while switching is in progress.
Other Information Troubleshooting If the product seems to have a problem, first review this list of possible problems and solution. If none of the troubleshooting tips apply, visit www.samsung.com Issues Solutions and Explanations Flickering and Dimming If your Samsung Television is flickering or dimming sporadically, you may need to disable some of its energy efficient features such as the Energy Saving feature. Follow the steps below with your remote to turn these features off or on.
Other Information Issues Solutions and Explanations Trouble Powering On Before you turn the product on, find the blue light in the bottom of the right position product. Press the power on button on the product or remote and the light should blink about 5 times before the product turns on. If you find that you are having trouble powering on your Samsung television, there are a number of things to check before making a call to the service department.
Other Information Issues Solutions and Explanations PC Connection A Mode Not Supported message appears. Set your PC’s output resolution so it matches a resolution supported by the product. “PC” is always shown on the source list, even if a PC is not connected. This is normal. “PC” is always shown in the source list, regardless of whether a PC is connected. The video is OK but there is no audio. If you are using an HDMI connection, check the audio output setting on your PC.
Other Information Issues Solutions and Explanations There is a dotted line on the edge of the screen. If the Picture Size is set to Screen Fit, change it to 16:9. Change the cable/satellite box resolution. The picture is black and white. If you are using an AV composite input, connect the video cable (yellow) to the Green jack of Component on the product When changing channels, the picture freezes or is distorted or delayed. If the product is connected to a cable box, try to reset the box.
Other Information Issues Solutions and Explanations The product Signal Information is unavailable in the Self Diagnosis menu. This function is only available for digital channels the product receives from an Aerial / RF /Coax connection. The product is tilted to the side. Remove the base stand from the product and reassemble it. The channel menu is grayed out (unavailable). The Channel menu is only available when you select the product source.
Other Information Issues Solutions and Explanations You have intermittent loss of audio or video. Check the cable connections and reconnect them. Loss of audio or video can be caused by using overly rigid or thick cables. Make sure the cables are flexible enough for long term use. If mounting the product to a wall, we recommend using cables with 90 degree connectors. You see small particles when This is part of the product’s design and is not a defect.
Other Information Issues Solutions and Explanations The cable/set top box remote control doesn’t turn the product on or off, or adjust the volume. Programme the Cable/Set remote control to operate the product. Refer to the Cable/ Set-Top-Box user manual for the SAMSUNG product code. Anynet+ (HDMI-CEC) Anynet+ does not work. Check if the device is an Anynet+ device. The Anynet+ system supports Anynet+ devices only. You can connect only one receiver (home theatre).
Other Information Issues Solutions and Explanations The Anynet+ device does not play. You cannot use the play function when Setup is in progress. The connected device is not displayed. Check whether or not the device supports Anynet+ functions. Check whether or not the HDMI cable is properly connected. Check whether Anynet+ (HDMI-CEC) is set to On. (System → Anynet+ (HDMI-CEC)) Search Anynet+ devices again. Anynet+ requires an HDMI connection.
Other Information Supported Subtitle and Media Play file formats Subtitle External –– MPEG-4 timed text (.ttxt) –– SAMI (.smi) –– SubRip (.srt) –– SubViewer (.sub) –– Micro DVD (.sub or .txt) –– SubStation Alpha (.ssa) –– Advanced SubStation Alpha (.ass) –– Powerdivx (.
Other Information Supported music file formats File Extension Type Codec *.mp3 MPEG MPEG1 Audio Layer 3 Comments *.m4a *.mpa *.aac MPEG4 AAC *.flac FLAC FLAC The Seek (jump) function is not supported. Supports up to 2 channel *.ogg OGG Vorbis Supports up to 2 channel *.wma WMA WMA WMA 10 Pro supports up to 5.1 channel. WMA lossless audio is not supported. *.wav wav wav *.mid *.midi midi midi type 0 and type 1 Video Codec File Extension *.avi *.mkv *.asf *.wmv *.mp4 *.3gp *.
Other Information Other Restriction ✎✎Video content will not play, or not play correctly, if there is an error in the content or the container. ✎✎Sound or video may not work if the contents have a standard bit rate/frame rate above the compatible Frame/sec listed in the table above. ✎✎If the Index Table is in error, the Seek (Jump) function is not supported. ✎✎The menu may take longer to appear if the video’s bit rate exceeds 10Mbps. ✎✎Some USB/digital camera devices may not be compatible with the player.
Other Information Analogue Channel Teletext Feature The index page of the Teletext service gives you information on how to use the service. For Teletext information to be displayed correctly, channel reception must be stable. Otherwise, information may be missing or some pages may not be displayed. ✎✎You can change Teletext pages by pressing the numeric buttons on the remote control. 1 / (Teletext on/mix/off): Activates the Teletext mode for the current channel.
Other Information Attaching a Wall Mount/Desktop Stand ✎✎Not available in TD590 series. Preparing before installing Wall-Mount / Desktop Stand 1. Turn the product off and unplug the power cord from the wall outlet. 2. Place a soft cloth or cushion on a flat surface to protect the panel and place the product face down. 3. Hold the main body of the product with your hand. Pull the stand in the direction of the arrow as shown in the figure to separate it.
Other Information [[Caution Important For the installation of Wall-mount, please don’t use screws longer than 10 mm (L10) of longitude. 4. Align wall mount/desktop stand to the product and firmly fix the wall mount/desktop stand by fastening the screw. 5. Align the groove of the part of the product that is to be connected to the stand with the groove in the stand (desktop stand, wall mount stand or another stand) and firmly fix the stand by fastening the screw.
Other Information Installing the Wall Mount Installing the Wall Mount Kit The wall mount kit (sold separately) allows you to mount the TV on the wall. For detailed information on installing the wall mount, see the instructions provided with the wall mount. Contact a technician for assistance when installing the wall mount bracket. We do not advice you to do it yourself.
Other Information Anti-theft Kensington Lock A Kensington Lock is a device you can use to physically fix your product in place when using it in a public place. You wrap the Kensington Lock’s cable around a large, immobile object and then attach the lock to the Kensington slot on the back of the product. The appearance and locking method may differ from the illustration below depending on the manufacturer. Refer to the manual provided with the Kensington Lock for additional information on proper use.
Other Information Storage and Maintenance If a sticker was attached to the product screen, some debris can remain after you remove the sticker. Please clean the debris off before watching product. The exterior and screen of the product can get scratched during cleaning. Be sure to wipe the exterior and screen carefully using the cloth provided or a soft cloth to prevent scratches. Do not spray water directly onto the product.
Other Information Licence Manufactured under licence from Dolby Laboratories. Dolby and the double-D symbol are trademarks of Dolby Laboratories. Manufactured under a license from U.S. Patent No’s: 5,956,674, 5,974,380, 5,978,762, 6,487,535, 6,226,616, 7,212,872, 7,003,467, 7,272,567, 7,668,723, 7,392,195, 7,930,184, 7,333,929 and 7,548,853. DTS, the Symbol, and DTS and the Symbol together are registered trademarks & DTS Premium Sound | 5.1 is a trademark of DTS, Inc. ©2012 DTS, Inc. All Rights Reserved.
Other Information –– WARNINGS: Image retention, commonly known as screen burn-in, can occur on most types of television if the same image is displayed continuously. The most common causes of image retention are logos that remain stationary on the TV screen. These logos are common on many programmes received via a Set-top Box. To reduce this risk, avoid displaying still images for long durations and lower the brightness or contrast settings to decrease the intensity of the picture.
Warranty Card United Kingdom Republic of Ireland (EIRE) This Samsung product is warranted for a period of twelve (12) months from the original date of purchase, against defective materials and workmanship. In the event that warranty service is required, you should return the product to the retailer from whom it was purchased. However, Samsung Authorised Dealers and Authorised Service Centres in other EC Countries will comply with the warranty on the terms issued to purchasers in the country concerned.
Other Information Specifications Environmental considerations Operating Temperature : 10°C~ 40°C Humidity : 10 % ~ 80 %, non-condensing Storage Temperature : -20°C ~ 45°C Humidity : 5 % ~ 95 %, non-condensing TD590: -2° (±2.0°) ~18° (±2.0°) TD390/TD391: -1° (±2.0°) ~20° (±2.0°) Tilt Analogue: B/G, D/K, L, I (Depending on your country selection) Digital: DVB-T/DVB-C TV System Colour/Video System Analogue: PAL, SECAM, NTSC-4.43, NTSC-3.58, PAL60 Digital: MPEG-2 MP@ML, MPEG-4, H.264/AVC MP@L3, MP@L4.
Other Information Index A E N Advanced Settings 33 Eco Solution 51 Aerial 38 Energy Saving 51 Anti-theft Kensington Lock 83 Entertain 27 O Anynet+ (HDMI-CEC) 65 Equaliser 36 Off Timer 50 Audio Format 47 On Timer 50 Auto Power Off 51 F Auto Tuning 38 Film Mode 34 Auto Volume 37 P Fine Tune 46 Panel Lock 53 Flesh Tone 33 Photo Playback 62 Picture Mode 27 B No Signal Power Off 51 Backlight 28 G Picture Options 34 Black Tone 33 Game Mode 53 Picture Size
Other Information S Schedule Manager 42 Self Diagnosis 55 Setting up Anynet+ (HDMI-CEC) 66 Sharpness 28 Signal Information 55 Sleep Timer 48 Software Update 56 Sound Effect 36 Sound Mode 35 Sound Test 55 Speaker Settings 37 Supported music file formats 77 Supported Subtitle and Media Play file formats 76 T Time 48 Tint (G/R) 28 Troubleshooting 68 V Video Codec 77 Video Playback 60 W White Balance 33 English - 90
Contact SAMSUNG WORLDWIDE If you have any questions or comments relating to Samsung products, please contact the SAMSUNG customer care centre. Country Customer Care Centre Web Site AUSTRIA 0800-SAMSUNG (0800-7267864) www.samsung.com/at/support BELGIUM 02-201-24-18 www.samsung.com/be/support (Dutch) www.samsung.com/be_fr/support (French) BOSNIA 055 233 999 www.samsung.com/support BULGARIA 800 111 31 , Безплатна телефонна линия www.samsung.com/bg/support CROATIA 072 726 786 www.samsung.