
User Manual

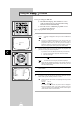
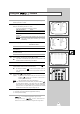

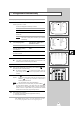
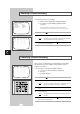
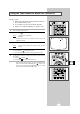

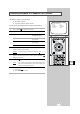
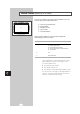
Table Of Contents
- FOREWORD
- Contents
- Contents (cont.)
- CONNECTING AND PREPARING YOUR COMBI VISION
- Connecting the Aerial or Cable Television Network
- Connecting a Decoder
- Connecting Other Video Equipment
- Inserting the Batteries in the Remote Control
- Switching Your Combi Vision On and Off
- Automatic Degaussing to Remove Colour Patches
- Becoming Familiar with the Remote Control
- Becoming Familiar with the Menu System
- Selecting a Menu Option
- Choosing Your Language
- Setting the Date and Time
- SETTING THE CHANNELS
- Storing the Stations Automatically (depending on the model)
- Sorting and/or Clearing the Stored Channels
- Changing Stations
- Selecting a Station Numbered Ten or Over
- Storing the Stations Manually
- Storing the Stations Manually (cont.)
- Activating the 3DB LNA (Low Noise Amplifier) Feature (depending on the model)
- USING THE TELEVISION FUNCTION
- Adjusting the Picture and Storing Your Preferences
- Adjusting the Picture Setting
- Adjusting the Volume
- Adjusting the Sound and Storing Your Preferences (depending on the model)
- Adjusting the Sound Setting (depending on the model)
- Selecting the Sound Mode (depending on the model)
- Selecting the Audio Output Mode (depending on the model)
- Switching the Sound Off Temporarily (MUTE)
- Setting the Combi Vision to Switch On Automatically
- Setting the Sleep Timer
- Viewing Pictures from External Sources
- Displaying Information on the Screen
- USING THE VCR FUNCTION
- Cassette Types and Recording Speeds (Option)
- Protecting a Recorded Cassette
- Selecting the Video Standard (depending on the model)
- Playing a Cassette
- Using the Crystal PlayBack
- Adjusting the Picture Quality during Playback
- Adjusting the Picture Contours
- Selecting the Type of Cassette Tape
- Rewinding and Fast-forwarding a Cassette
- Playing a Cassette in Slow Motion
- Playing a Sequence Frame by Frame
- Recording a Programme Directly
- Recording a Programme with Automatic Stop
- Using the Feature TM
- Using the Feature TM
- Setting the VCR Unit to Record ...
- ... a Programme Automatically
- Checking a Preset Recording
- Cancelling a Preset Recording
- SEARCHING FOR A SEQUENCE
- USING THE TELETEXT FEATURE (DEPENDING ON THE MODEL)
- RECOMMENDATIONS FOR USE
- Using the Buttons on the Front Panel
- Locking the Front Panel
- Cleaning the Video Heads
- Before Contacting the After-sales Service
- Technical Specifications
- Wiring the Mains Power Supply Plug (UK Only)
- SCART Connector Wiring
- Using Your Combi Vision Abroad
- Glossary
- Front View of Your Combi Vision
- Rear View of Your Combi Vision
- Teletext Control Buttons (Teletext Option Only)
- Infrared Remote Control (All Functions Except Teletext)

35
... a Programme Automatically
7 Specify the stop time. When you are satisfied, press the P ▼ button.
8 Indicate the date on which the recording is to take place. When you are
satisfied, press the P ▼ button.
➢ The month is displayed automatically, as follows.
If the day entered is... Then...
Before the current date The next month is displayed.
The same as or after the The current month is displayed.
current date
Example
: If today’s date is 20th November and you specify the
2nd as the recording date, December (12) is selected
automatically.
9 To record a programme... Then press the + button one or
more times to select...
Once ONCE.
Every day (Monday...Friday) DAILY.
at the same time
Every week on the same day WEEKLY.
and at the same time
When you are satisfied, press the P ▼ button.
10 Indicate whether you wish to use a decoder ON or not OFF.
☛
If you have no scramble decoder, please do not set decoder “ON”
and the set will be recorded through “AV INPUT”.
11 Indicate whether you wish to use PDC(VPS) ON or not OFF (Option).
12 When you are satisfied with all your settings, press V.MENU ( ) one or
more times to return to normal viewing.
☛
DO NOT press MENU ( ) to exit the menu system; if you do,
your settings are not stored and the programme will not be
recorded.
13 Press POWER ( ) to activate the timer.
(Option) If you have a dual tuner model you don’t have to press
POWER ( ), because you can watch TV while VCR is
recording a different channel.
Result
: The Timer indicator on the front panel lights up.
☛
If no cassette has been inserted when you press POWER ( ),
the Timer indicator flashes. If the safety tab on the cassette has
been broken, the Timer indicator flashes. Insert the appropriate
cassette.
If there is a power failure or you disconnect the COMBI
VISION from the wall socket, all your settings are lost.
14 Refer to page 36 if you wish to:
◆ Check that your VCR unit has been programmed correctly
◆ Cancel a preset recording
➢
If the TIMER indicator flashes, insert the appropriate cassette
or cancel the programme which is no longer required.
15:07 06/04/00 THU
PR. (NICAM ) : 01 (OFF)
START : 16:50
STOP : 18:30
DATE : 08/04 SAT
MODE : ONCE
DECODER : OFF
SPEED : SP
PDC(VPS) : OFF
15:07 06/04/00 THU
PR. (NICAM ) : 01 (OFF)
START : 16:50
STOP : 18:30
DATE : 08/04 SAT
MODE : ONCE
DECODER : ON
SPEED : SP
PDC(VPS) : OFF
PR. START STOP DATE
05 16:50 18:30 08/01 SP
-- --:-- --:-- --/--
-- --:-- --:-- --/--
-- --:-- --:-- --/--
-- --:-- --:-- --/--
-- --:-- --:-- --/--
INPUT