
User Manual


Table Of Contents
- FOREWORD
- Contents
- Contents (cont.)
- CONNECTING AND PREPARING YOUR COMBI VISION
- Connecting the Aerial or Cable Television Network
- Connecting a Decoder
- Connecting Other Video Equipment
- Inserting the Batteries in the Remote Control
- Switching Your Combi Vision On and Off
- Automatic Degaussing to Remove Colour Patches
- Becoming Familiar with the Remote Control
- Becoming Familiar with the Menu System
- Selecting a Menu Option
- Choosing Your Language
- Setting the Date and Time
- SETTING THE CHANNELS
- Storing the Stations Automatically (depending on the model)
- Sorting and/or Clearing the Stored Channels
- Changing Stations
- Selecting a Station Numbered Ten or Over
- Storing the Stations Manually
- Storing the Stations Manually (cont.)
- Activating the 3DB LNA (Low Noise Amplifier) Feature (depending on the model)
- USING THE TELEVISION FUNCTION
- Adjusting the Picture and Storing Your Preferences
- Adjusting the Picture Setting
- Adjusting the Volume
- Adjusting the Sound and Storing Your Preferences (depending on the model)
- Adjusting the Sound Setting (depending on the model)
- Selecting the Sound Mode (depending on the model)
- Selecting the Audio Output Mode (depending on the model)
- Switching the Sound Off Temporarily (MUTE)
- Setting the Combi Vision to Switch On Automatically
- Setting the Sleep Timer
- Viewing Pictures from External Sources
- Displaying Information on the Screen
- USING THE VCR FUNCTION
- Cassette Types and Recording Speeds (Option)
- Protecting a Recorded Cassette
- Selecting the Video Standard (depending on the model)
- Playing a Cassette
- Using the Crystal PlayBack
- Adjusting the Picture Quality during Playback
- Adjusting the Picture Contours
- Selecting the Type of Cassette Tape
- Rewinding and Fast-forwarding a Cassette
- Playing a Cassette in Slow Motion
- Playing a Sequence Frame by Frame
- Recording a Programme Directly
- Recording a Programme with Automatic Stop
- Using the Feature TM
- Using the Feature TM
- Setting the VCR Unit to Record ...
- ... a Programme Automatically
- Checking a Preset Recording
- Cancelling a Preset Recording
- SEARCHING FOR A SEQUENCE
- USING THE TELETEXT FEATURE (DEPENDING ON THE MODEL)
- RECOMMENDATIONS FOR USE
- Using the Buttons on the Front Panel
- Locking the Front Panel
- Cleaning the Video Heads
- Before Contacting the After-sales Service
- Technical Specifications
- Wiring the Mains Power Supply Plug (UK Only)
- SCART Connector Wiring
- Using Your Combi Vision Abroad
- Glossary
- Front View of Your Combi Vision
- Rear View of Your Combi Vision
- Teletext Control Buttons (Teletext Option Only)
- Infrared Remote Control (All Functions Except Teletext)
7
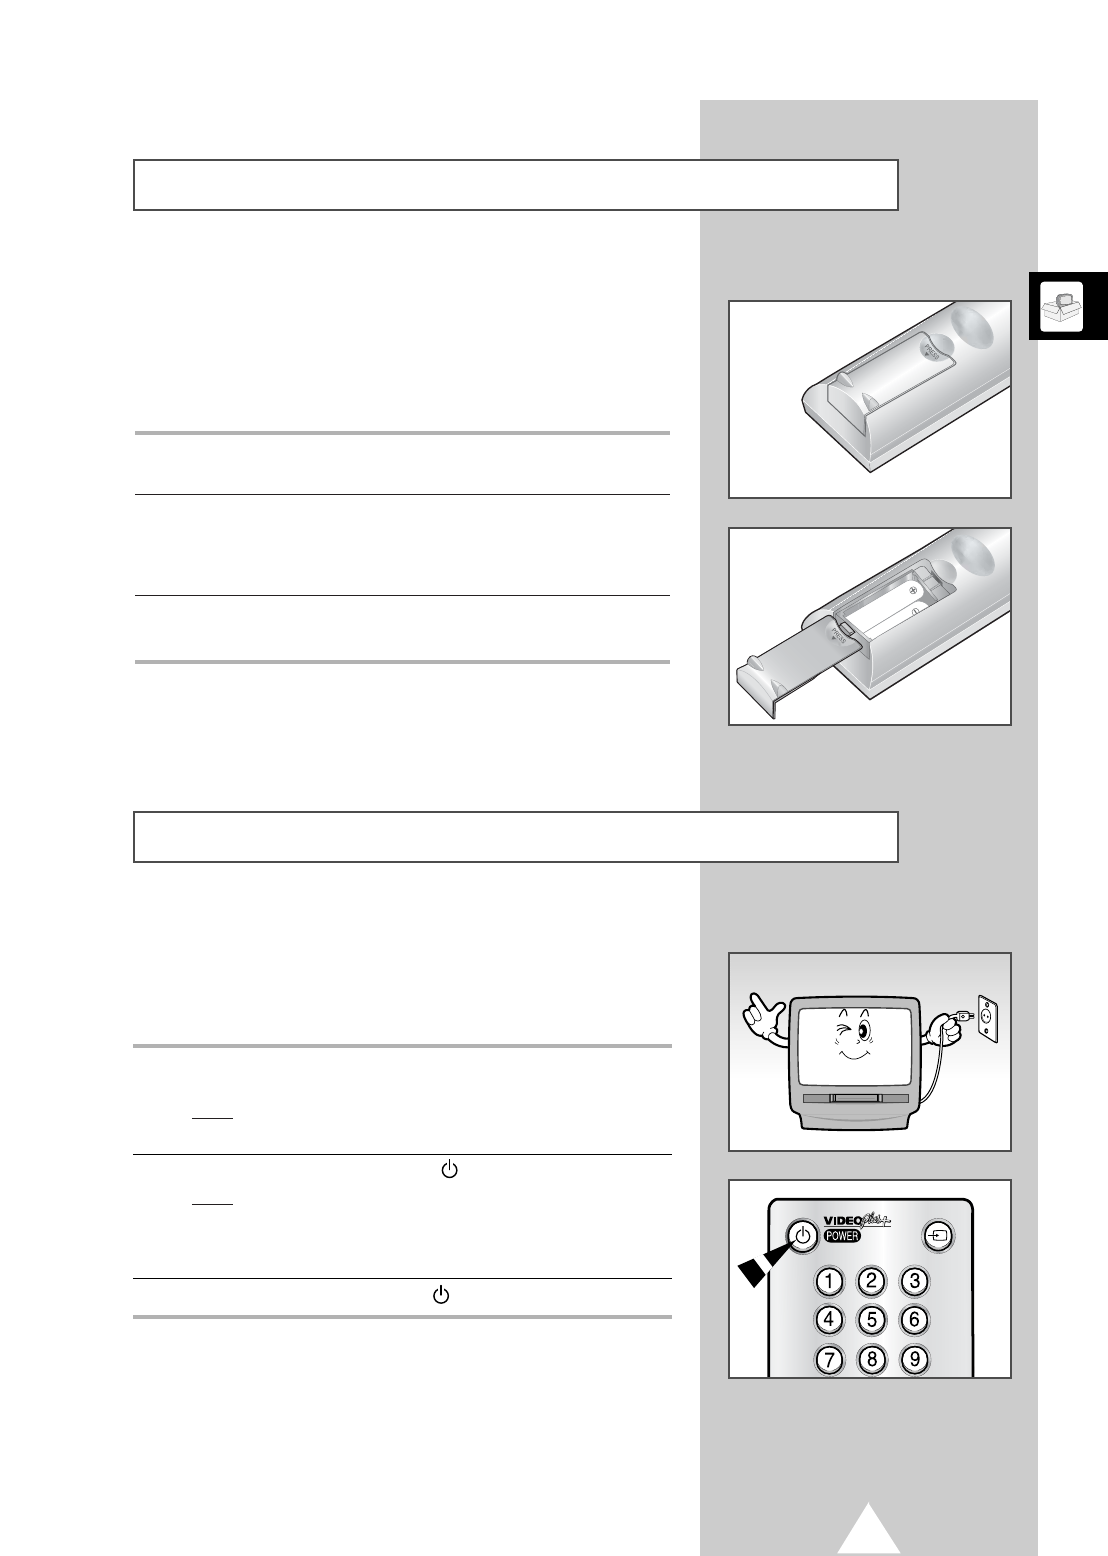
The mains lead is attached to the right side of your COMBI VISION.
☛ If you have purchased this set in the United Kingdom,
refer to page 48 for further instructions on plug wiring.
1 Plug the mains lead into an appropriate wall socket and press the Master
Switch ( I ) on the front panel.
Result
: The set is placed in Standby mode and the Standby indicator
lights up on the front panel.
2 To switch your set on, press POWER ( ).
Result
: If stations have already been stored, the station (or AV input)
that you were watching prior to switching off the unit is
selected automatically. You can now use the remote control,
as required.
3 To switch the set off, press POWER ( ) again.
➢
If you wish to switch the COMBI VISION off completely,
disconnect it from the wall socket or press the Master
Switch. This is particularly recommended when you will
not be using the set for a long period of time and you
have not set the VCR unit to record a programme
automatically.
Switching Your Combi Vision On and Off
You must insert or replace the batteries in the remote control when
you:
◆ Purchase the television
◆ Find that the remote control is no longer operating
correctly
1 Remove the cover on the rear of the remote control by pressing the symbol
downwards and then pulling firmly to remove it.
2 Insert two R03, UM4, “AAA” 1.5V or equivalent batteries taking care to
respect the polarities:
◆ + on the battery against + on the remote control
◆ - on the battery against - on the remote control
3 Replace the cover by aligning it with the base of the remote control and
pressing it back into place.
➢
Do not mix battery types, i.e. alkaline and monganese.
Inserting the Batteries in the Remote Control
INPUT