Contact SAMSUNG WORLD WIDE If you have any questions or comments relating to Samsung products, please contact the SAMSUNG customer care centre. Country Customer Care Centre Web Site EIRE 0818 717100 www.samsung.com/ie/support U.K 0330 SAMSUNG (7267864) www.samsung.com/uk/support LED TV user manual Thank you for purchasing this Samsung product. To receive more complete service, please register your product at www.samsung.com/register Model ______ Serial No.
Warning! Important Safety Instructions (Please read the appropriate section that corresponds to the marking on your Samsung product before attempting to install the product.) CAUTION RISK OF ELECTRIC SHOCK DO NOT OPEN CAUTION: TO REDUCE THE RISK OF ELECTRIC SHOCK, DO NOT REMOVE COVER (OR BACK). THERE ARE NO USER SERVICEABLE PARTS INSIDE. REFER ALL SERVICING TO QUALIFIED PERSONNEL. This symbol indicates that high voltage is present inside.
Features of your new TV 3D This new feature enables you to view 3D content. SMART HUB This TV features Smart Hub, a multi-purpose entertainment and family centre. With Smart Hub, users can surf the web, download applications, and stay in touch with family and friends through social networking services. In addition, you can enjoy photo, video, and music files stored on external storage devices. Press the ™ button to launch Smart Hub. Choose a service using the displayed panels.
Contents 01 What's in the Box? 02 Assembling the TV 7 Attaching the TV to the Stand 7 Mounting the TV on the Wall Using the Wall Mount Kit (Optional) 9 Providing Proper Ventilation for Your TV 10 Securing the TV to the Wall 10 Arrange the cables using the Cable Holder 03 Connections and Remote Control 11 Connecting devices to your TV 12 Connecting to a Network 14 Connecting to a COMMON INTERFACE slot (Your TV viewing Card Slot) 17 Remote Control 04 Performing the initial setup 18 Turning on the TV 1
06 Getting more details. 22 Viewing more TV features 07 Troubleshooting and Maintenance 24 Troubleshooting 25 Cautions about the Eco Sensor and Screen Brightness 26 What is Remote Support? 26 Storage and Maintenance 08 Specifications and other information 27 TV Specifications 29 Licences 31 Warranty Card English - 5 [UH6200-XU]BN68-05806A-02ENG.
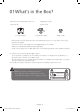
01What's in the Box? Remote Control & Batteries (AAA x 2) Regulatory Guide User Manual Power Cord CI Card Adapter IR Extender Cable Cable Holder -- Please make sure the following items are included with your TV. If any items are missing, contact your dealer. -- The items’ colours and shapes may vary depending on the models. -- Cables not included can be purchased separately. -- Check for any accessories hidden behind or in the packing materials when opening the box.
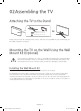
02Assembling the TV Attaching the TV to the Stand X7 (M4 X L12): 32” X8 (M4 X L12): 40”~ 55” X8 (M4 X L10): 60”~ 65” Make sure you have all the accessories shown, and that you assemble the stand following the provided assembly instructions. Mounting the TV on the Wall Using the Wall Mount Kit (Optional) If you mount this product on a wall, it should be mounted only as recommended by the manufacturer.
Wall Mount Kit Specifications (VESA) The wall mount kit is not supplied, but is sold separately. Install your wall mount on a solid wall perpendicular to the floor. When attaching the wall mount to other building materials, please contact your nearest dealer. If the product is installed on a ceiling or slanted wall, it may fall and result in severe personal injury. -- Standard dimensions for wall mount kits are shown in the table below.
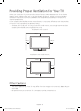
Providing Proper Ventilation for Your TV When you install your TV, maintain a distance of at least 10 cm between the TV and other objects (walls, cabinet sides, etc.) to ensure proper ventilation. Failing to maintain proper ventilation may result in a fire or a problem with the product caused by an increase in its internal temperature. If you use parts provided by another manufacturer, it may cause difficulties with the product or result in injury caused by the product falling.
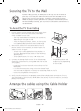
Securing the TV to the Wall Caution: Pulling, pushing, or climbing on the TV may cause the TV to fall. In particular, ensure that your children do not hang on to or destabilize the TV. Doing so may cause the TV to tip over, resulting in serious injuries or death. Follow all safety precautions provided in the Safety Flyer included with your TV. For added stability and safety, you can purchase and install the anti-fall device as described below. To Avoid the TV from Falling 1.
03Connections and Remote Control Connecting devices to your TV You can connect various external devices using the connectors located at the back of the product. Check the connectors and then refer to the Quick Guide for more instructions on supported external devices. English - 11 [UH6200-XU]BN68-05806A-02ENG.
Connecting to a Network Connecting the TV to a network gives you access to online services such as the Smart Hub, as well as software updates. -- The shape of the rear panel differs among the models. Network Connection - Wireless Connect the TV to the Internet using a standard router or modem.
The LAN Port on the Wall TV Rear Panel External Modem (ADSL / VDSL / Cable TV) Modem Cable (Not Supplied) IP Router with a DHCP Server LAN Cable (Not Supplied) LAN Cable (Not Supplied) TV Rear Panel The LAN Port on the Wall LAN Cable (Not Supplied) -- The TV does not support network speeds less than or equal to 10Mbps. -- Use Cat 7 cable for the connection. English - 13 [UH6200-XU]BN68-05806A-02ENG.
Connecting to a COMMON INTERFACE slot (Your TV viewing Card Slot) -- Turn the TV off to connect or disconnect a CI card or CI card adapter. Attaching the CI Card Adapter -- A CI Card Adapter that lets the TV use two different CI Cards is available, depending on the model. Attach the adapter as shown. -- To install the CI CARD Adapter, please remove the sticker attached to the TV. To connect the CI CARD Adapter, follow these steps.
Using the “CI or CI+ CARD” To watch paid channels, the “CI or CI+ CARD” must be inserted. -- If you don’t insert the “CI or CI+ CARD”, some channels will display the “Scrambled Signal” message. -- The pairing information containing a telephone number, the “CI or CI+ CARD” ID, the Host ID, and other information will be displayed in about 2~3 minutes. If an error message is displayed, please contact your service provider.
Inserting Batteries into Remote Control (Battery size: AAA) Match the polarities of the batteries to the symbols in the battery compartment. 1 2 3 -- The colour and shape may vary depending on the model. -- Use the remote control within 7 m of the TV. -- Bright lights may affect the performance of the remote control. Avoid using the remote control near special fluorescent lights or neon signs. 1. Gently pull on the battery cover's notch and then remove the cover completely once it comes loose. 2.
Remote Control Learn where the function buttons are on your remote, such as: SOURCE, MUTE, Y, < P >, MENU, TOOLS, E, INFO, CH LIST, RETURN, GUIDE and EXIT. -- This remote control has Braille points on the Power, Channel, and Volume buttons and can be used by visually impaired persons. Turns the Set-top box on and off. Turns the TV on and off. Displays and selects available connected devices. Gives direct access to channels. Returns to the previous channel.
04Performing the initial setup -- The initial setup differs from model to model. Turning on the TV Turn on the TV using the P button on the remote control or TV panel. -- The product colour and shape may vary depending on the model. -- The TV’s Controller, a small joystick-like button at the right back of the TV, lets you control the TV without the remote control. Function menu m R P TV Controller Remote control sensor English - 18 [UH6200-XU]BN68-05806A-02ENG.
Initial setup The initial setup dialogue box appears when the TV is first activated. Follow the on-screen instructions to finish the initial setup process such as selecting the menu language, scanning channels, connecting to the network, and more. During each step, either make a choice or skip the step. You can manually perform this process at a later time in the System > Setup menu.
05 Selecting Connected Devices You can select a connected external device using the SOURCE button. For example, to switch to a gaming console connected to the second HDMI connector, press SOURCE. From the Source list, select HDMI2 to change the input signal to HDMI mode. Connector names may vary depending on the model. -- For some compatible devices connected via SCART or HDMI sockets, the TV may automatically select the correct source when this device is accessed.
Controlling External Devices with the TV Remote (Universal Remote Setup) System > Universal Remote Setup -- Availability depends on the specific model and area. The universal remote control feature lets you control cable boxes, Blu-ray players, home theatres, and other external devices connected to the TV using the TV's remote control. In order to use the TV's remote control as a universal remote, you must first connect the IR extender cable (included).
06Getting more details. - For more information about the Samsung TV, refer to the e-Manual. Viewing more TV features The e-Manual contains more detailed information on the TV features. How to access e-Manual : Press the E-MANUAL button on the Remote Control. Launching the e-Manual The embedded e-Manual contains information. - You can also download a copy of the e-Manual from Samsung's website, and read it on your computer or print it out.
Additional e-Manual Features Loading Pages using Keywords Select Search from the side of the screen to bring up the search screen. Enter a search term and then select Done. Select an item from the search results to load the corresponding page. Loading Pages from the Index Page Select Index from the side of the screen to bring up the index screen. Select a keyword from the list to navigate to the relevant page. Using the History to Load Previously Read Pages Select Opened page from the side of the screen.
07Troubleshooting and Maintenance Troubleshooting If you have any questions about the TV, first refer to the Troubleshooting list below. If none of these troubleshooting tips apply, please visit “www.samsung.com” and click on Support, or contact the call centre listed on the back cover of this manual. Issues Solutions and Explanations The TV won’t turn on. Make sure the AC power cord is securely plugged into the wall outlet and the TV. Make sure the wall outlet is working.
Cautions about the Eco Sensor and Screen Brightness The Eco Sensor measures the light in the room and optimises the brightness of the TV automatically to reduce power consumption. This causes the TV to brighten and dim automatically. To turn this function off, go to System > Eco Solution > Eco Sensor. Do not block the sensor with any material. This may decrease the picture brightness. 1.
What is Remote Support? Samsung's Remote Support service offers you one-on-one support with a Samsung Technician who can remotely: •• Diagnose your TV •• Adjust your TV settings •• Perform a factory reset for your TV •• Install recommended firmware updates How Does it Work? Having a Samsung Tech remotely service your TV is really pretty simple 1. Call the Samsung Contact Centre and ask for remote support. 2. Open the menu on your TV and go to the Support section. 3.
08 Specifications and other information TV Specifications Display Resolution Environmental Considerations Operating Temperature Operating Humidity Storage Temperature Storage Humidity Stand Swivel (Left / Right) 1920 x 1080 50°F to 104°F (10°C to 40°C) 10% to 80%, non-condensing -4°F to 113°F (-20°C to 45°C) 5% to 95%, non-condensing -20˚ ~ 20˚ (60 inches: -15˚ ~ 15˚) Sound (Output) Model Name Screen Size (Diagonal) Dimensions (W x H x D) Body With stand Weight Without Stand With Stand Model Name Screen
Model Name Screen Size (Diagonal) Dimensions (W x H x D) Body With stand Weight Without Stand With Stand UE55H6200 UE60H6200 55 inches 60 inches 1230.6 x 718.4 x 64.0 mm 1230.6 x 800.0 x 306.9 mm 1365.0 x 797.4 x 64.4 mm 1365.0 x 874.4 x 306.9 mm 15.8 kg 17.4 kg 23.5 kg 25.5 kg -- The design and specifications are subject to change without prior notice. -- For information about the power supply, and about power consumption, refer to the label attached to the product.
Licences The terms HDMI and HDMI High-Definition Multimedia Interface, and the HDMI Logo are trademarks or registered trademarks of HDMI Licensing LLC in the United States and other countries. Still image warning Avoid displaying still images (such as jpeg picture files), still image elements (such as TV channel logos, stock or news bars at the bottom of the screen etc.), or programmes in panorama or 4:3 image format.
Correct Disposal of This Product (Waste Electrical & Electronic Equipment) (Applicable in countries with separate collection systems) This marking on the product, accessories or literature indicates that the product and its electronic accessories (e.g. charger, headset, USB cable) should not be disposed of with other household waste at the end of their working life.
Warranty Card United Kingdom Republic of Ireland (EIRE) This Samsung product is warranted for a period of twelve (12) months from the original date of purchase, against defective materials and workmanship. In the event that warranty service is required, you should return the product to the retailer from whom it was purchased. However, Samsung Authorised Dealers and Authorised Service Centres in other EC Countries will comply with the warranty on the terms issued to purchasers in the country concerned.
Wiring the Mains Power Supply Plug (UK Only) IMPORTANT NOTICE The mains lead on this equipment is supplied with a molded plug incorporating a fuse. The value of the fuse is indicated on the pin face of the plug, and if it requires replacing, a fuse approved to BSI1362 of the same rating must be used. Never use the plug with the fuse cover omitted if the cover is detachable. If a replacement fuse cover is required, it must be of the same colour as the pin face of the plug.
This page is intentionally left blank. [UH6200-XU]BN68-05806A-02ENG.